Setting Up Direct Deposits
|
Page Name |
Definition Name |
Usage |
|---|---|---|
|
DIRECT_DEPOSIT |
(USA, USF) Enter the information to enable the direct deposit of employee pay to checking or savings bank accounts. |
|
|
DIRECT_DEPOSIT_CAN |
(CAN) Enter the information to enable the direct deposit of employee pay to chequing or savings bank accounts. |
|
|
US Bank Additional Data Page or Canada Bank Additional Data Page |
SRC_BANK_PY_SP |
Specify check and advice form ID and medium for transferring data to banks. (USA) Specify the number of days in the prenote wait period. (CAN) Specify the bank routing number format. See (CAN and USA) Canada Bank Additional Data or US Bank Additional Data Pages in your PeopleSoft HCM Application Fundamentals documentation. |
|
Payroll for NA Installation Page |
INSTALLATION_PY |
Control masking of direct deposit account numbers on employee and administrator direct deposit pages and on PDF or non-PDF wage statements (paychecks and payslips). Enable the creation of direct deposit files for off-cycle payments that are tied to unconfirmed on-cycle calendars in US Payroll. |
|
DIR_DEP_CNTRLS |
(USA, USF, CAN) Specify setup options for the Direct Deposit functionality in Employee Self Service. |
|
|
<Country Code> Allow Direct Deposit Overrides by Job Action Page |
PY_DDP_JBACTN_SEC |
Specify the lead time for inactivating direct deposit accounts or printing direct deposit advices for employees by job action. |
|
PY_DD_FILE_INFO |
Specify parameters used to run the Create Direct Deposit Transmit process (PY_DIRDEP). (CAN) The PY_DIRDEP process does not apply to Canadian Payroll. |
In Payroll for North America, direct deposit distributions are performed during the Pay Confirmation process. Administrators can enter employee direct deposit distribution data on the Request Direct Deposit page. Employees can enter their own direct deposit information in Fluid Employee Self Service.
(Classic) For USA and USF, direct deposit add or edit changes are limited to one transaction per day in Self Service. Employees can add or edit information for multiple direct deposit accounts in a single self-service transaction, but once they save the changes and exit the page, they cannot make additional changes on the same day. If they attempt to make additional changes, a message appears from the Direct Deposit page saying that multiple direct deposit changes are not allowed on the same day.
(Fluid) Employees can add or change their own direct deposit information using the Direct Deposit tile in Employee Self Service. They are not limited to making direct deposit changes to one transaction a day in Fluid. To avoid unexpected behavior, Oracle recommends that customers prevent users from updating their direct deport information while payroll calculation and confirmation are running, which can be set up using the Component Lockdown feature.
See Also Using the PeopleSoft Fluid User Interface to Add and Modify Direct Deposit Accounts and Configuring Component Lockdown.
Multiple Direct Deposit Distributions
Each direct deposit can be stated as either a percent of net pay or a dollar amount. For example, suppose that an employee wants 100 CAD deposited to a savings account, a 200 CAD check for pocket money, and 100 percent of the remaining net pay deposited to a checking account. To do this, you set up three rows of distribution data:
|
Objective |
Priority |
Account Type |
Amount |
|---|---|---|---|
|
100 CAD to Savings |
300 |
Savings |
100 CAD |
|
200 CAD Check |
350 |
Issue Check |
200 CAD |
|
Deposit remainder in Checking |
400 |
Checking |
100% of remaining net pay |
In this case, make sure that you assign the savings and separate check entries lower priority numbers than the checking account direct deposit; this ensures that they are taken out first. Otherwise, 100 percent of the employee's net pay goes into checking before the system checks the other direct deposit guidelines.
Designate one direct deposit account to receive the remaining funds after all of the other direct deposits are made. To designate an account to receive remaining funds, select Balance of Net Pay as the deposit type. If you do not do this, the remaining balance is issued through a check.
The system provides a setup option to require employees to add remaining balance accounts in Employee Self Service. If this option is selected, the system displays a warning message to administrators when they add new or update existing direct deposit accounts for employees who do not have remaining balance accounts. For more information, see Direct Deposit Configuration for Self Service.
Changing or Discontinuing Direct Deposit
To change or discontinue direct deposits, set up the appropriate effective-dated rows on the Request Direct Deposit page.
Note: You can stop direct deposits for a single paycheck by selecting the Disable Direct Deposit check box on an employee's paysheet. This causes the system to produce an actual paycheck for the employee, rather than a direct deposit.
The prenote process is an optional, but strongly recommended, test run for direct deposits to verify that bank IDs and employee account numbers are valid.
Payroll for North America provides these reports that you can use to notify employees of new direct deposit requests so that they can verify the information:
|
Report Name |
Report ID |
Description |
|---|---|---|
|
Direct Deposit Prenotification |
DDP005 |
For each company and pay period, this report lists employees that you have added to the direct deposit instructions since the last Create Direct Deposit Transmit process run. It includes Employee ID, priority of the types of deposits, account type, bank ID, and account number. |
|
Direct Deposit Prenote Memo |
DDP006 |
This report prints a memo on your company stationery or memo forms. The text of the memo informs the employee of the direct deposit and lists bank ID, account number, account type, and deposit instructions. |
If you're running the DDP Prenotification report (DDP005) and DDP Prenote Memo report (DDP006), you must run them prior to running the Create Direct Deposit Transmit process.
Prenote Wait Period
Here is how you manage the prenotification wait period to enable employees to verify new direct deposit information:
On the US Bank Additional Data page, define the number of days required for a prenotification wait period (one-time setup).
Specify the start date of the prenote wait period in the Prenote Date field when you run the Create Direct Deposit Transmit process.
U.S. employees who request a new direct deposit continue to receive checks until the prenote period has passed. For example, if the prenote wait period is 10 days and you're running a weekly payroll, employees might receive two paychecks before direct deposit starts.
This table describes the prenotification data that the system enters on the Request Direct Deposit page during creation and processing of new direct deposits:
|
Processing Step |
Prenotification Status |
Prenote Date |
|---|---|---|
|
Save new direct deposit record. |
Not Submtd (not submitted) |
Blank |
|
Run the Create Direct Deposit Transmit process. |
Submitted |
The date entered on the process run control page (blank if no date entered). |
|
Prenote wait period ends. |
Completed |
Remains the same as the value entered on the process run control page. |
An example of prenoting might be that on January 14 you confirm the payroll for period January 1 to January 14. You run the Create Direct Deposit Transmit process on the same day and enter a prenote date of January 14. Ten working days from that date (assuming that is the Wait Days value entered on the US Source Bank table), the system changes the prenotification status from Submitted to Completed and direct deposits go into effect on the next payroll.
Prenotification of Changed Direct Deposit Data
To change direct deposits, set up the appropriate effective-dated rows on the Request Direct Deposit page. When you insert a new data row, all values of the previous row are carried over to the new row as default values. You can update most values, but the availability of the Prenotification Required check box depends upon the type of data updated. In addition, the Prenote Date and Prenotification Status values are always system-generated.
This table describes the results of updating and saving the direct deposit record when the Prenotification Required check box is selected on the employee's previous data row and the prenotification status of the previous row is Completed:
|
Description of Change |
Prenotification Required |
Prenote Date |
Prenotification Status |
|---|---|---|---|
|
Changed bank ID or account information. |
Selected and unavailable for change upon saving. To update the check box, exit the page and re-enter in Correction mode. The check box is now selected and available for change. |
Blank |
Not Submitted |
|
Changed percent, amount, or priority with no change in bank ID or account information. |
Selected and unavailable for change. You cannot update this check box if the bank ID or account information has not changed. |
Same as the previous row |
Completed |
|
Changed account type to Issue Check and deleted bank ID and account information. |
Deselected upon saving. If you do not deselect the check box, the system deselects it when you save. |
Blank |
Not Submitted |
Payroll for North America provides a number of configuration options on the Direct Deposit Controls Page to add flexibility to the system when employees enter their direct deposit information in Fluid Employee Self Service.
Important! These setup options are available to both Canadian and U.S. Payroll.
While these options are specific to Employee Self Service, two of them are also applicable to administrators when they create or manage direct deposit accounts for employees on the Request Direct Deposit Page in these scenarios:
1. If the Require Remaining Balance Account option is selected, a warning message is displayed if the employee for whom the account is being created or updated does not have a remaining balance account on file.
2. If the administrator updates the suppress advice print option for an employee and it is now the opposite of the Suppress Direct Deposit Advice Print option, a warning message is displayed to notify the administrator of the discrepancy.
Video: Image Highlights, PeopleSoft HCM Update Image 44: Direct Deposit Extended Functionality
Require Remaining Balance Account
A remaining balance account is where the net pay balance of an employee is deposited, when the amount cannot be distributed in any other direct deposit accounts that were set up for the employee. For example, the employee has 3 direct deposit account setup: the first one gets a fixed amount of $100 of the pay, the second one 75% of the pay, and the third one 20% of the pay. The weekly net pay is $500.03. Based on the setup, $500.02 of the pay is distributed among the 3 direct deposit accounts. That leaves a net pay balance of $0.01, which will be sent to the employee in the form of a check because the employee does not have an account that is configured to receive the remaining balance.
To avoid the operational costs around processing and printing checks of insignificant net pay balances, a configuration option is available to require each employee to designate an account to receive the remaining balance after all the other direct deposits are processed.
When the Require Remaining Balance Account option is selected, the first account that the employee creates is set to take the full balance by default. When the employee adds and saves the second account, the system changes the deposit type of the first account to Remaining Balance and reorders its processing order to Last.
While this option does not apply to administrators, the system displays a warning message when the administrator either adds a new direct deposit account or updates an existing direct deposit account for an employee without a remaining balance account.
Excluding Check as Payment Method
To save costs on processing and printing checks, you have the option to remove Check as a payment method from employees when they add or update their direct deposit accounts in Employee Self Service.
The Remove Check as Payment Method option is available when the option to require remaining balance accounts is selected.
Note: Accounts with the Check payment method cannot be used as remaining balance accounts when the Remove Check as Payment Method option is selected.
If accounts were created with Check as the payment method either by employees themselves before the configuration option was enabled, or the administrator, employees can view but cannot edit the details of these accounts in Employee Self Service.
Employees can delete accounts with the Check payment method that were created by themselves or the administrator.
Restricting Removal of the Last Direct Deposit Account
When employees are required to set up remaining balance accounts to receive net pay balances, the Restrict Removal of Last Direct Deposit Account option becomes available. This option allows the system to prevent employees from removing the last account (with Direct Deposit as the payment method) that they have on file. To remove the last direct deposit account, employees will need to contact the payroll administrator for assistance.
This option does not impact accounts with Check as the payment method. In other words:
If the option to remove the Check payment method is selected, the employee can delete the last account with the Check payment method.
If the option to remove the Check payment method is not selected, the employee can delete the last account with the Check payment method. Or, they can update the account to use Direct Deposit as the new payment method.
Suppress Printing of Direct Deposit Advices
The system-level Suppress Direct Deposit Advice Print option sets the default behavior for printing direct deposit advices for employees who create their direct deposit accounts for the first time on the Direct Deposit Page in Employee Self Service. For employees who already have direct deposit account setup before this option became available, their employee-level configuration is also used to determine their print option on the Direct Deposit page.
This diagram illustrates the presence of the option to print direct deposit advices for employees on the Direct Deposit page based on system-level and employee-level configuration.
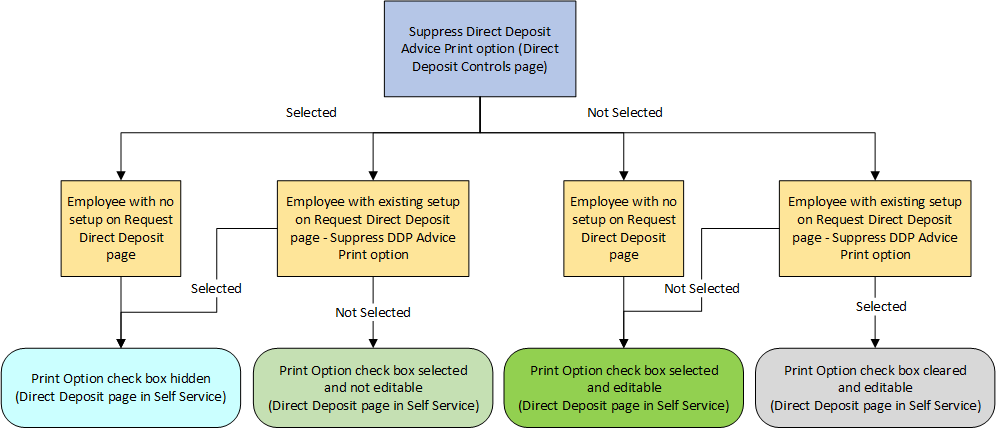
Here is how the system determines if the employee can print direct deposit advices using the Suppress Direct Deposit Advice Print option:
If the option is selected on the Direct Deposit Controls page:
The Print Option check box does not appear on the Direct Deposit page, if the employee creates a direct deposit account for the first time (in this case, the print option is defaulted from the system-level configuration), or if the employee has existing direct deposit setup and the Suppress DDP Advice Print option is selected on the Request Direct Deposit page.
The Print Option check box is preselected and not editable on the Direct Deposit page, if the Suppress DDP Advice Print option is not selected for the employee on the Request Direct Deposit page.
If the option is not selected on the Direct Deposit Controls page:
The Print Option check box is preselected and editable on the Direct Deposit page, if the employee creates a direct deposit account for the first time (in this case, the print option is defaulted from the system-level configuration), or if the employee has existing direct deposit setup and the Suppress DDP Advice Print option is not selected on the Request Direct Deposit page.
The Print Option check box is cleared and editable on the Direct Deposit page, if the Suppress DDP Advice Print option is selected for the employee on the Request Direct Deposit page.
Maximum Number of Direct Deposit Accounts
You can limit the number of direct deposit accounts that employees can set up for themselves. The system displays a message when the employee adds a direct deposit account but has already reached the maximum number of accounts allowed.
Direct Deposit Overrides by Job Action
The system supports these automatic direct deposit updates based on employees' job actions:
Inactivate direct deposit accounts.
Clear the suppress print option to allow direct deposit advices to be printed.
Suppose that you want to inactivate employees' direct deposit accounts and print the last direct deposit advices automatically when they leave the company. You can set up the system to perform any of these actions on direct deposit rows based on job action triggers on the <Country Code> Allow Direct Deposit Overrides by Job Action Page. At runtime, when a job data row with a matching job action is inserted for an employee, the system inserts corresponding rows for the employee on the Request Direct Deposit Page based on the configuration.
Refer to the Direct Deposit Overrides by Job Action Examples topic for direct deposit overrides setup scenarios.
Note: If the HR administrator deletes a job data row that triggered the creation of direct deposit rows for the employee, it is the administrator's responsibility to monitor and remove these added direct deposit rows in correction mode accordingly.
If the employee has a current, future-dated, or both types of direct deposit rows in the system, as well as a job data row that triggered an insertion of a new direct deposit row that is prior to the existing rows, the same direct deposit updates will also be applied to existing rows of the employee.
This section provides examples of direct deposit overrides configuration and what gets updated in the employee's direct deposit information when the job action is triggered.
EXAMPLE 1: No reason code and number of days specified in direct deposit overrides configuration
In this scenario, the configuration consists of two rows for the TER (Termination) action, one to inactivate the direct deposit row, and the other to print the direct deposit advice. There is no reason code or number of days specified in either configuration row.
|
Action |
Reason |
Direct Deposit Control |
Days from Job Effective Date |
|---|---|---|---|
|
TER |
- |
Inactivate Direct Deposit |
- |
|
TER |
- |
Print Direct Deposit Advice |
- |
(Single job scenario) Suppose that this job data row is added for the employee:
Job effective date: 01/01/2022
Action: TER
Reason: -
Empl Record: 0
Result: based on the setup, the system inserts this direct deposit row for the employee:
Direct deposit effective date: 01/01/2022
Status: Inactive
Suppress DDP Advice Print option: cleared
(Multiple jobs scenario) Suppose that these job data rows are added for the employee:
#1 Job effective date: 01/01/2022
Action: TER
Reason: -
Empl Record: 1
#2 Job effective date: 05/01/2022
Action: TER
Reason: -
Empl Record: 0
Note: In case of multiple job rows, the latest effective-dated row is considered.
Result: based on the setup, the system inserts this direct deposit row for the employee:
Direct deposit effective date: 05/01/2022
Status: Inactive
Suppress DDP Advice Print option: cleared
EXAMPLE 2: No reason code specified in direct deposit overrides configuration
In this scenario, the configuration consists of two rows for the TER (Termination) action, one to inactivate the direct deposit row 5 days after the job effective date, and the other to print the direct deposit advice 3 days after the job effective date. There is no reason code specified in either configuration row.
|
Action |
Reason |
Direct Deposit Control |
Days from Job Effective Date |
|---|---|---|---|
|
TER |
- |
Inactivate Direct Deposit |
5 |
|
TER |
- |
Print Direct Deposit Advice |
3 |
(Single job scenario) Suppose that this job data row is added for the employee:
Job effective date: 01/01/2022
Action: TER
Reason: -
Empl Record: 0
Result: based on the setup, the system inserts these direct deposit rows for the employee:
#1 Direct deposit effective date: 01/04/2022
Status: Active
Suppress DDP Advice Print option: cleared
#2 Direct deposit effective date: 01/06/2022
Status: Inactive
Suppress DDP Advice Print option: cleared
(Multiple jobs scenario) Suppose that these job data rows are added for the employee:
#1 Job effective date: 01/01/2022
Action: TER
Reason: -
Empl Record: 1
#2 Job effective date: 05/01/2022
Action: TER
Reason: -
Empl Record: 0
Note: In case of multiple job rows, the latest effective-dated row is considered.
Result: based on the setup, the system inserts these direct deposit rows for the employee:
#1 Direct deposit effective date: 05/04/2022
Status: Active
Suppress DDP Advice Print option: cleared
#2 Direct deposit effective date: 05/06/2022
Status: Inactive
Suppress DDP Advice Print option: cleared
EXAMPLE 3: Reason code and number of days specified in direct deposit overrides configuration
In this scenario, the configuration consists of four rows for the TER (Termination) action, one set has a specified reason code and number of days setup, the other set does not.
|
Action |
Reason |
Direct Deposit Control |
Days from Job Effective Date |
|---|---|---|---|
|
TER |
- |
Inactivate Direct Deposit |
- |
|
TER |
- |
Print Direct Deposit Advice |
- |
|
TER |
RES (resignation) |
Inactivate Direct Deposit |
5 |
|
TER |
RES (resignation) |
Print Direct Deposit Advice |
3 |
(Single job A scenario) Suppose that this job data row is added for the employee:
Job effective date: 01/01/2022
Action: TER
Reason: ERT (early retirement)
Empl Record: 0
Result: based on the setup, the system inserts these direct deposit rows for the employee:
Direct deposit effective date: 01/01/2022
Status: Inactive
Suppress DDP Advice Print option: cleared
(Single job B scenario) Suppose that this job data row is added for the employee:
Job effective date: 01/01/2022
Action: TER
Reason: RES
Empl Record: 0
Result: based on the setup, the system inserts these direct deposit rows for the employee:
#1 Direct deposit effective date: 01/04/2022
Status: Active
Suppress DDP Advice Print option: cleared
#2 Direct deposit effective date: 01/06/2022
Status: Inactive
Suppress DDP Advice Print option: cleared
(Multiple jobs A scenario) Suppose that these job data rows are added for the employee:
#1 Job effective date: 01/01/2022
Action: TER
Reason: ERT
Empl Record: 1
#2 Job effective date: 05/01/2022
Action: TER
Reason: RES
Empl Record: 0
Note: In case of multiple job rows, the latest effective-dated row is considered.
Result: based on the setup, the system inserts these direct deposit rows for the employee:
#1 Direct deposit effective date: 05/04/2022
Status: Active
Suppress DDP Advice Print option: cleared
#2 Direct deposit effective date: 05/06/2022
Status: Inactive
Suppress DDP Advice Print option: cleared
(Multiple jobs B scenario) Suppose that these job data rows are added for the employee:
#1 Job effective date: 01/01/2022
Action: TER
Reason: ERT
Empl Record: 1
#2 Job effective date: 01/01/2022
Action: TER
Reason: RES
Empl Record: 0
In this example, both job data rows have the same effective date. The row that was entered last is used to determine how direct deposits rows should be inserted.
If the empl record 0 row was entered last, the system inserts these direct deposit rows for the employee:
#1 Direct deposit effective date: 01/04/2022
Status: Active
Suppress DDP Advice Print option: cleared
#2 Direct deposit effective date: 01/06/2022
Status: Inactive
Suppress DDP Advice Print option: cleared
If the empl record 1 row was entered last, the system inserts this direct deposit row for the employee:
Direct deposit effective date: 01/01/2022
Status: Inactive
Suppress DDP Advice Print option: cleared
(Multiple jobs C scenario) Suppose that these job data rows are added for the employee:
#1 Job effective date: 01/01/2022
Action: TER
Reason: ERT
Empl Record: 1
#2 Job effective date: 05/01/2022
Action: LOA
Reason: -
Empl Record: 0
In this case, no direct deposit rows will be added for the employee because the HR status of the empl record 0 row is still active.
Note: (For multiple jobs) The direct deposit overrides setup does not apply to employees with multiple job rows except when the HR status of all their job data rows is set to Inactive. When that happens, the system uses the last inactivated job data row and the setup to determine how direct deposit rows should be inserted.
EXAMPLE 4: Reason code and number of days specified in direct deposit overrides configuration
In this scenario, the configuration consists of four rows for the XFR (Transfer) action, one set has a specified reason code and number of days setup, the other set does not. The specified job action does not update the HR status of the job data row to Inactive.
|
Action |
Reason |
Direct Deposit Control |
Days from Job Effective Date |
|---|---|---|---|
|
XFR |
- |
Inactivate Direct Deposit |
- |
|
XFR |
- |
Print Direct Deposit Advice |
- |
|
XFR |
XFR |
Inactivate Direct Deposit |
5 |
|
XFR |
XFR |
Print Direct Deposit Advice |
3 |
(Single job A scenario) Suppose that this job data row is added for the employee:
Job effective date: 01/01/2022
Action: XFR
Reason: -
Empl Record: 0
Result: based on the setup, the system inserts this direct deposit row for the employee:
Direct deposit effective date: 01/01/2022
Status: Inactive
Suppress DDP Advice Print option: cleared
(Single job B scenario) Suppose that this job data row is added for the employee:
Job effective date: 01/01/2022
Action: XFR
Reason: XFR
Empl Record: 0
Result: based on the setup, the system inserts these direct deposit rows for the employee:
#1 Direct deposit effective date: 01/04/2022
Status: Active
Suppress DDP Advice Print option: cleared
#2 Direct deposit effective date: 01/06/2022
Status: Inactive
Suppress DDP Advice Print option: cleared
(Multiple jobs A scenario) Suppose that these job data rows are added for the employee:
#1 Job effective date: 01/01/2022
Action: XFR
Reason: -
Empl Record: 1
#2 Job effective date: 05/01/2022
Action: XFR
Reason: -
Empl Record: 0
Note: In case of multiple job rows, the latest effective-dated row is considered.
Result: based on the setup, the system inserts these direct deposit rows for the employee:
#1 Direct deposit effective date: 05/04/2022
Status: Active
Suppress DDP Advice Print option: cleared
#2 Direct deposit effective date: 05/06/2022
Status: Inactive
Suppress DDP Advice Print option: cleared
(Multiple jobs B scenario) Suppose that these job data rows are added for the employee:
#1 Job effective date: 01/01/2022
Action: XFR
Reason: PRO
Empl Record: 1
#2 Job effective date: 01/01/2022
Action: XFR
Reason: XFR
Empl Record: 0
In this example, both job data rows remain active. They have the same effective date, and the system is unable to determine which one was entered last. In this case, the system does not insert any rows because it cannot determine the appropriate configuration to use. It is the responsibility of the administrator to review these job data rows and make updates to the direct deposit data accordingly.
Note: (For multiple jobs) The direct deposit overrides setup applies only when all multiple job rows of the employee are active and have the same job action (or job action and reason code combination), as illustrated in the multiple jobs A scenario. When that happens, the system uses the last effective-dated (or the last entered if effective dates are the same) job data row and the setup to determine how direct deposit rows should be inserted.
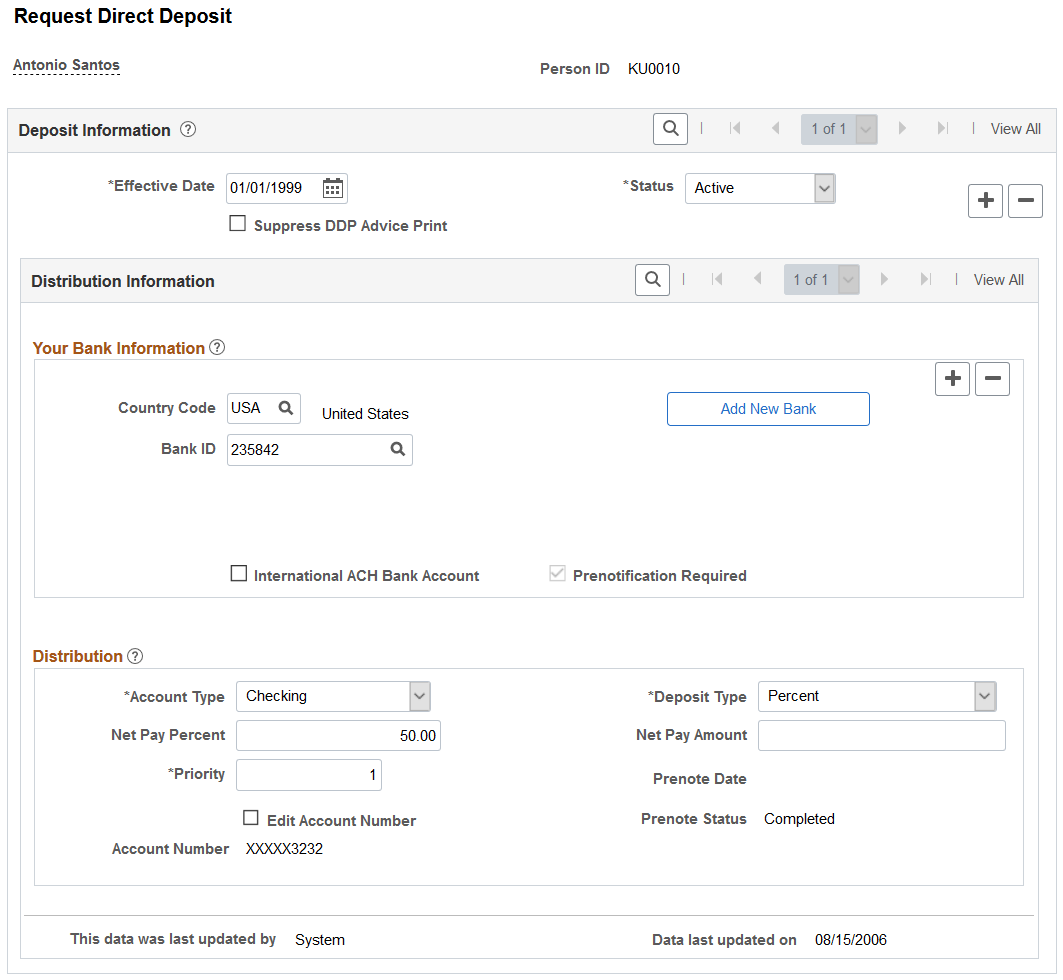
(USA, USF) Use the Request Direct Deposit page (DIRECT_DEPOSIT) to enter the information to enable the direct deposit of employee pay to checking or savings bank accounts.
Navigation:
(CAN) Use the Request Direct Deposit page (DIRECT_DEPOSIT_CAN) to enter the information to enable the direct deposit of employee pay to chequing or savings bank accounts.
Navigation:
This example illustrates the fields and controls on the Request Direct Deposit page.
|
Field or Control |
Description |
|---|---|
|
Suppress DDP Advice Print (suppress direct deposit advice print) |
Select this check box to indicate that the employee has elected to receive their pay advice electronically, through the ePay self-service transaction, rather than in print. When creating a new account, the system defaults this field with the Suppress Direct Deposit Advice Print field value from the Direct Deposit Controls Page. The system displays a message when this field value is updated. If part of an employee's check is direct deposited and part is issued in a live check, the live check would also show the direct deposit information. |
(USA) Your Bank Information
|
Field or Control |
Description |
|---|---|
|
Country Code |
Enter the country of the bank where the direct deposit is to be sent. |
|
Bank ID |
Enter the identifier for the bank where the direct deposit is to be sent. When you select a bank, its name and address appear. |
|
Add New Bank |
If the employee's bank has not yet been set up in the system, select the Add New Bank button to add the bank to the bank table. Note: If the system is not set up to validate the Bank ID (for US) or the Bank ID and Branch ID (for CAN), then the administrator does not need to set up the banking information in the Bank table. The setup is only required if validations are turned on in the Direct Deposit Control table. |
|
International ACH Bank Account (international automated clearing house bank account) |
If the bank is in the United States, select this check box to indicate that funds are actually going to a non-US bank. This information is included in the direct deposit file that you create with the Create Direct Deposit Transmit process. If the bank is not in the United States, the system selects this check box and makes it read-only. |
|
Prenotification Required |
Select this check box if prenotification is required. By default, this option is deselected, which means that prenotification is not performed when the payroll administrator adds or updates direct deposit data for an employee on this page. The system also updates the Prenotification Required field when the Prenote Required in Employee Self Service field is selected on the Direct Deposit Controls Page. Note: The Prenotification Required check box is available for entry when you make a change to the Bank ID or Account Number fields and only after you save the page and re-enter with Correct History selected. Prenoting is the process of verifying routing numbers and account number information for an electronic transfer through a zero-dollar transaction. During the prenote period (wait days set for each bank on the US Additional Bank Data page [SRC_BANK_PY_SP] page), a zero-dollar deposit is sent to the payee's bank account, and the employer typically pays the payee with a check instead of a deposit. Direct deposits do not go into effect until after the end of the prenote wait period. This way, if the payee entered an invalid transit or account number the bank can reject the transaction, deposit into an incorrect account may be avoided, but the payee is still paid on time. The prenote process is optional, but strongly recommended. When using prenoting, you will also want to run the Direct Deposit Prenotification (DDP005) and Direct Deposit Prenote Memo (DDP006) reports prior to running the Create Direct Deposit Transmit process. An example of prenoting might be that on January 31 you confirm the payroll for period January 1 to January 31. You run the Create Direct Deposit Transmit process on the same day and enter a prenote date of January 31. Ten working days from that date (assuming that’s the Wait Days value entered on the US Source Bank table), the system changes the prenotification status from Submitted to Completed and direct deposits go into effect. Note: If you change direct deposits by setting up a new effective-dated row on the Request Direct Deposit (DIRECT_DEPOSIT) page, all values of the previous row carry over to the new row. You can update most values, but the availability of the Prenotification Required check box depends on the type of data that you update. The Prenote Date and Prenotification Status values (in the Distribution group box) are always system generated. |
Distribution
Note: For CAN, the group box title is Distribution Information.
|
Field or Control |
Description |
|---|---|
|
Account Type |
Select the applicable value to indicate a direct deposit to a checking or savings account, or if the system will issue a check: Checking, Savings, and Issue Check. |
|
Deposit Type |
Select Amount if the employee wants a fixed dollar amount to be deposited in this account type. Select Balance of Net Pay if the balance of an employee's pay is to be deposited in this account type. Use this option if the employee requests only one account. Select Percent if the employee wants a specific percentage of his net pay to be deposited in this account type. |
|
Net Pay Percent and Net Pay Amount |
Enter a specific dollar amount if you selected Amount in the Deposit Type field. Enter a percent if you selected Percent in the Deposit Type field. |
|
Bank ID and Branch ID |
(CAN) The Bank ID and Branch ID fields appear in the Distribution group box for Canada only. Enter the three-digit bank ID, and enter the five-digit branch ID. Note: You must enter a bank ID and account number for each account type. |
|
Priority |
Enter a priority number for this distribution. During direct deposit processing, distributions are made to accounts in order of their priority number―the lower the priority number, the higher the priority. Priority becomes important when an employee's net pay isn't enough to cover all direct deposits―in this case, only the higher priority deposits are made. Note: Enter 999 for remaining balance accounts, which have Balance of Net Pay as the deposit type. Enter a value less than 900 for accounts with Account or Percent deposit types. |
|
Edit Account Number |
Select to update the account number. This field appears together with the Account Number field, when the encryption process is run and the account number currently displayed belongs to a country that is specified on the Define Country for Encryption Page. When selected, the existing read-only number is cleared from the field for you to enter a new one. |
|
Account Number |
Enter the employee's account number. The account number represents the employee's checking or savings account into which the money should be deposited. If the account number was entered previously, it is displayed as read-only. Payroll for North America provides the ability to mask direct deposit account numbers on the Payroll for NA Installation Page. When masking is enabled, the system masks all but the last four digits of a direct deposit account number. You have the options to enable masking on direct deposit pages for employees, direct deposit pages for administrators, and PDF and non-PDF wage statements (paychecks and payslips). Note: For maximum data protection, you have an option to enable data encryption in addition to data masking. When the Enable Encryption option is selected and the encryption process is run for the DIR_DEP_DISTRIB record, direct deposit account numbers are encrypted in the database if they belong to a country that is specified on the Define Country for Encryption Page. Masking on wage statements becomes mandatory, whereas masking on Employee Direct Deposit pages and Administrator Direct Deposit pages are selected by default but remain configurable. If masking is enabled for Administrator Direct Deposit pages, users can still view the account numbers as unmasked if they are assigned the Bank Account Admin role, and this role is defined on the Grant Unmasked Access Page for the DIR_DEP_DISTRIB record. See Also Understanding Data Encryption for Payroll for North America. Note: This note applies when the encryption process is not run for the DIR_DEP_DISTRIB record. When the direct deposit account number is masked for Employee Direct Deposit pages, the data behind the account number is not encrypted so that the payroll administrator can access the account number in the event of an issue with the direct deposit request. If you select to mask direct deposit account numbers on Administrator Direct Deposit Pages, then administrators will need to run SQL to view the employee’s complete account numbers. When masking is selected for Wage Statements, direct deposit account numbers are masked on statements created with PAY003.SQR, PAY003CN.SQR, DDP003.SQR, and DDP003CN.SQR are masked and in PeopleSoft Fluid User Interface mobile paychecks. |
|
Prenote Date |
(USA) The system enters here the prenote date that you enter in the run parameters for the Create Direct Deposit Transmit process. |
|
Prenote Status |
(USA) The system enters a value to indicate the status of the prenotification process:
Note: (CAN) The prenotification process does not apply in Canada. |
Note: On uptaking the Fluid Direct Deposit feature, the Nickname field will be auto-populated as account type appended with priority number, when an administrator creates a new account. This field will only be visible on the Direct Deposit page in Employee Self Service. The user can modify the auto-populated nickname in Employee Self Service. For more information, see Using the PeopleSoft Fluid User Interface to Add and Modify Direct Deposit Accounts in your PeopleSoft ePay product documentation for more information.
Last Updated Page Elements
|
Field or Control |
Description |
|---|---|
|
This data was last updated by and Data last updated on |
Each time direct deposit data is updated, the system indicates whether an online user or a self-service web user made the update, and it displays the date of the most recent update. Online users can make updates online using the Request Direct Deposit page. The employee, also known as the web user, can make updates using the Direct Deposit transaction in the ePay self-service application. |
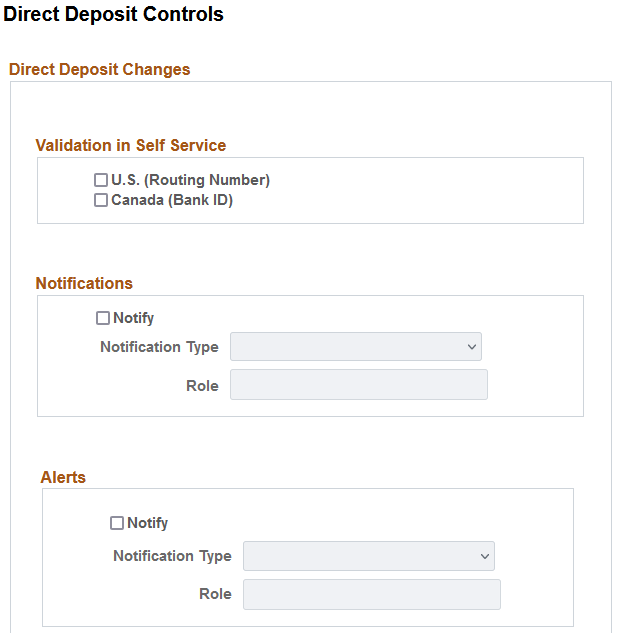
(USA, USF, CAN) Use the Direct Deposit Controls page (DIR_DEP_CNTRLS) to specify setup options for managing direct deposit data in Employee Self Service.
Navigation:
This example illustrates the fields and controls on the Direct Deposit Controls page (1 of 2).
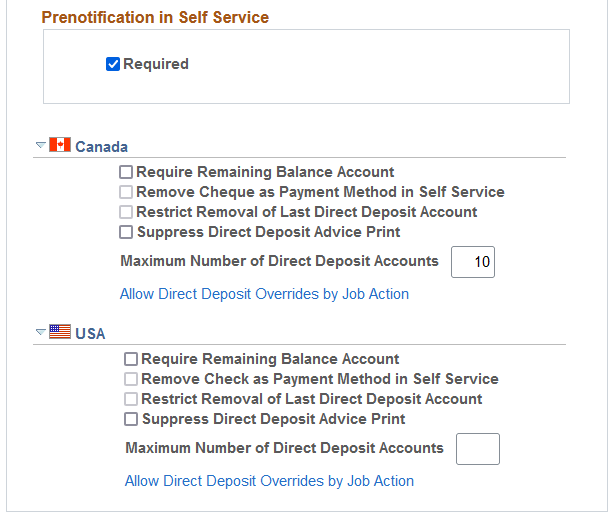
This example illustrates the fields and controls on the Direct Deposit Controls page (2 of 2).
Use the Direct Deposit Controls page to control email notifications, push notification (alerts), validation of (USA, USF) Bank ID (bank routing transit number) or (CAN) Bank ID and Branch ID, prenotification preference, and other configuration options when employees add or update direct deposit information in Employee Self Service.
See Direct Deposit Page.
Validation in Self Service
Select the appropriate check box to turn on bank validations for direct deposit accounts that are entered or updated for that country.
When U.S. (Routing Number) is selected, the system validates the bank ID (bank routing transit number) against the Bank Table (BANK_EC) page.
When Canada (Bank ID) is selected, the system validates the bank ID against the Bank Table (BANK_EC) page, and if the bank ID is validated, the system also validates the branch ID against the Branch Table (BANK_BRANCH_EC) page.
Note: If the (USA) routing number or (CAN) bank ID does not exist on the Bank ID table, the system issues an error message and the employee cannot save the direct deposit transaction.
See Setting Up Banks and Bank Branches in your PeopleSoft HCM Application Fundamentals product documentation.
Notifications
Select the Notify check box to turn on automatic direct deposit email notifications.
Note: Oracle PeopleSoft delivers Notification Composer Framework to manage the setup and administration of all notifications in one central location.
Once you have adopted the Notification Composer feature, you must use it to create new notifications and manage your existing notifications.
Notifications delivered with HCM Image 47 or later must use Notification Composer.
For more information about Notification Composer Framework, see Understanding Notification Composer.
When selected, you must also specify a notification type (Administrator, EE and Admin, or Employee) to receive the predefined email notification that the system sends when an employee's direct deposit data is entered or updated. If the specified notification type includes an administrator, specify the administrator role to use, for example, Payroll Administrator.
The email shows the date and time, based on the system date and time, when the action took place.
The email is sent to the address that is associated with the recipient’s User ID, not the email address from the personal data record. If no User ID email address exists for the employee, the employee notification is not sent, but the direct deposit changes are still saved and completed.
Note: When multiple rows are added or updated for the same effective date, the system sends an email notification to the employee and the administrator.
Alerts
Select the Notify check box to turn on automatic direct deposit push notifications.
Note: Oracle PeopleSoft delivers Notification Composer Framework to manage the setup and administration of all notifications in one central location.
Once you have adopted the Notification Composer feature, you must use it to create new notifications and manage your existing notifications.
Notifications delivered with HCM Image 47 or later must use Notification Composer.
For more information about Notification Composer Framework, see Understanding Notification Composer.
When selected, you must also specify the notification type (Administrator, EE and Admin, or Employee) to receive the predefined push notification that the system sends when an employee’s direct deposit data is entered or updated. If the specified notification type includes an administrator, specify the administrator role to use.
Note: Alert functionality is available only for customers who have taken the Fluid Direct Deposit feature.
Prenotification in Self Service
|
Field or Control |
Description |
|---|---|
|
Required |
Select this check box if prenotification is required when employees add or update direct deposit data via Employee Self Service. By default, this check box is selected. Deselect this check box if prenotification is not required. This field value is used to update the Prenotification Required field on the Request Direct Deposit Page (for Payroll Administrators). In other words, if this field is selected, the Prenotification Required field on the Request Direct Deposit page will also be selected. |
Canada or USA
See Direct Deposit Configuration for Self Service for more information about these setup options for managing direct deposit information in Employee Self Service.
(CAN and USA) The same list of configuration options is available to both Canadian and U.S. Payroll.
|
Field or Control |
Description |
|---|---|
|
Require Remaining Balance Account |
Select this check box to require employees to set up a direct deposit account where the remaining balance can be deposited. Clear this check box to not require a remaining balance account from employees. Employees will receive remaining funds in the form of checks. |
|
Remove Check as Payment Method in Self Service or Remove Cheque as Payment Method in Self Service |
Select this check box to remove Check (or Cheque) as a payment method when setting up direct deposit accounts in Employee Self Service. This option becomes editable when the Require Remaining Balance Account field is selected. |
|
Restrict Removal of Last Direct Deposit Account |
Select this check box to not allow employees to remove their last or only direct deposit account. They need at least one direct deposit account on file to receive payment. This option becomes editable when the Require Remaining Balance Account field is selected. |
|
Suppress Direct Deposit Advice Print |
This system-level option is used to provide the default print option value for the employee-level configuration when employees create their first direct deposit accounts. If selected, the employee does not have an option to print advices on the Direct Deposit Page when they add the first account. Additionally, the Suppress DDP Advice Print field is selected as default on the Request Direct Deposit page for the employee. If cleared, the employee has the option to print advices on the Direct Deposit Page when they add the first account. The system clears the Suppress DDP Advice Print field on the Request Direct Deposit page for the employee as default. For more information on how this setup option works, see Direct Deposit Configuration for Self Service. |
|
Maximum Number of Direct Deposit Accounts |
Enter the maximum number of direct deposit accounts allowed for employees. Do not enter a number that is greater than 10. |
|
Allow Direct Deposit Overrides by Job Action |
Select this link to set up the system to inactivate direct deposit accounts or print direct deposit advices for employees by job action on the <Country Code> Allow Direct Deposit Overrides by Job Action Page. |
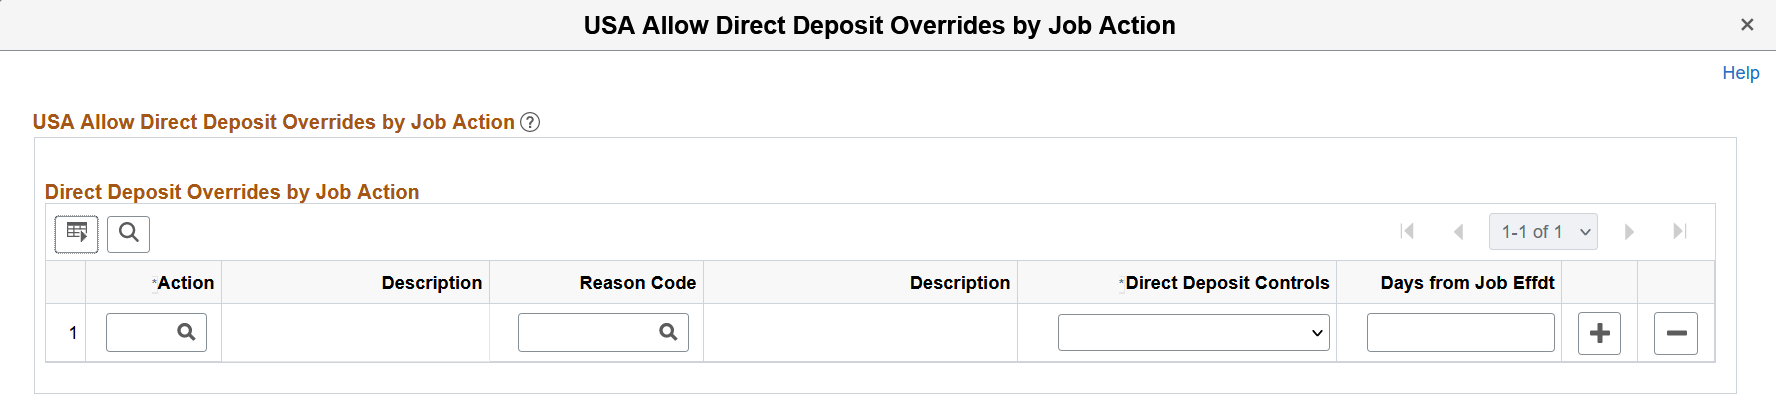
Use the <Country Code> Allow Direct Deposit Overrides by Job Action page (PY_DDP_JBACTN_SEC) to specify the lead time for inactivating direct deposit accounts or printing direct deposit advices for employees by job action.
Navigation:
Select the Allow Direct Deposit Overrides by Job Action link on the Direct Deposit Controls page.
This example illustrates the fields and controls on the <Country Code> Allow Direct Deposit Overrides by Job Action page.
|
Field or Control |
Description |
|---|---|
|
Action and Reason Code |
Select a job action and reason code combination that triggers an update to employees' direct deposit information on the Request Direct Deposit Page. Leave the Reason Code field blank if you want updates to be triggered for all reason codes that are associated with the specified job action. If two rows for the same job action exist, one with a reason code and the other without, the setup of the row with the reason code will be applied when a job data row with the matching reason code is inserted for an employee. |
|
Direct Deposit Controls |
Select the direct deposit information to update on the Request Direct Deposit page. Valid values include: Inactive Direct Deposit: Set the status to Inactive. Print Direct Deposit Advice: Clear the Suppress DDP Advice Print check box for advices to be printed. You can set up the system to perform either or both direct deposit updates for any job action (or job action and reason code combination). |
|
Days from Job Effdt (days from job effective date) |
Enter the number of days to be used to determine the effective dates of newly inserted direct deposit data rows. Enter a negative number for the effective dates of the direct deposit rows to be before their corresponding job action effective dates by that number of days. Enter a positive number for the direct deposit row effective dates to be after their job action effective dates. Enter 0 for the system to add direct deposit rows using the same effective date as their job actions. For example, an employee has a Termination job action and the effective date of this action is set to March 15. If this field value is set to 2, the effective date of the newly added row for the employee's direct deposit data is March 17. If this field value is set to -2, the effective date of the new direct deposit data row is March 13. |
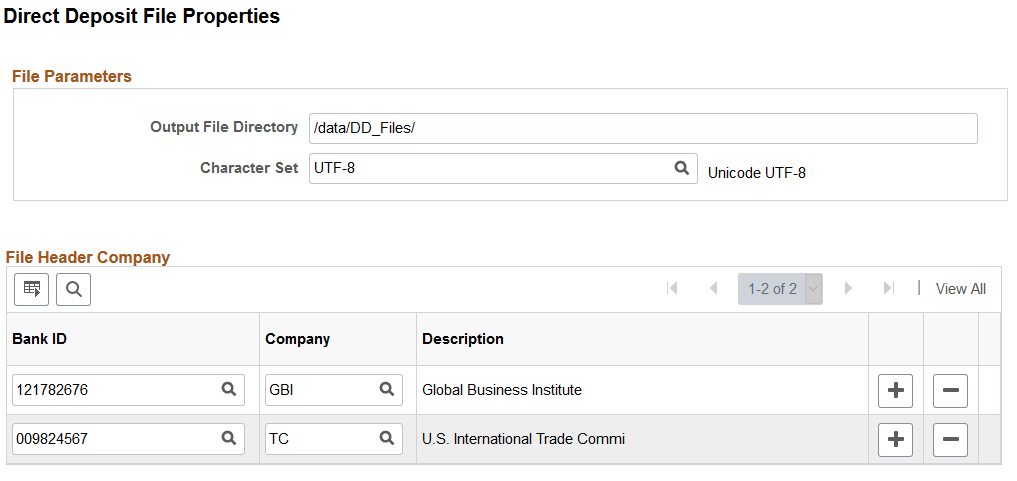
Use the Direct Deposit File Properties page (PY_DD_FILE_INFO) to specify parameters used to run the Create Direct Deposit Transmit process (PY_DIRDEP).
Note: This page is only used in the process when the Create Off-Cycle Files option is selected on the Payroll for NA Installation Page.
Navigation:
This example illustrates the fields and controls on the Direct Deposit File Properties page.
(CAN) The PY_DIRDEP process and Direct Deposit File Properties page do not apply to Canadian Payroll.
File Parameters
|
Field or Control |
Description |
|---|---|
|
Output File Directory |
Enter the directory path where generated direct deposit files and log files reside. Note: This value must be specified prior to running the Create Direct Deposit File process. The system displays an error message if this output directory is missing. |
|
Character Set |
Select the character set to be used for generating direct deposit files. The default value is set to UTF-8. |
File Header Company
|
Field or Control |
Description |
|---|---|
|
Bank ID and Company |
For each company that runs the PY_DIRDEP process to create direct deposit files, specify a bank ID and company ID. The process uses these field values to determine the company ID and company name that appear at the header of the direct deposit files. Bank ID must be unique. When the process runs, it uses the source bank ID of the pay group included in the run control to find the matching bank ID entry in this section. The company ID and name associated with the matching bank ID will be used in the header of the file that gets generated. If a pay run is selected in the run control and it contains pay groups with different source banks, the process generates a direct deposit file for each source bank, and displays in the file header the matching company ID and name specified in this section. If the process is unable to find any matching bank entry in this section, it uses the company of the first direct deposit transaction it processed to determine the company ID, and leaves the company name blank. |