Entering and Updating Quick Invoices
|
Page Name |
Definition Name |
Usage |
|---|---|---|
|
VCHR_HEADER_QV |
Enter and update invoice header, line, and distribution information, along with PO and receiver details for the Voucher Build process to use in building a voucher. When you enter the page in update/display mode from the Find an Existing Value page, you can search for vouchers by build status, including vouchers that have been staged for review by the Voucher Build process, vouchers with Voucher Build process pre-edit errors, or vouchers to be built. |
|
|
VCHR_HEADER_WCA |
Update information for the Voucher Build process to build into a voucher and to view the imaged invoice. |
|
|
Copy Worksheet (purchase order) Page |
VCHR_QVLN_PO_WRK |
Enter PO search criteria and select the lines from one or more purchase orders for copying to the Quick Invoice page (complete worksheet). |
|
Copy Worksheet (receiver) Page |
VCHR_QVLN_RECV_WRK |
Enter receipt search criteria and select the lines from one or more receivers for copying onto the Quick Invoice page (complete worksheet). |
|
Quick Invoice Entry - Miscellaneous Charges Page |
VCHR_MISC_QV |
This page applies only when you have copied a purchase order with freight or miscellaneous charges. For invoice headers, review or override the miscellaneous charge codes, accounting entry type, and charge amounts for the invoice. For invoice lines, select whether or not to apply the miscellaneous charges to the line. |
|
Quick Invoice Entry – Review Errors Page |
VCHR_PREEDERR_PG |
Review and correct worksheet errors. |
|
VCHR_QUICK_SBP2 |
Enter distribution information for a specific invoice line. See |
|
|
VCHR_HEADER_QV2 |
Enter and update invoice header, line, and distribution information for the Voucher Build process to build into a voucher. The simple worksheet requires minimal voucher data entry. You can only enter the simple worksheet in update/display mode if you have not yet run the Voucher Build process for the voucher. |
|
|
Session Defaults Page |
AP_SESSN_DFLT_SEC |
Enter voucher defaults for an adhoc session or use an existing available session default. These defaults override the values that the system applies using the PeopleSoft Payables control hierarchy. |
|
VCHR_HDR_QV_SEC |
Override optional voucher header defaults for the current quick invoice. |
|
|
VCHR_PYMNT_QV_SEC |
Enter and update specific payment information for a quick invoice. |
Field or Control |
Description |
|---|---|
Action |
Select to run an on-demand Application Engine process after you have saved the quick invoice. Processes are numbered to indicate the order of how the processes run. For example, if you select 3. Doc Tolerance (document tolerance), the system automatically initiates the number 1 and 2 processes (in this example, 1. Voucher Build then 2. Matching), and then the number 3 process (in this example, 3. Doc Tolerance). Note: Available processes depend on your implementation and the quick invoice's processing status. Therefore, the numbers may be different than those listed below. Select from the following: 1. Voucher Build: Select this option to launch the Voucher Build process (APVCHR_BLD). 2. Matching: Select this option to run the Voucher Build and Matching (MATCHING) processes. Note: This option always appears. However, the system runs the Matching Application Engine process (AP_MATCH) only when the quick invoice voucher includes copied purchase order information. 3. Doc Tolerance (document tolerance): Select this option to run the Voucher Build, Matching, and Document Tolerance (DOC_TOL) processes. This option displays only if you activate it at the installation level. 4. Budget Checking: This option appears only when the Commitment Control feature is enabled. Select this option to run the Voucher Build, Matching, Document Tolerance, and Budget Checking (BUDGET_CHK) processes. 5. Voucher Post: Select this option to run the Voucher Build, Matching, Document Tolerance, Budget Checking, and Voucher Post (PST_VCHR) processes. 6. Journal Generate: Select this option to run the Voucher Build, Matching, Document Tolerance, Budget Checking, Voucher Posting, and Journal Generator (PST_VCHRGL) processes. |
Use the Quick Invoice (complete worksheet) page (VCHR_HEADER_QV) to enter and update invoice header, line, and distribution information, along with PO and receiver details for the Voucher Build process to use in building a voucher.
When you enter the page in update/display mode from the Find an Existing Value page, you can search for vouchers by build status, including vouchers that have been staged for review by the Voucher Build process, vouchers with Voucher Build process pre-edit errors, or vouchers to be built.
Navigation:
Select Complete in the Quick Invoice Template field on the Add Search page.
Click the Examine Error Messages button for a voucher with Voucher Build pre-edit errors on the Build Errors page to access the Quick Invoice page in update/display mode.
Click the Correct Errors link on the Voucher Build Error Detail page to access the Quick Invoice page in update/display mode.
This example illustrates the fields and controls on the Quick Invoice page for complete worksheets. You can find definitions for the fields and controls later on this page.
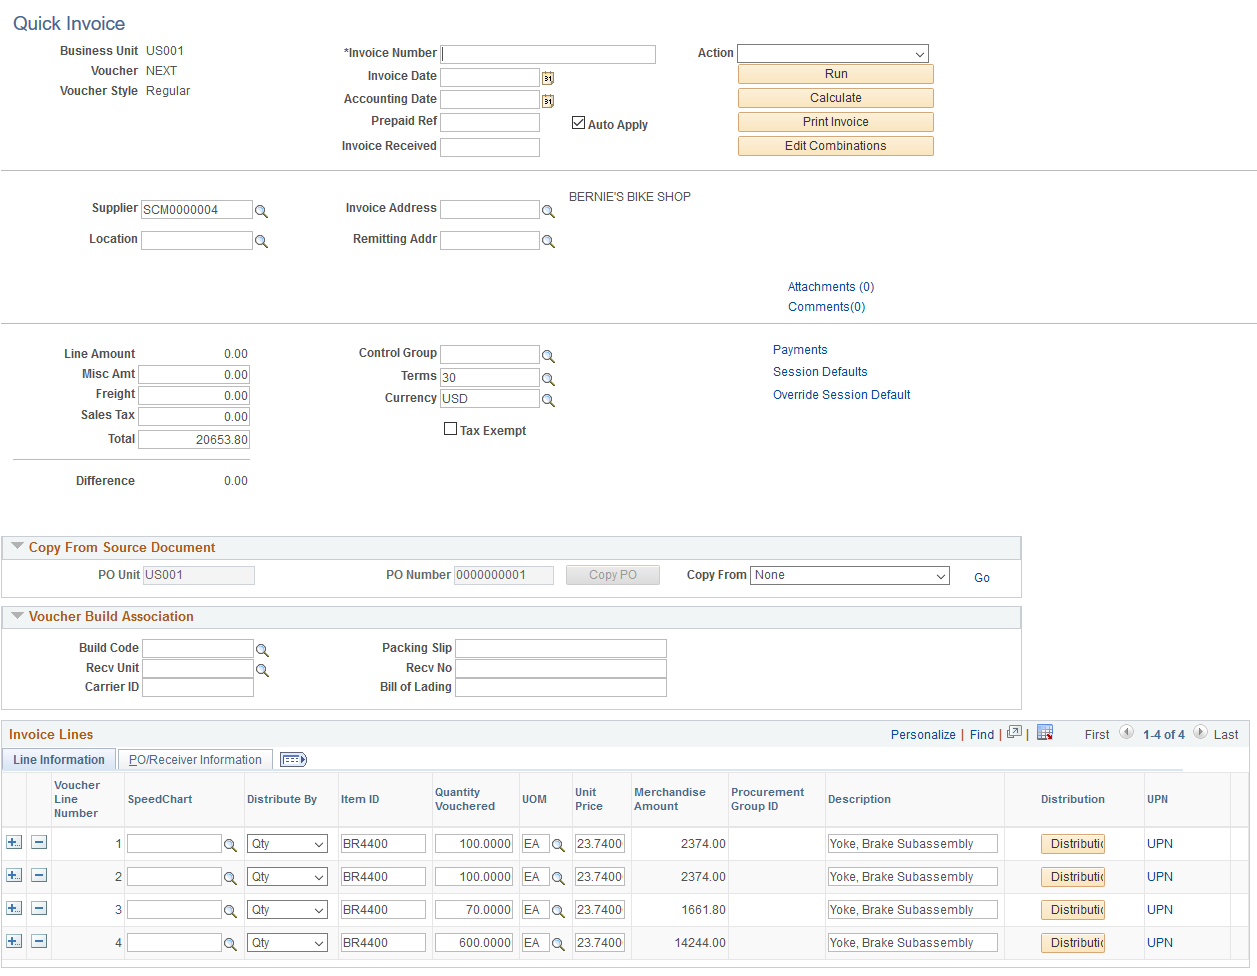
General Invoice Information
You must enter a supplier ID, invoice number, invoice date, and total amount. Other fields are optional. If you leave the optional fields blank, the Voucher Build process completes the voucher according to the defaults that you set up in the PeopleSoft Payables control hierarchy or the session defaults.
Note: If financial sanctions validation is enabled at the installation level, and the supplier has a financial sanctions status of Review or Blocked, the system displays a warning message that the supplier selected is currently under financial sanctions review. You can save the quick invoice, however, the system does not allow payments to suppliers with a financial sanctions status of Review or Blocked.
Field or Control |
Description |
|---|---|
Print Invoice |
Click to create the invoice in a PDF file format. The system opens a new window where you can view and print the invoice. |
Calculate (calculate on-demand balancing) and Difference |
Click to perform on-demand balancing validation, which calculates the difference between the invoice lines plus the applicable charge amounts (miscellaneous, freight, and tax amounts) and the gross invoice amount. This amount appears in the Difference field when the voucher is out of balance. The system populates the Difference field with 0.00 when the voucher is in balance. |
Edit Combinations |
Click to perform on-demand combination edit validation, which audits ChartField combinations. |
Attachments (n) |
Click to add or view attachments related to this quick invoice. Attachments are available after the quick invoice becomes a regular voucher. See Installation Options - Multiple Attachments Page to define the maximum attachment upload limit for various products. |
Comments (n) |
Click to enter comments for a quick invoice to explain payment schedules, issues with the supplier, or anything else that you need to document the invoice. Any comments that you enter in this field are meant for your reference only. You can enter up to 254 characters for a comment. If you exceed 254 characters, the system displays a warning message that it can save only 254 characters and truncates the message. Comments are available after the quick invoice becomes a regular voucher. The system displays (0) if no comment is attached to this voucher. The system displays a number if there is one or more comments associated to this quick invoice. |
Line Amount |
Displays the combined total of the invoice line amounts. |
Misc Amount (miscellaneous amount) |
Displays the miscellaneous charge amount. |
Freight |
Displays the freight charge amount. |
Entered VAT Amount |
Displays the entered VAT amount. This field only displays if the invoice is VAT applicable. |
Sales Tax |
Displays the sales tax charge amount. |
Total |
Displays the combined total of the invoice lines and the miscellaneous, freight, and tax charge amounts. |
Tax Exempt |
Select to override the default sales and use tax setup for the voucher and make it exempt from sales and use tax. |
Payments |
Click to access the Quick Invoice - Payment Details page, where you can enter payment information for the voucher. |
Session Defaults |
Click to access the Session Defaults page, where you can select existing available session defaults or set adhoc default values for all of the invoices that you enter in the current session. These defaults override the defaults that the system applies using the PeopleSoft Payables control hierarchy. |
Override Session Defaults |
Click to access the Override Session Default page, where you can override the session defaults for the current invoice and specify optional voucher header field values. |
Miscellaneous Charges |
Click to access the Quick Invoice Entry - Miscellaneous Charges page for the voucher header, where you can review or override the miscellaneous charge codes, accounting entry type, and charge amounts for the invoice. Note: This field appears only if you have copied a purchase order with freight or miscellaneous charges. Note: You can click the Miscellaneous Charges link on each voucher line to access the voucher line Quick Invoice Entry - Miscellaneous Charges page, where you can select whether or not to apply the miscellaneous charges to the line. |
Copy From a Source Document
In add mode, this group box provides fields for indicating purchase orders or receivers that you want to copy to the voucher or that you want the Voucher Build process to build into a voucher.
In update/display mode, this group box also includes fields for delimiting the number of voucher lines that appear in the Voucher Lines scroll area.
See Quick Invoice Page.
PeopleSoft Payables enables you to copy entire source documents, or portions of them, saving data entry time and reducing potential input errors. Select the UPN hyperlink to view the details of the UPN This hyperlink is available whenever a voucher is created by copying from a source document. When an quick voucher is created without copying from a source document, the UPN link is hidden. Likewise, when a quick invoice is created using the simple template, the UPN link is hidden.
Note: When an Item ID field is left blank, the UPN fields are cleared, and after the Voucher Build process is run, the UPN fields reverts to the default information from the Source document. When there are any changes to the Item or to the UOM, the UPN fields reverts to the default information based on the Item ID and UOM entered.
Note: When copying a source document into a Quick invoice, the UPN details are rendered as display-only for both, Item Source document, and also for Description only Source document.
Important! If you intend to copy information from a purchase order or a receiver, do not begin by entering information on the add and search page. Leave these fields blank. Also ensure that the line entry default is one (1).
Note: The fields in this group box are not available for entry if the voucher style is Prepaid. You cannot copy a purchase order or receiver to a prepaid voucher.
Any values that you enter in this group box are copied to the voucher and distribution lines, where you can override them.
See Voucher Build Processing Logic for Associating Voucher Lines with Purchase Order and Receiver Lines.
Field or Control |
Description |
|---|---|
PO Unit (purchasing business unit) and PO Number (purchase order number) |
Enter a PeopleSoft Purchasing business unit and PO ID. You can either copy the purchase order information onto the voucher lines by clicking Copy PO, or you can let the Voucher Build process use the PO business unit and PO ID (along with appropriate PO information you enter on the voucher lines) to locate the purchase order lines and build the voucher and distribution lines from them. If you enter a PO business unit only, the Voucher Build process uses the PO IDs that you enter on the voucher lines to locate the purchase order lines. |
Copy PO (copy purchase order) |
Enter a PO business unit and PO ID in the PO Unit and PO No fields and click this button to copy purchase order fields onto the voucher. If you don't know the PO business unit, use the Copy information from a worksheet into this invoice field to access the appropriate copy worksheet, where you can search for a purchase order to copy. Note: The system behaves differently when you have one (1) or multiple lines specified on the search dialogue. After entering the PO values and clicking the Copy button, when there is only one line, the functionality copies the PO into the quick invoice. When the number of lines on the search dialogue is greater than one, the system accesses the Copy Worksheet page. If you primarily use the quick invoice to copy POs into vouchers, consider defining a one line default in your session defaults for efficiency's sake. |
Copy From |
Select a value and click the Go link to access the appropriate copy worksheet for copying purchase orders and receivers onto a voucher. The copy worksheets enable you to search for purchase orders and receivers and select the lines that you want to copy to the voucher. Options are: None: Do not copy information. Purchase Order Only: Access the copy worksheet for purchase orders (that is, the Copy Worksheet - PO Lookup Criteria page). PO Receipt: Access the copy worksheet for receivers (that is, the Copy Worksheet - Receiver Lookup Criteria page). When you select this option, you can search for receivers by purchase order and receiver information and the system returns only receivers that reference purchase orders. Non PO Receipt (non purchase order receipt): Access the copy worksheet for receivers (that is, the Copy Worksheet - Receiver Lookup Criteria page). When you select this option, you can search for receivers by receiver information only, and the system returns only receivers that do not reference purchase orders. These copy worksheets function as they do in the Voucher component. |
Voucher Build Association
Field or Control |
Description |
|---|---|
Build Code |
Enter a voucher build code, which defines how the Voucher Build process associates invoice lines for the voucher with a PO or receiver. Once the process finds an association, it uses the PO and receiver lines to complete the voucher line and accounting distributions. If you don't enter a voucher build code, default association processing logic applies. The processing logic—whether defined by a voucher build code or by default—determines the fields that you are required to enter in this group box and on the voucher lines in order for the Voucher Build process to locate a purchase order or receiver and build a voucher from it. You set up voucher build codes on the Voucher Build Code Definition page. |
Recv Unit (receiving business unit) and Recv No (receiver number) |
Enter a PeopleSoft Purchasing receiving business unit and receiver ID. The Voucher Build process uses these values, along with the other receiver information that you enter in this group box and on the voucher lines, to locate the receiver lines and build the voucher and distribution lines from them. If you enter a receiving business unit only, the Voucher Build process uses the receiver IDs that you enter on the voucher lines to locate the purchase order lines. |
Packing Slip, Bill of Lading, and Carrier ID |
Enter the relevant receiver data. The Voucher Build process uses these values, along with the other receiver information you enter in this group box and on the voucher lines, to locate receiver lines and build the voucher and distribution lines from them. |
Invoice Lines
Most of the fields in this scroll area are identical to those in the Invoice Lines scroll area on the Invoice Information page in the Voucher component. Any differences are documented here.
Note: The purchase order- and receiver-related fields in this scroll area are not available for entry if the voucher style is Prepaid.
Field or Control |
Description |
|---|---|
Distribute By |
Select to distribute by either Amt (amount) or Qty (quantity). |
Item ID and Description |
If you enter an item ID reference code, the Voucher Build process uses this value to match voucher lines to receiver and purchase order lines. |
Merchandise Amount |
Displays the merchandise amount for the voucher line. The Voucher Build process computes this value if you enter the quantity and unit price or copy the voucher line from a purchase order or receiver. |
PO Business Unit, PO Number, Line Number and Schedule Number |
Enter values to identify the related purchase order. The Voucher Build process uses this information to locate the purchase order line and build the voucher and distribution lines from it. |
Receiving Business Unit Receipt Number, and Receipt Line (receiver line number) |
Enter values to identify the related receiver. The Voucher Build process uses this information to locate the receiver line and build the voucher and distribution lines from it. |
Line Match Opt (line match option) |
Select whether to use matching. Options are:
|
Miscellaneous Charges |
Click to access the Quick Invoice Entry - Miscellaneous Charges page for the voucher line, where you can select whether or not to apply the miscellaneous charges to the line. |
Discount |
Select to make the voucher line discount-applicable. By default, this check box is selected. |
Distributions |
Click to access the Distribution Lines page, where you can enter distribution information and copy down distribution lines. |
UPN |
Click to access the Invoice Line UPN Information page where you can view the UPN details for an item. This link is also not available if a PO ID is manually entered in the PO/Receiver Information tab. This link is also not available if changes are made to the PO ID or Receipt ID after copying from a Source document. |
To access the Copy Worksheet (purchase order) Page, select PO Only in the Worksheet Opt (worksheet option) field on the Quick Invoice page (complete worksheet).
To access the Copy Worksheet (receiver) Page, select PO Receipt or Recp Only (receipt only) in the Worksheet Opt (worksheet option) field on the Quick Invoice page (complete worksheet).
To access the Quick Invoice Entry - Miscellaneous Charges Page,
Click the Miscellaneous Charges link on the invoice header on the Quick Invoice complete worksheet page to access the Miscellaneous Charges page for the invoice header.
Click the Miscellaneous Charges link on an invoice line on the Quick Invoice complete worksheet page to access the Miscellaneous Charges page for invoice lines.
The link appears only if you have copied a purchase order with freight or miscellaneous charges.
To access the Quick Invoice Entry – Review Errors page, click the Review Errors link on the complete or simple worksheet. This link appears only when the worksheet has build errors.
Use the Quick Invoice page (VCHR_HEADER_WCA) to update information for the Voucher Build process to build into a voucher and to view the imaged invoice.
Navigation:
. Select Voucher Source as Document Management Interface and click Search.
This example illustrates the fields and controls on the Quick Invoice page — Imaging invoice page. You can find definitions for the fields and controls later on this page.
This example illustrates the fields and controls on the Purchase Order page.

This example illustrates the fields and controls on the ChartFields page.

Field or Control |
Description |
|---|---|
View Invoice Image |
Click to open the scanned invoice image, which was used to create a voucher using a third party imaging solution. This link is enabled once the data is populated into staging tables. Note: The View Invoice Image link is available only on the Quick Invoice (simple worksheet) page, and when you have selected the Voucher Source as Document Management Interface at the time of creating the invoice. This voucher source allows integration from third party imaging solutions to voucher staging. |
Use the Distribution Lines page (VCHR_QUICK_SBP2) to enter distribution information for a specific invoice line.
Navigation:
Click the Distribution button on an invoice line on the Quick Invoice page (complete worksheet).
Use the Distributions scroll area to enter multiple distribution lines for each voucher line. You can select the Copy Down check box on a distribution line to copy that line's general ledger business unit and ChartField values to new distribution lines. To avoid recycle status, you must enter at least an account if the voucher is not associated with a PO or receiver. For prepayment vouchers, you can leave the Account field blank, and the Voucher Build process will supply the prepayment account from the Accounting Entry Template.
Most of the fields are identical to those on the Invoice Information page in the Voucher component, except that there are no edits against these fields in the Quick Invoice Entry component. Any other differences are documented here.
Note: The system does not recalculate balancing differences when exiting the page; you must click the Calculate button to refresh the totals. For example, if you short distribution line field amounts here, they remain out of balance on the Quick Invoice page until you click the Calculate button.
Important! ChartFields that display here depend on how you configure options on the Standard ChartField Configuration page.
See Standard ChartField Configuration Page.
Field or Control |
Description |
|---|---|
VAT Apport CF (VAT apportionment ChartField) |
If you use VAT apportionment to track the organization's recoverability, select the business unit whose ChartField values the system uses for VAT apportionment control: Dist GL BU (distribution general ledger business unit): The system uses the general ledger business unit on the voucher distribution line to determine the VAT apportionment. Txn BU (transaction business unit): The system uses the PeopleSoft Payables business unit in which the voucher is entered to determine the VAT apportionment. Txn GL BU (transaction general ledger business unit): The system selects the general ledger business unit to which the PeopleSoft Payables business unit is mapped to determine the VAT apportionment. See Establishing the PeopleSoft Payables VAT Default Hierarchy. |
Use the Quick Invoice (simple worksheet) page (VCHR_HEADER_QV2) to enter and update invoice header, line, and distribution information for the Voucher Build process to build into a voucher.
The simple worksheet requires minimal voucher data entry. You can only enter the simple worksheet in update/display mode if you have not yet run the Voucher Build process for the voucher.
Navigation:
Select Simple in the Quick Invoice Template field on the Add Search page.
This example illustrates the fields and controls on the Quick Invoice page for simple worksheets. You can find definitions for the fields and controls later on this page.
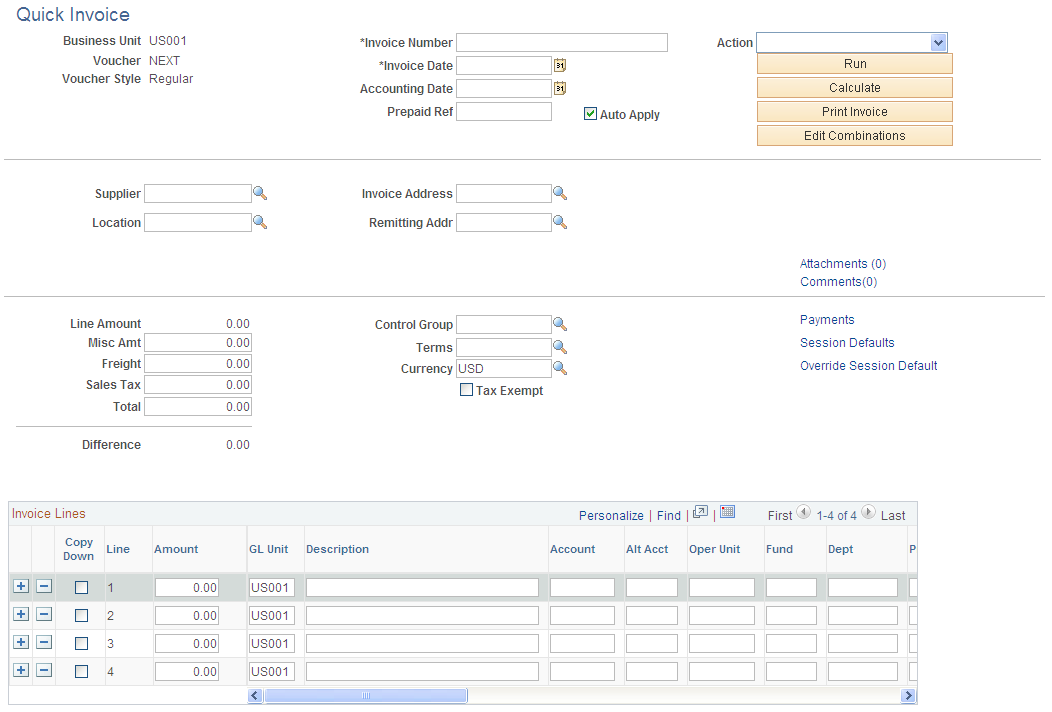
Note: Descriptions of many of the fields on this page can be found in the discussion of the Quick Invoice complete worksheet page and in other topics.
See Quick Invoice Page.
You must enter a supplier ID, invoice number, invoice date, and total amount. Other fields are optional. If you leave the optional fields blank, the Voucher Build process completes the voucher according to the defaults that you set up in the PeopleSoft Payables control hierarchy or the session defaults.
Note: If financial sanctions validation is enabled at the installation level, and the supplier has a financial sanctions status of Review or Blocked, the system displays a warning message that the supplier selected is currently under financial sanctions review. You can save the quick invoice, however, the system does not allow payments to suppliers with a financial sanctions status of Review or Blocked.
Field or Control |
Description |
|---|---|
Prepaid Ref (prepaid reference) and Auto Apply (automatically apply payment) |
Enter a prepayment reference and select to have the system automatically apply the payment to a subsequent invoice with that prepayment reference. See Entering Prepayment Vouchers Using the Quick Invoice Entry Component. |
Invoice Lines
Enter the extended amount and distribution information for each voucher line. You can enter one combined distribution line per voucher line. You can select the Copy Down check box on a distribution line to copy that line's General Ledger business unit and ChartField values to new distribution lines.
To access the Session Defaults Page, click the Session Defaults link on the Quick Invoice page (complete or simple worksheet).
Use the Override Session Default page (VCHR_HDR_QV_SEC) to override optional voucher header defaults for the current quick invoice.
Navigation:
Click Override Session Default on the Quick Invoice page (complete or simple worksheet).
This example illustrates the fields and controls on the Override Session Default page. You can find definitions for the fields and controls later on this page.
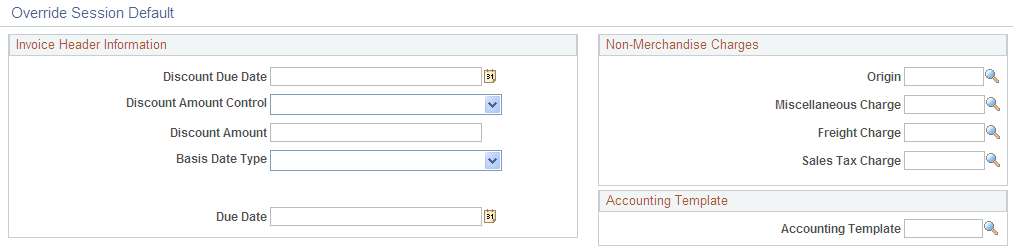
Note: The fields that appear in the Non-Merchandise Charges group box—and the presence of the Non-Merchandise Charges group box itself—depend on the display options selected on the Session Defaults page for your session. The Miscellaneous Charge, Freight Charge, and Sales Tax Charge fields do not appear if you are entering a prepaid voucher.
Discount Terms
Field or Control |
Description |
|---|---|
Discount Amount Control |
Specify whether or not to accept the default payment terms or to enter your own due date and discount information. Values are: Terms: The system uses the calculated discount amount. The system calculates the discount amount according to the payment terms, due date, and discount due date that you enter here. If you leave these blank, the system calculates the discount amount according to the payment terms that are populated by default through the PeopleSoft Payables control hierarchy. User: The system uses the discount amount that you enter in the Discount Amounts field. |
Note: The system does not use any discount amount you enter here if you select Terms as the discount amount control value.
Note: Discount terms fields are grayed out if you are entering a prepaid voucher. If you enter discount terms or multipayment terms in the Terms field for a prepaid voucher, the voucher will fail voucher build processing.
Use the Quick Invoice Entry - Payment Details page (VCHR_PYMNT_QV_SEC) to enter and update specific payment information for a quick invoice.
Navigation:
Click Payments on the Quick Invoice page (complete or simple worksheet).
Note: Each row in the Payment Details scroll region is a payment schedule, and each schedule can be defined with only one payment message. When you add rows in this area, this indicates that the system (during the Voucher Build process) should create additional payment schedules, which can each have a different payment message. Remember that even though each payment schedule can be defined with one message, you can create and use payment message codes defined with multiple messages. This enables you to have multiple payment messages display on the check advice.
Most of the fields on this page are identical to those on the Payments page in the Voucher component. Only fields that differ are discussed here.
Field or Control |
Description |
|---|---|
Payment Message |
Enter a payment message of up to 70 characters to appear on the remittance advice (check stub), or select a message code for a predefined message to appear on the remittance advice. You define message codes on the Payment Messages page. |
Use the Quick Invoice page for a complete or simple worksheet (Accounts Payable, Vouchers, Add/Update, Quick Invoice Entry, Quick Invoice Entry, Quick Invoice).
You can enter and apply prepayment vouchers using either the complete or simple worksheets.
Entering Prepayments
To enter prepayment vouchers using the complete worksheet:
Select a voucher style of Prepaid on the add search page.
Enter your voucher information, session defaults, and session default overrides.
Note: You cannot copy POs or receivers. Nor can you enter nonmerchandise amounts (except VAT), discount terms, or multipayment terms.
(Optional) Enter a prepayment reference in the Prepaid Ref (prepaid reference) field.
Select or deselect the Auto Apply option.
The Auto Apply option is selected and grayed out by default.
If you enter a prepayment reference and select Auto Apply, then, if the next entered invoice with that prepayment reference has a total amount less than the prepayment amount, the system automatically applies the remaining amount of the prepayment voucher to a subsequent invoice with that prepayment reference.
If you enter no prepayment reference and select the Auto Apply option, then the next invoices from the supplier on the prepayment voucher are applied to the prepayment until the prepayment amount is fully applied.
To deselect the Auto Apply option, click the Refresh button after you enter the prepayment reference to make the field enterable, and deselect it.
If you enter a prepayment reference and deselect the Auto Apply option, then only the next entered invoice that references the prepayment will have the prepayment applied. The prepayment will not be applied to any subsequent invoices. You must use the Prepayments Inquiry page to handle any remaining unapplied prepayment amounts.
To enter prepayment vouchers using the simple worksheet:
Select a voucher style of Prepaid on the add search page.
Enter your voucher information, session defaults, and session default overrides, as necessary.
(Optional) Enter a prepayment reference in the Prepaid Ref field.
Note: You can also enter prepayment references and select the Auto Apply option on the Override Session Default page, as you do for the complete worksheet.
Select or deselect the Automatically Apply Prepayment option.
This option functions the same way as the Auto Apply option on the Override Session Default page for the complete worksheet.
Applying Prepayments
To apply regular vouchers to a prepayment using the complete or simple worksheets if you entered a prepayment reference on the prepayment voucher, enter a prepayment reference for the regular voucher. The regular voucher will be applied to the prepayment, subject to the conditions described in the discussion of entering prepayment vouchers.
To apply regular vouchers to a prepayment using the complete or simple worksheets if you did not enter a prepayment reference on the prepayment voucher, you do not need to enter a prepayment reference for the regular voucher.
Use the Quick Invoice page for a complete or simple worksheet in update/display mode.
Navigation:
Note: All quick invoice vouchers staged by the Voucher Build process appear in the complete worksheet. Those entered in the Quick Invoice Entry component and not yet processed by Voucher Build appear in the worksheet of entry.
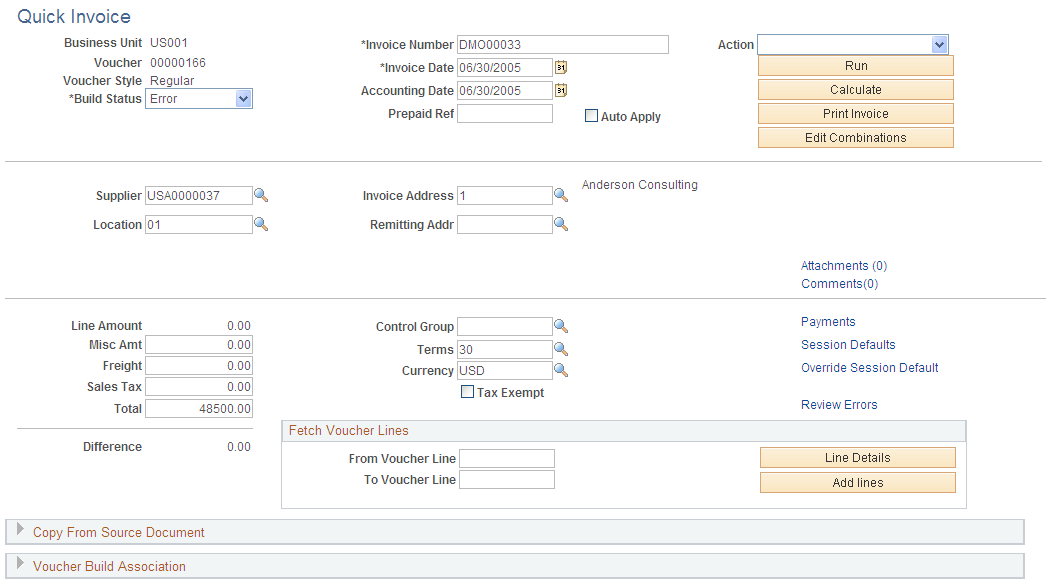
This example illustrates the fields and controls on the Quick Invoice page for a complete worksheet in update/display mode, before inserting or fetching voucher lines.
The Quick Invoice Entry component is used for reviewing and updating vouchers staged for review by the Voucher Build process, as well as for correcting vouchers that have Voucher Build process pre-edit errors. For this reason, the Quick Invoice Entry component provides the following special functions when accessed in update/display mode:
When you access the page, voucher lines are not called up and the Invoice Lines scroll area does not appear; this enables you to open a voucher with a large number of lines without taking unnecessary processing time.
To view existing voucher lines, enter a range of voucher lines in the From Vchr Line and To Voucher Line fields and click the Search button to view and update the lines in the Voucher Lines scroll area.
The default from and to values are the first and last lines in the voucher; to view all lines in a voucher, simply click Search.
To insert a voucher line without calling up existing lines, click the Insert button to display the Invoice Lines scroll area, where you can add voucher line information.
Note: Once you've inserted a voucher line, you must save the voucher and access it again through the search page to fetch additional voucher lines.
You can change the build status of the voucher:
When you have reviewed and, if necessary, updated a voucher that has been staged for review, you can change the build status from Staged to To Build to mark the voucher for another run of the Voucher Build process.
When you have corrected a voucher with pre-edit errors, you can change the build status from Error to To Build to mark the voucher for another run of the Voucher Build process.
To mark a voucher for deletion the next time you run the Voucher Build process, select To Delete as the build status.
Note: Quick invoices created with the simple worksheet are converted to complete worksheets by the Voucher Build process.
Note: In all other respects, the Quick Invoice page and the other pages in the Quick Invoice Entry component—the Session Defaults page, the Override Session Default page, the Quick Invoice Entry - Payment Details page, and the Quick Invoice Entry - Miscellaneous Charges page—function the same way in update/display mode and add mode.