Creating Authored Documents
|
Page Name |
Definition Name |
Usage |
|---|---|---|
|
CS_DOC_ADD |
Create documents for all source transactions. |
|
|
CS_DOC_CREATE |
Provide additional details when creating documents for all source transactions. |
|
|
CS_DOC_COPY_SEC |
Copy documents for all source transactions using Document Management. |
|
|
CS_DOC_IMPORT |
Import documents for all source transactions. |
You can create authored documents to use with purchasing contracts, purchase orders, sourcing event, or as stand-alone ad hoc documents. Creating these types of documents can originate from each source transaction within Supplier Contract Management. The series of pages that you use to create documents is similar for all methods, but some differences exist depending on the source transaction and other values that you select to create the document. You can also import or copy documents.
When adding a document from a source transaction, the system takes you through the same series of steps and pages to create a document:
The Add a Document Page or another page that initiates the process.
the Create Document Page to add details about the document.
Wizard pages that allow you to provide details to appear in the document or control how the document is created.
The Document Management Page to access to the document and manage other options.
To add documents within the document management system, you can use these methods:
Add a document for all source transactions using the Add a Document Page.
Copy a document from another document using the Copy Document Page.
Import a document using the Import Document Page.
Using the Copy Document feature, you can create documents for any source transaction by copying them from existing documents. This saves time when a new document contains the same edits that may have been done on a prior document. The Copy Document Page provides document attributes that you can use to search for existing documents. When searching document types, the search is limited to documents that have the same type that you specify for the document that you are creating. The system does not use a document configurator to build documents that you create when using the copy document method. Instead, it copies the document from the existing authored document and refreshes document content based on the bind variables of the source transaction for the target document.
When using multi-source configurators, the system enables you to copy documents from different source transactions as long as the existing and new documents use the same multi-source configurator within the document type.
Note: You can specify rules within a multi-source configurator to include or exclude content from a document for each source so that the source and target document can include different content. For content that does not change due to rules or refreshed bind information, changing any edits made to the source document are preserved as much as possible in the target.
Note: The system does not copy amendment files or imported documents.
When you are using the Copy Document button on the Add a Document Page, the system provides a convenient method to find and copy an existing document from which you can create a new document. Using the button, you access the Copy Document Page, and search for the document that you want to copy. After retrieving the document, the system displays the Create Document Page for you to define attributes for the new document.
After you select the document attributes, click the Create Document button to create the document. If the current configurator uses a wizard, the system runs the wizard using default values from the corresponding wizard in the document from which you are copying. You can override these values. The system then creates the document and displays the Document Management Page.
Purchase order documents and purchasing contracts can originate through the requisition process. Before creating either document using this process, requesters can define information that can be used for the contract document. When using requisition documents, requestors can define a related document and wizard responses to capture additional information from a requisition before it becomes a contract. While the requisition document itself does not feed into the contract document, the wizard responses associated with the requisition document can. In addition, you can associate a requisition document to a contract document when you create the contract document.
When you define a document type to be used only with a purchase order requisition, you can specify that the system use this type when a requestor creates a requisition from PeopleSoft eProcurement or Purchasing. In this case, along with the requisition, the requestor can generate a supplemental request document by launching a wizard that captures information pertaining to the contract request.
Wizard responses enables the requestor to provide the required information in the supporting document. After the requisition is awarded to a contract by means of an RFQ or sourcing event, the contract specialist can reference the original request document and use wizard responses within that request document to help drive the content and complete required data on the actual contract. This is possible when you create a contract document and a related requisition exists. The system prompts the contract specialist to select an associated requisition that copies the wizard responses for the requisition document as default values for the new contract document.
Note: Requisition documents are ad hoc documents that include document contents based on a configurator and responses to wizard questions. The document type that you use with requisitions determines user capabilities, such as editing the requisition document. Within Purchasing and eProcurement requisition components, you can also use the Attach to Requisition button to attach a generated document to the requisition along with your comments. Attaching the document to the requisition is performed at a point in time, and the system does not automatically reattach any further changes to the requisition document.
Requisition documents are based on document types that allow a purchase order requisition to create a purchase order or purchasing contract document. Documents of this type must be associated with a requisition ID and business unit. Use the Installation Options - Supplier Contract Management Page to use document types and purchase requisitions. Requisitions depend on a document type and you must indicate that the system uses document types. This enables you to use document types with purchase requisitions. As part of the setup, you should set up a wizard that captures additional information from a requisition and can be used with the purchase order contract.
Use these steps to add a requisition document:
Ensure that these options are selected on the Installation Options - Supplier Contract Management Page:
Use Document Type.
Use with PO Requisition.
Establish wizards and group sections to be used with requisition document types.
This series of questions or question groups should relate to the kind of contracts for which you are creating the document type.
Create a document configurator that uses the wizard that you defined for requisitions.
The document configurator also provides the content of the document, such as sections and clauses that provide structure for the wizard responses.
Create a document type.
The document type should be an ad hoc type and the Use Only with PO Requisition check box should be selected. You can either define a specific configurator or use a configurator selector wizard to select a configurator.
Create a requisition in PeopleSoft Purchasing or eProcurement.
Click the Add Request Document button.
The system accesses the Add a Document Page. This page appears with the business unit, purchase requisition, and a description for the requisition document. You can change the document type that the system uses as a default value. You can also select to import and copy a document to attach to the requisition.
Click the Add a Document button and complete the wizard questions.
If you are using a configurator selector wizard, the system launches that wizard before launching the document creation wizard. When you finish the questions, the system generates the document and the Document Management Page appears. You can view the document, refresh, or re-create it. Other actions available for the document depend on information defined for the document type.
(Optional) Click the Attach to Requisition button in the Document Management page and enter comments about the document.
This attaches the current document, with your comments, to the requisition instead of manually attaching the document to the requisition. Your comments appear under the Edit Comments link for the requisition. You can only attach one version of the document to the requisition at a time.
After creating a requisition document, you can update the responses to the wizard using the Modify Request Document button from within PeopleSoft Purchasing or eProcurement requisitions.
When you select a document type on the Add a Document Page that is used with a requisition, the system updates the page with two fields. This enables you to link to requisitions created in PeopleSoft eProcurement or Purchasing.
Requisition documents define a request document and wizard that capture additional information from the requestor. When you award the requisition to a purchase contract or purchase order and then create a document from that source, you can reference the original request document and use wizard responses within that request document to drive the content and fill in required data for the authored document. The benefit of this process is that by the time the contracting specialist becomes involved in the process, the requestor has already been prompted for and provided all of the necessary information.
Depending on the document type, the system pulls wizard answers from these sources:
When you create a Purchasing Contract document (from the Create Document Page) that is associated with a requisition document, the system pulls wizard answers that are associated with sources All or Purchasing Contracts.
When you create a Purchase Order document (from the Create Document page) that is associated with a requisition document, the system pulls wizard answers that are associated with sources All or Purchase Orders.
When you create an RFx document (from the Create Document page) that is associated with a requisition document, the system pulls wizard answers that are associated with sources All or Sourcing Events.
Note: The steps to create an ad hoc document for requisitions are the same as those for stand-alone ad hoc documents, except that you must use a document type that enables you to link to the requisition ID. You can also launch document creation from Purchasing or eProcurement requisition pages.
If a wizard has been defined for the document type, the system launches the wizard when you click the Add a Document button. After you respond to wizard questions, the system creates the document and the Document Management page appears.
If a wizard has not been defined for the document type, the system displays the Create Document Page Create Document page for you to select a document type. Use this page to define document attributes for the requisition document. You can also import a document to use with the requisition.
Note: Information that is used for the document is pulled from wizard answers and not the requisition. This is why a requisition is not considered to be one of the four source transactions.
Example: Creating Ad Hoc Documents from Purchasing Requisitions
To create ad hoc documents from a purchasing requisition:
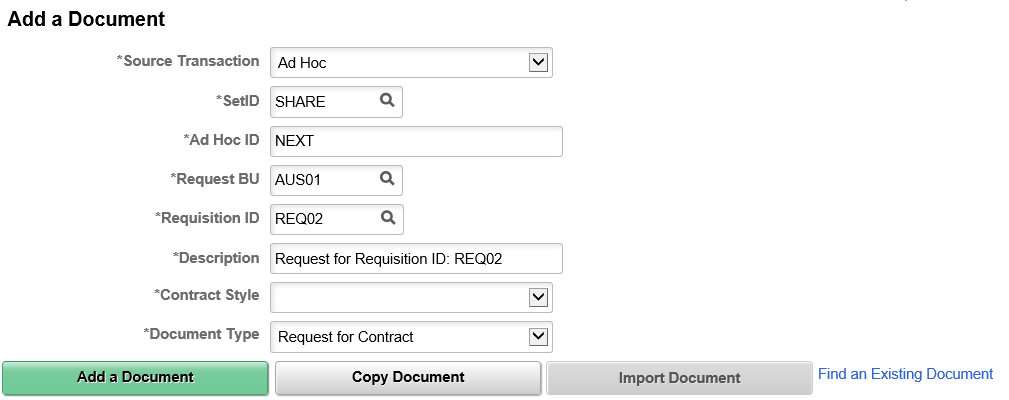
Navigate to the Add a Document page.
Select Ad Hoc in the Source Transaction field.
Enter the SetID.
Select Request for Contract in the Document Type field.
Note: Note that the available fields expand to include Request BU and Requisition ID.
Enter an ID in the Ad Hoc ID field or allow the field to default to NEXT.
Enter the business unit for the requisition.
Enter the requisition ID.
The system completes the Description field to access the Create Document page.
Click the Add a Document button.
Use the Add a Document page (CS_DOC_ADD) to create ad hoc documents and ad hoc contracts from purchasing requisitions using Document Management.
Navigation:
This example illustrates the fields and controls on the Add a Document page for purchasing requisitions.
Term |
Definition |
|---|---|
Request BU (request business unit) |
Select the business unit in which the requisitions exists. This field is only visible when using a document type that is setup to link to an eProcurement or Purchasing requisition. Note: If you access this page directly from an eProcurement or Purchasing requisition page, the system automatically populates the field. |
Requisition ID |
Select the requisition to which you want to attach this document. This field is only available when you are using a document type that is setup to use a requisition. When the system creates the document, it provides a link from the Document Management page to the requisition in PeopleSoft Purchasing or eProcurement. In addition, you can access the document in the document authoring system using links from Purchasing or eProcurement requisition pages. After the requisition is approved, buyers can use the document as supplemental information as they progress through the requisition process. Note: If you access this page directly from an eProcurement or Purchasing application requisition page, the system updates this field. |
This example illustrates the fields and controls on the Create Document page for a requisition.
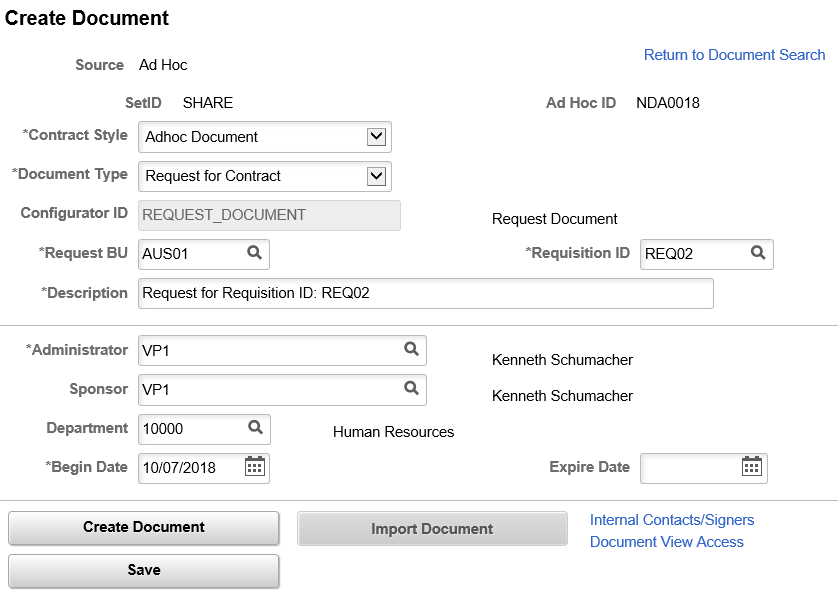
Use this page to define document attributes for the requisition document. You can also import a document to use with the requisition. See Creating Authored Documents for Purchasing Contracts.
Use the Add a Document page (CS_DOC_ADD) to create documents for all source transactions.
Navigation:
This example illustrates the fields and controls on the Add a Document page when Ad Hoc is selected as the source transaction.
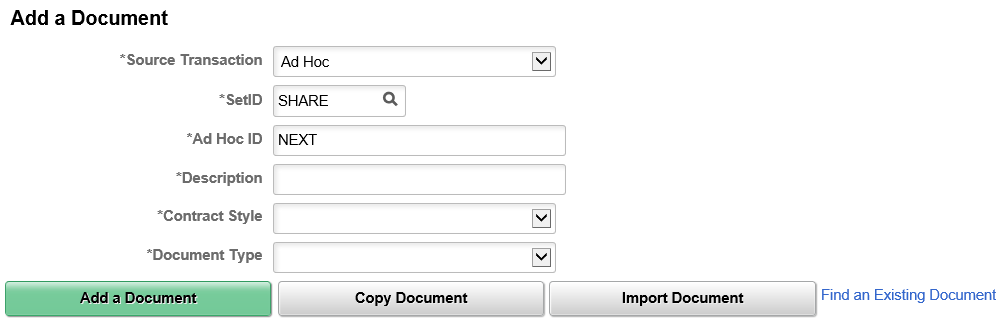
Use this page to select a source transaction and enter the key information pertaining to the document to be added. The field order may change based on the source transaction selected.
Field or Control |
Description |
|---|---|
Source Transaction |
Select Ad Hoc, Purchase Order, Purchasing Contract, or Sourcing Event. Depending on the source transaction that you select, either the Contract ID, PO ID, Ad Hoc ID, or Event ID field appears. Note: For purchasing contract, purchase order, and sourcing event source types, you need to create the transactional data before creating a contract document. |
Ad Hoc ID |
Enter a name for the ad hoc document. This field is only available when you select Ad Hoc in the Source Transaction field. |
Contract Style |
Select a contract style you want to use for the document. The contract style is linked with the document type and source transaction.
|
Document Type |
Select a document type to use with this document. When creating a document the list of valid document types for a user is controlled by the roles associated with the document type on the Document Type Page. If installation options have been set to use the document type, the Document Type field is required. If the Use Document Type installation option has not been selected, the Document Type field does not appear on this page. Note: If the document is based on a document type that points to a configurator selection wizard to determine which is the best configurator for the document, the system launches the wizard after you click the Add a Document button. These questions guide you when selecting a configurator to use with the new document. When the wizard is complete, the system automatically assigns the configurator ID. Note: If the document type you are using has the Automatic Document Creation check box selected, then when you click the Add a Document button, the system immediately generates the document using the values specified in the document type and bypasses the Create Document page. |
Contract ID |
Select the purchasing contract for which you want to create a document. This field is only available when you select .Purchasing Contract in the Source Transaction field. |
Event ID |
Select the event from which you want to create a document. This field is only available when you select Sourcing Event in the Source Transaction field. |
PO ID(purchase order ID) |
Select the purchase order for which you want to create a document. This field is only available when you select Purchase Order in the Source Transaction field. |
Description |
The Description field is required.
|
Add a Document |
Click to create the document based on a document configurator ID. |
Copy Document |
Click to access the Copy Document Page and create a new document from an existing document that is in the system. |
Import a Document |
Click to import a legacy document or a contract. Note: Depending on user preference settings, this button may not be visible for all users. See Importing Documents. |
Find an Existing Document |
Click to access the Find an Existing Document page to search for existing documents, see Finding Authored Documents in Supplier Contract Management. |
Use the Create Document page (CS_DOC_CREATE) to provide additional details when creating documents for all source transactions.
Navigation:
. Click the Add a Document button on the Add a Document page.
This example illustrates the fields and controls on the Create Document page for ad hoc sources. This page is similar when other sources are selected. However, variations may exist due to differences specified on the document type.
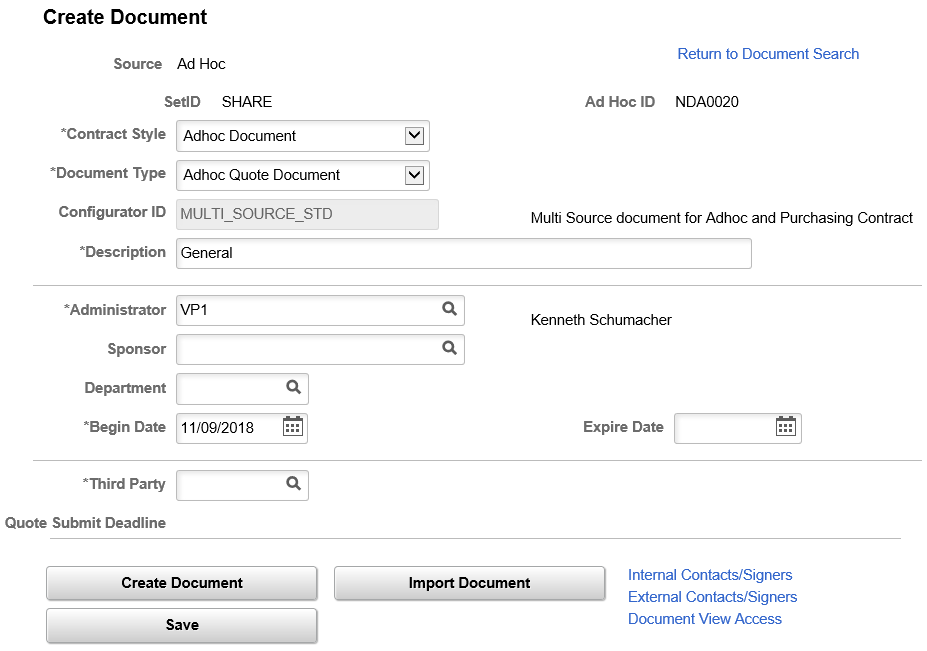
Use this page to review and enter supplemental information and to create the contract document for ad hoc, purchase orders, purchasing contract, and sourcing event documents.
Field or Control |
Description |
|---|---|
Contract Style |
Select to change the contract style that you entered on the Add a Document page for Ah Hoc documents. If you change this field, it must correspond with the document types that are available. Depending on the type you select, the fields that are displayed on this page might change. You cannot change the contract style for purchase order and purchasing contracts. |
Document Type |
Select to change the document type that you entered on the Add a Document page. Depending on the type you select, the fields that are displayed on this page might change. This field is only visible if Document Types are enabled. |
Configurator Selector |
Click to run the wizard that will select the configurator based on the answers to wizard question. The button is only available if document types are enabled and the document type selected is defined to use a configurator selector wizard. |
Configurator ID |
If you use a document type that has a specific configurator ID defined for it, the system automatically populates the Configurator ID field based on the document type. Or, if you are using a configurator selector wizard, the system populates the field when you complete the configurator selector wizard's questions. The Configurator ID field is only available if document types are not enabled, or if you are using document types and the user has configurator override capability defined on the document type. |
Begin Date |
For Ad Hoc documents only, this date represents the start date of the document. For example, this might be the begin date of the contract. The system uses this date to determine which effective content to use from the configurator ID when creating the document. The system does not display this date for PeopleSoft Purchasing contract documents. Their begin date is already specified in the contract itself. |
Expire Date |
For Ad Hoc documents only, this date represents the end date of the document, such as the end date of the contract. The system does not display this date for PeopleSoft Purchasing contract documents. Their expire date is already specified in the contract itself. |
Description |
The Description field is required.
You can override the description. |
Cycle Start Date |
Displays the current date. Only users who are set up with full document access on their user preferences can override the date. The start date establishes a cycle start date on which to track cycle times for contract document and amendment creation, approval, and execution. Using the cycle start and end dates, you can track documents to ensure that they meet time requirements. |
Cycle End Date |
Displays the date based on the number of days of cycle time and the cycle calendar that has been set up on the Installation Options page. The system adds the defined cycle time from the start date to arrive at the end date. The system calculates the date using the calendar to only include actual working days. Only users who are set up with full document access on their user preferences can override the date with a new value. You use these cycle dates on the Document Management search results to identify contract documents that have stalled or are not progressing through the collaboration and approval cycle. See Cycle Time Settings on the Installation Options - Supplier Contract Management Page. Note: When you are creating new documents, user-defined fields appear on the Document Management page. When you are maintaining existing documents, user-defined fields appear on the Document Details page. |
Use Wizard Responses from Document |
Select to use the responses to a set of wizard questions from another document to create this document. The system displays and uses the responses from the wizard or the original document when the bind variable between the original document's wizard and this documents wizard match. You can override individual responses as you go through the questions. This button is available when you are using document types that have the Allow using wizard responses from a prior document check box selected. You can also use this feature to do general copying of wizard responses from document to document. For example, you might have a contract document containing several wizard responses in it, and wish to create a summary document with only selected key responses from the original document in it. In this case when you add the summary document the system can display the Use Wizard Responses from Document field. Click the Select Document link to select a document and select the contract document. When you create the summary document, the system runs the summary document's wizard and uses the answers from the original contract as default values for the wizard questions. |
Select Document |
Click to select the document that contains the wizard responses that you want to use. The link becomes available when you select to use wizard responses from another document within the Document Type definition page. |
Create Document |
Click to create the document. The system initiates the document generation process, expands the configurator, resolves binds and rules, and populates the generation log. If generation errors occur, the system displays a message. When the document is complete, the Document Management page appears with the appropriate buttons and links available for you to begin the document's life cycle. Note: If the document configurator uses a wizard, the system presents the questions to the document author before generating the document. See Understanding Microsoft Word Document Generation and Generating Microsoft Word Documents. |
Import Document |
Click to import an document that was created outside of Supplier Contract Management. For additional information about importing document, see Understanding Document Import. |
Internal Contacts/Signers |
Click to access the internal authored document list where you can add internal collaborators and configure the signing settings. |
External Contacts/Signers |
Click to access the external authored document list where you can add external collaborators, enable supplier portal access, and configure the signing settings. |
Document View Access |
Click to view or grant access authority to authored documents for user roles and collaborators. |
Use the Copy Document page (CS_DOC_ COPY_SEC) to copy documents for all source transactions using Document Management.
Navigation:
. From the Add a Document page, click the Copy Document button. Select the document from which you want to copy to the new document.
This example illustrates the fields and controls on the Copy Document page.
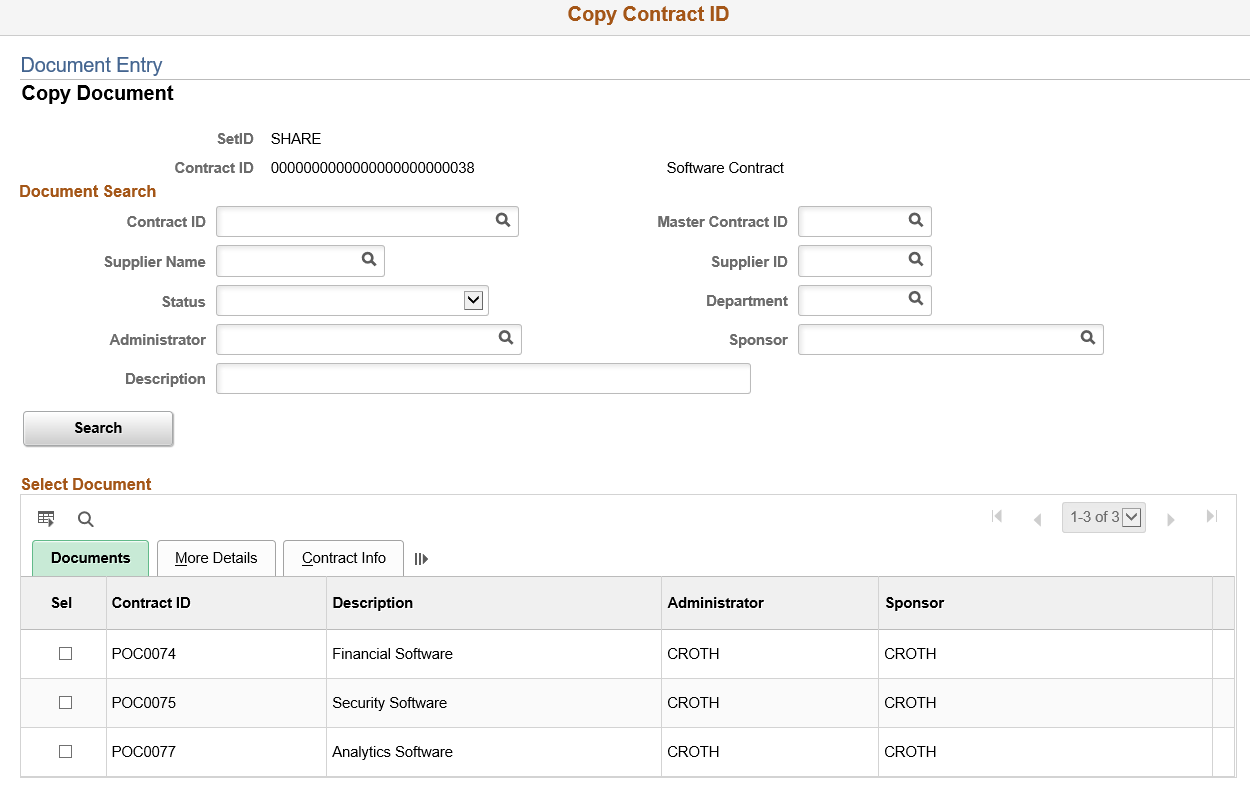
You can copy a document that is based on a different source transaction if the document type has been set up to allow copying from a different source transaction. The system determines the document combinations that can be copied by using the setting in the Applicable Sources section of the document configurator. These settings define the other source transactions documents that can be copied for documents that use the configurator.
Use the Document Search section to search for existing documents. The section fields depend on the type of document that you selected on the Add a Document page. The search criteria for ad hoc documents, is related to document attributes defined for a document.
For purchasing contracts, additional search criteria relates to contract information.
For purchase order documents, the search criteria relates to purchase order information.
For RFx documents, the search criteria relates to sourcing event information.
The Copy From Source field appears when you are using a document configurator that is defined to use with multiple transaction sources. For example, this allows you to copy a document from an ad hoc document to a purchase order contract document when both documents use the same configurator. In addition, the document type must allow copying from one source to another. However, if a section needs to be changed due to a rule change or perhaps a change to transaction data in a repeating section, then the configurator is used to rebuild that section.
When you select an option in the Copy From Source and select a value in the Supplier SetID field, the system verifies the SetID and business unit corresponding to the ID, and displays only those documents for the copy from source type in the Select Document section.
After you click the Search button, the system provides the documents that match the search criteria in the Select Document section. Select the Sel (select) check box next to the document that you want to copy. Use the Documents tab to view basic information about the documents that are retrieved in the search, and use the More Details tab to view the document's status, begin date, and expiration date. You must have security access to the document before you can copy it. The system provides a warning if the document is not in an Approved, Collaborated, Complete, Dispatched, or Executed status, and if a separate amendment exists . Only the latest version of the main contract is copied.
The system performs searches based on matching source transactions, existing authored documents, contract process options, and document types. You cannot copy imported documents unless you are copying from a sourcing event to the awarded contract or purchase order document.
Searches also include the following criteria:
The document must exist in the system.
The source transaction must be of the same type, unless you select a multiple source configurator
Documents returned in the search must match the document type unless you select a multiple source configurator.
If copying from a document with a different source transaction, then both the ‘from and to’ documents must use the same multiple source configurator.
Purchase order contracts, must match the contract process option.
Therefore, if you are searching for a particular contract and the process option does not match, that contract does not appear in the search results.
After you select the document that you want to copy, click the OK button. The Create Document page appears with information about the document that you are going to copy and the document you are going to create.
This example illustrates the fields and controls on the Create Document page from a copied document that has a Purchasing Contract document source.
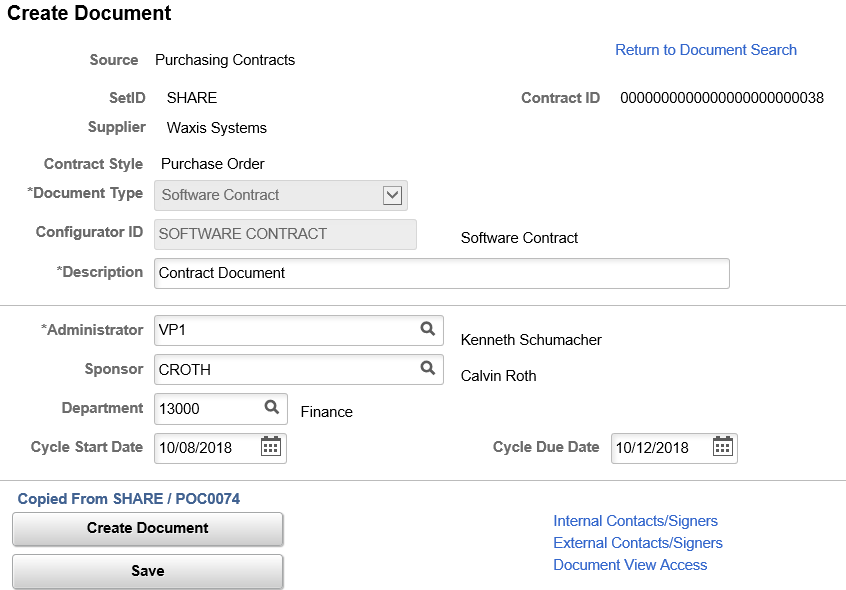
After selecting the document from which you want to copy, you cannot update the document type or configurator ID, but you can define attributes for the new document. Click the Create Document button to complete the copy process. If the document you are copying uses a wizard, the system launches the wizard when you click the Create Document button. After the system copies the document, it displays the Document Management page where you can maintain the new document.
Note: You can specify rules within a multi-source configurator to include or exclude content from the document for each source. This allows the source and target document to have different content. For content that does not change due to rules or refreshed bind information, changing edits made to the source document are preserved as much as possible in the target.
Note: The system tracks whether a contract was created using the Copy Document page and what contract was used as the source of the copied contract. This can be viewed using the Document Version History link on the Document Management page.
Use the Import Document page (CS_DOC_IMPORT) to import documents for all source transactions.
Navigation:
. Click the Import a Document button on the Add a Document page.
Using the Document Management and Contract Entry components, you can import legacy documents or contracts into the document authoring system. Legacy documents are preexisting contracts and documents that were not created in the document authoring system. For example, you can import legacy documents that are still active contracts so that you can collaborate on, approve, and include in document searches if the document format is supported for searches.
For detailed information about this page, see the Importing Documents topic, and the Import Document Page.