Managing Existing Self-Service Application Cases
This topic discusses how to manage existing self-service application cases.
Note: You can display a group box for billing information by selecting this option on the display template. This section is delivered hidden.
|
Page Name |
Definition Name |
Usage |
|---|---|---|
|
RC_CASE_SW_SS_SRCH RC_CASE_HD_SS_SRCH |
Search for cases to view more details. |
|
|
RC_CASE_SW_SS RC_CASE_HD_SS |
View case information. This page is also the starting point for several other processes: adding notes, changing contact information, requesting that an agent contact the user, searching for new solutions, and viewing solutions that are already under consideration for this case. |
|
|
RC_CASE_SW_SS_NDTL RC_CASE_HD_SS_NDTL |
View case notes and attachments. |
|
|
RC_CASE_SW_SS_NADD RC_CASE_HD_SS_NADD |
Enter a new case note and attachment. You must save the case to save the note. |
|
|
RC_CASE_SW_SS_INT RC_CASE_HD_SS_INT |
View interested parties added by the user or by an agent. The tab also displays the count of the number of interested parties on the case. |
|
|
RC_CASE_SW_SS_CLSE RC_CASE_HD_SS_CLSE |
Select or enter the reason for closing an open case. |
|
|
RC_CASE_SW_SS_ROPN RC_CASE_HD_SS_ROPN |
Select or enter the reason for reopening a closed case. Reopening a case causes all successful resolutions to be marked as failed solutions. |
|
|
RC_CASE_SW_SS_CONT RC_CASE_SW_SS_CNTC RC_CASE_HD_SS_CNTC RC_CASE_HE_SS_CSMR |
Change the contact information for a case. |
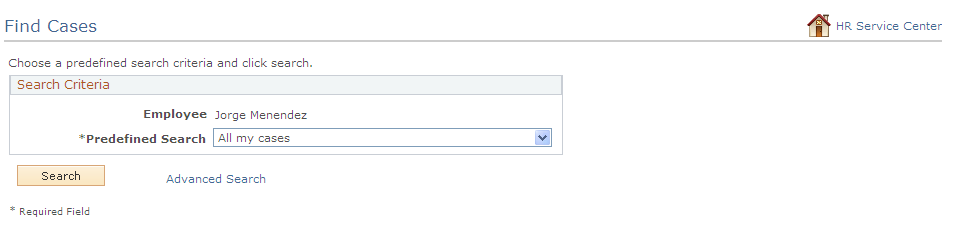
Use the Find Cases page (RC_CASE_SW_SS_SRCH or RC_CASE_HD_SS_SRCH) to search for cases to view in more detail.
Navigation
On the HR Service Center, IT Service Center, Customer Service Center, or Campus Service Center home page, click the Find Cases link on the Quick Links or My Recent Cases pagelet.
Image: Find Cases page
This example illustrates the fields and controls on the Find Cases page.
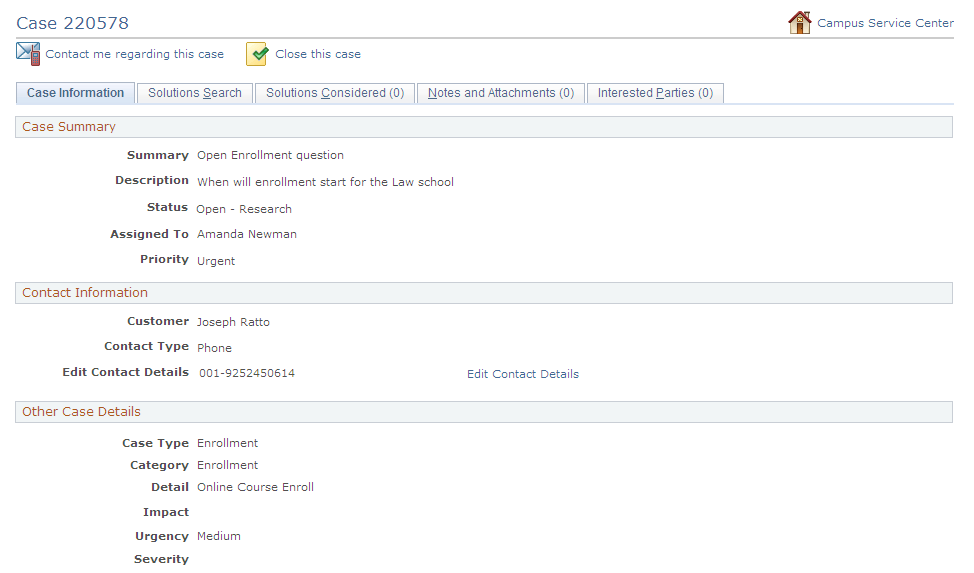
Use the Case <ID> - Case Information page (RC_CASE_SW_SS or RC_CASE_HD_SS) to view case information.
This page is also the starting point for several other processes: adding notes, changing contact information, requesting that an agent contact the user, searching for new solutions, and viewing solutions that are already under consideration for this case.
Navigation
On the HR Service Center, IT Service Center, Customer Service Center, or Campus Service Center home page, click a Link Case link on the My Recent Cases pagelet.
Select a case from the list of search results on the Find Cases page.
Image: Case <ID> - Case Information page
This example illustrates the fields and controls on the Case <ID> - Case Information page.
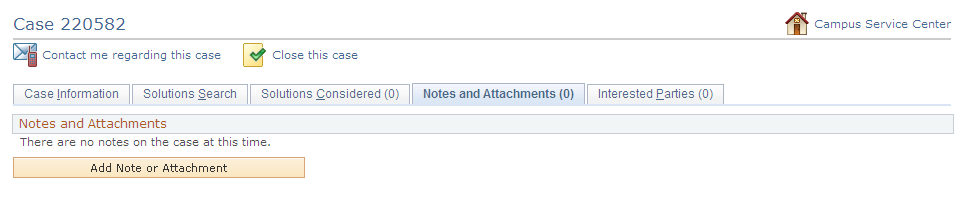
Use the Case <ID> - Notes and Attachments page (RC_CASE_SW_SS_NDTL or RC_CASE_HD_SS_NDTL) to view case notes and attachments.
Navigation
On the Case <ID> page, click the Notes and Attachments tab.
Image: Case <ID> - Notes and Attachments page
This example illustrates the fields and controls on the Case <ID> - Notes and Attachments page.
Use the Add Note and Attachment page (RC_CASE_SW_SS_NADD or RC_CASE_HD_SS_NADD) to enter a new case note and attachment.
You must save the case to save the note.
Navigation
On the Case <ID> - Notes and Attachments page, click the Add Note or Attachment button.
Image: Add Note and Attachment page
This example illustrates the fields and controls on the Add Note and Attachment page.
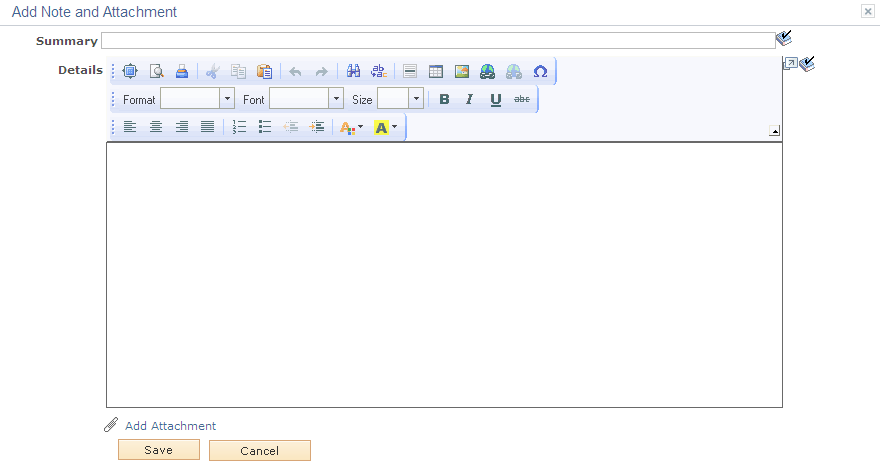
Use the fields on this page to add notes and attachments. Click the Add Attachment button to add files from your computer to the case. Click Save when you are finished.
Use the Case <ID> - Interested Parties page (RC_CASE_SW_SS_INT and RC_CASE_HD_SS_INT) to view interested parties added by the user or by an agent. The tab also displays the count of the number of interested parties on the case.
Navigation
On the Case <ID> page, click the Interested Parties tab.
Image: Case <ID> - Interested Parties page
This example illustrates the fields and controls on the Case <ID> - Interested Parties page.
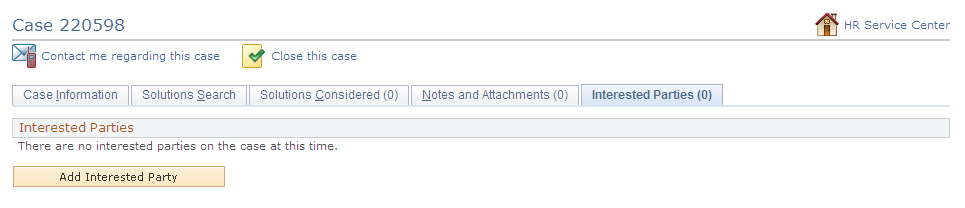
For HR Help Desk, the Case <ID> - Interested Parties page is hidden and can be displayed for self-service users by the Administrator.
|
Field or Control |
Definition |
|---|---|
| Add Interested Party |
Click the Add Interested Party button to display the Add Interested Party page. Select a Name and Reason Code, and click the Save button to add an interested party to the case. |
Use the Reason for Closing the Case page (RC_CASE_SW_SS_CLSE or RC_CASE_HD_SS_CLSE) to select or enter the reason for closing an open case.
Navigation
On the Case <ID> page, click the Close this Case button. This button is available only if the business unit rules permit self-service users to close cases.
Image: Reason for Closing the Case page
This example illustrates the fields and controls on the Reason for Closing the Case page.

|
Field or Control |
Definition |
|---|---|
| Predefined Reasons and Reason |
Select the Predefined Reasons option and then select one of the predefined reasons from the Reason drop-down list box. |
| Other Reason and Details |
Select this option and enter the reason in the Details field if you want to enter a free-form text reason. |
| Save |
When the user clicks this button, the system changes the case status to the value that is specified in the Closed Case Status field on the Case Defaults page. See Case Defaults Page. If a user selects a predefined reason from the Reason field, the system resolves the case by using the solution that is identified on the Reason and Solution Link page. If no solution is linked to the selected reason code, the system creates one (using the solution type Canned) and updates the Reason and Solution Link page accordingly. If a user entered a reason in the Details field, the system uses the text to create a new solution of type Adhoc. The solution then resolves the case using the newly created solution. |
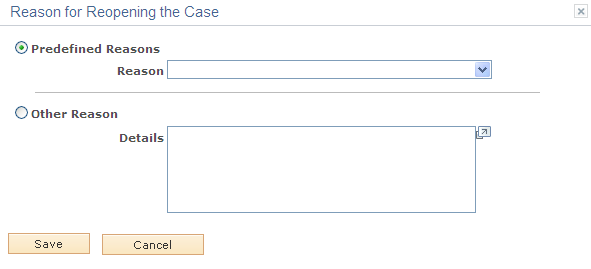
Use the Reason for Reopening the Case page (RC_CASE_SW_SS_ROPN or RC_CASE_HD_SS_ROPN) to select or enter the reason for reopening a closed case.
Reopening a case causes all successful resolutions to be marked as failed solutions.
Navigation
On the Case <ID> page, click the Reopen this Case button. This button is available only if the business unit rules permit self-service users to close cases.
Image: Reason for Reopening the Case page
This example illustrates the fields and controls on the Reason for Reopening the Case page.
|
Field or Control |
Definition |
|---|---|
| Predefined Reasonsand Reason |
Select the Predefined Reasons option and then select one of the predefined reasons from the Reason drop-down list box. The available reasons include: Problem Re-occurred, and Solution Failed. |
| Other Reason and Details |
Select this option and enter the reason in the Details field if you want to enter a free-form text reason. |
| Save |
When the user clicks this button, the system changes the case status to the value that is specified in the Reopened Case Status field on the Case Defaults page. The reason (either predefined or free-form text) becomes a resolution note. |
Use the Manage Case - Edit Contact Information page (RC_CASE_SW_SS_CONT, RC_CASE_SW_SS_CNTC, RC_CASE_HD_SS_CNTC, or RC_CASE_HE_SS_CSMR) to change the contact information for a case.
Navigation
Click the Edit Contact Details Change Contact Information button link on the Create Case page or the Case <ID> page.
Image: Manage Case - Edit Contact Information
This example illustrates the fields and controls on the Manage Case - Edit Contact Information.
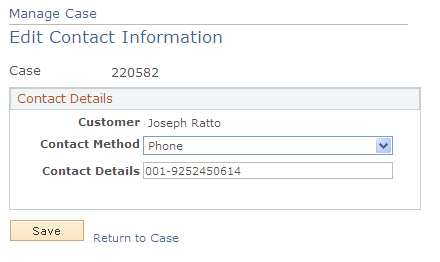
The appearance of this page varies slightly depending on whether the user is a company contact person (PeopleSoft Support), a consumer (PeopleSoft Support), or a worker (PeopleSoft HelpDesk).
You can change contact information when you are creating a new case or viewing an existing case.
On the Create Case page, the Change Contact Information button is available only until the case is submitted. After submitting the case, use the Manage Case - Edit Contact Information page to change the contact information.