Managing Related Cases
This topic provides an overview of related cases and discusses how to manage related cases.
|
Page Name |
Definition Name |
Usage |
|---|---|---|
|
RC_RELATIONSHIP |
Manage case relationships, relate cases to each other based on case relationship types that your organization has established, and view and delete existing case relationships. Your organization must define case relationship types and workflow rules for cascading statuses through related cases. |
|
|
Search Cases Page |
RC_CASE_SEARCH_SEC. |
Select a case to relate to the current case. |
|
RC_REL_TYPE_SEC |
Specify the relationship details when relating a case to an existing case. |
|
|
RC_REL_COPY |
Specify the relationship details when you create a new related case. You can also specify which information from the originating case to copy into the case that you are creating. |
Users can relate cases to each other for numerous reasons. Your organization establishes valid case relationship types on the Case Relationship Type page. Each relationship is marked as hierarchical or equivalent (non-hierarchical). Each case in a relationship has a relationship label. If the relationship is hierarchical, the parent case and the child case have separate labels. If the relationship is equivalent, only one valid label exists.
When defining hierarchical relationship types, you can select the Set Parent As Global Case option to make the system automatically designate the parent case as a global case as soon as you establish a relationship between that case and a child case.
See Setting Up Case Relationship Types and Labels.
You can easily search for similar cases from the Case page (using the Match Cases button) or from the 360-Degree View page in order to identify cases that should be related to each other.
The Case Relationships page displays a list of all cases that are related to the current case. Relationships are always reciprocal. If case A is related to case B, then the Related Cases page for both cases reflects the relationship. However, child cases of a common parent do not appear on each other's Related Cases page. Use the Related Cases page of the parent case to see all case relationships at a glance.
Similarly, two cases that are equivalent to a third case do not appear on each other's Related Cases page. That is, the fact that case A is equivalent to both case B and case C does not establish a relationship between case B and case C. To see all equivalent cases in one place, you must make the equivalent cases into children of a common parent.
You can easily choose to make the system cancel any duplicate cases that you identify by associating them with the appropriate original case using a relationship type that has been set to use the option entitled Set status of child case using duplicate case status from the Call Center Business Unit Defaults.
See Setting Up Case Relationship Types and Labels.
Your organization can also use the AAF Case Relationship action to cascade case statuses. You can write a policy to use this action to cascade statuses from a parent case to all of its child cases.
For example, this is useful if your organization establishes a global relationship type for tracking problems where a single solution (such as rebooting a server) fixes a problem for multiple people. In this situation it may make sense to automatically close all child cases when the parent case is closed. When the status cascades to children, any status-related workflow for the child case is triggered, including cascading statuses to the child case's children.
Note: The Case Relationship policy is delivered inactive in the Case Status Changed policy.
Methods for relating cases are:
Relate the current case to another existing case.
For example, you receive four calls reporting problems about your web server before you recognize that this is a global problem. The four cases that you've already created need to be related to each other. When you relate the cases, you can choose one as the parent case and make the other three into children or you can make all four of the original cases into children of a new parent case.
Create a new case and relate it to the current case.
For example, you've established a global case for your web server problem. Someone calls to report the problem. From the existing global case, you can create a new child case and copy the problem information into the new case.
Note: You can also modify the display template to enable the user to relate a case to a new or an existing case on the Case Summary page.
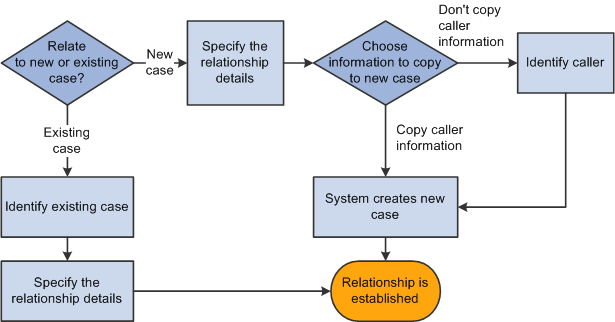
Image: Methods for relating casesprocess flowsrelating cases
This diagram illustrates the methods for relating cases, depending on whether the case in question is new or existing.
Identifying Potentially Related Cases
While reviewing or creating a case you can click the Match Cases button on any page of the case component to search for similar cases using predefined match criteria. Once similar cases are found, you can quickly relate the case to one of the similar cases, such as designating it as the related child of a global case or as a duplicate case that is to be cancelled.
See Managing Basic Case Information.
You can also view potentially related cases for a particular customer or employee by looking at the 360-Degree View. As delivered, the relevant 360-Degree views will contain a folder for global cases with the following nodes:
Related: The Related node displays the global cases for which a related case is already created for the customer or employee. If the global case is for the customer or employee whose 360-Degree View is being displayed, the case will show in the related node
Not Related. The Not Related node displays cases that are not yet related to the customer or employee but which might impact them. It lists existing global cases whose products are the same as those for the installed products of the customer or employee. It also lists global cases that are not associated with any product.
View All. The View All node lists all the global cases from the Related and Not Related nodes.
Selecting any of the nodes from the Global Cases folder will populate the related dynamic grid with information about those cases. Use this grid to see information from the list of global cases or transfer to a global case by clicking on its Case ID link.
Note: When the link of a secure global case is selected, you will not be able to access the case unless you are in the provider group assigned to that case. Similarly, for secured cases, the Summary, Product, Case Type, and Incident Location fields will display the word Secured instead of the relevant data.
When viewing the Not Related or View All dynamic grids, you can perform a related action on a global case by selecting its row on the grid and choosing the desired action from the Related Actions list. As delivered, the following two actions will be available.
Add Child Case: The Add Child Case action automatically creates a child case and links it to the selected global case. The new case will contain the customer or employee details associated with the current 360-Degree View, and the Problem and Resolution of the global case will be copied over to the new case. If the 360-Degree View has been opened for a company without a contact and the Add Child Case action is selected, you will be prompted to search and select the company contact.
Add Interested Party: The Add Interested Party action will add the contact of the customer as an interested party to the global case, and will apply the reason specified from the Reason Interested field on the Options page of the Business Unit Call Center Definition setup component. If the 360-Degree View has been opened for a company without a contact and the Add Interested Party action is selected, you will be prompted to search and select the company contact.
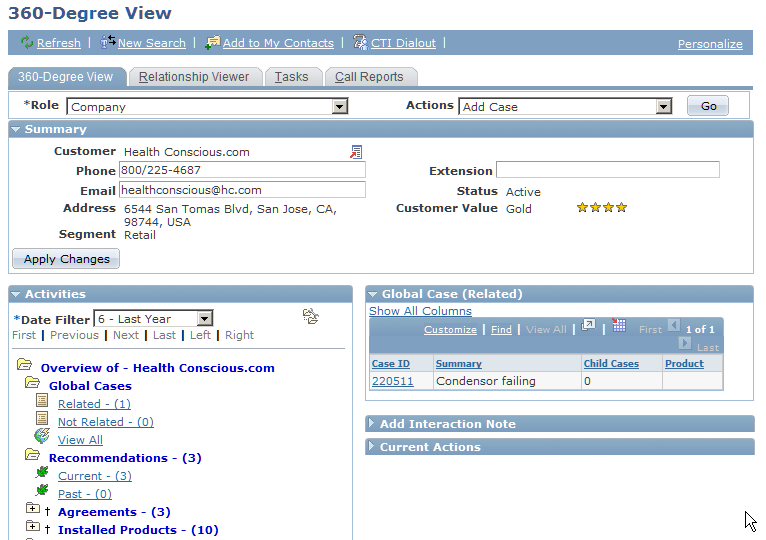
The Global Cases folder and related dynamic grid on the 360-Degree View is shown here.
Image: 360-Degree View page with Global Cases folder expanded
This example illustrates the fields and controls on the 360-Degree View page with Global Cases folder expanded.
Relating a Case to an Existing Case
To relate a case to an existing case:
On the Related Cases page, click the Relate an Existing Case button.
The Search Cases page appears.
Use the Search Cases page to identify the case that you want to associate with the current case.
Enter search criteria to help you find the case and click the Search button. The system returns a list of cases that match your criteria. To select a case, click that case in the results list. The Relate Existing Case - Relationship page appears.
If your search criteria uniquely identifies a case, the system bypasses the list of search results and displays the Relate Existing Case - Relationship page.
Use the Relate Existing Case - Relationship page to specify the relationship details.
Specify a relationship type and choose relationship labels for each of the cases. Valid relationship types are defined by your organization and are based on the business unit of the case.
Click OK.
The system establishes the relationship and saves the case. The new case relationship appears on the Related Cases page.
Another way to relate an existing case to another is to click the Match Cases button on any page of the Case component, and select the desired case to relate to the current one from among the displayed results.
Creating and Relating a New Case
To create a new case related to the current case:
On the Related Cases page, click the Create and Relate a New Case button.
The Create a New Case - Relationship page appears.
Use the Create a New Case - Relationship page to specify the relationship details.
Specify a relationship type and choose relationship labels for each case. Your organization defines valid relationship types based on the business unit of the case.
Select the information to copy from the original case to the new case.
You can copy the customer or employee information, problem information, and resolution information.
Click OK.
Customer or employee information is required for all cases. Therefore, if you choose to not copy caller information, the Create a New Case - Relations page appears so that you can identify the company-contact or the consumer-employee contact for whom you are creating and relating a case.
Note: Contact information is optional if you are creating a case for a consumer.
If you choose to copy the caller information, the system immediately creates the new case and returns you to the Related Cases page. The newly established case relationship appears in the Existing Related Cases grid. Select the case link in the Related Cases grid to transfer to the new case.
Use the Related Cases page (RC_RELATIONSHIP) to manage case relationships, relate cases to each other based on case relationship types that your organization has established, and view and delete existing case relationships.
Your organization must define case relationship types and workflow rules for cascading statuses through related cases.
Navigation
Image: Related Cases page
This example illustrates the fields and controls on the Related Cases page.
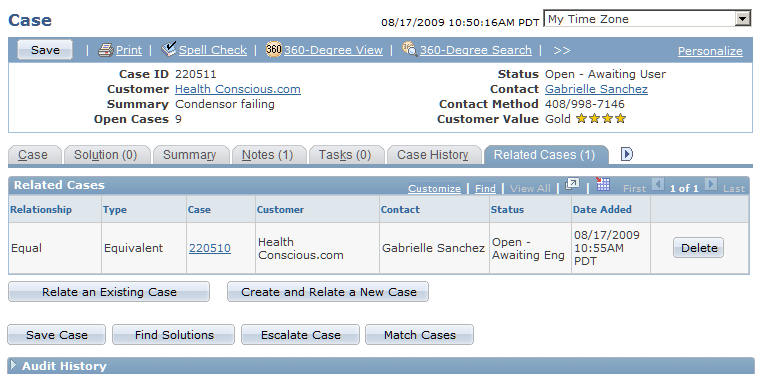
The Related Cases grid lists all existing case relationships.
|
Field or Control |
Definition |
|---|---|
| Relationship |
Describes how the current case relates to the related case. If the relationship is hierarchical, the parent case and the child case can have different values in this field. For example, one value might be Global Case and the other value might be Ticket. If the relationship is equivalent, only one label is valid. |
| Type |
The relationship type. This value is the same for both cases in the relationship. For example, if your organization established a relationship type called Global, then both the parent and child record have Global in the Type column. |
| Case |
The case number of the related case. Click the case number link to display the related case. |
| Customer and Name |
For a PeopleSoft Support case, these fields identify the customer and contact who are associated with the related case. |
| Employee and EmplID (employee ID) |
For a PeopleSoft HelpDesk case, these fields identify the employee who is associated with the related case. |
| Status |
The status of the related case. The system gets this information from the Case Status field for the case. |
| Date Added |
The date and time that the relationship was established. |
| Delete |
Click to delete the case relationship. Clicking this button does not delete either case, only the relationship. |
Creating New Case Relationships
|
Field or Control |
Definition |
|---|---|
| Relate an Existing Case |
Click to display the Relate Existing Case - Search page, where you identify an existing case to relate to the current case. After you identify the case, the system displays the Relate Existing Case - Relationship page, where you establish the relationship between the cases. |
| Create and Relate a New Case |
Click to display the Create a New Case - Relationship page, where you can choose the information to be copied to the new case and establish the relationship between the cases. |
Use the Relate Existing Case - Relationship page (RC_REL_TYPE_SEC) to specify the relationship details when relating a case to an existing case.
Navigation
Select the case on the Relate Existing Case - Search page.
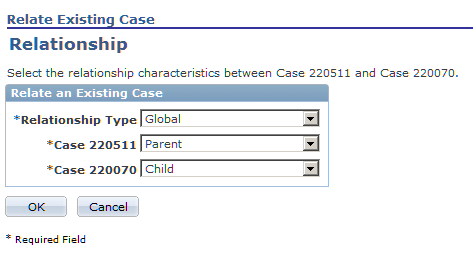
Image: Relate Existing Case - Relationship page
This example illustrates the fields and controls on the Relate Existing Case - Relationship page.
|
Field or Control |
Definition |
|---|---|
| Relationship Type |
Specify a relationship type. Relationship types can be either hierarchical (parent-child) or nonhierarchical. Your organization defines values that are based on the business unit of the case. |
| Case (current case number) and Case (related case number) |
Select relationship labels for the current case and the case that you're relating to it. If the relationship is hierarchical, one valid label exists for the parent case and one valid label exists for the child case. Match the cases to the appropriate labels to establish the desired parent-child relationship. If the relationship is not hierarchical, only one valid label exists. Select that label for both cases. |
Use the Create a New Case - Relationship page (RC_REL_COPY) to specify the relationship details when you create a new related case.
You can also specify which information from the originating case to copy into the case that you are creating.
Navigation
Click the Create and Relate a New Case button on the Related Cases page.
Image: Create a New Case - Relationship page
This example illustrates the fields and controls on the Create a New Case - Relationship page.
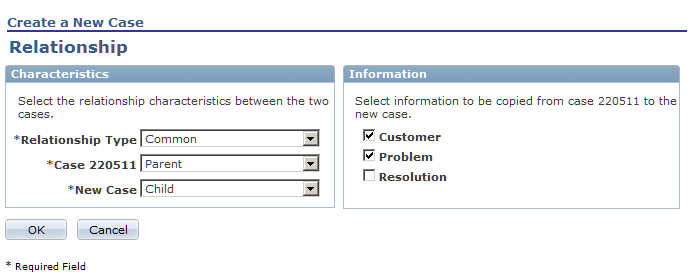
Characteristics
|
Field or Control |
Definition |
|---|---|
| Relationship Type |
Specify a relationship type. Relationship types can be either hierarchical (parent-child) or nonhierarchical. Values are defined by your organization and are based on the business unit of the case. |
| Case (current case number) and New Case |
Select relationship labels for both the current case and the new case that you're creating. If the relationship is hierarchical, one valid label exists for the parent case and one valid label exists for the child case. Match the cases to the appropriate labels to establish the desired parent-child relationship. If the relationship is not hierarchical, only one valid label exists. Select that label for both cases. |
Information
The system always copies the business unit to the new case. You choose which other information to copy to the new case.
|
Field or Control |
Definition |
|---|---|
| Customer |
In PeopleSoft Support, select this check box to copy the caller from the originating case to the new case. The system copies the customer, contact, site, PIN (person identification number), SIN (site identification number), contact method, and contact details. |
| Employee |
For PeopleSoft HelpDesk applications, select this check box to copy the caller from the originating case to the new case. The system copies the employee number, employee name, phone type, email address type, contact method, contact details, and alternate contact. |
| Problem |
Select to copy problem information from the originating case to the new case. The system copies the problem summary, description, case status, case type, source, priority, severity, impact, error code, error message, resolved on first contact, closed date and time, provider group, assignee, product, problem type, serial number, asset tag, and category, type, and detail information. If you do not copy problem information, the summary for the newly created case identifies the originating case. Note: If you don't copy caller information to the new case, then the product, serial number, and asset tag that are copied might not be valid for the caller that you identify. In this situation, modify the values before saving the case. |
| Resolution |
Select this check box to copy resolution information from the originating case to the new case. The system copies all attempted resolutions and their statuses, but not the resolution notes. |
| OK |
Click this button to create the new case, establish the relationship between the two cases, and return to the Related Cases page. If you are not copying caller information, the system prompts you to identify the caller for the new case before the case is created. |
| Cancel |
Click this button to return to the Related Cases page without establishing the relationship. |