Managing Basic Case Information
This topic discusses how to manage basic case information.
Note: The information that is available on the Case page is conditional and is based on the template that you or your implementation team have assigned to the business unit.
|
Page Name |
Definition Name |
Usage |
|---|---|---|
|
RC_CASE |
Add and manage PeopleSoft Support, HelpDesk, HelpDesk for Human Resources, and Service Center for Higher Education cases. You can also access the Case page in PeopleSoft Support, HelpDesk, HelpDesk for Human Resources, and Service Center for Higher Education from the 360-Degree View page by selecting Add Case from the Actions drop-down list box. |
|
|
RC_MATCH_RSLT_SEC |
View a list of matching cases based on the Case Match Definition. Where appropriate, select a related case from the match results set. When selected, the case will appear in the Related Cases grid. |
|
|
RB_EM_OB_NOTIFY |
Send a manual notification. If you have purchased PeopleSoft ERMS, you can use the Notification button on the toolbar to compose new email messages using the Outbound Notification component or respond to existing email using Email Workspace. The system automatically populates the contact and interested parties of the case in the recipient list on the Outbound Notification page. |
|
|
RF_INSTPROD_VH_SEC |
View the installed products that meet the criteria available on the Case page. For the installed products that the system returns, the page displays parent, child, and sibling relationships to other installed products. |
|
|
RF_ENTL_LIST_SEC |
Select from a list of warranties or agreement lines that may cover the case. |
|
|
RF_VIEW_ENTL_SEC |
View the entitlements associated with a case. This link is available after an agent selects an agreement line or a warranty. |
|
|
RF_ASSIGN_PG_SEC |
Select a provider group from the search result that can be assigned to the case. Groups are ranked by their fit score, an evaluation of how well each group matched the case criteria. |
|
|
RF_ASSIGN_LIST_SEC |
Select a worker from the search result that can be assigned to the case. Candidates are ranked by their fit score, an evaluation of how well each candidate matched the case criteria. |
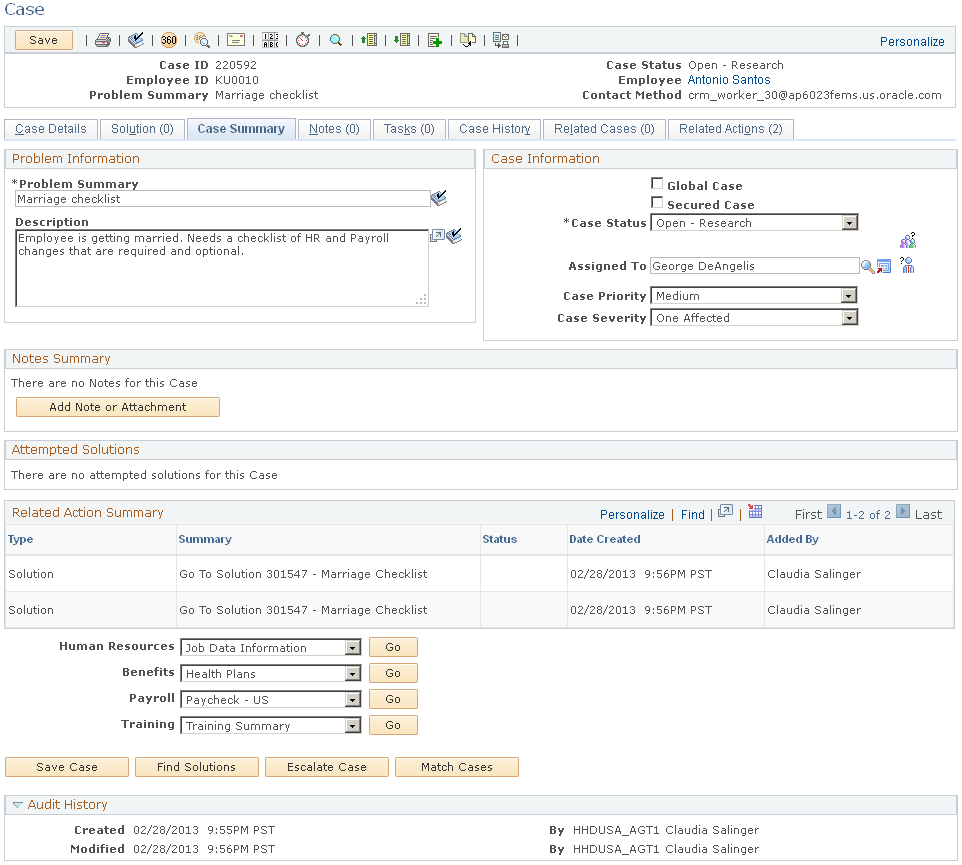
Use the Case page (RC_CASE) to add and manage PeopleSoft Support, HelpDesk, HelpDesk for Human Resources, and Service Center for Higher Education cases.
You can also access the Case page in PeopleSoft Support, HelpDesk, HelpDesk for Human Resources, and Service Center for Higher Education from the 360-Degree View page by selecting Add Case from the Actions drop-down list box.
Navigation
Image: Case Page
This example illustrates the fields and controls on the Case Page.
Customer Information
In PeopleSoft Support cases, this group box displays information about the customer who reported the problem. In HelpDesk and HelpDesk for Human Resources cases, this group box displays employee information. In Service Center for Higher Education, this group box displays a combination of these types of information, since such a case can be created for a company contact, consumer, or employee.
Select the Show Details link to see more information about the customer.
Note: The visibility of fields in this section depends on the Business Object Search setup, the display template that is used, and how you modify the display template.
These fields are used by PeopleSoft Support:
|
Field or Control |
Definition |
|---|---|
| Customer |
Displays the customer (company or consumer) who reported the case. |
| Contact |
Displays the contact person for this case. If the customer is a company, this is a person acting on the company's behalf. If the customer is a consumer, this is someone acting on the consumer's behalf. Note: The contact must have a currently active relationship with the company to be valid. If a consumer does not have a contact, this field is blank on the Case page. However, the search results grid on the Case Search page shows the consumer name in both the customer and contact columns. |
| Contact Method and Edit |
Click Edit to enter the preferred method for contacting the caller. |
| Reported By |
Select the person who is reporting the problem. |
| Site |
Displays the customer site that is associated with the case. Initially, the system uses the contact's site (for this customer) as the default value. If this site doesn't exist or isn't unique, the system uses the customer's site (if unique) as the default value. The site is validated against the SIN and the Installed Product fields for the case. If you select a SIN or a product, the system enters the site that is associated with that SIN or product. If you select a site for which the current SIN or product is invalid, the system clears the SIN or product information. |
| SIN (site identification number) |
Displays the site identification number (SIN), which is generated for each valid site on an agreement line when the agreement line is created. The SIN identifies the agreement line, the site, and the customer, but not the contact. If you enter a SIN, you cannot also enter a PIN (personal identification number). When you select a SIN, the system enters the associated site in the Site field. If the product is not valid for the SIN, the system clears the Product field. |
| PIN (personal identification number) |
Enter a PIN to identify a customer, a representative, and an agreement. |
| Region |
Displays the region that is associated with the default address. |
| Customer Reference |
Enter the reference number provided by the customer, if available. This number is used for the customer's internal tracking purposes. |
Employee Information
Access the Employee Information section on the Case page in PeopleSoft HelpDesk for Human Resources.
In PeopleSoft HelpDesk cases, the Employee Information group box displays information about the employee who reported the problem.
If you enter information in this section to look up an employee for the case but the system cannot identify an exact match, a search page appears and you can select to create either worker or POI using the quick create function. If the search yields multiple matches, you can pick one from the search results or create a new one if deemed necessary.
Note: The visibility of the fields in this section is dependent on the display template that is used and how you modify the display template. If an agent has access to view secured data, the system displays information for the Contact Method, Edit, Phone, Email, Address, Status, and Gender fields. Secured worker information is home phone number, home email address, and home address. If the agent does not have access to view secured data, the system hides the data for these fields and the agent can only view data that is not secured.
These fields are used by PeopleSoft HelpDesk and HelpDesk for Human Resources:
|
Field or Control |
Definition |
|---|---|
| Employee |
Displays the worker who is experiencing the problem. Click the name of the person to go to the Worker page, where you can change or add address, phone, and email details for the contact. Note: When you search for an employee, you can use the Employee ID, First Name, and Last Name as search fields. The Employee ID field uses the equals (=) operator. The other two fields use the Begins With operator. The operators are not displayed, so they aren't obvious to the user. You can, however, configure and change the default operator. See Adding and Modifying BO Search and Quick Create Definitions. |
| National ID |
Displays the ID number by which a person is identified nationally. In the U.S., it is the social security number. This field appears in PeopleSoft HelpDesk for Human Resources cases only. |
| Alternate Contact |
Select an alternate contact for a case; for example, an office manager who handles calls for other employees. |
| Contact Method and Edit |
Click Edit to enter the preferred method for contacting the caller. |
| Reported By |
Select the person who is reporting the problem. In cases that are crated for Higher Education, any individual may be selected for the Reported By field. In HelpDesk applications, existing agent-facing cases display the manager or employee who reported the problem and the employee name for whom the case was opened in the Employee field. In the case of the HR for HelpDesk application, you can also select POIs to report cases on behalf of employees. For example, a wife can log a case to ask about her husband’s benefits plan coverage. If the search doesn’t return the desired reported by person, you can create a new worker or POI on the search page using the quick create functionality. |
| Department, Location, Address, and Employee Status |
Displays information about the worker who is experiencing the problem. Note: In the HelpDesk for Human Resources application, the Department and Location fields are display-only. You cannot change the values that the system displays in these fields. In the HelpDesk application, which is customized for IT departments, you can edit the values in the Department and Location fields. The system provides values for the Department and Location fields by default based on the worker information, provided the setID specified for these fields in the worker component matches the setID specified for the appropriate record group for the Case business unit. |
| Gender |
Displays the person's gender, if known. This field appears in PeopleSoft HelpDesk for Human Resources cases only. |
Contact Method
Click the Edit link to edit a person's preferred method of contact. A secondary page appears.
|
Field or Control |
Definition |
|---|---|
| Contact Type |
Select the address, email, or phone number that you want to use on the Case page. To enter additional contact information that is not in the system, use the drop-down list box. For example, suppose that you need to contact the caller at a hotel phone number. You can enter the phone number here and avoid adding the hotel phone number to the caller's permanent record. |
| Contact Details |
Enter contact information for the contact. |
| Type |
Displays the contact type for existing contact methods associated with this person. If adding a temporary new contact method, the field value defaults to For This Case Only. |
Note that any emails initiated from a case by AAF will use the contact method associated with the recipient's role, regardless of whether the case has an email contact method with the type For This Case Only.
Academic Information Section
Access the Academic Information section on the Case page in PeopleSoft Service Center for Higher Education.
After identifying a constituent for a case in PeopleSoft Service Center for Higher Education, an agent will be able to view a display-only summary of the constituent's academic information.
|
Field or Control |
Definition |
|---|---|
| Institution |
The academic institution associated with constituent. |
| Career |
The academic career of the constituent. |
| Lifecycle Status |
The program status ( not including recruiting status) of the constituent. If the constituent is only a suspect or prospect, this field and the other fields below it will be blank. |
| Start Date |
The start date for the specified combination of institution, career, program, and plan. |
| Program |
The academic program associated with the constituent. |
| Plan |
The plan within the specified program with which the constituent is associated. |
| Sub Plan |
The sub plan within the specified program and plan with which the constituent is associated. |
Main
|
Field or Control |
Definition |
|---|---|
| Global Case |
Select this check box to identify the case as a Global Case. |
| Quick Code |
Select a quick code. Depending on your business rules, the quick code you select automatically populates other fields or suggests an action. If the quick code is associated with a display template ID, selecting that quick code will cause the case component to be shown using the associated display template ID. Note: Cases retain the display template ID with which they were originally created. Therefore subsequent views of the case will be shown using the original display template for that case, not the display template associated with the quick code. |
| Case Type |
Select the case type that best describes the part of your organization that is responsible for the problem. For example, a case can be a documentation issue, a service request, or a possible product defect. |
| Case Subtype |
Select the case subtype that best describes the kind of case type selected. |
| Case Status |
Select the overall status of the case. Use the different statuses to track the progression of the case. You define specific statuses for your organization. |
| Provider Group |
Select the provider group to which you want to assign the case. For new cases, the default provider group (if any) depends on your business unit configuration. When a Product Group is specified on a case, the system filters the values for product and installed product to only display the products and installed products contained within the specified product group. See Understanding Call Center Business Unitsand Understanding Display Templates. |
 |
Click the Suggest a Provider Group button to generate a list of suggested provider groups on the Provider Group Summary page. Select one of the suggested provider groups. |
| Assigned To |
Select an agent who belongs to the selected provider group. For new cases, the default assignee depends on your business unit configuration. You cannot select an agent without first selecting a provider group. The only time that a case is assigned to an agent and not a provider group is when the default assignee is the agent who created the case. |
 |
Click the Suggest an Agent button to generate a ranked list of qualified, available agents on the Candidate List page, where you can select one of the suggested agents. You must select a provider group before you can generate a candidate list. |
| Product Group |
Select the product group that requires support. This field is enabled when you first install your PeopleSoft Support application. It is applicable for all the verticals except HelpDesk for Human Resources and Government. |
| Product |
Select the product that requires support. Note: The system displays a list of products based on the option that you selected for the Product Prompt field on the Business Unit - Options page. If you selected All, you can select a product from the master products table. If you selected FSI and you have FSI installed, you can select an FSI-related product from the master FSI products table. If you selected Installed, you can select from a list of products that are installed at a specific site. When you select an installed product, the system enters the associated site in the Site field, and, if the current SIN is not valid for the product, clears the SIN field. To define a new installed product for this customer, click the Transfer button to access the Installed Products component. |
| Description |
Enter a complete description of the problem that the caller is reporting. If you do not enter a description, the system copies the value of the Summary field into this field. |
| Problem Type |
Select an aspect of the product for which a call center agent might be qualified to resolve the problem. This field is related to the Product field. You must first select a product before the system displays problem type values that you can select. If the Product field is blank, no values are available. If you use the system's auto-assignment feature, the assignment engine employs the competencies associated with the problem type to help identify the agents who are most qualified to solve the problem. |
| Serial Number |
Enter the serial number of the product that requires support or servicing. If you have selected a product, the system enters the serial number for that product. If you have not selected a product, selecting a serial number enters both the product and the serial number. If you enter a serial number directly into the Serial Number field when you first access the Case page for PeopleSoft Support and HelpDesk, the system automatically populates the Customer, Contact, Site, and Product fields on the Case page. |
| Asset Tag |
Click to display the Search Installed Assets page, where you can look for installed assets by employee, department, and location. To display this field on the Case page, access the Display Template page to select the check box for the Asset Tag field. |
| Installed |
If the product that you select is registered to the employee, consumer, or customer on the Installed Products page, it displays here (PeopleSoft Support and HelpDesk only). |
| Select Agreement or Warranty |
Click to search for warranties and agreement lines that might cover the case. This link is available only for open cases that are not already associated with existing agreements or warranties. Warranties are associated with installed products and are, therefore, found only in the PeopleSoft Support application and only if you've specified an installed product with a valid warranty. If the entitlement search returns more than one match, the system displays the results on the Entitlement Match page. From there, you can select a warranty or agreement line, view warranty or agreement line details, and associate a warranty or agreement line with the case. The system returns agreement lines as search results in entitlement searches for either a product or an installed product. The search attempts to locate either a product or an installed product on the agreement line that matches the product or installed product on the case. A warranty is returned in an entitlement search only if an installed product is supplied. If the entitlement search finds only one valid warranty or agreement line, the system bypasses the Entitlement Match page and displays the warranty or agreement line that was found on the case. Once you have selected an agreement line or warranty and saved the case, the system replaces this link with a link to access entitlement details of the selected agreement line or warranty, and a link to clear the current selection on the Case page. In addition, values of these fields are no longer available for edits:
Note: Once the page is saved, you can't modify an agreement line without special administrative-level permission. If you modify the entitlements of an agreement after the agreement is already selected on the case, the new entitlements don't take effect. The PeopleSoft system provides an Application Engine program (RF_AGR_LEAD) to verify the entitlements that are already scheduled at the time the agreement is selected. Select |
| Credit Authorization |
This link initiates a search of the customer's billing records for a flag indicating whether to accept the customer's payment by credit card. |
| Priority |
Select the priority that classifies the case according to its effect on the caller's ability to continue operations. A problem that stops mission-critical activities has a higher priority than a problem that has a workaround or that inconveniences someone. |
| Urgency |
Select the urgency of the case. As delivered, this field is visible on HelpDesk (but not Support) cases, though this may be changed by your system administrator. |
| Severity |
Select the severity of the case according to its reproducibility. |
| View Product Hierarchy |
Click the View Product Hierarchy button to view the installed product records that meet the caller and product criteria already entered on the Case page. The system displays the parent, child, and sibling relationships for the selected installed product records on the Installed Product Viewable Hierarchy page. In PeopleSoft Support cases, the search is based on the customer, site, product, and serial number that have been entered. In PeopleSoft HelpDesk cases, the search is based on the worker, department, product, and asset tag that have been entered. |
More
|
Field or Control |
Definition |
|---|---|
| View Mode |
Use this field to manually change the display template that controls the appearance of the information that appears on the page. Note: This field is delivered as hidden. If you want it to appear on the page, you must select it on the Display Template - Page Definition page. When you change a display template (using AAF or manually) the system re-renders the entire page, including the toolbar, related actions, and various group boxes that appear on the pages within the Case component. The View Mode field displays all the display templates for the component, display template family, and selected business unit. The system obtains the list of display templates from the Call Center Definition - Display Templates page. When an agent changes the business unit on the Case page, the system repopulates the display template values that appear in the drop-down list box for the View Mode field. Warning! The display template that an agent selects using the View Mode field is temporary. This information is not stored in the Case record. Therefore, if an agent selects a display template that is not the default display template and then saves the case and comes back to it, the system displays the Case page with the default display template, not the one that the agent last used to view the case. |
| Business Unit |
Displays the business unit that is associated with the case. Business units also control prompting for many other fields in the case. The system displays values that are valid for the business unit only. When you change the business unit, the values in this field are those for which the appropriate vertical (PeopleSoft Support or HelpDesk) is established. The system confirms that these conditions are met before the case is transferred to the business unit that you select:
|
| Visibility |
Select the visibility of the case. The options are Internal, External,and Internal, exclude Case Contact. Select the Internal, exclude Case Contactoption to prevent self-service users from viewing the case through the self-service application. |
| Resolved by First Contact |
Select to indicate that the agent resolved the case on the first contact with the customer or employee. |
| Source |
Select the communication channel used by the person who originally reported the problem. For example, a person can report a case by telephone, email, or a self-service web page. A case can also be created as a result of a personal data record change in the HCM system. |
| Impact |
Select from the drop-down list box a value that describes the effect that the problem has on the business processes of the organization. |
| Asset Tag |
Select the asset tag of the installed product that requires support in PeopleSoft HelpDesk. If you entered a product, values are limited to asset tags for the specified product. If you have not entered a product, selecting an asset tag enters both the product and the asset tag. |
| Installed |
Displays Yes or No in PeopleSoft Support and HelpDesk if the product that you select is registered to the employee, consumer, or customer on the Installed Products page. |
| Summary |
Enter a summary of the problem that the caller is reporting. This field is required. If you do not enter a value, the system uses the first 80 characters of the Description field as the summary. This shortcut helps you avoid retyping the same text into two fields. |
| Category, Specialty Type, and Details |
Select category, specialty type, and details for the case. These are hierarchical fields. The category value that you enter limits the specialty type values, and the specialty type value that you enter limits the details values. Note: These fields can be set up to drive the case assignment process. |
Additional Fields in the Case Information Section
Use the display template to control the visibility of these fields. You can choose whether these fields appear on the Main tab or the More tab.
Note: The system updates the response met and restore met dates and times for all cases, even if the case does not have an associated agreement with an entitlement.
See Configuring Display Templates for Components.
|
Field or Control |
Definition |
|---|---|
| Secured Case |
Select to indicate to the system that the case should only be viewed by individuals associated with the provider group on the case. When you mark a case as secured, you must enter a provider group before you can save the case. Once you secure the case, it is associated with the provider group. Only agents belonging to the provider group can access the case. If the agent who created the case is not a member of the provider group, that agent will not have access to the secured case. |
| Anonymous Caller |
Select if the caller wants to remain anonymous. No personal information is recorded, and no personal information is required to save the case. If the caller wants to register, clear the Anonymous check box and search for existing customers or use the Quick Create function to create a new customer. Note: The Anonymous Caller option requires that an anonymous customer or worker is already set up using the installation options. See Creating Business Objects by Using the Quick Create Component. |
| Site without Customer |
Select to enable cases to be created for specific sites without a customer. This check box is displayed after the Customer Information is selected. If you plan to use this option, first set up an anonymous customer, since the system assigns the anonymous customer when this option is selected. |
| Remote Case/Issue ID |
The unique keys of the case in the third-party system from which the case was passed to PeopleSoft Call Center applications. This option is used to map the case created in CRM to its counterpart stored in a third-party system. |
| Purchased From |
Enter the name of the vendor from whom the customer acquired the product or service that is referenced in the case. |
| Target Close Date |
Enter the desired date of resolution for the problem. |
| Error Code and Error Message |
Error codes are relevant for business units that support products that can display error messages, products such as software or electronics. If you enable error code processing, users can access a list of frequently used solutions based on the error code or error message entered for the case. Enter any error code and error message that the caller reports. To fill in the message associated with the error code, click the Validate button. If the error code has not been used before, the system displays the Error Validation page. You can then use this page to search for or create new error codes and messages. By entering error information, you enable the Frequently Used Solutions page to list frequently used solutions according to the error. The system does not restrict you from prompting against known errors. |
| Response Met |
Displays the date and time that the problem was fixed or the service was restored. |
| Restore Met |
Displays the date and time the agent or service person restored service or fixed the problem with the product. |
| Entitled Response |
Displays the date and time that the customer or employee is entitled to a response after they call in a problem. |
| Actual Response |
Displays the date and time that the agent or service person actually responded to the caller's problem. |
| Entitled Restore |
Displays the date and time that the caller is entitled to have their problem or service restored. |
| Red Restore and Yellow Restore |
Displays the date and time that the problem or service will turn red or yellow if it is not restored. These fields are used in conjunction with agreements. To use these fields, you must enter a percent in the Percent of SLA for Red and Percent of SLA for Yellow fields on the Business Unit-Options page. |
| Actual Restore |
Displays the date and time that the service or problem was actually fixed or restored. |
| Survey Score |
Displays the score generated by the survey that was sent to the customer. This field does not appear on the page unless you enable it using the Display Template - Page Definition page. You must also sign in as a user that has permission to view this field; otherwise it does not appear on the page. The Survey Score field uses the RC_VIEW_SURVEY _SCORE functional option code, the RC_VIEW_SURVEY _SCORE _GROUP functional option group code, and the Case Survey Score application security profile to enforce security. The PeopleSoft system delivers the functional option code for the Survey Score field on the Display Template - Page Definition page. It also delivers the Case Survey Score membership list, which is where you can control what roles or users are permitted to view the Survey Score once it is enabled on the Display Template - Page Definition page. For this membership list, the PeopleSoft system delivers the Call Center Manager and Help Desk Manager roles. Note: The Survey email is sent to Customer's primary email address. If the customer is a consumer, then the survey email is sent to the consumer's primary email address. If the customer is a company, then the survey email is sent to the contact's primary email address. On the Case page, an agent can edit the Contact Method field to enter an email with the For This Case Only type, which can be different from the customer's primary email. In that scenario, the survey email is still sent to customer's primary email address and not to the email address with the For This Case Only type. Using AAF policies, you can instruct the system to send out a survey when a case is in the Closed - Resolved status. In this type of policy setup, administrators can specify who to notify if an error occurs while sending out a survey. The two options are: Notify a Role and Notify a User. If the notify role option is selected and an error occurs, then all users having the specified role receive an email notification. If the user option is selected, then only that user will receive the email about the error. |
| Escalation Date Time and Escalation Count |
These fields display the date and time an escalation was initiated and the number of times the case was escalated. These fields are hidden when you first install your call center applications. |
See Configuring Display Templates for Components.
See Understanding Assignment Options.
Enter information about the case in the following fields:
Actions
Access the Actions section on the Case page.
The Action Link Groups that you or your implementation team set up during installation appear in the Related Actions group box on the Case page. You can set up links in the Related Actions drop-down list box to create service orders and defects and to look for offers and promotions.
When the system loads the items in the Related Actions drop-down list box, it checks to see if the link definition is setID enabled. If it is, then the setID of the link definition is matched with the setID of the case, which is obtained from Case business unit. If the two setIDs do not match, then the system does not populate that link definition in the drop-down list box. When the Case page is loaded and the user changes the business unit, the system reloads the items in the Actions drop-down list box.
In PeopleSoft HelpDesk for Human Resources, you can link to pages in the PeopleSoft or E-Business HCM database (depending on which one your system is integrated with).
In PeopleSoft Service Center for Higher Education, you can link to pages in the PeopleSoft Campus Solutions application.
PeopleSoft Support, HelpDesk, and Service Center for Higher Education applications offer the capability to link to predefined actions from the Case page. You can execute actions on the Actions section of the Case Page, the Summary page, or the Related Actions page.
Note that in Service Center for Higher Education, some listed actions may not be applicable for all roles (constituent, company contact, or worker). If an action is attempted for someone who does not have a role that permits that action, an error message will be displayed to inform the user that the action is not available.
The PeopleSoft system delivers these predefined actions:
Asset Administrator
Asset Summary
Branch Script
Business Project
Case Survey
Change Request - Create New
Change Request - Relate
Create RMA
Defect - Create New
Defect - Relate Existing
Offer History
Sales Lead
Sales Order
Service Order
Remote Control
Software Delivery
Work Order - Create New
Note: To create a related action to the Offer Presentation page in PeopleSoft Order Capture, you must set up the link using the Link Group pages. To display the Get Offers or Promotions icon, you must set it up using an AAF policy.
See Understanding AAF.
Suggest Action
The system automatically displays a suggested action that the agent can perform. This suggestion is driven by policies that you set up in AAF.
Links
The system displays a category name (for example, Human Resources, Benefits, Related Actions) for specific links in a category and a Go button.
Depending on the security established for the links that are set up as content references (CREFs), an agent can view all links or a subset of the links. Note that only permission list security definitions from the content reference will be used for determining link visibility. If the user does not have access to any links in a category, the category does not appear.
|
Field or Control |
Definition |
|---|---|
| Go |
Click this button after selecting a link in a category to access the corresponding component (specified as a link). When you click Go, the system:
Note: The PeopleSoft system includes links to Base Benefits and Benefits Administration enrollment functionality in PeopleSoft Capital Management (PeopleSoft HCM). Enrollment in medical and FSA (flexible spending accounts) plans under the COBRA (Consolidated Omnibus Budget Reconciliation Act) provisions is carried out in a different manner within PeopleSoft HCM. To access the enrollment pages for medical and FSA plans under COBRA, log on directly to your PeopleSoft HCM system. |
See PeopleSoft HCM: Application Fundamentals.
See PeopleSoft HCM: Benefits Administration.
Access the Case page.
Use the Escalate Case button to send notifications to agents and managers. If you have associated an AAF trigger point with the button, the system displays a message when a user clicks the Escalate Case button.
Note: The PeopleSoft system does not deliver the Escalate Case button with any associated trigger points. You must use the functionality within AAF to activate this button before you implement your PeopleSoft call center applications.
When the user clicks OK, the system increments the escalation count, saves the escalation date and time, saves the case, and sets off one of these trigger points in AAF:
When a Support Case is Escalated
When a Help Desk Case is Escalated
See Understanding AAF.
Use the Match Results page (RC_MATCH_RSLT_SEC) to view a list of matching cases based on the Case Match Definition.
Where appropriate, select a related case from the match results set. When selected, the case will appear in the Related Cases grid.
Navigation
Click the Match Cases button on the Case, Solution, Summary, Notes, Tasks, Case History, Related Actions, Related Cases, or Interested Parties page.
Image: Match Results page
This example illustrates the fields and controls on the Match Results page.
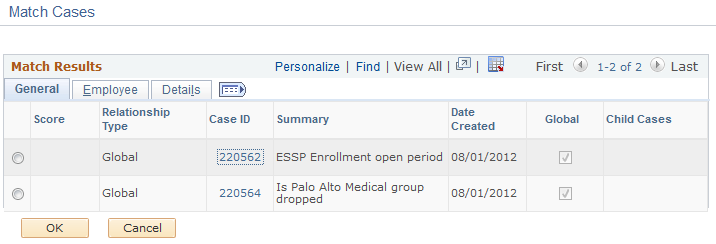
The Match Cases page enables you to see any existing cases that match the current case. This lets you see if the current issue has already been recorded in another case. Any cases that match the current case will be displayed.
|
Field or Control |
Definition |
|---|---|
| Score |
Displays a rating between 1 and 100 that represents how closely the entry matches the search criteria. This field is only displayed if keyword searching is enabled. Note: Keyword searching is enabled or disabled on the Match Detail page. |
| Relationship Type |
Describes the type of relationship that will apply if you associate the case from this grid row with the current case. |
| Case ID |
Identifies cases which match the current case. Note: Case matching criteria are defined on the Match Detail page. |
| OK button |
Click this button to associate the current case with the case on the selected grid row. The two cases will be associated with the relationship indicated on the selected grid row. Note that the system will also automatically make the following updates:
|
Note: If no existing cases meet the match criteria, the Match Results page will be displayed with a message indicating that no matches were found.
If case matching is not enabled for the business unit of the current case, the Match Results page will be displayed with a message indicating that no match criteria have been defined for this business unit.
Use the Outbound Notification page (RB_EM_OB_NOTIFY) to send a manual notification.
If you have purchased PeopleSoft ERMS, you can use the Notification button on the toolbar to compose new email messages using the Outbound Notification component or respond to existing email using Email Workspace.
The system automatically populates the contact and interested parties of the case in the recipient list on the Outbound Notification page.
Navigation
Click the Notification button or Set Reminder button on the Case page or any page with the case toolbar.
The Outbound Notification page behaves slightly different if the Set Reminder toolbar button is clicked to access the page as opposed to the Notification button:
The Send and Send and Solve Case toolbar buttons are unavailable.
The system makes the sender of the notification the TO recipient of the notification.
Use the Installed Product Viewable Hierarchy page (RF_INSTPROD_VH_SEC) to view the installed products that meet the criteria available on the Case page.
For the installed products that the system returns, the page displays parent, child, and sibling relationships to other installed products.
Navigation
Click the View Product Hierarchy button on the Information section of the Case page.
For more information about viewing the installed product hierarchy, see Understanding Installed Products.
Use the Entitlement Match page (RF_ENTL_LIST_SEC) to select from a list of warranties or agreement lines that may cover the case.
Navigation
Click the Select Agreement or Warranty link on the Case page selecting an agreement or warranty agreement or warranty link
For more information about using entitlement matches, see Understanding Entitlement Searches.
Use the Entitlement Details page (RF_VIEW_ENTL_SEC) to view the entitlements associated with a case.
This link is available after an agent selects an agreement line or a warranty.
Navigation
Click the available warranty or agreement line link on the Case page.
For more information about using entitlement defaults, see Understanding Agreements and Warranties.
Use the Provider Group Summary page (RF_ASSIGN_PG_SEC) to select a provider group from the search result that can be assigned to the case.
Groups are ranked by their fit score, an evaluation of how well each group matched the case criteria.
Navigation
Click the Suggest a Provider Group button on the Case page.
For more information about selecting provide groups, see Understanding Assignment Searches.
Use the Candidate Summary page (RF_ASSIGN_LIST_SEC) to select a worker from the search result that can be assigned to the case.
Candidates are ranked by their fit score, an evaluation of how well each candidate matched the case criteria.
Navigation
Click the Suggest an Agent button on the Case page.
For more information about selecting workers, see Understanding Workers in CRM.