Setting Up Basic Prompt Tables for Cases
To set up basic prompt tables for cases, use the Quick Code (RC_QUICK_CODE), Source (RC_SOURCE), Severity (RC_SEVERITY), Priority (RC_PRIORITY), Case Type (RC_CASE_TYPE), Case Status (RC_STATUS), Category/Type/Detail (RC_CTD_DEFINE), Combine Category/Type/Detail (RC_CTD_COMBINE) and Impact (RC_IMPACT) components.
This topic lists prerequisites and discusses how to set up basic prompt tables for cases.
|
Page Name |
Definition Name |
Usage |
|---|---|---|
|
RC_STATUS |
Set up case status values. |
|
|
RC_CASETYPE |
Set up case type values. |
|
|
RC_PRIORITY |
Set up case priority values. |
|
|
RC_URGENCY |
Set up case urgency values. |
|
|
RC_SEVERITY |
Set up case severity values. |
|
|
RC_IMPACT |
Set up impact values. |
|
|
RC_SOURCE |
Set up valid methods people can use to report cases. You can track cases that are created through self-service or cases that are initially created by your computer and telephony integration system. |
|
|
RC_PROBTYPE |
Set up problem types. Associate problem types to products and the competencies that one would need to resolve the particular problem. |
|
|
RC_CTD_CATEGORY |
Set up case category values. |
|
|
RC_CTD_CAT_COMP |
Set up case category competency values. |
|
|
RC_CTD_TYPE |
Set up case specialty types. |
|
|
RC_CTD_TYPE_COMP |
Set up case specialty type competencies. |
|
|
RC_CTD_DETAIL |
Set up case details. |
|
|
RC_CTD_DETAIL_COMP |
Set up case detail competencies. |
|
|
RC_CTD_COMBINE |
Set up valid combinations of category, specialty type, and detail. |
|
|
RC_CTD_COMP |
View and edit competencies linked to the category, specialty type and detail associated with row of the grid from which the user clicked the Competencies button. |
|
|
RC_QUICK_CODE |
Set up quick code shortcuts that an agent can use to enter data automatically into various fields on the Case page. |
Before you set up the prompt tables for your call center application, consider the following:
Before you set up quick codes, set up all of the values to be referenced by the quick code.
Quick codes may reference most of the other setup values discussed in this section.
You must set up your products before you can set up problem types.
If you want to use competencies in case assignment, establish competencies before you set up the Category, Specialty Type, Detail, and Problem Types pages.
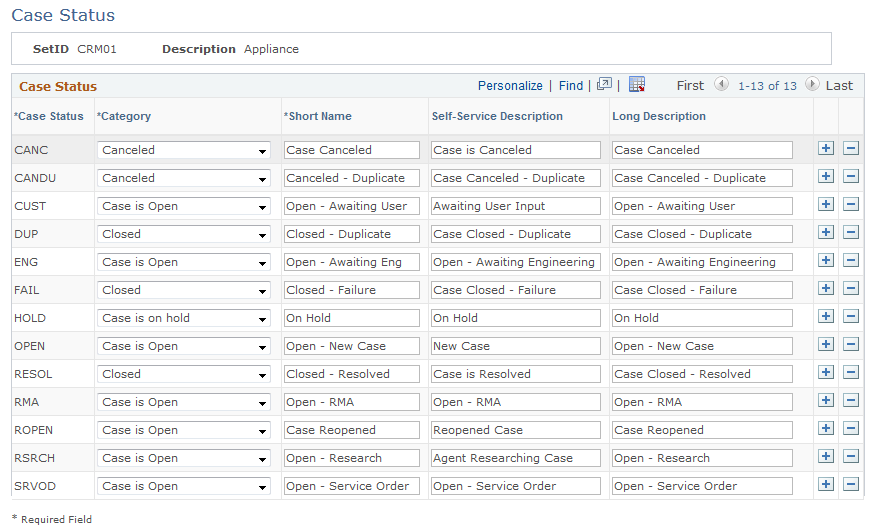
Use the Case Status page (RC_STATUS) to set up case status values.
Navigation
Image: Case Status page
This example illustrates the fields and controls on the Case Status page.
|
Field or Control |
Definition |
|---|---|
| Category |
Select a case category value for each case status. This value drives many of your call center metrics. Because the actual status values vary by implementation, certain system processing is based on the category field rather than the actual case status. All statuses fall into one of these categories: Open: Case needs to be resolved. Closed: Case is resolved and no further work is necessary. Canceled: Case is not resolved, but there is no longer any need to resolve the case. On-Hold: Case is on-hold, and the case needs to be resolved. |
| Billable |
Select if you bill for support and integrate your CRM data with a PeopleSoft or third-party billing system. |
Use the Case Type page (RC_CASETYPE) to set up case type values.
Navigation
Image: Case Type page
This example illustrates the fields and controls on the Case Type page.
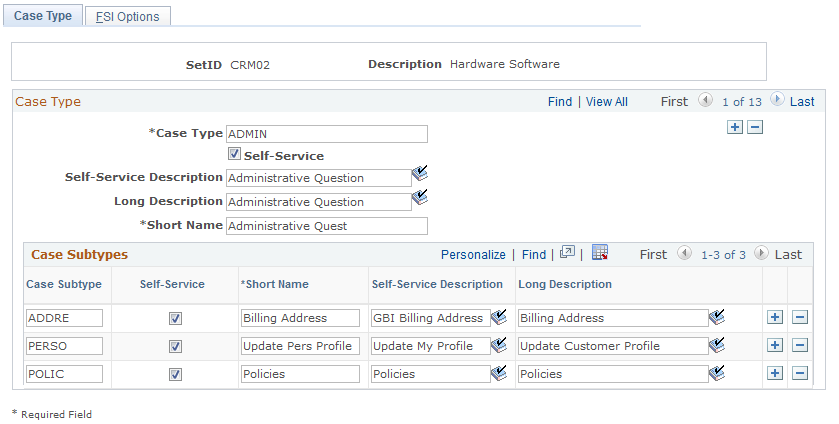
Enter descriptions for the Case Type, Self-Service Description, Long Description, and Short Name fields. Select the Self-Service check box if the case type will be used in the self-service application.
|
Field or Control |
Definition |
|---|---|
| VAT Defaults |
Click this link to access the VAT Defaults Setup page. This is a common page that is used to set up value-added tax (VAT) defaults for all PeopleSoft applications that process VAT transactions. Use this page to define VAT defaults for service groups according to VAT registration country and state. The system displays VAT defaults and Service VAT Treatment defaults only when the integration to PeopleSoft Transaction Billing Processor is installed. |
| Service VAT Treatment Defaults |
Click this link to access the Service VAT Treatment Drivers Setup page. This common page is used to set up VAT services treatment for all PeopleSoft applications that process VAT transactions. If you are required to implement special handling for services, you can specify VAT service treatment defaults for service groups on this page for a supplier's (seller's) location country and state. |
| Case Subtypes |
Use the fields in this section to enter descriptions of the case subtype that you want to associate with the case type that is described in the Case Type field. |
See the product documentation for PeopleSoft FSCM: Global Options and Reports.
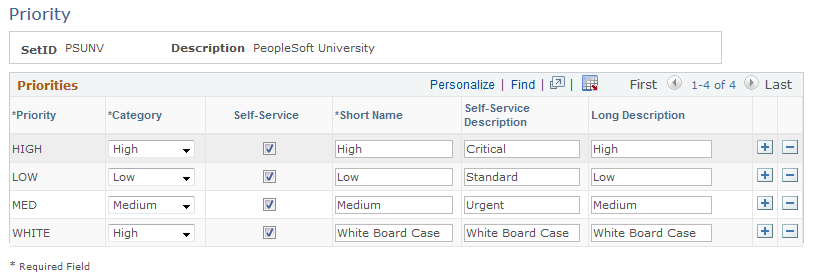
Use the Priority page (RC_PRIORITY) to set up case priority values.
Navigation
Image: Priority page
This example illustrates the fields and controls on the Priority page.
|
Field or Control |
Definition |
|---|---|
| Category |
Select the category that you want the system to associate with the entry in the Priority field. All priority values are associated with a priority category. Values include High, Medium, and Low. The association between a priority and a priority category enables the display of the High Priority Problem Reports chart to help identify high-priority cases. |
| Self-Service Description |
Enter the descriptions of the priorities as you want them to appear on the self-service page of your call center application. |
Use the priority values to indicate how quickly a problem or case must be fixed.
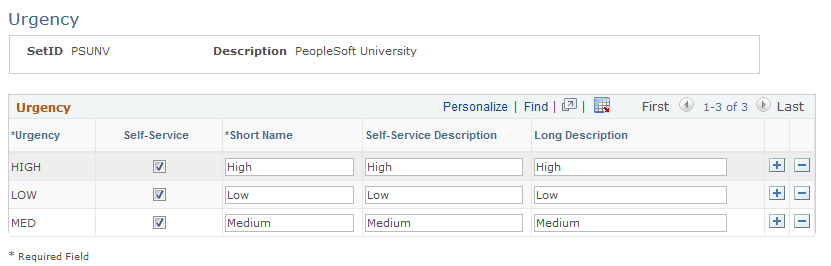
Use the Urgency page (RC_URGENCY) to set up case urgency values.
Navigation
Image: Urgency page
This example illustrates the fields and controls on the Urgency page.
|
Field or Control |
Definition |
|---|---|
| Self-Service Description |
Enter the descriptions of the urgency values as you want them to appear on the self-service page of your call center application. |
Use the urgency values to indicate the business impact of the case or issue.
Use the Severity page (RC_SEVERITY) to set up case severity values.
Navigation
Image: Severity page
This example illustrates the fields and controls on the Severity page.
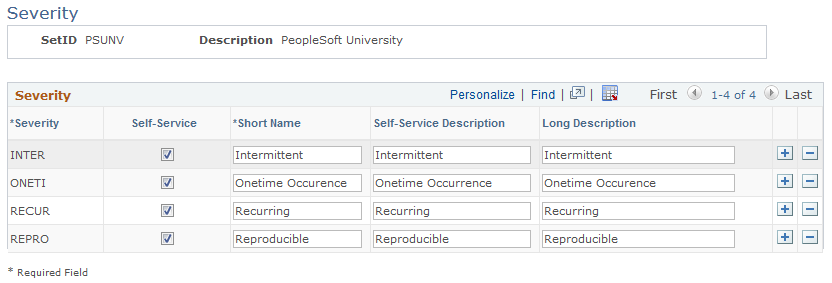
Select the Self-Service check box if you want the value for the severity to appear on the self-service page of your call center application. Use the Self-Service Description field to enter a description of the severity that self-service users will understand.
Use the Impact page (RC_IMPACT) to set up impact values.
Navigation
Image: Impact page
This example illustrates the fields and controls on the Impact page.
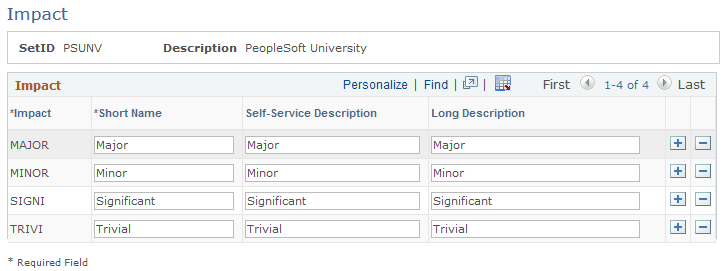
To enter a new impact, click the Add a new row button. Enter a code to represent the effect in the Impact field. Then enter descriptions of the effect in the Short Name, Self-Service Description, and Long Description fields.
Use the Source page (RC_SOURCE) to set up valid methods people can use to report cases.
You can track cases that are created through self-service or cases that are initially created by your computer and telephony integration system.
Navigation
Image: Source page
This example illustrates the fields and controls on the Source page.
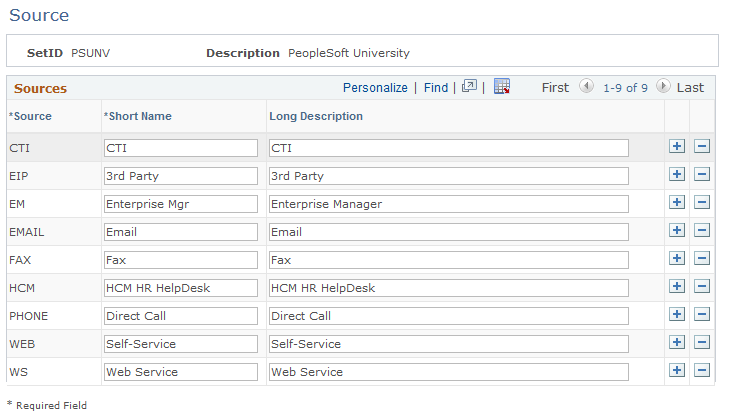
Enter descriptions for the various sources that you use to collect information for your call center applications.
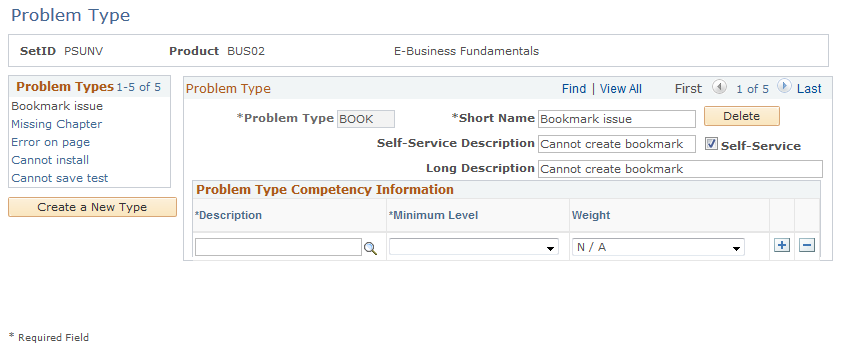
Use the Problem Type page (RC_PROBTYPE) to set up problem types.
Associate problem types to products and the competencies that one would need to resolve the particular problem.
Navigation
Image: Problem Type page
This example illustrates the fields and controls on the Problem Type page.
Problem Type
|
Field or Control |
Definition |
|---|---|
| Problem Type |
Enter an abbreviation to represent the problem type. Abbreviations can be no longer than five characters. |
Problem Type Competency Information
|
Field or Control |
Definition |
|---|---|
| Description |
Select the competency needed to resolve the problem. |
| Minimum Level |
Select the minimum skill level that a person would need to resolve the problem for the selected competency. |
| Weight |
Select the level of importance that you want to assign to the competency. The system uses this weighting factor during the assignment process to locate the best person available to resolve the problem. |
Use the Category page (RC_CTD_CATEGORY) to set up case category values.
Navigation
Image: Category page
This example illustrates the fields and controls on the Category page.
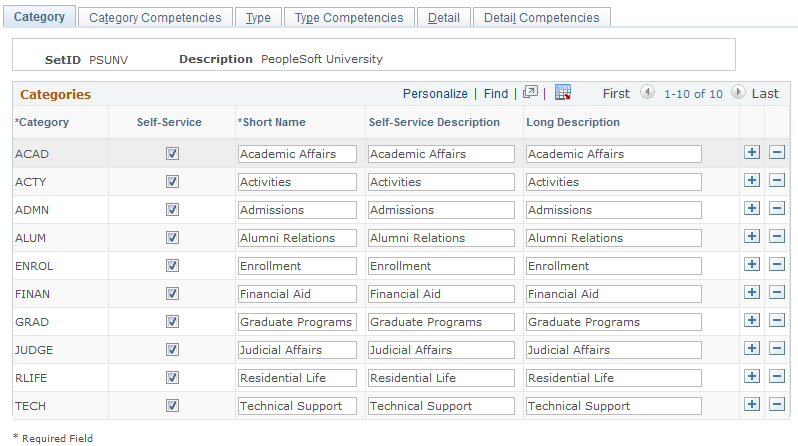
To enter a new category, click the Add a new row button. Enter a code in the Category field, then enter descriptions in the Short Name, Self-Service Description, and Long Description fields.
Select the Self-Service check box if the category will be used in the self-service application. Note that if Self-Service is not installed, the Self-Service check box and Self-Service Description, field will be hidden.
Use the Category Competencies page (RC_CTD_CAT_COMP) to set up case category competency values.
Navigation
Image: Category Competencies page
This example illustrates the fields and controls on the Category Competencies page.
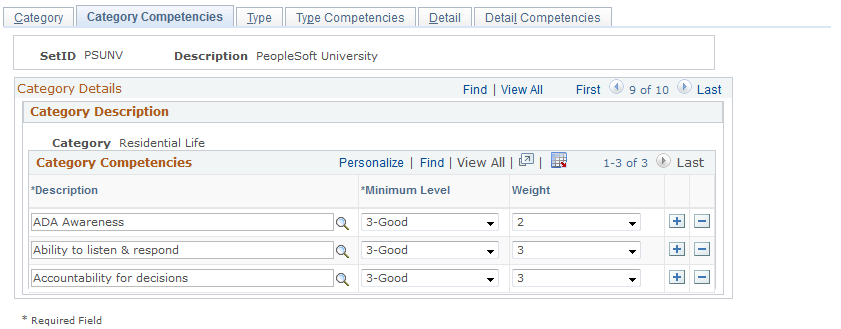
Category Competency Information
|
Field or Control |
Definition |
|---|---|
| Description |
Select the competency needed to resolve problems for the displayed category. |
| Minimum Level |
Select the minimum skill level that a person would need to resolve the problem for the selected competency. |
| Weight |
Select the level of importance that you want to assign to the competency. The system uses this weighting factor during the case assignment process to locate the best person available to resolve the problem. |
Use the Type page (RC_CTD_TYPE) to set up case specialty types.
Navigation
Note: Though this page is simply entitled Type, be aware that it refers to Specialty Type (do not confuse it with the Case Type page).
Image: Type page
This example illustrates the fields and controls on the Type page.
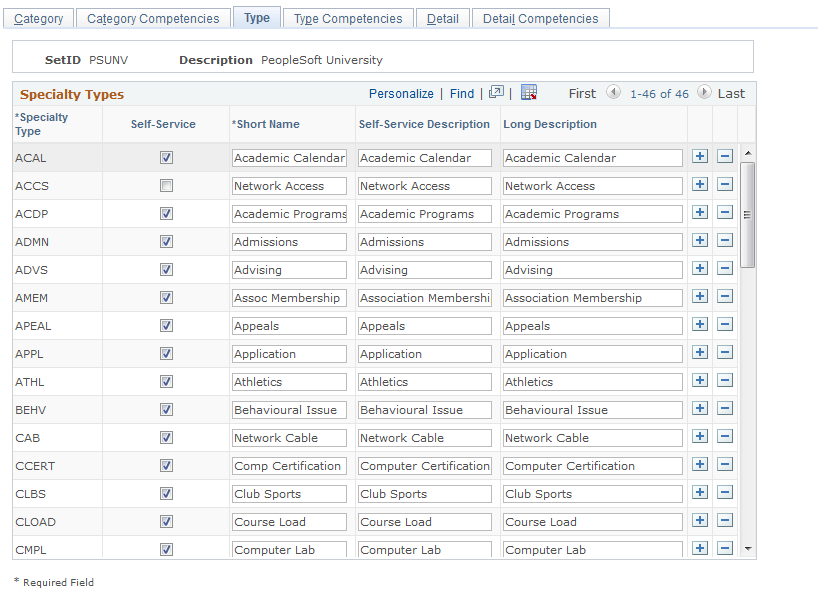
To enter a new specialty type, click the Add a new row button. Enter a code in the Specialty Type field, then enter descriptions in the Short Name, Self-Service Description, and Long Description fields.
Select the Self-Service check box if the specialty type will be used in the self-service application. Note that if Self-Service is not installed, the Self-Service check box and Self-Service Description, field will be hidden.
Use the Type Competencies page (RC_CTD_TYPE_COMP) to set up case specialty type competencies.
Navigation
Image: Type Competencies page
This example illustrates the fields and controls on the Type Competencies page.
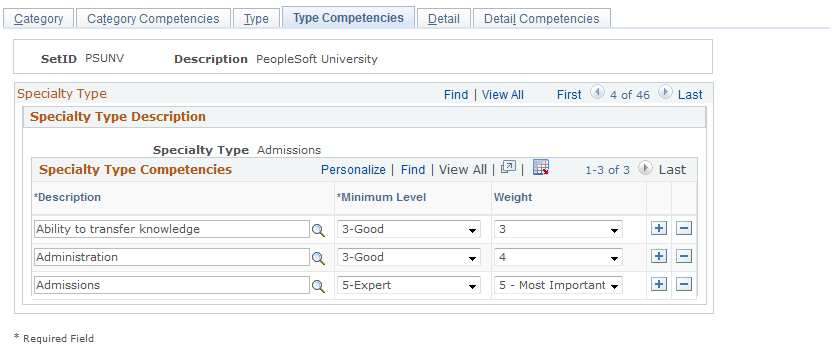
Specialty Type Competency Information
|
Field or Control |
Definition |
|---|---|
| Description |
Select the competency needed to resolve problems for the displayed specialty type. |
| Minimum Level |
Select the minimum skill level that a person would need to resolve the problem for the selected competency. |
| Weight |
Select the level of importance that you want to assign to the competency. The system uses this weighting factor during the case assignment process to locate the best person available to resolve the problem. |
Use the Detail page (RC_CTD_DETAIL) to set up case details.
Navigation
Image: Detail page
This example illustrates the fields and controls on the Detail page.

To enter a new detail, click the Add a new row button. Enter a code in the Detail field, then enter descriptions in the Short Name, Self-Service Description, and Long Description fields.
Select the Self-Service check box if the detail will be used in the self-service application. Note that if Self-Service is not installed, the Self-Service check box and Self-Service Description, field will be hidden.
Use the Detail Competencies page (RC_CTD_DETAIL_COMP) to set up case detail competencies.
Navigation
Image: Detail Competencies page
This example illustrates the fields and controls on the Detail Competencies page.
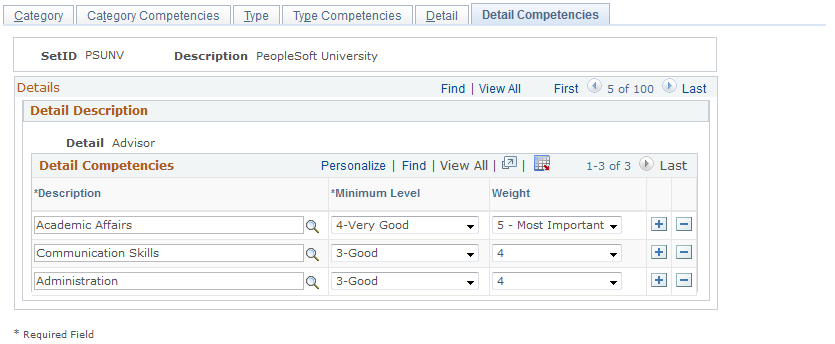
Detail Competency Information
|
Field or Control |
Definition |
|---|---|
| Description |
Select the competency needed to resolve problems for the displayed detail. |
| Minimum Level |
Select the minimum skill level that a person would need to resolve the problem for the selected competency. |
| Weight |
Select the level of importance that you want to assign to the competency. The system uses this weighting factor during the case assignment process to locate the best person available to resolve the problem. |
Use the Combine Category/Type/Detail page (RC_CTD_COMBINE) to set up valid combinations of category, specialty type, and detail.
Navigation
Image: Combine Category/Type/Detail page
This example illustrates the fields and controls on the Combine Category/Type/Detail page.
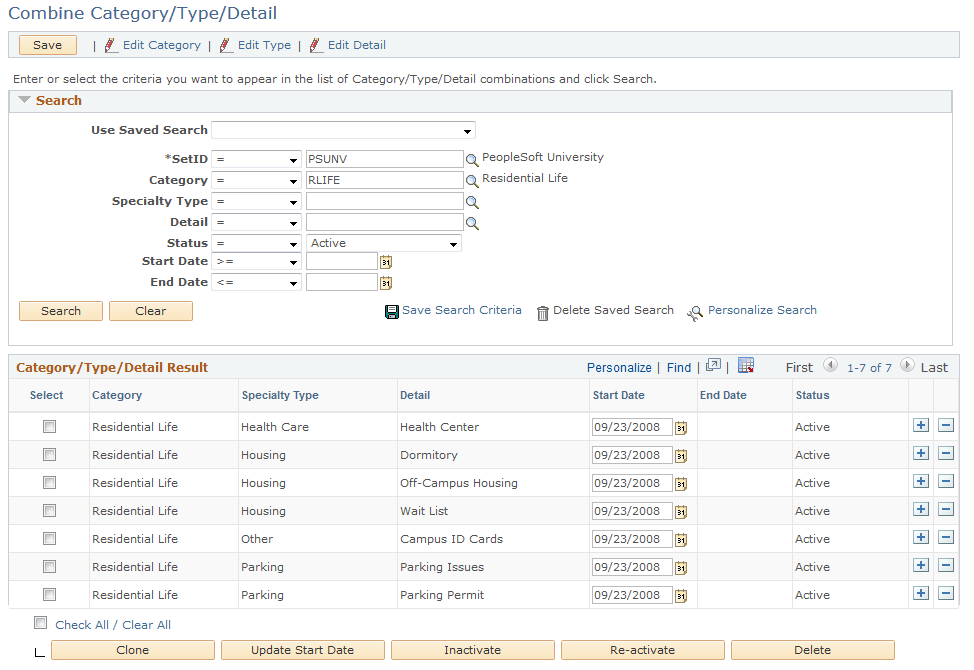
Use this page to link specialty types and details to each desired category. When a user selects a category value on the case page, only the specialty type entries linked to that category will be available on the case page specialty type drop-down. Similarly, when a user selects a category and specialty type on the case page, only the details linked to those two fields will be displayed in the detail drop-down.
To search for existing combinations, enter your search criteria and click the Search button.
To enter a new combination, click the Add a new row button (the grid row button with a plus sign) within the Category/Type/Detail Result grid.
Search
|
Field or Control |
Definition |
|---|---|
| Use Saved Search |
Select a set of saved search criteria that you wish to execute. |
| Save Search Criteria |
Click this link to name and save a set of search criteria for future use. |
| Delete Saved Search |
Click this link to delete an existing saved set of search criteria. |
Category/Type/Detail Result
|
Field or Control |
Definition |
|---|---|
| Category Description |
Select the category for which you wish to define valid specialty types and details |
| Specialty Type |
Select a specialty type that you wish to make available for the specified category value. |
| Detail |
Select a detail that you wish to make available for the specified category and specialty type values. |
| Start Date |
Enter the start date on which the specified category, specialty type and detail value combination will become valid. |
| End Date |
The date after which the specified category, specialty type and detail value combination will no longer be valid. Cases created after this date will no longer be able to use this combination. Users do not enter end dates directly into the grid: end dates are displayed after a user selects one or more rows and clicks the Inactivate button. |
| Status |
Shows the status of a particular combination defined on a row in the grid. Users do not enter values for this field: the status value displayed is based on the start and end dates in effect for that row. Rows with a start date greater than the current date are considered to be in Pending status, indicating that these combinations are not yet available on cases. Rows with an end date less than the current date are considered to be in Inactive status, and are not available to new cases. Rows whose start date precedes the current date and whose end date is either blank or greater than the current date are considered Active. |
 (Competencies) (Competencies) |
Click this button to view the competencies for the category, specialty type and detail listed on the row. Note: This button is only visible if there competencies exist for at least one of the category, specialty type or detail definitions listed in the search results. |
| Clone |
Click this button to clone the selected row(s) from the grid. You will be prompted to select which field(s) you do not wish to have cloned from the specified source row(s), since you must specify at least one value on the new row that is different from the source row. For example, users who wish to define multiple valid detail entries for a given category and specialty type may find it convenient to clone an existing row for that category and specialty type and simply add the desired detail value. |
| Update Start Date |
Users may select multiple rows in the grid and update the valid start date for those rows by clicking this button and specifying the new desired start date. |
| Inactivate |
Click this button to inactivate the selected row(s) from the grid. All selected rows will be given an end date equal to the current date, and the corresponding category, specialty type and detail combinations will no longer be available on cases opened after that date. Note that a combination cannot be inactivated if it is currently used by an open case, a case default, a quick code or an AAF policy action. |
| Reactivate |
Click this button to reactivate the selected row(s) from the grid. All selected rows will be given a blank end date and a start date equal to the current date. |
| Delete |
Use this button to delete the selected row(s) from the grid. A combination may not be deleted if it is currently used in an open case, a quick code, a business unit default, or an AAF policy action. |
Use the Combine Category/Type/Detail: Competencies page (RC_CTD_COMP) to view and edit competencies linked to the category, specialty type and detail associated with row of the grid from which the user clicked the Competencies button.
Navigation
. Click the Competencies button for the desired Category/Type/Detail Result grid row.
Image: Combine Category/Type/Detail: Competencies page
This example illustrates the fields and controls on the Combine Category/Type/Detail: Competencies page.
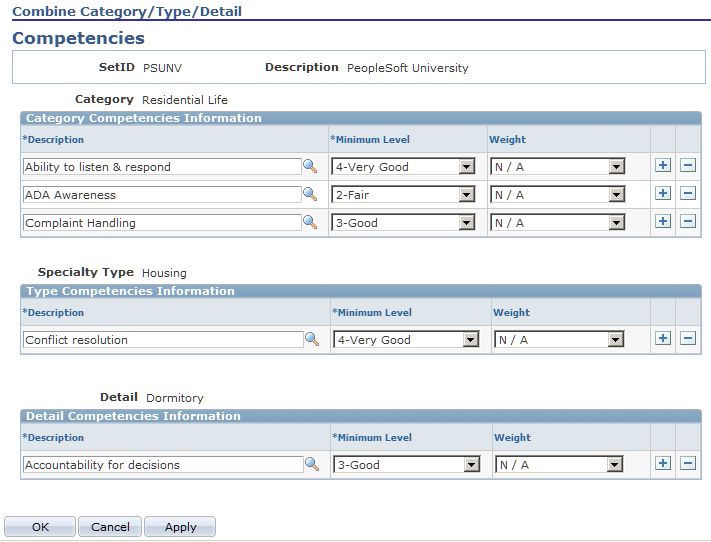
Use this page to view or edit the competencies for the selected combination of category, specialty type, and detail.
You may add or delete competencies associated to any entry shown on this page.
Note: Be aware that any changes made to the competency values for the category shown on this page will apply to all instances of that category, not just to the category, specialty type, and detail combination shown on the page. The same applies to any changes made to competency values made on this page for specialty types or details. Changes made on this page will apply in the same manner as changes made to the competency pages on the Category/Type/Detail component.
Use the Quick Code page (RC_QUICK_CODE) to set up quick code shortcuts that an agent can use to enter data automatically into various fields on the Case page.
Navigation
Note: You can use quick code to have the system suggest an action and to populate other fields on the Case page.
Image: Quick Code page (1 of 3)
This example illustrates the fields and controls on the Quick Code page (1 of 3).
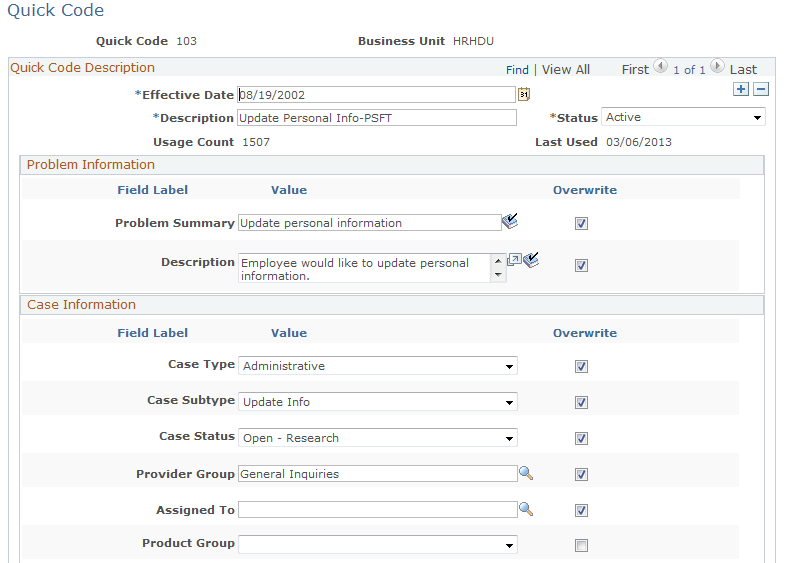
Image: Quick Code page (2 of 3)
This example illustrates the fields and controls on the Quick Code page (2 of 3).
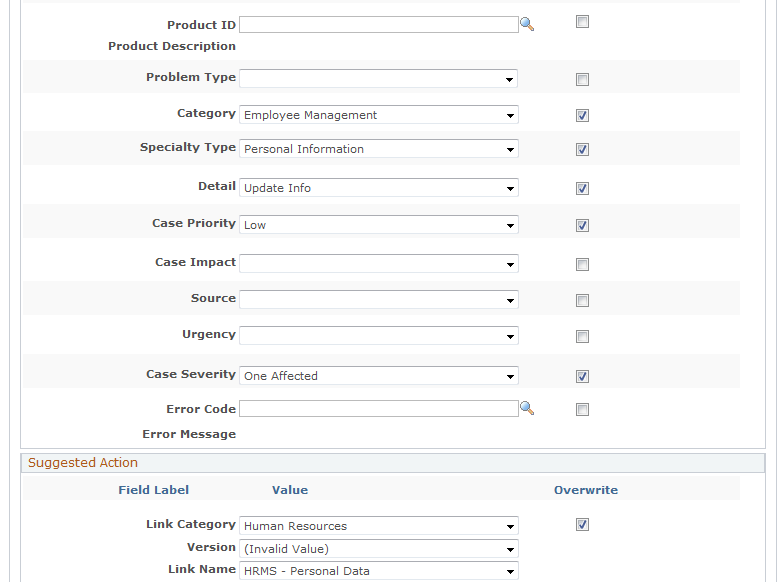
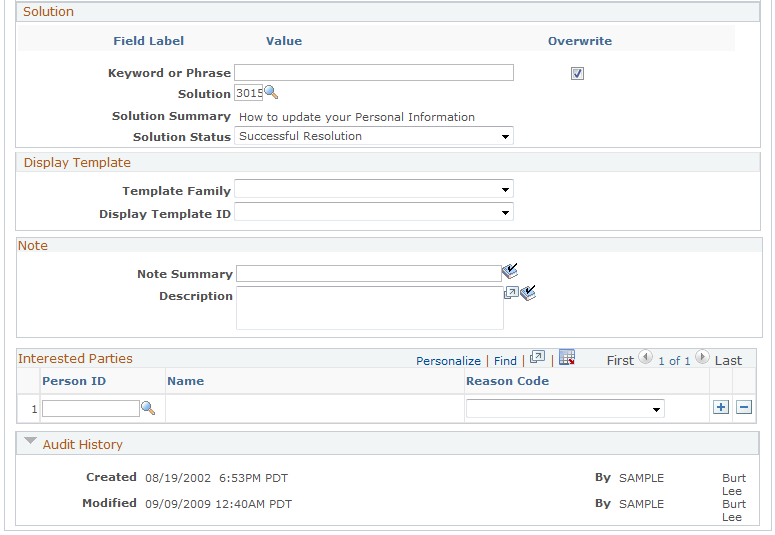
Image: Quick Code page (3 of 3)
This example illustrates the fields and controls on the Quick Code page (3 of 3).
|
Field or Control |
Definition |
|---|---|
| Quick Code |
This page displays a unique code that agents can use to populate multiple fields on the Case page automatically. |
| Business Unit |
Displays the business unit of the call center that uses this quick code. |
Quick Code Description
|
Field or Control |
Definition |
|---|---|
| Description |
Enter a short text description of the code. This description can be no longer than 20 characters. |
| Usage Count |
Displays the number of times this quick code has been used to populate default values in cases. When you select a quick code to use in a case, at save time, the system increases the quick code usage count by 1 and updates the code’s last used date to the current date. The same update applies when a case using this quick code is saved through component interface. The usage count provides the information needed to determine if a quick code is being utilized. You can then decide if you want to make modifications to increase usability or inactivate it accordingly. Note: If the quick code definition is updated using the Correct History mode, the usage count and last used values are not reset; however, if you add a new effective-dated row to the quick code definition, the system resets the usage count and the last used date of the new row to zero and null respectively. |
| Last Used |
Displays the date this quick code was last used. When you select a quick code to use in a case, at save time, this field is updated to the current date. |
Overwrite
Select the Overwrite check box if you want the system to overwrite the value for the same field on Case page when an agent selects the quick code for a case.
This table illustrates the use of the Overwrite check box using the Case Status field:
|
Value on Case Page |
Quick Code Value |
Overwrite Check Box |
After Quick Code is Selected |
Explanation |
|---|---|---|---|---|
|
Blank |
Open - Engineering |
Selected |
Open - Engineering |
Quick code overwrites blank field. |
|
Blank |
Open - Engineering |
Cleared |
Open - Engineering |
Quick code overwrites blank field even though Overwrite check box has not been selected. |
|
Open - New |
Open - Engineering |
Selected |
Open - Engineering |
Quick code overwrites existing value in field as Overwrite check box is selected. |
|
Open - New |
Open - Engineering |
Cleared |
Open - New |
Quick code does not overwrite existing value in field as Overwrite check box has not been selected. |
|
Open - New |
Blank |
Selected |
Blank |
Quick code uses blank field values to overwrite existing value in field as Overwrite check box is selected. |
|
Open - New |
Blank |
Cleared |
Open - New |
Quick code does not overwrite existing value in field as Overwrite check box has not been selected. |
The Suggested Action fields have only one Overwrite check box for the three fields. Also, you cannot use the Overwrite check box for the Notes and Interested Parties grids.
Problem Information
When an agent enters a quick code, the system assigns the information in these fields to a case.
|
Field or Control |
Definition |
|---|---|
| Problem Summary |
Enter the summary associated with this quick code. |
| Description |
Enter the description associated with this quick code. |
Case Information
When an agent enters a quick code, the system assigns the information in these fields to a case.
|
Field or Control |
Definition |
|---|---|
| Case Type |
Select the case type associated with this quick code. |
| Case Subtype |
Select the case subtype associated with this quick code. |
| Case Status |
Select the case status associated with this quick code. |
| Provider Group |
Select the provider group associated with this quick code. |
| Assigned To |
Select the agent to whom the case is to be assigned. If you've specified a provider group, you can select agents who are part of that group only. |
| Product ID |
Select the product ID associated with this quick code. |
| Problem Type |
Select the problem type associated with chosen Product ID of this quick code |
| Category |
Select the category associated with this quick code. |
| Specialty Type |
Select the specialty type associated with this quick code. |
| Detail |
Select the detail associated with this quick code. |
| Case Priority |
Select the priority to be assigned to a case. |
| Case Impact |
Select the impact to be assigned to a case. |
| Source |
Select the source to be assigned to a case. |
| Urgency |
Select the urgency to be assigned to a case. |
| Case Severity |
Select the severity to be assigned to a case. |
| Error Code |
Select the error code to be assigned to a case. |
| Error Message |
Select the error message to be assigned to a case. |
Suggested Actions
When an agent enters a quick code, the system assigns an action to the case.
|
Field or Control |
Definition |
|---|---|
| Link Category |
Select the link category to be associated with a case. |
| Version |
Select the link category's version to be assigned to a case. |
| Link Name |
Select the link name to be associated with a case. |
Solution
|
Field or Control |
Definition |
|---|---|
| Keyword or Phrase |
Enter the keywords to be associated with a case. These keywords appear in the Search subtab on the Solutions page of the Case component, thus driving the search for solutions for the case. |
| Solution |
Click to select a solution to be associated with this quick code. When this quick code is selected for a case, the chosen solution appears on the Attempted Solutions section on the Solutions page of the case. Only solutions that meet all these conditions are available for selection:
Note: When you select a solution for a quick code, you must also select a status for the solution. An error message appears if only one of these field has a value but not both. |
| Solution Summary |
Displays the summary text of the selected solution. |
| Solution Status |
Select the initial status for the solution to appear on the Solution page of the Case component. Values are: Failed Resolution In Consideration Successful Resolution Waiting on Customer Withdrawn Note: When you select a solution status, you must also select a solution to which the status applies. An error message appears if only one of these field has a value but not both. |
See Case - Solution Page, Service Order - Solution Page or Quality Management - Solutions Page.
Display Template
If you associate a display template to a quick code, selecting that quick code on a case will cause the case component to be shown using the associated display template ID.
Note: Cases retain the display template ID with which they were originally created. Therefore subsequent views of the case will be shown using the original display template for that case, not the display template associated with the quick code. However, a user could also create an AAF policy to change the display template used to view a case based on certain conditions, such as if a particular field has a certain value.
|
Field or Control |
Definition |
|---|---|
| Display Template Family |
Select the display template family to be associated with the quick code. |
| Display Template ID |
Select the display template ID to be associated with the quick code. When the quick code is selected on a case, the case will be re-displayed using the quick code's display template ID (as long as the display template family of the case and the display template family of the quick code match). |
Notes
When an agent enters a quick code, the system assigns the information in these fields to a case.
|
Field or Control |
Definition |
|---|---|
| Summary |
Enter the notes summary to be associated to the case. |
| Description |
Enter the notes description to be associated to the case. |
Interested Parties
When an agent enters a quick code, the system assigns the information in these fields to a case.
|
Field or Control |
Definition |
|---|---|
| Interested Parties |
Select the interested parties to be associated with a case. |
| Reason Code |
Select the reason the interested party should be listed as an interested party on the case. |