Managing 360-Degree Views
This topic discusses how to manage 360-Degree Views.
|
Page Name |
Definition Name |
Usage |
|---|---|---|
|
RBQ_BOSRCH |
View search results for a business object (customer, constituent, worker, or person of interest). You can also enter criteria to refine the existing search, or enter data for a new search. |
|
|
RB_TD_AGENT_VIEW |
Manage overall activity for the business object (customer, constituent, worker, or person of interest). |
|
|
RB_TD_REL_VIEWER |
View the relationships for the business object whose information appears on the 360-Degree View page. |
|
|
RB_TD_TASK_LIST |
Maintain the tasks that are associated with the business object whose information appears on the 360-Degree View page. |
|
|
Call Reports Page |
RD_TD_CR_LIST |
Maintain the call reports that are associated with the business object whose information appears on the 360–Degree View Page. |
Use the Search for <Business Object> page (RBQ_BOSRCH) to view search results for a business object (customer, constituent, worker, or person of interest). You can also enter additional criteria to refine your existing search, or enter data for a new search.
Note: When you sign into the CRM system and access a 360-Degree View for the first time, the initial search dialog page appears, which enables you to select a business object to view in the 360-Degree View. When you access the 360-Degree View for that business object type again in the same login session, the system skips the initial search dialog page and displays the 360-Degree View component of the previously selected business object automatically.
Navigation
Image: Search for <Business Object> page
This example illustrates the fields and controls on the Search for <Business Object> page.
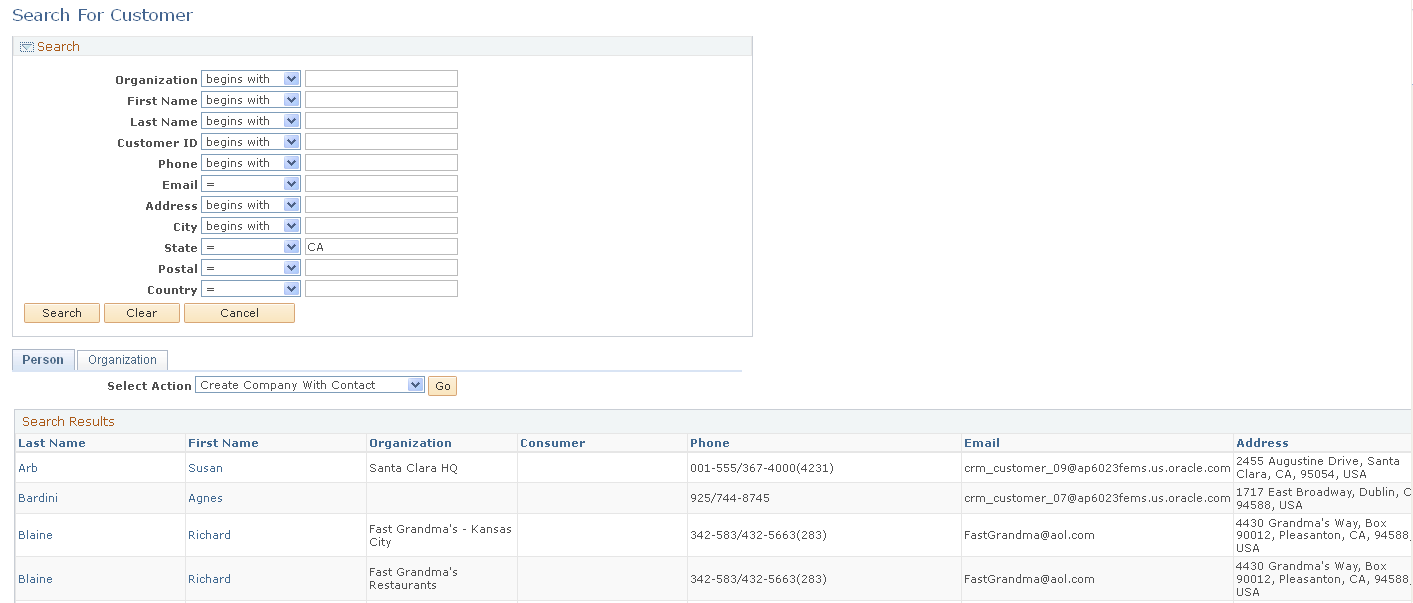
The systems displays the criteria that you entered on the original search dialog page and the results of the search based on that criteria..
Note: This search uses the customer identification framework.
Search Criteria
You can enter additional search criteria to refine your existing search, or clear the data and enter new data for a new search.
Search Results
If more than one match for the search criteria that you enter is found, then all business objects that match the search criteria appear in the search results grid. If only one record matches the search criteria, then the 360-Degree View page for that object appears.
Select an existing business object from the results to access the 360-Degree View pages for that customer, constituent, worker, or person of interest.
For business objects that are contacts of customers, one row appears in the Search Results page region for each customer that the individual represents. The Name column that appears in the row for an individual identifies the company that the individual represents, and the Consumer column identifies the consumer that the individual represents. If both the Name and Consumer columns in a row are blank, then the individual listed in the row is a consumer.
|
Field or Control |
Definition |
|---|---|
| Select Action |
Select a role for the business object you like to create. Click the Go button to transfer to the corresponding page where you continue with the business object creation process. The system prepopulates this page with data that was entered previously as search criteria. The system determines the available roles from the search criteria that you entered. For example, suppose that you enter a value in the Organization field, the available role is Company, but if you enter a value in either the First Name or Last Name field, the available roles are the roles that are associated with the individual business object type: Create Company with Contact, Create Consumer, and Create Consumer with Contact. In the case of Worker 360 Degree View, a link appears where you can create workers. As for HRHD 360 Degree View, you have the options to create either workers or POIs. To use this functionality, you must have previously set up Quick Create for that object. Once you create the new business object, the system transfers you to the 360-Degree View page automatically, using the newly created business object. |
Use the 360-Degree View page (RB_TD_AGENT_VIEW) to manage overall activity for the business object —customer, constituent, worker, or person of interest.
Navigation
Select an existing business object (customer, constituent, worker, or person of interest).from the search results grid on the Search for <Business Object> page for that business object type.
Note: The customer 360-Degree View page is used here for illustration purposes. The 360-Degree View page the other business objects is similar in usage.
Image: 360-Degree View page (1 of 2)
This example illustrates the fields and controls on the 360-Degree View page (1 of 2).
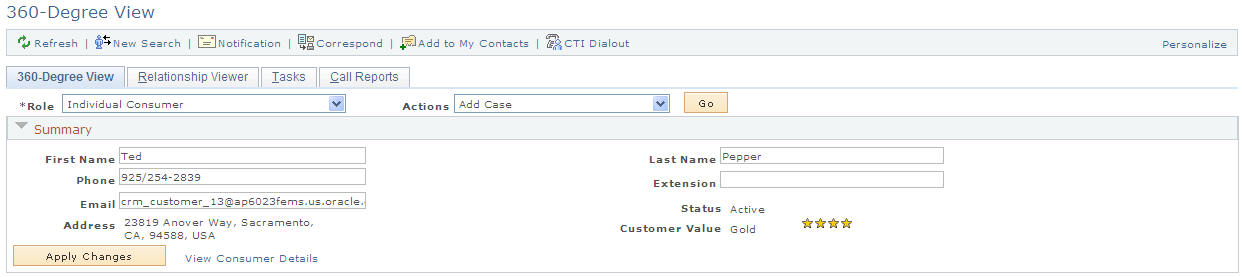
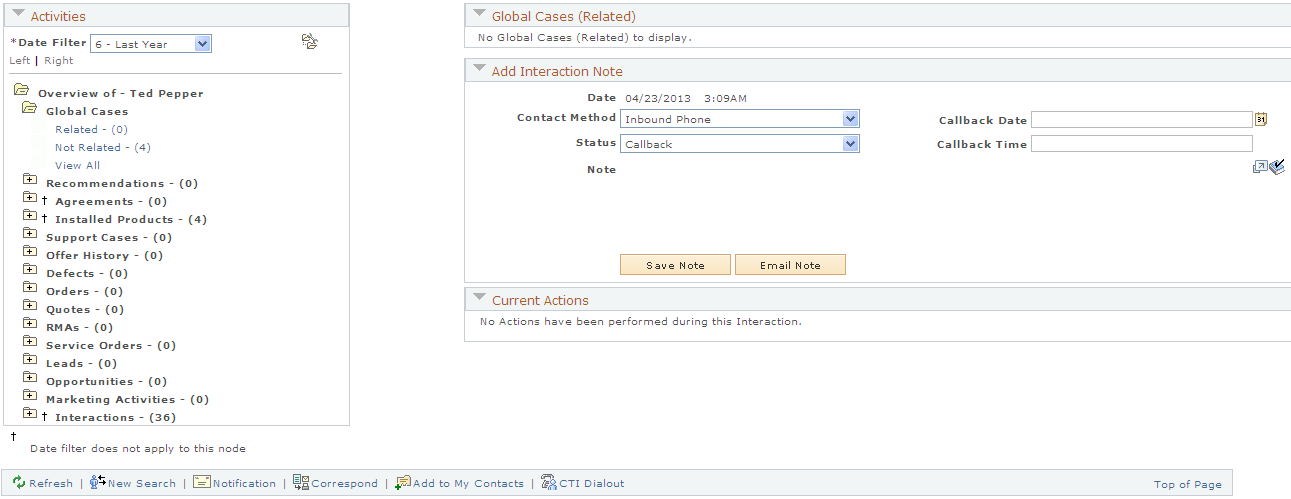
Image: 360-Degree View page (2 of 2)
This example illustrates the fields and controls on the 360-Degree View page (2 of 2).
|
Field or Control |
Definition |
|---|---|
| Role |
Select a role that is listed for the customer, worker or contact. The profile changes to reflect data that is relevant to that role. Note: Not all roles of an individual will be displayed on all versions of the 360-Degree View page. For example, the consumer role will not be displayed on Worker 360-Degree View or HRHD 360-Degree View. If the individual whose information is being viewed in the Worker 360-Degree View page also has a consumer role, use the left hand navigation to open the Customer 360-Degree View page and search again for that individual. Similarly, the worker role will not be displayed on the Customer 360-Degree View page. If the individual whose information is being viewed in the Customer 360-Degree View page also has a worker role, use the left hand navigation to open the Worker 360-Degree View page and search again for that individual. |
| Actions |
Select the action that you want to perform from the 360-Degree View. Delivered values include Add Case, Add Defect, Add Install Product, Add Lead, Add Opportunity, Add Order, Add Quote, Add Service Order, Installed Product Hierarchy, Add Quote, Add RMA (return material authorization), Product Registration, Student Service Center, Person Profile, and Add Case - Admissions Status Inquiry. The particular actions shown depends on the 360-degree view being used. |
| Phone, Email, and Extension |
Enter new data to update customer, worker, and contact profile information. Click the Apply Changes button to enter and permanently update the changes. The ability to enter or edit data in these fields is configurable. Users who are not able to edit these fields will still see the existing values listed in display-only format. |
Note: On the Constituent 360-Degree View, the labels for phone, email and address may also indicate the corresponding type, such as Dorm Phone, Campus Email, or Home Address.
The following fields appear in the Summary region only for the Constituent 360-Degree View when viewing information for a consumer (academic constituent):
|
Field or Control |
Definition |
|---|---|
 |
The FERPA indicator icon enables the user to view details about the restrictions that the student has requested regarding the disclosure of certain types of directory information. Clicking the icon transfers the user directly to the Campus Community FERPA page. |
 and and  |
The Positive and Negative Service indicator icons enables the user to view details about the service restrictions or service privileges associated for each indicator. Clicking an icon transfers the user directly to the Manage Service Indicators page in Campus Solutions. |
 |
Click the Affiliations icon view details regarding the academic constituent's affiliations. |
| ID |
This is the automatically generated ID from Campus Solutions used to identify the constituent within the PeopleSoft Campus Solutions system. |
| Campus ID |
This is the ID selected by the academic institution to identify the constituent (for example, for use on student identification cards). |
| Current Status |
Displays the current academic status for the constituent. Separate statuses are shown for each combination of institution and career for the most recent applicable term. Only the most advanced status is shown for each institution and career combination. The available status values are (from lowest to highest): Suspect, Prospect, Applicant, Student, and Alumnus. If the same status exists in multiple institution and career combinations, only that for the most recent status date or source date is shown. If the dates are the same, then only the status from the institution/career in first alphabetical order is shown. |
| Deceased |
This text appears in the summary area if the individual consumer whose information is being viewed is deceased. If the consumer is deceased, no FERPA, Service Indicator, or Affiliations icons will be displayed for the individual. |
Activities
This region contains the 360-Degree View Tree, which displays all activities and interactions with the customer.
Activities are grouped by transaction type. Expand the folder or icon next to a transaction type to view activities for that transaction type.
Depending on the way the system is configured, you can add transactions or search for transactions of a particular type. Click a detail link to access transaction detail or click the activity summary to view a grid that lists summary information about the transactions.
|
Field or Control |
Definition |
|---|---|
| Date Filter |
Select the date filter for the activities that you want to view. Values are 1 - Today, 2 - Yesterday, 3 - Last Week, 4 - Last 2 Weeks, 5 - Last Month, 6 - Last Year, and 7 - View All. If you select 6 - Last Year and the tree header has a maximum date filter of 5 - Last Month, the system stops the user from viewing records that are older than the maximum date filter criteria. If you select 7 - View All and you don't enter maximum date filter criteria in the tree header, the system displays all of the records. When the 360-Degree View page initially appears, the date range that you specify in the profile of the user who is currently accessing the system appears by default. If the user's profile is not available, the system displays the activities for the date range that you specify in the tree. When defining the tree, you specify the date filter and maximum date filter to use when displaying this page. |
| From and Through |
Enter the date range for the information that you want to see on the 360-Degree View. After you enter the date range, click the Go button. Note: The system displays the From and Through fields on this page only after you enable data filtering on the 360-Degree View - Personalize page. |
| First, Previous, Next, Last, Left and Right |
Click to navigate the Activities tree. Navigation links become active if the number of items included in the tree or the length of these tree items exceeds the limit that can be displayed at any given time. |
Activities Detail
The system displays a dynamic grid that lists key information from the most recent transactions and associated actions for the activity type that you click in the 360-Degree view tree.
The label for this grid changes depending on the type of information you view. For example, when you expand the Agreements node in the 360-Degree view tree, and then click the Active child node, the system displays the Agreements-Active dynamic grid and shows important information from agreement records. It can also provide an action link for further interactions concerning an agreement, such as viewing its details. You can configure the associated actions, the number of transactions, and the columns that appear in this grid.
Note: For performance reasons, a maximum of 100 entries will be retrieved for display in the dynamic grid at any one time.
See Dynamic Grid Page.
Log Interaction Note
The fields in the Log Interaction section capture the details of an interaction.
Every time that you record a subinteraction on this page, the system groups the subinteractions into one related interaction. You can perform multiple subinteractions for a customer at one time before you leave this page. The subinteractions that you created previously appear in the Current Actions group box.
Note: Interactions that are automatically generated through correspondence management are not related to the values in the drop-down menus on the 360-Degree View page. Interactions that are generated through correspondence management do not appear in reports that track which contact methods are used most often by agents for interactions with customers or contacts through the 360-Degree View page.
|
Field or Control |
Definition |
|---|---|
| Contact Method |
Select the contact method for the interaction. Delivered values include Inbound Chat, Inbound Email, Inbound Fax, Inbound Phone, Inbound Web, Outbound Email, Outbound Fax, and Outbound Phone. |
| Interaction Status |
Select the interaction status. Delivered values include Busy, Callback, Child Answered, Completed, Do Not Call Again, In Progress, and No Answer. |
| Callback Date and Callback Time |
Enter a date and time for callback. |
| Add Note |
Enter a note to add to the interaction. The note is saved in the 360-Degree View Tree as a subinteraction. |
| Email Note |
Click to send the note to the customer. |
Use the 360-Degree View - Relationship Viewer page (RB_TD_REL_VIEWER) to view the relationships for the business object whose information appears on the 360-Degree View page.
Navigation
Select the Relationship Viewer tab on the 360-Degree View page for the business object.
Use the Tasks page (RB_TD_TASK_LIST) to maintain the tasks that are associated with the business object whose information appears on the 360-Degree View page.
Navigation
Select the Tasks tab on the 360-Degree View page for the business object.