Understanding Service Orders
This section discusses:
The service order data model.
Service order status levels.
Methods for accessing service orders.
Service order toolbar functions.
Note: PeopleSoft Customer Relationship Management (PeopleSoft CRM) delivers an enterprise integration point (EIP) that you can use to integrate service orders with third-party voice recognition applications.
A service order records a request for a service provided by the company. You can assign a service order to the technicians who will perform the requested work, order materials that are required to perform the work, and track progress. You can also record expenses and labor time and material usage that are incurred while performing the requested work.
In PeopleSoft CRM applications, call center agents and dispatchers can enter multiple service orders for a case in PeopleSoft Support or enter a service order directly in PeopleSoft Integrated FieldService. Service technicians can work with a streamlined view of the service orders that have been assigned to them through the My Service Order component.
Each service order is composed of a header, which captures customer, service, and agreement information and at least one activity, which represents the work associated to the service requested by the customer. Each activity of a service order is associated with one or more technician assignment and material management records.
Image: Service order data model
This diagram illustrates the structure of a service order.
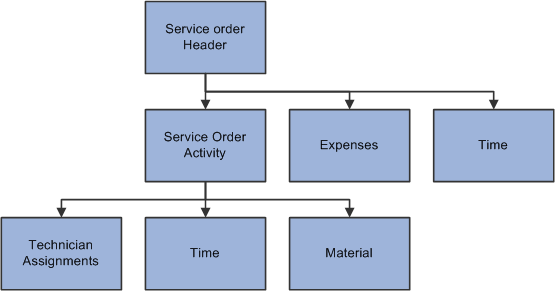
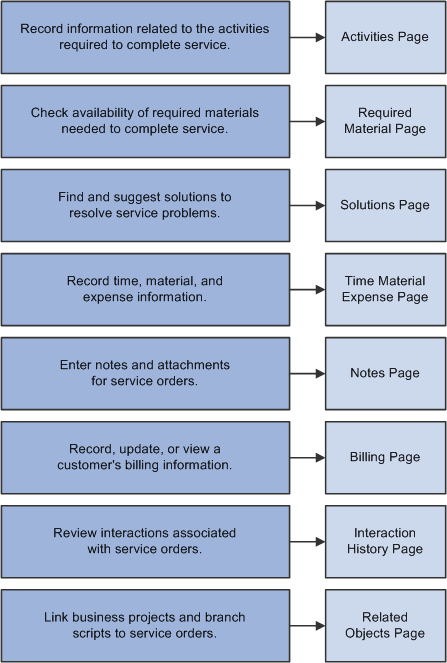
Image: Service order processing
This illustration shows how the system processes information using the pages contained within the Service Order component to perform various actions throughout the service order management process.
You can perform technician assignments manually on the Service Order activities page, or you can enable the system at the business unit level to automatically assign provider group and group members to new service orders. You can also default a provider group and technician from the service.
In PeopleSoft Integrated FieldService, you can enable the system at the business unit level to automatically calculate the committed start and end dates and times for service orders. When you select an agreement, warranty, or on-demand service in the service order, the system performs the calculation based on the response and restore entitlements of the selected agreement or warranty and displays the associated entitlement information in the Entitlements group box on the Service Order page.
Service entitlements are primarily used if both the agreement and warranty are not available for the service order.
Note: If the service is being covered by a warranty, but the warranty does not have any restore and response entitlements, then these entitlements will come from the service definition. If the service is being covered by an agreement which has no restore and response entitlements, no calculation is done.
Depending on your business needs, you can launch a business project or branch scripts from a service order. Use a business project to coordinate and track the work involved in performing a sequence of tasks, and use a branch script as a tool for technicians to troubleshoot service tasks. From the Service Order component, you can also view a list of interactions that were created for the service order and view or add notes and attachments to the service order at the header and activity levels.
The service order status reflects the current processing state of a service request. The processing status is tracked at two levels: the service order header and the service order activity. The header level reflects the general processing status of the entire service request, while activity-level status provides a more detailed view of each activity that is associated with the service request.
Header Level Status
At the header level, a service order can have one of four status values:
|
Field or Control |
Definition |
|---|---|
| Open |
This is the initial status of a new service order. At the service order header level, the status remains open until all associated service order activities have a status of Completed, Canceled, or Closed. |
| Completed |
When all associated activities have a status of Completed, Canceled, or Closed, the system automatically changes the status at the service order header level to Completed. You can record time, expense, material usage, and billing information (if the service order is billable) and view address information. However, you cannot order additional material for the service order or change any of the field values on the Service Order page except the status value. You can change the status from Completed to Closed or Canceled. Note: If required, the service order must be approved at the header level to attain the Completed status. |
| Closed |
The service request has been finished and all time, expense, and material information has been entered. For billable service orders, set the service order status to Closed when all time, material, expense, and billing information has been recorded for a completed service order. Once the service order header status is changed to Closed, you cannot change the status again or make any changes to the service order or to the associated time, material, and expense records or billing information. Note: The system automatically initiates the billing process if you have set up an integration to the Transaction Billing Processor when the status changes to closed. |
| Canceled |
You can select this status at the level of the service order header only if all associated service activities have a status of Completed, Canceled, or Closed. Once the service order header is set to Canceled, you cannot change the status again nor modify any other fields on the Service Order page. However, you can continue to enter associated time and material records for associated completed or canceled service order activities that were previously recorded for the closed activities on the canceled service order. The system, however, does not record expenses against activities. Note: If you change the status to canceled at the service order level, the system will not initiate billing even if you have items marked as billable. Also, you cannot make any time changes. |
Activity Level Status
Each service order activity on a service order can have one of the these status values:
|
Field or Control |
Definition |
|---|---|
| Accepted |
To accept an assignment, the technician or a representative for the technician manually changes the activity status to this value. Note: Once the status has been set to Accepted, it cannot be changed to Hold Assignment, Assigned, or Rejected. |
| Assigned |
When a technician is assigned to a service order activity, the system automatically changes the activity status to this value. |
| Canceled |
Once the service order activity status is changed to Canceled, you cannot make any changes to the fields on the service order activity or order material for the activity. However, you can continue to capture associated time and material information for the activity until the status at the header level is changed to Closed. |
| Closed |
After you record all time, material, and billing information for a completed service order activity, select this status to indicate that billing processes can be initiated for the service order. Once the service order activity status is changed to Closed, you should not make any changes to the activity or to the time and material records that are associated with the activity. However, since time and expense don't have to be tied to an activity, you can still enter time and expense information until the service order status is set to Closed. Note: Billing is not initiated for individual lines when a user changes the status of an activity to Closed. The system does not initiate the billing process until a user changes the status of the entire service order to Closed. |
| Completed |
When the service order activity reflects this status value, you can record time, expense, and material usage; however, you cannot order additional material for the service order or change any of the field values on the service order activity except the status value. You can change the status on the service order activity from Completed to Closed or Canceled. Note: If required, the activity must be approved before you change its status to Completed. |
| En Route |
While the technician is on the way to the customer's site, the technician or a representative for the technician can manually change the activity status to this value. This status value is informational only and can be set manually for a service order activity in any of the open status values, except for Rejected. Note: The system returns an error if you change the service order activity status to En Route after it is set to Completed or Rejected. |
| Hold Assignment |
A technician has not been assigned to the service order activity. When you first create a service order, the system sets the header status to Open and the activity status to Hold Assignment. The system automatically changes the activity status from Hold Assignment to Assigned if a technician has been assigned to the service order activity manually by a dispatcher or call center agent, through automatic assignment, or as a result of a default assignment. |
| Hold Customer |
Work for the service order activity is on hold pending action from the customer. This status value is informational only and can be set manually for a service order activity in any of the Open status values. |
| Hold Part |
Work for the service order activity is on hold pending the receipt of ordered material. This status value is informational only and can be set manually for a service order activity in any of the Open status values. |
| On Site |
On arrival at the customer's site, the technician or a representative for the technician manually changes the activity status to this value. Note: Once the status has been set to On Site, you cannot change it to Hold Assignment, Assigned, or Rejected. |
| Rejected |
To reject an assignment, the technician or a representative for the technician manually changes the activity status to this value. Activities with this status can be manually changed to Hold Assignment, Hold Part, Hold Customer, or Assigned. Note: Changing the service order activity to Accepted or Rejected applies to all technicians assigned to the line. You cannot accept or deny specific technician assignments on a service order activity. |
Summary of Time, Expense, and Material Availability Based on Status
For combinations of Open, Completed, Closed, and Canceled status values at the service order header, this table summarizes when the time, expense, and manage material transactions can be recorded:
|
Header Status |
Time, Expense, and Material |
|---|---|
|
Open |
Enabled |
|
Canceled |
Disabled |
|
Completed |
Enabled Note: Cannot order materials. |
|
Closed |
Disabled |
You can create or access service orders:
From the system navigation.
Select from the left navigation menu to create new service orders
Select from the left navigation menu to update service orders.
Because service orders are keyed by business unit, you need to enter a business unit when you add or update service orders.
From the Case component.
You can create a service order from a PeopleSoft Support case. Access the Related Actions page of the case and create a service order. Enter the business unit (prepopulated with the case's business unit) and service for which the service order is created. The system populates the new service order with the case ID, customer, product, and service information from the case. You can also reselect an agreement or warranty that is specific to the service order. Also, the system defaults the problem description on the service order from the problem summary on the case
From the 360-Degree View.
You can create new service orders from the 360-Degree View of a contact or company by selecting Add Service Order from the Go To drop-down list box. The system populates the new service order with customer information from the 360-Degree View and the business unit that is defined for the user who is currently signed in from the User Preferences menu. If the business unit value is not specified, the user is asked to enter the business unit for the new service order. You can also view or update service orders that are associated with the given contact or company from the Activities group box.
From the 360 Degree View page, you can also define an action to create a specific type of service order. In this case, you do not have to supply any additional information. Also, navigating to the newly created service order is optional.
From PeopleSoft Order Capture.
You can create service orders through PeopleSoft Order Capture if the customer is ordering a product that requires installation and a service order. Users can select the Installed Product tab on the Product component to see how this is set up.
While service orders are usually created manually by using one of the these methods, some service orders are periodically generated by the system. These service orders, when you have enabled the preventive maintenance functionality in the system, are created by an Application Engine program for installed products that are covered by agreements and require scheduled preventive maintenance services.
The PeopleSoft CRM toolbar is delivered on the Service Order page and several PeopleSoft Integrated FieldService-related components, providing easy access to PeopleTools actions (such as saving pages), application-specific functions (such as sending notifications in service orders and cases), and useful summary information that is specific to the component that you are viewing.
The configurable toolbar is available for most PeopleSoft Integrated FieldService-related components. These are the list of buttons and data elements that are used in toolbars for these components. Some of them are common across all PeopleSoft CRM applications, whereas some are specific to pages.
|
Field or Control |
Definition |
|---|---|
| Save |
Click the Save button to save the page on which you are currently working. |
 |
Click the Search button to go back to the search page with the search results list, which is where you accessed the current page. |
 |
Click the Add button to add a new service order. |
 |
Click the Next button to go to the next record in the search results list. |
 |
Click the Previous button to go to the previous record in the search results list. |
 |
Click the 360 Degree View button to access the 360-Degree View page, where you can view details of the company or contact that is listed on the current page and perform transactions. |
 |
Click the Notification button to access the Outbound Notification page, where you can send an email message or a worklist entry to a person or provider group. You can apply a delivered template or add attachments to the text message. The system transfers you to the same page if you click the Email button on the Notes page (summary view) or Solution page. The system prepopulates the subject line and message body with the corresponding service order ID. This functionality is available only to the Service Order and My Service Order components. This button is also used in the Service component to send email or worklist notifications. |
 |
Click the Correspondence button to access the Create Correspondence page, where you can send text messages to prepopulated recipients through different channels (email or print). PeopleSoft Integrated FieldService delivers two templates that you can use when a correspondence is sent: Service Order Status, which is a thank you note with current service order status information for the customer and Service Order Status - Failure, which is a note stating that the status information cannot be retrieved because of an invalid service order ID. You can add attachments to the text message and schedule when it should be delivered. Once a correspondence is sent, the system automatically creates an interaction on the 360-Degree View for the associated contact. The interaction is also viewable from the Interaction History page of the associated service order. Note: Before creating a correspondence, make sure a contact is available on the service order. The system prepopulates the Recipients field of the correspondence request with the contact defined for the service order. If the contact is not available on the service order, the field is populated with the consumer name. This functionality is available only to the Service Order and My Service Order components. The system passes the business unit, service order ID, customer (either a company or a consumer), and contact name to the correspondence request. |
 |
Click the Hierarchy button to view the installed products that meet the customer, site, product, and serial number available on this page. The system displays the parent, child, and sibling relationships for the selected installed products on the Installed Product Hierarchy page. The button is available only from the Service Order, My Service Order, and Installed Product components. Initially, the system displays only those installed products, services, assets, and agreements with a status of Installed/Activated. To view products in other statuses, you must select All Statuses or a different status and click Refresh. Activate this functionality only if the user has enabled the Status filter on the tree configuration. Enable the status filter by selecting one or more of the Show Status check boxes on the tree setup. If the user has not selected any status filters, or if no tree configuration is loaded, then the tree displays products of all statuses in the initial view. Note: This button is hidden from the Service Order and My Service Order toolbar if you selected Prompt for Product Master, Hide Installed Product Information, or Hide All Product Information on the service order configuration template that is used by the business unit of this service order. |
| Personalize |
Click to access the Personalize Toolbar page, where you can change the way buttons appear on the toolbar and hide them. |
| Time Zone |
Select to display dates and times at both service order header and activity levels based on the selected time zone. Options include: My Time Zone: Your local time zone, according to your user personalizations. Customer: The customer's time zone, based on the time zone selected for the address that is associated with the site, contact, or customer. Note: If you select the time zone of Customer, the PeopleSoft CRM system first checks for and uses the time zone that is associated with the site's primary address. If this information is unavailable, it looks for the time zone that is defined in the contact's primary address. If this information is also unavailable, the system uses the time zone that is associated with the customer's primary address. If none of these addresses includes time zone information, the date and time display remains the same regardless of what you select. |
| Customer Value |
Displays the value of the customer derived from the Customer Data Model (CDM). This value is also available from the Company page. |