Creating Orders or Quotes
This section discusses how to enter orders or quotes and view or modify line details.
|
Page Name |
Definition Name |
Usage |
|---|---|---|
|
RO_FORM |
Create a new order or quote by entering order details and adding products to the order lines. |
|
|
Submit Confirmation Page |
RO_SUBMIT_CONFIRM |
View a summary of the order or quote. |
|
RO_CAPTURELINE_DTL |
Information appears on this page only after a customer and product have been added to the order or quote. View up-sell or cross-sell opportunities, and check product availability. You can edit line details such as unit of measure, order quantity, unit price, and promotion code. You can also allow partial shipment for this product. |
Use the Order - Entry Form page or Quote - Entry Form page (RO_FORM) to create a new order or quote by entering order details and adding products to the order lines.
Navigation
Image: Order - Entry Form page (1 of 4)
This example illustrates the fields and controls on the Order - Entry Form page (1 of 4).
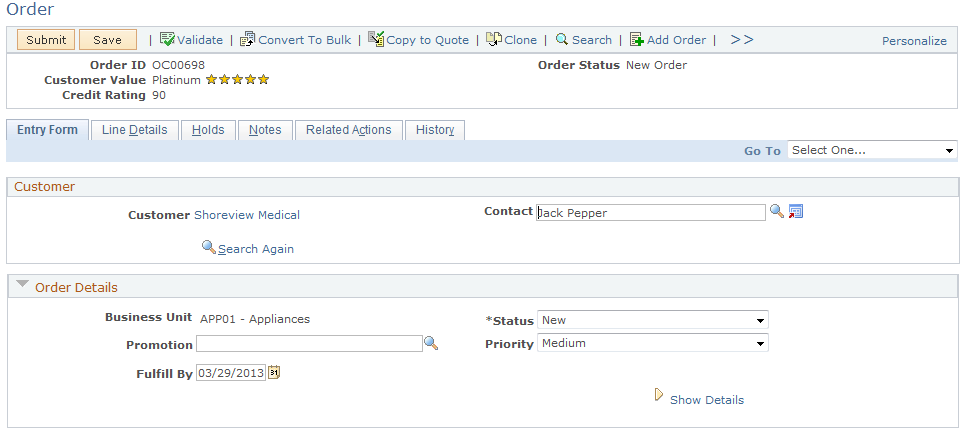
Image: Order - Entry Form page (2 of 4)
This example illustrates the fields and controls on the Order - Entry Form page (2 of 4).
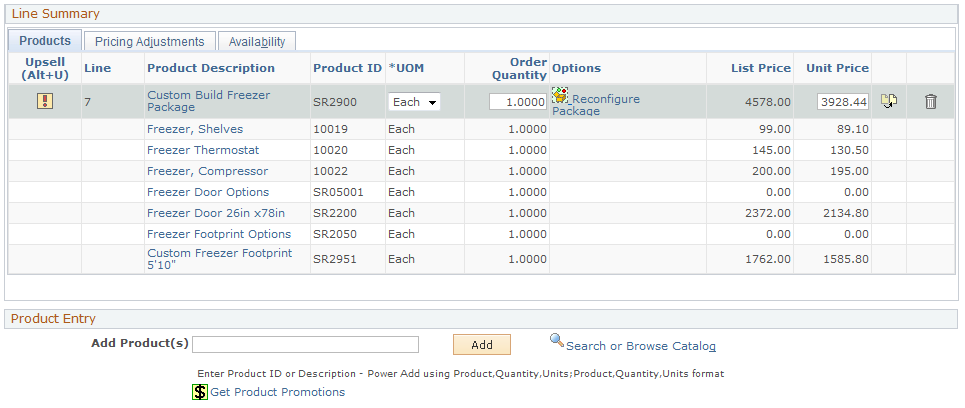
Image: Order - Entry Form page (3 of 4)
This example illustrates the fields and controls on the Order - Entry Form page (3 of 4).
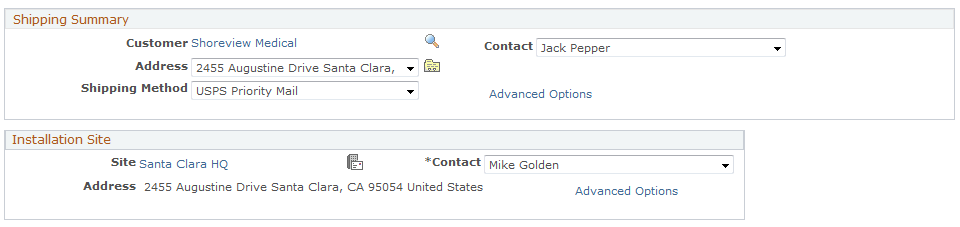
Image: Order - Entry Form page (4 of 4)
This example illustrates the fields and controls on the Order - Entry Form page (4 of 4).
|
Field or Control |
Definition |
|---|---|
| Credit Rating |
Display-only field that is associated with the customer and defaults from the customer data model. |
Customer
When you initially access this page, the Customer, First Name, and Last Name fields are enterable. After you enter or select a customer, the Customer and Contact fields appear.
|
Field or Control |
Definition |
|---|---|
| Customer |
You can create a new customer directly from the Entry Form page using the Quick Create functionality. To create a new customer:
See Understanding Delivered System Data for BO Search and Quick Create. |
| Contact |
The primary Sold To contact defaults here. You can change the contact to any valid Sold To contact associated with this customer for this transaction by selecting from the prompt. Note: If the customer is a company, a Sold To contact is required. A consumer does not require a Sold To contact. Orders or quotes that do not have a contact when one is required are automatically placed on hold. |
 |
Click to access the Search For Contact Of [company] page to view, select, or add contacts for the company. If you wish to select a new customer and contact, click the Search Again link that is available. The current customer information will be erased from the order. |
Order Details
This section appears on the Order - Entry Form page and is similar to the Quote Details section on the Quote - Entry Form page. Fields that are discussed in this section are applicable to both orders and quotes.
Note: Some of the fields may not show depending on template settings and additional fields may show based on the template or the product added to the order.
|
Field or Control |
Definition |
|---|---|
| Business Unit |
Select a business unit to use for this order or quote. Based on the tableset control setup, this field may appear as a read only field with one designated business unit, or a drop-down list box where users can select a business unit from the list for the order or quote. The system locates the default business unit (by taking the Order Capture unit that is specified on the User Preferences page for the user who logged on, or by identifying the default business unit that is specified in the Order Capture Definition component if the former is unavailable). If more than one business unit in the system have their RO_01 (order capture setup tables) record group associated with the same setID as the default business unit, all these business units are then listed in this field. Otherwise, only the default business unit appears in this field and it is not editable. |
| Status |
Displays the status of the order or quote. Common statuses are:
|
| Promotion |
Select a code that uniquely identifies the promotional offer, if applicable. Products assigned to this promotion will then display a promotional price, rather than their regular price. Note: This field involves integration to PeopleSoft Marketing, which relies upon the pricing engine to establish promotional pricing. Under certain circumstances, this field may automatically populate, for instance when an AAF Action that uses a Marketing Wave is used to add a product to the order. |
| Priority |
Priorities appear by default from the Order Capture Business Unit. You can change the priority for the order or quote to Urgent, High, Medium, or Low. Note: There is no extra processing logic associated with priorities. Priorities may be changed from the Setup Workbench. |
| Fulfill By |
Enter the date that the order needs to be fulfilled. This field is empty by default and a value is optional as long as the order is not yet submitted. The Fulfill By date will automatically be populated by the order upon submittal. By default, it's the same as the Earliest date that is calculated by the system and it can be updated manually. Note: The fulfill by date should not be a past date or a date that is earlier than the date that is specified in the Earliest field (if available), otherwise the order will be put on hold. An order is referred to as a future dated order if its fulfill by date is a date in the future. A future dated order would be queued until the date when the order should be fulfilled. |
| Earliest |
Displays the date that the order can be fulfilled at the earliest. This field will appear if any of the products on the order has a defined lead time on its product definition. The system uses this formula to calculate the earliest fulfillment date: Order created date + Product lead time |
| Show Details or Hide Details |
Click to view or hide additional details about the order. |
| Description |
Enter a description for the order if needed. |
| Source |
Identify the source of the order or quote as either CTI, Fax, Phone, Self Service, or Supply Chain. Note: Source types may be changed in the Setup Workbench. |
| Sub Source |
Select the sub source of the order to indicate the origin from where the order is created. Available sub source values are based on the selected source. The default value of this field is specified in the definition of the associated order capture business unit. Sub sources are established in the Order Capture Workbench. |
| Price As Of |
(Optional) Enter the order date that Enterprise Pricer will use in the pricing process. If a date is specified as the price as of date, it is used to match the start and end dates of price lists and price rules for retrieving list prices as well as price adjustments. |
| Created |
The system populates the date when the order is created. You can enter a date in the future or in the past. |
| Currency |
Select the currency to use for the order or quote. This defaults based on the business unit. |
| Total |
Indicates the total price of the order as it stands with the currently added products and the discounts applied. |
Quote Details
This section appears, replacing the Order Details section, when you access the Quote - Entry Form page. Page elements that appear in both the Quote Details and Order Details sections are described above in the Order Details section.
Order Capture displays these additional page elements for quotes.
|
Field or Control |
Definition |
|---|---|
| Due Date |
Enter the date due for the quote. Due Date can be used if the customer has requested pricing information by a certain date, or if the quote is part of a request for quote (RFQ) that is due by a certain time. A default date may populate this field if specified during business unit setup. |
| Expire Date |
Enter the expiration date for the quote. A default date may populate this field if specified during business unit setup. |
| Revision |
Displays the total number of times the quote has been revised. |
| Confidence % (confidence percentage) |
Order Capture provides this field so that PeopleSoft Sales can populate its relevant data in the quote. The value amount is transferred from an opportunity if populated on the opportunity. |
Line Summary: Products
This section lists products that are added to the order in individual lines.
In addition to adding new products to or removing them from the order, you can also:
Update order line information, such as product UOM, order quantity and prices as available.
Perform options that are available to existing products, such as configuring products and adding attributes.
Additional order line information is available on the Order - Line Details page.
See Order - Line Details Page or Quote - Line Details Page.
After you add a product to the order, additional buttons and options appear as appropriate.
|
Field or Control |
Definition |
|---|---|
 |
Click to view an up-sell or cross-sell opportunity. The up-sell alert appears on the order line if there is an upsell or cross-sell opportunity associated with the product. |
 or or  |
Click to transfer to a modal page and configure the product package using Lightly Configurator. If the product package has already been configured, the name of the link is changed to Reconfigure Package. See Configuring Products. |
 (collect attributes) (collect attributes) |
Click to add product attributes to an order or quote line on a modal page that appears. Always specify the attribute value for products with required attributes. |
| List Price |
Displays the list price of the product as defined in the matching price list or the Product Price component (if matching price list is unavailable), which is the default option for displaying initial product list prices on orders that is set at the business unit level. It is the base price that the system uses for calculating price adjustments and the total price of the order line. Note: Administrators can specify how product list prices are derived and displayed on orders initially at the business unit level. By default, it is set to be handled by the pricing engine, which displays the list price from a matching price list, or the list price from the Product Price component if no matching price list is found. |
| Unit Price |
Displays the net price of the product, which can be the same as the list price, or different from the list price in the case when price adjustments are applied (manually by CSRs or by price rules). Product Unit Price = Product List Price + (applicable price adjustments) This value is modifiable. If you want to override the list price in the order line, specify the new price in the Unit Price field. |
Line Summary: Pricing Adjustments
Select the Pricing Adjustments tab to enter discounts or surcharges for order lines.
|
Field or Control |
Definition |
|---|---|
| Total |
Displays the subtotal of the corresponding order line. Total Price = Unit Price x Order Quantity |
| Discount |
Displays, if available, the last available discount amount that has applied to the product list price of the corresponding order line. |
| Promotion Code |
Select a promotion code for the line. If you add a product to the order line using the promotion code, the associated promotion code populates this field. If an activity is direct with an Order Capture integration, the Offer/Promotion Code of the activity will default to both the Order Details Promotion Code and the Line Detail Pricing Adjustment Promotion Code. If you have a promotion code, you must use capture level pricing instead of line level pricing. Note: This field differs from the field on the Header only in that you can specify a product promotion for a specific line. |
| Adjustment |
Enter the amount of the adjustment you want to apply to this order line. You can choose to enter either a percentage or an actual currency amount. Select Percent or Amount in the next field to decide whether the number you enter here will be a percentage of the price, or a static currency adjustment. |
| Pct/Amt (percent/amount) |
Identifies the adjustment field as an exact Amount or a Percentage. |
| Adjustment Type |
Select whether the price adjustment is a Discount or a Surcharge. |
| Apply |
Click to apply the discount or surcharge to the order line. The system updates the Total Price and Discount fields of the order line. |
| More... |
Click to access the Price Adjustments page to view the price adjustments that have been applied to the order line currently (both manual and price rule adjustments). You have the choice to delete pricing adjustments if the order has not been submitted. |
Line Summary: Availability
Select the Availability tab to check product availability and specify shipment preference.
|
Field or Control |
Definition |
|---|---|
| Availability |
Click the Check Availability link to conduct a real-time availability check. An integration with the PeopleSoft SCM or a third-party inventory system should be up and running for this link to be operative. If successful, the process returns a numerical count of the remaining number of products in stock for those products that you have selected. If the response fails to return (for example, integration issue or system down, this link is renamed to Availability Check Failed. This link is applicable to tangible products. |
| Partials |
Select to allow partial shipment of the order line. This option is applicable to tangible products. |
Product Entry
Add products to orders using any of these methods:
Enter the product ID or description manually and click the Add button.
Search for the product from catalogs.
|
Field or Control |
Definition |
|---|---|
| Add Product(s) |
Enter the product ID or a description to search for a product or product package. The system retrieves all the products that you have requested and enters each product on a new line. You can enter more than one product at a time by separating the product IDs or descriptions with semicolons. Be sure to leave no spaces between the IDs or descriptions. This field contains processing logic so that you do not need to enter exact information. Partial matches retrieve the Product Search Results Page, which lists all of the closest matches. Note: This field is also equipped with Personalization capability. A CSR's preferences for product selection can be configured so that a variety of input techniques can be used. |
| Search or Browse Catalog |
Click to view catalogs that are associated with this business unit. You can make selections from available catalogs and compare products. You can then add product selections directly to the order form. |
| Get Product Promotions |
Select to access the Products Promotions page to view the promotions that are defined in Marketing for the customer. If the customer only qualifies for one offer, then the order is populated with that offer code. If the customer qualifies for multiple offers, the offer codes are available in a pull-down in the Order so that the user can select the appropriate one. |
Shipping Summary
Use this section to enter shipping information.
Clicking the Advanced Options link combines the Shipping Summary and Installation Site sections to become the Advanced Shipping section. CSRs choose to work with the advanced mode of the form typically when there is a need to split shipments, in which case the installation sites would likely to be different for each shipment.
If the Installation Site section is not displayed in the basic mode, it'll be hidden in the advanced mode as well.
|
Field or Control |
Definition |
|---|---|
| Customer |
Displays the customer who the order will be shipped to. Click to access the Company page in the Customer Data Model. |
 |
Click to select a different ship to customer. |
| Contact |
Select a shipping contact for the customer. Note: Select Add/Select More Contacts to access the Address Book - Select Contact page to select or add a contact. When adding a new contact, you can indicate the new contact as a one-time contact by checking the "One Use Only (not a permanent address or contact)" on the Address Book - Create New Address page. |
| Address |
Select a shipping address for the customer. Note: Select Add/Select More Addresses or click the View Addresses button to access the Address Book - Select Address page to select or add a shipping address. When adding a new address, you can indicate the new address as a one-time address by selecting One Use Only (not a permanent address or contact) on the Address Book - Create New Address page. |
| Shipping Method |
Select a carrier service. Applicable carriers that are to be used by the system are set up in CARRIER_TBL. |
| Arrival Date |
Select the requested arrival date for the product(s) being shipped. If the order is a future dated order, the shipping Arrival Date must be after the Fulfill By date, otherwise the order will go on hold. |
| Description |
Enter any additional information about the shipment. |
| Tax Exempt Flag |
Select if the shipment is exempt from taxes. If selected, Order Capture displays the Exemption Certificate field where you select a tax exemption certificate. |
 |
Click to select the site and address or to add a site address. After you select a site, Order Capture displays the site name, which you can then click on to access the Site page in the Customer Data Model. Note: Select Site appears only when a product requires one, as defined in the product data model or if the No Site Hold option is active. See Defining Creation and Update Rules for Installed Products. |
| Contact |
Select a site contact for the customer. Note: Select Add/Select More Contacts to access the Address Book - Select Contact page to select or add a contact. Contact displays only when a product requires one, as defined in the product data model or if the No Site Hold option is active. |
| Address |
The primary address associated with the site appears here. Note: Address displays only when a product requires one, as defined in the product data model or if the No Site Hold option is active. |
Lines for this Destination
This section shows all products tied to the shipment. You can split a shipment so that certain lines are:
Shipped to a different address.
Shipped using a different shipping method.
Assigned to a different site.
Assigned a different requested date.
Note: You cannot split the quantity on a single line into multiple shipments. You must create two lines with the appropriate quantity so that you can specify a unique shipping address, shipping method, and date for each shipment.
|
Field or Control |
Definition |
|---|---|
| Split |
Select a line to split the order into multiple shipment. |
| Move to Another Shipment |
After you select a line, click to split a line to create multiple shipments. |
| Combine with Previous Shipment |
Click to combine the shipment with the previous shipment. This button appears after you split a shipment |
| Basic Options or Advanced Options |
Click to view or hide details about the shipment. |
Installation Site
This section appears if one of these conditions is met:
Any product added to this order has the Site Required option selected on the Installed Product page of its product definition.
The NOSITE hold is enabled for this capture type (for example, order, or quotet) and business unit combination.
Hold processing is defined using the Capture Type Workbench. For each setID that is used by the order capture applications, you specify, per capture type, a list of hold validations that the system fires when CSRs submit forms of that capture type. For example, if this hold is enabled for the SHARE setID and the order capture type, for any order of which its business unit is associated with this setID, the system performs a check and places a hold on the order if a site is missing at time of submission.
By default, the NOSITE hold is disabled in system delivered setIDs.
|
Field or Control |
Definition |
|---|---|
 |
Click to select the site and address or to add a site address. After you select a site, Order Capture displays the site name, which you can then click on to access the Site page in the Customer Data Model. Note: This icon appears only when a product requires one, as defined in the product data model or if the No Site Hold option is active. See Defining Creation and Update Rules for Installed Products. |
| Contact |
Select a site contact for the customer. Note: Select Add/Select More Contacts to access the Address Book - Select Contact page to select or add a contact. Contact displays only when a product requires one, as defined in the product data model or if the No Site Hold option is active. |
| Address |
Displays the primary address associated with the site appears here. Note: Address displays only when a product requires one, as defined in the product data model or if the No Site Hold option is active. |
| Advanced Options |
Click to view the Lines for this Destination section under the Advanced Shipping section. Both the Shipping Summary and Installation Site (if available) sections are combined and renamed the Advanced Shipping section. CSRs choose to work with the advanced mode of the form typically when there is a need to split shipments, in which case the installation sites would likely to be different for each shipment. The Lines for this Destination section shows all products tied to the shipment. You can split a shipment so that certain lines are:
Note: You cannot split the quantity on a single line into multiple shipments. You must create two lines with the appropriate quantity so that you can specify a unique shipping address, shipping method, and date for each shipment. |
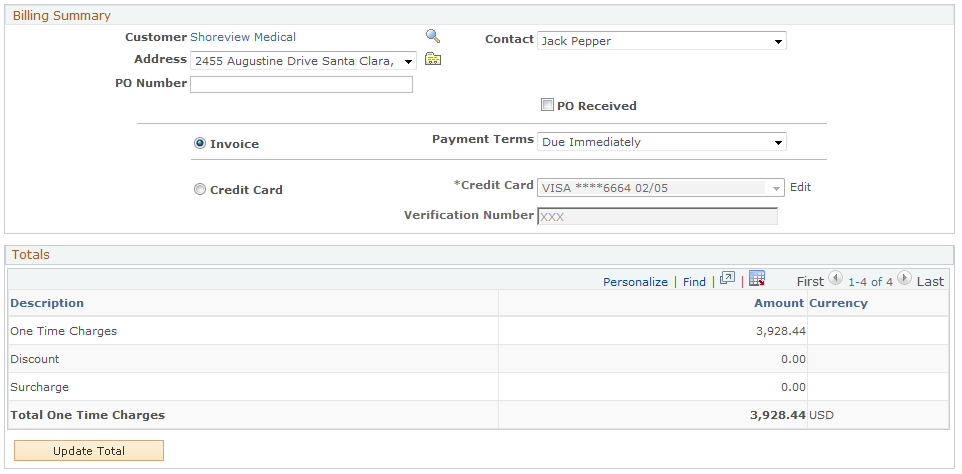
Billing Summary
Use this section to manage payment information.
|
Field or Control |
Definition |
|---|---|
| Customer |
Displays the customer who the order will be billed to. Click the link to access the Company page in the Customer Data Model to view customer detail. |
 |
Click to select a different bill-to customer, if available. The system displays additional companies that are specified in the Send Bills To section of on the Company - Summary: Purchasing Info page. These companies have a Billed To relationship with the sold-to customer, which is either the one that appears on the order header, or the one that is currently selected in the Related Customer section of the order (in case of a convergent order that can include more than one customer for package migration purposes). See Purchasing Info Page. |
| Contact |
Select a billing contact for the customer. Note: Select Add/Select More Contacts to access the Address Book - Select Contact page to select or add a contact. When adding a new contact, you can indicate the new contact as a one-time contact by checking the "One Use Only (not a permanent address or contact)" on the Address Book - Create New Address page. |
| Address |
Select a billing address for the customer. Note: Select Add/Select More Addresses or click the View Addresses button to access the Address Book - Select Address page to select or add a billing address. When adding a new address, you can indicate the new address as a one-time address by checking the "One Use Only (not a permanent address or contact)" on the Address Book - Create New Address page. |
| PO Number (post office number) |
Enter the purchase order number, if one exists for the customer. |
| PO Received (post office received) |
Select this check box if a purchase order has been received. Note: This functionality is designed solely for auditing purposes. There is no attached business logic. |
| Invoice |
Select this payment option if you want to issue an invoice to the customer. |
| Payment Terms |
Select terms of payment if Invoice is selected as the payment method. This field is unavailable for edit if invoice is not the selected payment method. |
| Credit Card |
Select this payment option if you want to charge the customer using a credit card. |
| Credit Card (drop-down list) |
Select an existing credit card from available values or add a new credit card. Note: The credit card is attached to the bill to contact or consumer in the customer data model. |
| Edit |
Click to access the Edit Credit Card page (RO_CREDITCARD_SEC) to add new or edit existing credit card information for the customer. Note: When you add new or edit existing credit card information, you can select the Save on File option to save the information in the Customer Data Model. |
| Verification Number |
Enter the card verification code of the selected credit card (a 3-digit or 4-digit number). After you enter the number for the first time and tab out of this field, the system masks the entered number automatically and displays it in the form of XXX. This field becomes required if the Credit Card Verification Number Required option is selected on the General Options page. The system deletes the verification number permanently from the database after the order is submitted and the credit card authorization process is completed (whether passed or failed), or if the order is being canceled. For future dated orders, their verification numbers are stored in the database, and will be removed when the fulfill by date is reached AND the orders are submitted. |
Totals
Use this section to view and update the order total.
The system computes and displays the order total based on the price order option that is specified at the business unit level. Depending on the average size of orders and the number of orders an organization gets for a period of time, administrators can decide the best approach to show updated order pricing without causing negative impact to system performance. For example, for organizations that process large orders (containing over 100 order lines), administrators can choose to update order pricing only when users click the Update Total button, as opposed to when users add new order lines.
|
Field or Control |
Definition |
|---|---|
| One Time Charges |
Lists the total one-time charges of the order. |
| Surcharge and Discount |
Displays the order-level pricing adjustments. |
| Taxes and VAT |
Order Capture integrates with Taxware, Vertex, and WorldTax to calculate VAT and other taxes. Make sure that your tax integration options for Order Capture are set up on the Business Unit Definition page and tax provider page prior to using the functionality at runtime. Note: To display VAT, you must define World Tax as your Tax Vendor when you created your Order Capture business unit. You can test all of your third-party integrations on the business unit definition page. |
| Update Total and Total One Time Charges |
Click to manually invoke the pricing engine and any third-party calculations such as VAT, taxes, and shipping, and update the total amount charged to this order or quote. This is then reflected in Total One Time Charges. |
Use the Order - Line Details page or Quote - Line Details page (RO_CAPTURELINE_DTL) to view up-sell or cross-sell opportunities, and check product availability.
You can edit line details such as unit of measure, order quantity, unit price, and promotion code. You can also allow partial shipment for this product.
Navigation
Image: Order - Line Details page (1 of 2)
This example illustrates the fields and controls on the Order - Line Details page (1 of 2).
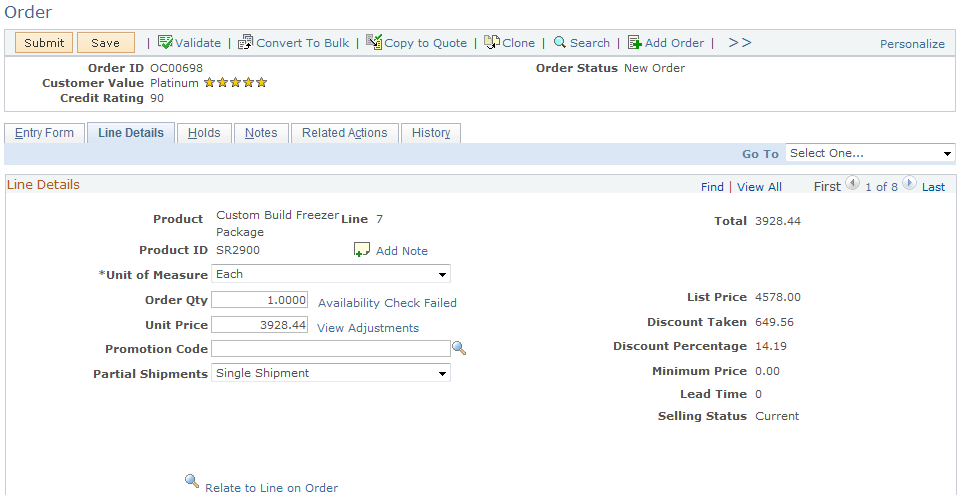
Image: Order - Line Details page (2 of 2)
This example illustrates the fields and controls on the Order - Line Details page (2 of 2).
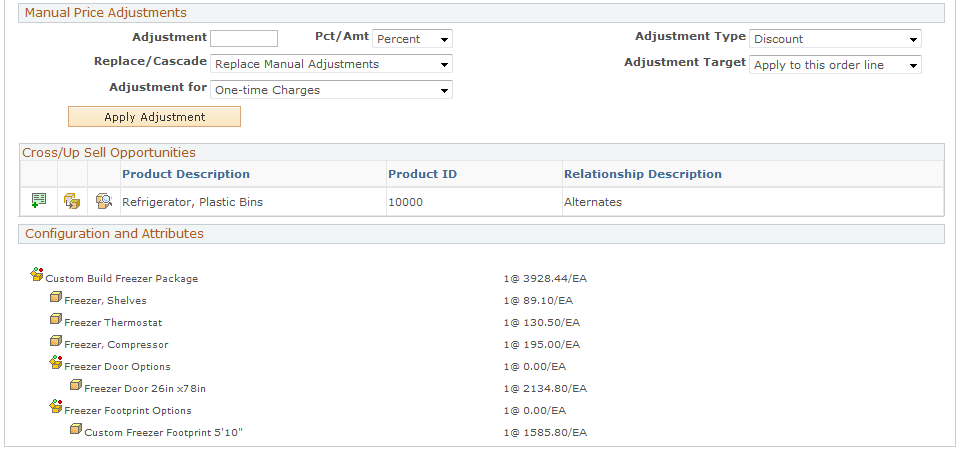
This page provides detailed information for each product ordered on each order line. Available information includes pricing, cross-sell and up-sell opportunities, configuration setting and attributes and so on. You can apply manual adjustments on the price of the order as well.
|
Field or Control |
Definition |
|---|---|
 (add note) (add note) |
Click to access the Notes and Attachments page. The cursor is automatically placed on the Summary line so that you can write your note immediately. When a note is attached, the icon becomes dotted. |
| Unit of Measure |
Select the product's unit of measure for use in the order. You can specify the units of measure for products on the Product Unit of Measure component. |
| Order Qty (order quantity) |
Specify the quantity of the product to be ordered. |
| Availability |
Click to return an exact numerical count of the remaining number of products in stock. Note: Order Capture uses the SCM_PROD_AVAIL integration point to make a call to PeopleSoft Supply Chain Management to determine product availability. PeopleSoft Supply Chain Management returns an exact numerical count of available products. If you are using a third-party product for order fulfillment, you can use this integration point. It provides the ability to transform the integration point message to the appropriate format using the PeopleTools Integration broker. If the availability check cannot be processed successfully, because the integration is inactive, the system is not responsive and so on, this link is renamed to Availability Check Failed. |
| Unit Price |
Displays the new net price of the product in the order line. A unit price is calculated by applying price adjustments to the list price of product. A price adjustment can be:
|
| View Adjustments |
Click to access the Price Adjustments page to view any price adjustments that have been applied to the order line and the respective adjustment methods (for example, manual price override, manual adjustment, or Summed Pro-rated Order Adjustments) as well as the price rules used in the process. |
| Promotion Code | |
| Partial Shipments |
Select Single Shipment not to allow partial shipments. Select Ship as Items Available to allow partial shipments. |
| Total |
Displays the one-time price total of the order line, which is the result of multiplying the unit price by the order quantity. |
| List Price |
Displays the product's one-time list price, which is retrieved either from a matching price list or the Product Price component (this is the default option for displaying initial product list prices on orders that is set at the business unit level). |
| Discount Taken and Discount Percentage |
Displays the discount (in actual amount and in percentage) that is applied to the one-time price of the specified target (this order line or the entire order), if available. For example, if you apply a $1 discount to a product of list price $25, the value of discount taken is $1.00 and the discount percentage 4 (which stands for 4 percent). |
| Minimum Price |
Displays the product's minimum price as defined on the Product Unit of Measure page. |
| Lead Time |
Displays, if available, the lead time that is defined in the product definition. The system uses this value to calculate the earliest order fulfillment date. |
Manual Price Adjustments
Validation checks are in place to make sure that total discounts or surcharges imposed on orders are within limits. Functional options are set up to limit the amount of discounts and surcharges that functional group users can apply. So when an order capture user (a customer support representative or an administrator who is also a functional group user) places an order with price adjustment, the system retrieves the maximum surcharge and discount amount allowed and compares the values with the pending surcharges and discounts. The order is put on hold if the pending amount exceeds the hold limit permitted to the user.
|
Field or Control |
Definition |
|---|---|
| Adjustment |
Enter the amount of the adjustment you want to apply to this order line. You can choose to enter either a percentage discount or an actual currency discount. Select Percent or Amount in the Pct/Amt field to decide whether the number you enter here will be a percentage of the price, or a static currency adjustment. |
| Pct/Amt (percent/amount) |
Identifies the adjustment field as an exact Amount or a Percentage. |
| Replace/Cascade |
Cascade Manual Adjustment adds this price adjustment to all existing adjustments, whereas Replace Manual Adjustments replaces any manual adjustments with the current discount being applied. |
| Adjustment for |
Displays One-time Charges, which is the default charge type to which the manual adjustment applies. |
| Adjustment Type |
Select Discount or Surcharge. |
| Adjustment Target |
You can target the discount for the current line that you are looking at, in which case you select Apply to this order line, or you can apply the discount to the whole order, by choosing Apply to entire order. |
| Apply Adjustment |
Click to apply the manual price adjustment to the order line. The system updates values of the Total Price, Unit Price and Discount fields accordingly. |
Cross/Up Sell Opportunities
This section lists the product definitions that are associated with the ordered product in the Product Relationship component.
|
Field or Control |
Definition |
|---|---|
 |
Click to add the corresponding product to the order. |
 |
Click to replace the ordered product of this line detail with the product corresponding to this icon. |
 |
Click to view the comparison between the ordered product of this line detail and the product corresponding to this icon. |
Configuration and Attributes
This section provides a detailed list of the options selected for the configured product. Configuration details appear in a list with corresponding product name, description and price. Attributes that are captured during the product configuration session also appear in this section.
Note: If a product is defined in the product data model as requiring configurable attributes, the Collect Attributes link appears when the product is added. You can also view the attribute and attribute values that are captured using this link for the product.