Creating a Sales Lead
This topic discusses how to create a sales lead.
Warning! If you use a Sybase database and your user role has data distribution rules with 16 or more subqueries, you may receive an error message when you access a lead or opportunity. If an error occurs, reduce the number of data distribution rules for the user role, or reduce the complexity of the data distribution rules.
You can set up data distribution rules in Enterprise Components.
See Enterprise Components product documentation.
|
Page Name |
Definition Name |
Usage |
|---|---|---|
|
RSF_LEAD_ENTRY |
Enter details about a sales lead, including the name, status, and rating, and the customer's name, address, and contact people. |
Use the Lead - Discover page (RSF_LEAD_ENTRY) to enter details about a sales lead, including the name, status, and rating, and the customer's name, address, and contact people.
Navigation
Image: Lead - Discover page (1 of 2)
This example illustrates the fields and controls on the Lead - Discover page (1 of 2).
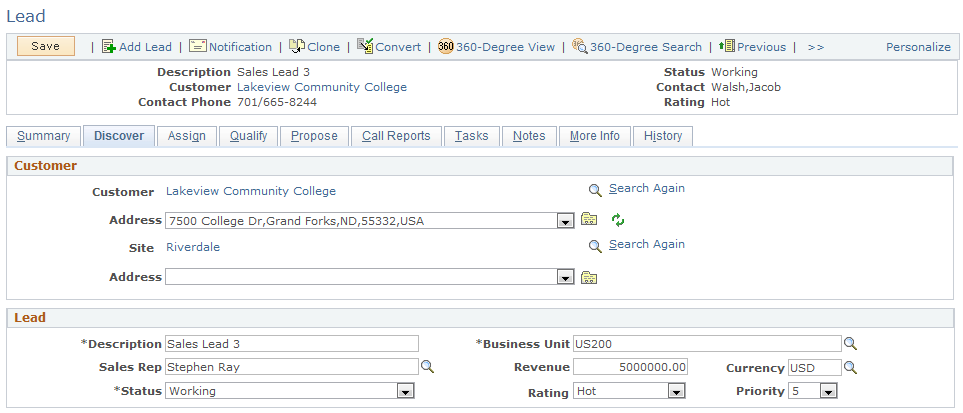
Image: Lead - Discover page (2 of 2)
This example illustrates the fields and controls on the Lead - Discover page (2 of 2).
Customer
The Type field indicates whether a lead is a company or a consumer. Depending on which you choose, different fields appear. For company customers, you can enter Customer and Site; for consumers, the fields are First Name, Last Name, and Site.
Note: For Higher Education leads, the Consumer type is selected as the default value if the business carding functionality is enabled.
See Selecting the Customer for a Lead or Opportunity.
When a customer is present on the lead, the Address field is populated with the primary address for the customer. Use the drop-down box to select whether to use an existing address, search for an existing address not in the list, or add a new address. Then, click the Go button to search for an address or add a new address.
Note that if the customer for a lead is a prospect, the name of the customer is editable on the Lead - Discover page. Otherwise, the customer name is displayed as a link that you can click to view more information about the customer.
When you manually create a lead, a text entry field and a search button appear next to the Customer and Site or First Name/Last Name and Site fields. You can enter or search for a customer and site. Before clicking the Search button, you can optionally enter characters in the Customer or First Name and Last Name fields to limit the search.
See Selecting the Customer for a Lead or Opportunity.
If you display an existing lead, the relevant fields (Customer or First Name and Last Name are displayed when lead is for a prospect customer.) If the lead is for an existing customer, a link is displayed that can be clicked to launch an existing customer's information on either the Company or Person (Consumer) components. The Search button becomes a Search Again link.
When a customer is present on the lead, the Address field is populated with the primary address for the customer. Use the drop-down box to select whether to use an existing address, search for an existing address not in the list, or add a new address. Then, click the Go button to search for an address or add a new address.
Lead
|
Field or Control |
Definition |
|---|---|
| Description |
Enter a description of the lead. This can be the customer name, the product, or other descriptive information. You can define the default value for this field on the Component Field Default component. |
| Business Unit |
Enter the business unit with which the lead is associated. The default is the business unit that is associated with the sales user on the Sales User page. If the person who is signed in is not a sales user, then the system uses the business unit that is specified on the person's User Preference page. |
| Sales Rep (sales representative) |
Enter the primary sales representative (formatted name: first name, last name) who is assigned for this lead. The default is the name of the sales user who is currently signed in. If your sales access profile permits you to reassign leads, you can override the default value. You can enter the desired sales person's name by entering a few letters of the sales user's last name and clicking the Lookup button to search for that person, or you can click Lookup without entering any letters to select from the list of all sales users that are within the specified business unit. Note: This field is renamed Recruiter for Higher Education leads. |
| Revenue and Currency |
Enter the estimated amount of revenue that you anticipate from this lead and the currency code for the revenue. When you add products to the lead on the Propose page, this currency is used for pricing information and to calculate a total price. You cannot change the currency code if products are already associated with the lead. The default currency code is the code that is associated with the sales user on the Sales User page. |
| Status |
Select the current status of the lead. Note: Status values are delivered as translate values; do not modify or delete them. However, if you have the required security permissions, you can create additional status values. Delivered values are:
|
| Rating |
Indicates the degree of the customer's interest or the potential for making a sale; for example, Hot, Warm, or Cold. Define rating values on the Lead Ratings page. Also, you can map scripted survey ratings to lead ratings to qualify a lead and move it from PeopleSoft Marketing to Sales. If a lead is not accepted or rejected within the specified time for its rating, PeopleSoft Sales workflow can be triggered to send an email notification to the assigned sales representative and to the representative's manager. Workflow can also send an email notification to the marketing agent who transferred the lead and to that agent's manager. Note: If the lead source is PeopleSoft Marketing, the value in this field is automatically generated. You can override this value. |
| Priority |
Select a priority to indicate the urgency of working this lead. Priority values are translate values. |
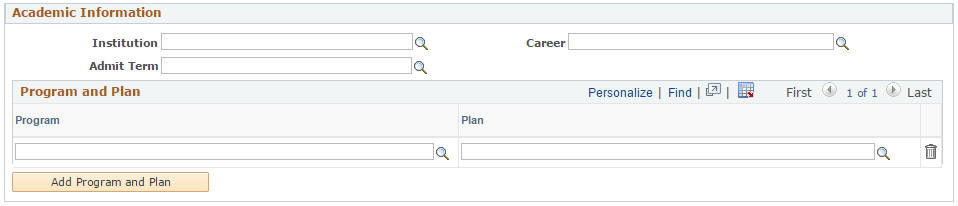
Academic Information
Use this section to select and store information about the institution, career, and one or more program and plan sets for the constituent in the lead.
This section appears only for Higher Education leads. Changing the customer of the lead does not change the current selection in this section.
If the Academic Information section is not displayed in the Lead — Discover page, check installation options and see if the Higher Education option is enabled. To check this pre-requisite, navigate to and select Higher Education under Product Options and Save. Then, navigate to . Search for HE_SALES Display Template and open the template for leads. Click Discover and select the Academic Information option under Sections. Save changes.
After making changes to the Installation Options, restart the Application Server and access the Lead — Discover page.
Image: Academic Information section of the Lead - Discover page
This example illustrates the fields and controls on the Academic Information section of the Lead - Discover page.
|
Field or Control |
Definition |
|---|---|
| Institution and Career |
Select the institution and career for the lead. These fields are editable when you first add the new lead; they become read-only after the lead is saved. The system filters the values for career based on the selected institution. Each lead supports only one institution and career. |
| Admit Term |
Select an admit term for the selected institution, career, program and plan combination, if applicable. Note: Enter value in this field if you run the Recruiting Performance Fusion Intelligence reports off of the CSW: Recruiting & Admissions Interactive Dashboard. |
| Program and Plan |
Enter a school program and a plan for the program. You can enter multiple programs and plans for the lead. The system filters the values for program based on the selected career, and plans based on the selected program. The system removes any existing program and plan sets in the lead if you change the current institution or career. |
| Add Program and Plan |
Click to add a new row and enter a program and a plan. |
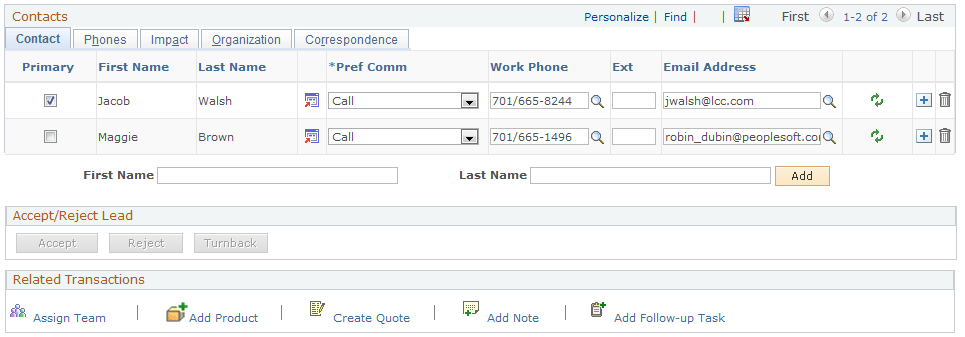
Contacts
This page region enables you to view and enter information about the contacts for the lead.
If the Allow Prospects option is enabled on the Installation Options page, you can use the + button to enter new prospects, or run a search to find already entered contacts.
See Selecting Customer Contacts for a Lead or Opportunity, Understanding PeopleSoft CRM General Options.
Accept/Reject Lead
Click a button to accept, reject, or turn back the lead. If you click the Reject or Turnback button, the Reason (required) and Comments (optional) fields appear on the page.