Configuring a Results List

A newly-added Results List component displays five attributes for each record. You determine how the component displays and how end users can interact with each displayed attribute.

To configure a Results List:

  1. Choose a data set view:
    1. In the component menu bar, click the Options icon to navigate to the Edit view:
      The Options icon.

      The Edit view opens to the Data Selection tab.

      The tab contains the list of views for the project. Views that are not valid for the selected component or sub-component are disabled in the UI.

      The View list includes the view name, description, whether the view is a base or custom view, the data sets the view is created from, and the identifying attributes for the view.

    2. (Optional) To display the list of attributes in a view, click its information icon.
    3. Select a view by enabling the radio button.
    4. Click Save.
      A message bar displays the result of the save operation.
  2. Select the attributes to display for each record in the list:
    1. In the Edit view, navigate to the List Template tab.

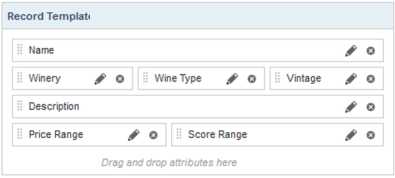
      The Results List record display includes multiple rows, each of which can contain up to 3 attributes. You can add or remove rows and attributes from the Record Template pane in this tab:
      List Template tab of the Results List edit view

    2. To add an attribute to the template, drag the attribute from the attributes list to the desired location in the Record Template.

      You can create a new row for the attribute or add it to an existing row.

    3. To change the location of a selected attribute, drag it to another location in the template.
    4. To remove an attribute from the template, click its delete icon.
  3. Configure the format of each displayed attribute:
    1. In Record Template pane, click the edit icon for an attribute you wish to configure.
    2. Configure the attribute as described in Configuring attribute value formats.
  4. Configure available actions for each displayed attribute:
    1. In Record Template pane, click the edit icon for an attribute you wish to configure.
    2. Configure the actions as described in Configuring actions for attribute values.
  5. Click Save.