Configuring column formatting
From the Column Selection tab of the Results Table edit view, you can configure the width, formatting, and other options for all of the table columns.
Note that for a record list table, if you are using the default column configuration, then you cannot configure the columns. Only default settings are used.
To configure the display of a column:
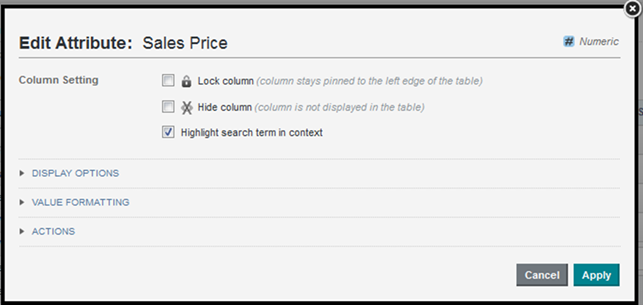
- From the Column Selection tab, to display the Edit column dialog, click the edit icon for the column.
- For aggregated tables, select the aggregation method for each metric.
- For a date/time attribute, from the Date/time Subset list, select the date/time subset to display.
The selected date/time subset is included in the column heading on the end user view.

- For persistent columns and dimensions, you can lock the column, so that it is always visible at the left of the table.
To lock the column, check the Lock column check box.

To unlock the column, deselect the check box. If the column is not locked, it is still at the left of the table, but can scroll horizontally.
- By default, all of the columns are visible. However, you can configure a column to be hidden when the table is first displayed.
To hide the column by default, check the Hide column check box.
On the Column Selection tab, hidden columns are flagged with an icon.
- For record list tables, you can indicate whether to highlight search terms that appear in the attribute value. To highlight search terms, check the Highlight search term in context check box.
- Optionally, configure the Attribute Cascade section to configure a dimension cascade when users refine by the dimension value as described in Configuring cascading for dimension refinement.
- In the Display Options section:
- Under Alignment, to select the horizontal alignment to use for the column value, click its radio button.
- Under Width, to override the default width, click Custom, then in the field, type the width in pixels of the column.
- The Value Formatting section is used to set the format for displaying the column values.
For details on formatting displayed values, see Configuring attribute value formats.
- The Actions section allows you to configure the action that occurs when users click the value.
When the dialog is first displayed, the section is collapsed. To expand or collapse the section, click the section heading.
For general information on configuring column actions, see Configuring actions for attribute values.
In addition to the basic action configuration, for Results Table columns, you can use the Action Condition setting to also set a condition to determine whether to enable the action based on the value of an attribute in the table. For example, you can configure the action to only be enabled if the Date Reviewed column has a non-null value.

For details on configuring action conditions, see Configuring conditions for enabling Results Table actions.