Assembling Branding Themes
Use the Assemble Themes page to create and maintain the definitions of branding themes.
Navigation:
This example illustrates the fields and controls on the Assemble Themes page. You can find definitions for the fields and controls later on this page.
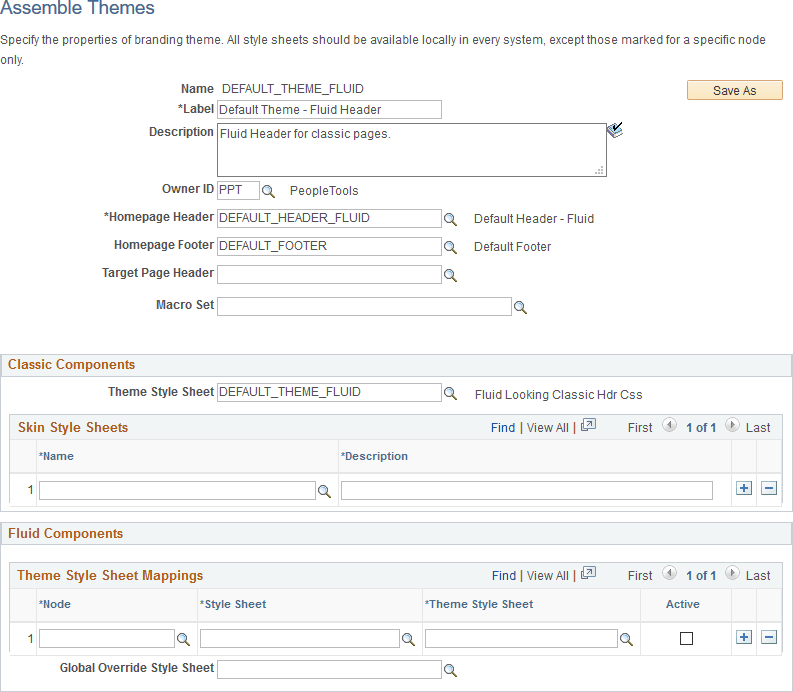
| Field or Control | Description |
|---|---|
|
Name |
Displays the ID of the theme that was specified when the theme was created. |
|
Save As |
Click the Save As button to save the current theme definition with a new ID. |
|
Delete |
Click the Delete button to delete the this theme definition. Note: The Delete button is displayed only for those theme definitions that are not assigned at the system, portal, or user attribute level. |
|
Label |
Enter a label for the theme definition. |
|
Description |
Enter a description for the theme definition. |
|
Owner ID |
Select which product, feature, or application owns this theme definition. |
|
Homepage Header |
Select a header definition to be used for classic homepages only. |
|
Homepage Footer |
Select a footer definition to be used for classic homepages only. |
|
Target Page Header |
Select a header definition to be used for classic pages only. Note: If no header is specified, then the header defined for homepages will also be used on target pages. |
|
Macro Set |
Select a custom macro set for this branding theme. |
Classic Components
Note:
For a cluster of applications managed by PeopleSoft Interaction Hub, the theme style sheet and any skin style sheets must exist in all systems.
| Field or Control | Description |
|---|---|
|
Theme Style Sheet |
Select an override style sheet for the theme for classic components. Note: Theme style sheets can only be free form style sheets. |
|
Name(Skin Style Sheets) |
Identify one or more free form style sheets that can be made available to use with this theme as skin style sheets. The skin style sheets identified here are made available for use on the Assign Branding Themes page. |
|
Description |
Enter a description of the skin. |
Fluid Components
Use the Fluid Components group box to register a base style sheet and theme style sheet pair for a specific node. Alternatively, you can use the Register Fluid Theme Style Sheet Mappings page to perform this registration, which will ensure that the pair is mapped correctly. See Generating Theme Style Sheets for Fluid Components. The rows in the Theme Style Sheet Mappings grid specify a mapping of a theme style sheet to a base style sheet only; the grid does not specify that this base style sheet is in use. The base style sheet is assigned at the system level on the Branding System Options page, or at the component or page level through PeopleCode. Then, when the base style sheet is loaded by the system into the generated HTML, any mapped theme style sheet is loaded immediately after it.
Note:
For a cluster of applications managed by PeopleSoft Interaction Hub, the global override style sheet and any mapped theme style sheets for a node specification of ANY must exist in all systems.
| Field or Control | Description |
|---|---|
|
Node |
Select the node to which the style sheet and theme style sheet is to be applied. You can select a specific node name, or one of the following values:
Note: The list of specific nodes includes non-local PeopleSoft nodes that have a defined content URI. |
|
Style Sheet |
Select the base style sheet for fluid components for the selected node. Note: The lookup lists style sheets on the current system. For remote nodes, you must ensure that the style sheet you select also exists in the remote system. |
|
Theme Style Sheet |
Select a mapped style sheet that has already been generated from the selected base style sheet. Note: The lookup lists style sheets on the current system. For remote nodes, you must ensure that the style sheet you select also exists in the remote system. |
|
Active |
Select this option to make the mapped pair active. |
|
Global Override Style Sheet |
Select an override style sheet for the theme for all fluid components on all nodes. |
Add to Project
Click the Add to Project link to access the Add To Project page to insert this branding theme definition into an ADS project. See Lifecycle Management Guide: Adding Data Set Instances from Object Designer Pages and Migrating Branding Data Using ADSs for more information.
Reverting Branding to Pre-8.63 Visuals
After upgrading to PeopleTools 8.63, you can revert the system branding to pre-8.63 visuals. The reversion mostly changes the colors to the PeopleTools 8.62 colors. Consider the following two scenarios before you revert the system branding to pre-8.63.
Scenario A: You've upgraded to PeopleTools 8.63, and you are using the delivered system branding theme.
In this scenario, to revert the system branding to pre-8.63:
-
Create a custom branding theme by cloning the delivered DEFAULT_THEME_FLUID theme.
Refer to Assembling Branding Themes for instructions.
-
Continue by completing the steps in Scenario B.
Scenario B: You've upgraded to PeopleTools 8.63, and you are using a custom system branding theme.
In this scenario, to revert the system branding to pre-8.63:
-
Select .
-
Select the custom system branding theme.
-
In the Classic Components group box, in the Skin Style Sheets grid, select PT_CUSTOM_PROPS_PRE863 and enter a description.
-
In the Fluid Components group box, in the Theme Style Sheet Mappings grid, select the following:
-
In the Node field, select ANY.
-
In the Style Sheet field, select PSSTYLEDEF_FMODE.
-
In the Theme Style Sheet field, select PT_CUSTOM_PROPS_PRE863.
-
In the Active field, select the check box.
-
-
Save your changes.
-
Sign out and sign back in.
Reverting Quick Access Bar (QAB) on Homepages to PeopleTools 8.59
In PeopleTools 8.60, by default, the quick access bar (QAB) is available on the banner. However, you can revert QAB to pre-8.60 on fluid homepages, for example, if you want to brand the logo area and require additional space for your logo in the banner. When you revert QAB to pre-8.60, QAB appears on the left on fluid homepages.
To revert QAB to pre-8.60:
-
Select .
-
Select Search.
-
From the search results, select PPTL.
-
Select the Format tab.
-
In the User Option column, locate HPQABPNL.
-
Select the Set Option Default Value link and change the value from "No" to "Yes."
See Security Administration: Understanding Internally Controlled Options.
-
Save your changes.
-
Sign out and sign back in.
On all fluid homepages, QAB appears on the left as a vertical bar. On classic pages, fluid pages, and classic homepages, QAB appears on the banner.