10 Connect to Compute
This section covers connecting compute in your Oracle AI Data Platform to other business intelligence tools.
Connections
You can connect your Oracle AI Data Platform with Oracle Analytics Cloud or other business intelligence tools.
You can connect to AI Data Platform from different business intelligence tools using a custom JDBC or ODBC provided by AI Data Platform. AI Data Platform also supports connections from third party commercial BI tools (Tableau, Power BI) or open source BI tools like DBeaver. In order to connect from these tools, you need the connection details of the compute cluster in your AI Data Platform, which you can find in the Connection details tab. The required information varies depending on the product you are connecting from.
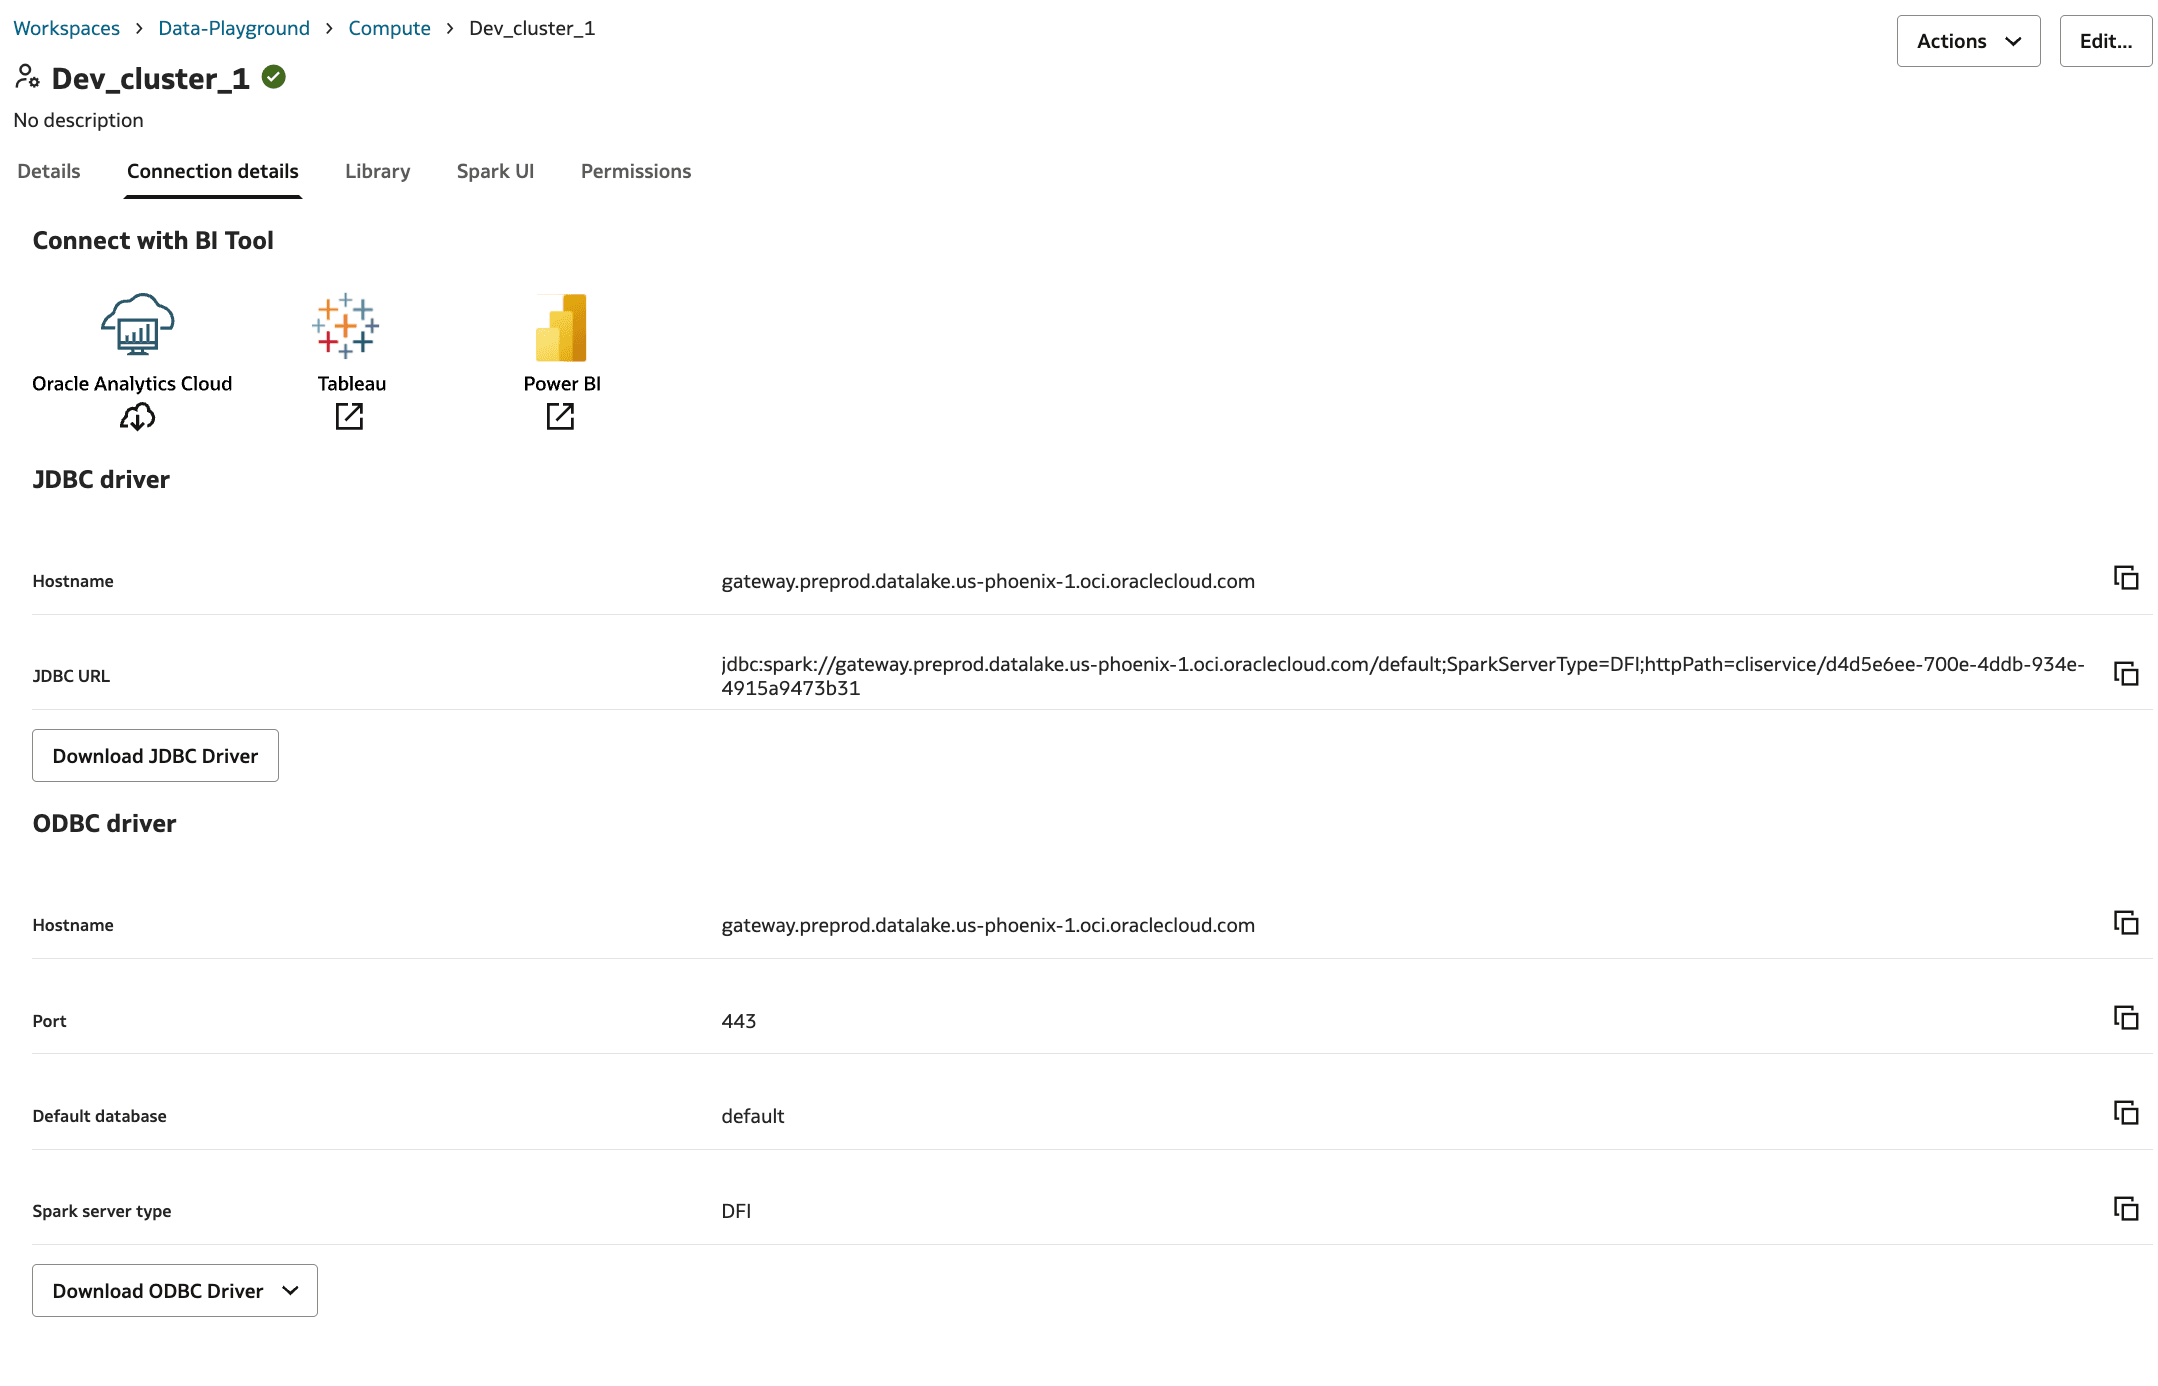
Connect Oracle Analytics to Oracle AI Data Platform
You can connect to the catalog or tables managed by your Oracle AI Data Platform instance from an Oracle Analytics Cloud instance.
In order to create a connection from Oracle Analytics to AI Data Platform, you need a connection file from AI Data Platform and an API key from Analytics Cloud.
Get an Oracle Analytics Connection Configuration File
You need to download a config.json file from your Oracle AI Data Platform instance to connect it to Oracle Analytics.
- Navigate to your workspace and click Compute.
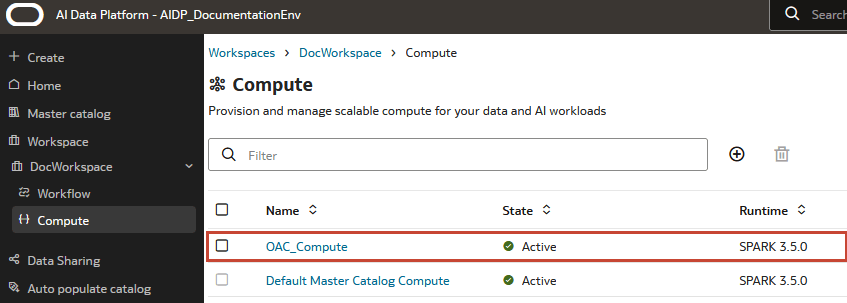
- In the Connection details tab, click the Download icon underneath the Oracle Analytics Cloud logo. A
config.jsonfile is downloaded to your machine.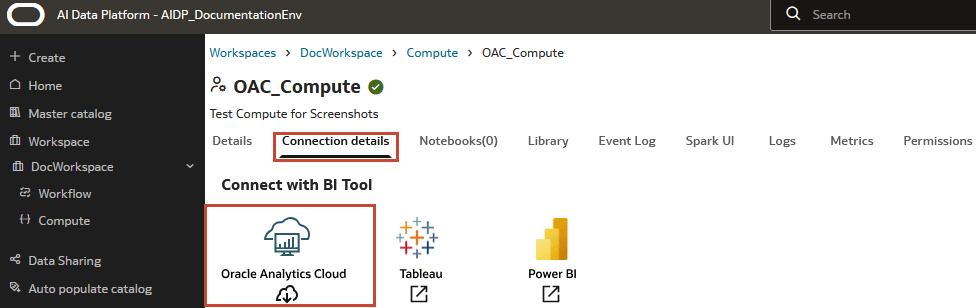
Connect to Oracle Analytics
You can connect to the catalog or tables managed by your Oracle AI Data Platform instance from an Oracle Analytics instance.
If you have followed the instructions and are still having issues saving your connection or listing your schemas, a cluster restart may be required.
Download JDBC Driver
You can download the JDBC driver from the Connection details tab and configure it for different BI tools.
- Navigate to your workspace and click Compute.
- Click the cluster you want to connect to a JDBC compatible BI tool and click Connections.
- Click Download JDBC Driver.
Configure DBeaver
You need to install DBeaver and prepare files downloaded from Oracle AI Data Platform before you can connect it to a compute cluster in your AI Data Platform.
- Download and install the DBeaver client. You can use either Community or Enterprise versions, but they must be at least 22.x.DBeaver is only available for Windows, Mac OS X, Eclipse Plugin, and Linux.
- Unzip the file from Download JDBC Driver.
- From the unzipped files, unzip the
simbaSpark.zipdriver file.
Configure DBeaver with the Spark Simba JDBC Driver
You can configure DBeaver to connect to a compute cluster in your Oracle AI Data Platform.
- Open DBeaver.
- Click Database Navigator.
- Click Driver Manager.
- Click New.
- Enter AI Data Platform as the Driver Name.
- Click Libraries.
- Click Add Folder.
- Browse to the location of the sparkSimba.zip extract.
- Click Find Class.
- Select OK.
- Set Driver class to com.simba.spark.jdbc.Driver.
- Click Settings.
- Set Class Name to com.simba.spark.jdbc.Driver.
- Click OK.
Create a Database Connection in DBeaver
To connect DBeaver to a compute cluster in your Oracle AI Data Platform, you need to first create a database connection in DBeaver.
- Open DBeaver.
- Click Database.
- Click New Database Connection.
- Click All.
- Select AI Data Platform.
- Click Next.
- Enter the URL of the JDBC driver. You can find the JDBC URL on the Connection details tab of your compute cluster in AI Data Platform.
- Click Finish.
Connect DBeaver to Oracle AI Data Platform using JDBC
Once DBeaver is configured and has a database connection to your Oracle AI Data Platform, you can complete the connection between DBeaver and AI Data Platform.
- Open DBeaver.
- Click Connect.
- Choose to connect with an authorization token or an API key.
- Connect using authorization token
- Use a token by not specifying any profile in the URL if you don't have a DEFAULT profile. For example:
jdbc:spark://gateway.aidp.me-riyadh-1.oci.oraclecloud.com/default;SparkServerType=AIDP;httpPath=cliservice/cf18b4ef-b83e-41dd-82b6-8d391584f6c5The URL opens a browser window.
Sign in to the tenancy where the AI Data Platform instance is created.
For more information, see Token-based Authentication for the CLI.
- Use a token by not specifying any profile in the URL if you don't have a DEFAULT profile. For example:
-
Connect using an API key, by specifying the OCI Profile with
ociProfile=<profile_name>in the connection URL.- Use API key authentication to connect to an AI Data Platform instance.
Use API key by specifying the OCI Profile with
ociProfile=<profile_name>in the connection URL. For example, to use OCI Profile name Demo:jdbc:spark://gateway.aidp.me-riyadh-1.oci.oraclecloud.com/default;SparkServerType=AIDP;httpPath=cliservice/cf18b4ef-b83e-41dd-82b6-8d391584f6c5 ;ociProfile=DemoFor more information, see Required Keys and OCIDs.
- Use API key authentication to connect to an AI Data Platform instance.
- Connect using authorization token
- DBeaver creates a connection for reading metadata, and a
connection for all the other operations. If you're limited for connections, you
can disable the second one so that DBeaver uses one connection for all
operations.
- Click Preferences.
- Click Common.
- Click Metadata.
- Deselect Open separate connection for metadata reads.
Download ODBC Driver
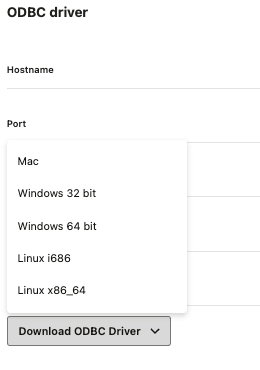
You can download the ODBC driver from the Connection details tab and configure it for different BI tools.
- Select the appropriate OS from the list.
SQL Statement Execution API
You can use the SQL Statement Execution API to run a read-only SQL statement on a compute cluster from an external application, automation, or agent.
The API returns the result directly for small result sets or provides a temporary link for larger results. The SQL Statement Execution API uses Oracle Cloud Infrastructure request signing. Statements run using the identity and permissions of the authenticated caller. You can submit a statement, retrieve its status and results, and cancel a running statement.
- A started compute cluster with a status of Active
- The compute cluster key (ID). You can find this on the Details tab of your cluster, under General information.
- The gateway hostname for your cluster. You can find the hostname on the Connection details tab of your cluster, under either JDBC driver or ODBC driver.
- An OCI CLI security token profile in the CLI terminal or application you're using. You can sign-in by running
oci session authenticate --profile-name <profile-name>and following the prompts.
How to Set Connection Values
Ensure you have set the connection values for your environment in the terminal or application where your OCI CLI is configured.
export BASE_URI="https://<gateway-host>"
export COMPUTE_CLUSTER_KEY="<compute-cluster-key>"
export REGION="<region>"
export PROFILE="<oci-profile>"
export REQ_SUFFIX="$(date +%s)"export BASE_URI="https://dev1.gateway.dataflow.us-phoenix-1.oci.oc-test.com:443"
export COMPUTE_CLUSTER_KEY="12345a67-b89c-1d23-4567-ef8912345ghi"
export REGION="us-phoenix-1"
export PROFILE="MYPROFILE"
export REQ_SUFFIX="20261022-123456"SQL Statement API Actions
To run actions for the SQL Statement Execution API, you need to call the endpoint from Oracle Cloud Infrastructure CLI.
You run the following actions from a terminal or application configured with your OCI CLI.
SQL Statement Execution API Request Options
The following request fields are used when creating a SQL Statement Execution API request.
| Field | Description |
|---|---|
statement |
Required. Read-only SQL statement. |
wait_timeout |
Optional. The maximum time that the API waits for the statement to complete before returning a response. |
disposition |
Specify INLINE or EXTERNAL_LINKS. |
row_limit |
The maximum number of rows retained for the statement. |
byte_limit |
The maximum number of bytes retained for the statement. |
catalog |
Optional. The catalog to use when executing the statement. |
schema |
Optional. The schema to use when executing the statement. |
parameters |
Optional. An array of named parameter values for the SQL statement. |
query_tags |
Optional. Key-value tags for identifying and tracking a statement. Specify no more than 20 entries. |
request_id |
Optional. A caller-provided correlation or idempotency identifier. Reuse the value only for the same logical request. |
opc-request-id |
Optional. A request header for tracing the request. Use letters, numbers, underscores, and hyphens only. |
Submit a SQL Statement
SQL statements are submitted to this API endpoint:
POST /20200129/computeClusters/<compute-cluster-key>/workbench/sql/statementswait_timeout value of 10 seconds for a result:oci raw-request \
--target-uri "${BASE_URI}/20200129/computeClusters/${COMPUTE_CLUSTER_KEY}/workbench/sql/statements" \
--http-method POST \
--request-headers "$(printf '{"Content-Type":"application/json","opc-request-id":"sql-submit-%s","opc-retry-token":"sql-submit-%s"}' "$REQ_SUFFIX" "$REQ_SUFFIX")" \
--request-body '{"statement":"SELECT 1 AS api_smoke_test","wait_timeout":"10s","on_wait_timeout":"CONTINUE","format":"JSON_ARRAY","disposition":"INLINE","row_limit":100,"byte_limit":1048576}' \
--region "${REGION}" \
--auth security_token \
--profile "${PROFILE}" \
| tee /tmp/sql-submit.json \
| jq '{http_status:.status, statement_id:.data.statement_id, state:.data.status.state, result:.data.result.data_array, opc_request_id:.headers["opc-request-id"]}'{
"http_status": "200 OK",
"statement_id": "095865c4-27ce-41cc-99bb-67af1de760b2",
"state": "SUCCEEDED",
"result": [
[
"1"
]
],
"opc_request_id": "sql-submit-20261022-214855/FBBFDCB770BDEFBC654EAE933E45E811/6CD8518A6A62E6411552DBFEF5ECEAD7"
}The wait_timeout field specifies how long the API waits for the statement to complete before returning a response. If the statement completes within the specified wait time, the API returns 200 OK and includes the statement result. If the statement doesn't complete within this time, the API returns 202 Accepted and continues running the statement.
You can modify the jq filter to display the response fields required by the application. The command saves the complete API response in the temporary file /tmp/sql-submit.json, which can be reviewed for additional response details.
Submit a Statement with External Links
oci raw-request \
  --target-uri "${BASE_URI}/20200129/computeClusters/${COMPUTE_CLUSTER_KEY}/workbench/sql/statements" \
  --http-method POST \
  --request-headers '{"Content-Type":"application/json","opc-request-id":"req-sql-external-'"$REQ_SUFFIX"'","opc-retry-token":"retry-sql-external-'"$REQ_SUFFIX"'"}' \
  --request-body "$(jq -nc --arg request_id "sql-external-$REQ_SUFFIX" '{
    statement: "SELECT id, sha2(cast(id AS STRING), 256) AS hash FROM range(2000)",
    wait_timeout: "30s",
    on_wait_timeout: "CONTINUE",
    format: "JSON_ARRAY",
    disposition: "EXTERNAL_LINKS",
    row_limit: 2000,
    byte_limit: 1048576,
    request_id: $request_id
  }')" \
  --no-retry \
  --region "${REGION}" \
  --auth security_token \
  --profile "${PROFILE}" \
  | tee /tmp/sql-external-submit.json \
  | jq '(.data.result // {}) as $result |
    {
      http_status: .status,
      statement_id: .data.statement_id,
      state: .data.status.state,
      disposition: .data.manifest.disposition,
      first_chunk_index: ($result.external_links[0].chunk_index // null),
      first_chunk_row_count: ($result.external_links[0].row_count // null),
      next_chunk_index: $result.next_chunk_index,
      external_link_count: (($result.external_links // []) | length),
      truncated: .data.manifest.truncated,
      opc_request_id: .headers["opc-request-id"]
}'{
"http_status": "200 OK",
"statement_id": "661527ef-dd96-480f-b65a-ac63aad6b910",
"state": "SUCCEEDED",
"disposition": "EXTERNAL_LINKS",
"first_chunk_index": 0,
"first_chunk_row_count": 1000,
"next_chunk_index": 1,
"external_link_count": 1,
"truncated": false,
"opc_request_id": "req-sql-external-20261022-225359/6D4D256A0952BA3E8A21A8F4299E35FC/062DA0791BE4E344828CD8F4DE538FD6"
}In this example, the temporary external result link is saved in /tmp/sql-external-submit.json and is not displayed in the command response.
Note:
Do not share external result links or store them in source code, logs, tickets, or other broadly accessible locations. Anyone who has a valid link can access the associated result data until the link expires.If truncated is true, the returned result reached the specified row limit or byte limit.
Set statement_id
statement_id is needed for retrieving information about the statement, such as status or results, and cancelling a statement. You can set the statement_id when the statement is submitted as follows:export STATEMENT_ID="095865c4-27ce-41cc-99bb-67af1de760b2"
echo "${STATEMENT_ID}"statement_id as follows:export STATEMENT_ID="$(jq -r '.data.statement_id' /tmp/sql-submit.json)"Request SQL Statement Status
statement_id from this endpoint:GET /20200129/computeClusters/<compute-cluster-key>/workbench/sql/statements/<statement-id>The following example retrieves the status of a statement by using its statement_id:
oci raw-request \
  --target-uri "${BASE_URI}/20200129/computeClusters/${COMPUTE_CLUSTER_KEY}/workbench/sql/statements/${STATEMENT_ID}" \
  --http-method GET \
  --request-headers "$(printf '{"opc-request-id":"sql-status-%s"}' "$REQ_SUFFIX")" \
  --region "${REGION}" \
  --auth security_token \
  --profile "${PROFILE}" \
| jq '{http_status:.status, statement_id:.data.statement_id, state:.data.status.state, error:.data.status.error, code:.data.code, message:.data.message, opc_request_id:.headers["opc-request-id"]}'{
"http_status": "200 OK",
"statement_id": "095865c4-27ce-41cc-99bb-67af1de760b2",
"state": "SUCCEEDED",
"error": null,
"code": null,
"message": null,
"opc_request_id": "sql-status-20261022-223517/A80E5E3A0BE5C2673C45E76C5A076B5F/890C178EA4CE5BC332681A546D3FB072"
}PENDINGRUNNINGSUCCEEDEDFAILEDCANCELLED
202 Accepted, retrieve the status until the statement reaches a terminal state: SUCCEEDED, FAILED, or CANCELLED.
Request Statement Results
When a statement completes, you can retrieve its result by using the statement_id and result chunk-index using the following endpoint:
GET /20200129/computeClusters/<compute-cluster-key>/workbench/sql/statements/<statement-id>/result/chunks/<chunk-index>Set the chunk-index to determine what results are retrieved when calling the endpoint. A chunk-index of 0 retrieves the first result. You can determine the chunk-index of the next result by checking the next_chunk_index in the response. If the next_chunk_index is null, this indicates there are no additional result chunks.
export CHUNK_INDEX="0"
export REQ_SUFFIX="$(date +%s)"
You can use row_limit and byte_limit to control how much result data the service retains and returns. When either limit is reached, the response can indicate that the result is truncated. A successful statement does not imply that all source rows were retained in the result.
This example demonstrates a request for statement results:
oci raw-request \
  --target-uri "${BASE_URI}/20200129/computeClusters/${COMPUTE_CLUSTER_KEY}/workbench/sql/statements/${STATEMENT_ID}/result/chunks/${CHUNK_INDEX}" \
  --http-method GET \
  --request-headers "$(printf '{"opc-request-id":"sql-result-chunk-%s"}' "$REQ_SUFFIX")" \
  --region "${REGION}" \
  --auth security_token \
  --profile "${PROFILE}" \
  | jq '(.data.result // .data) as $result |
    {
      http_status: .status,
      statement_id: .data.statement_id,
      chunk_index: $result.chunk_index,
      row_count: $result.row_count,
      row_offset: $result.row_offset,
      result: $result.data_array,
      next_chunk_index: $result.next_chunk_index,
      external_link_count: (($result.external_links // []) | length),
      code: .data.code,
      message: .data.message,
      opc_request_id: .headers["opc-request-id"]
    }'
The response to the above examples looks like this:
{
  "http_status": "200 OK",
  "statement_id": null,
  "chunk_index": 0,
  "row_count": 1,
  "row_offset": 0,
  "result": [
    [
      "1"
    ]
  ],
  "next_chunk_index": null,
  "external_link_count": 0,
  "code": null,
  "message": null,
  "opc_request_id": "sql-result-chunk-20261022-224623/A6702BBF95AEA1AA6D96EFA256B1062B/86AA007BC0A3E6824814EE1A7A246775"
}
When a statement completes, the response includes the statement status and result metadata. If you specify INLINE for disposition, the service returns result data in the response. Use INLINE for small results that an application can process immediately. If you specify EXTERNAL_LINKS, the service stores the result and returns a temporary link instead of including the result data in the response. Use EXTERNAL_LINKS for large results.
data_array– Result data when the result is returned inline. This value is null when you use EXTERNAL_LINKS.external_links– Temporary links to result data when you use EXTERNAL_LINKS.row_countandbyte_count– The number of rows and bytes in the returned result chunk.next_chunk_index– The index of the next result chunk, when more result data is available.truncated– Indicates whether the service retained only part of the result because the requested row or byte limit was reached.expires_at– The time when retained result data and temporary external links expire.
Cancel a Submitted Statement
You can cancel a statement that is running. You need the statement_id for the statement that you are trying to cancel.
POST /20200129/computeClusters/<compute-cluster-key>/workbench/sql/statements/<statement-id>/canceloci raw-request \
--target-uri "${BASE_URI}/20200129/computeClusters/${COMPUTE_CLUSTER_KEY}/workbench/sql/statements/${STATEMENT_ID}/cancel" \
--http-method POST \
--request-headers "$(printf '{"Content-Type":"application/json","opc-request-id":"sql-cancel-%s"}' "$REQ_SUFFIX")" \
--request-body '{}' \
--region "${REGION}" \
--auth security_token \
--profile "${PROFILE}" \
| jq '{http_status:.status, statement_id:.data.statement_id, cancel_state:.data.cancel_state, state:.data.status.state, error:.data.status.error, code:.data.code, message:.data.message, opc_request_id:.headers["opc-request-id"]}'{
"http_status": "200 OK",
"statement_id": "9b8ca043-5620-469a-b07c-51d5b99b9963",
"cancel_state": "COMPLETED",
"state": "CANCELED",
"error": null,
"code": null,
"message": null,
"opc_request_id": "sql-cancel-20261022-231732/1BA0029F78EFABC8F3A7D7D8F52E278F/CFB5C5994AF3861143602D08794A2628"
}When cancellation completes, the API returns 200 OK. The response includes the statement ID and a status of CANCELED.
statement_id:oci raw-request \
--target-uri "${BASE_URI}/20200129/computeClusters/${COMPUTE_CLUSTER_KEY}/workbench/sql/statements/${LONG_STATEMENT_ID}" \
--http-method GET \
--request-headers "$(printf '{"opc-request-id":"req-sql-canceled-status-%s"}' "$REQ_SUFFIX")" \
--no-retry \
--region "${REGION}" \
--auth security_token \
--profile "${PROFILE}" \
| jq '{http_status:.status, statement_id:.data.statement_id, state:.data.status.state, cancel_requested:.data.cancel_requested, error:.data.status.error, opc_request_id:.headers["opc-request-id"]}'{
"http_status": "200 OK",
"statement_id": "9b8ca043-5620-469a-b07c-51d5b99b9963",
"state": "CANCELED",
"cancel_requested": true,
"error": null,
"opc_request_id": "req-sql-canceled-status-20261022/727A96500CCB1BBCF311B91390F7370C/9231C1802E3466B9AF5FBDEA56D0A9EA"
}Specify a Catalog or Schema
You can specify a catalog, a schema, or both when you submit a SQL statement. Values that you specify in the request override the current session context. Specify both catalog and schema to run the statement in a specific catalog and schema.
{
  "statement": "SELECT * FROM orders LIMIT 10",
  "catalog": "sales_catalog",
  "schema": "reporting",
  "wait_timeout": "10s",
  "on_wait_timeout": "CONTINUE",
  "format": "JSON_ARRAY",
  "disposition": "INLINE"
}
You can specify only catalog to select a catalog. To ensure that a statement uses a specific schema, specify both catalog and schema.
You can specify only schema to select a schema in the current catalog. You can also specify a qualified schema name, such as sales_catalog.reporting, when you omit catalog.
If you don't specify catalog or schema, the statement uses the current session catalog and schema. If the specified catalog or schema doesn't exist, or if the caller doesn't have access, the statement can complete with a status of FAILED. Check status.state and status.error in every completed-statement response. Invalid catalog or schema field syntax returns 400 Bad Request.
Named Paramaters
You can use named parameters in a SQL statement. Specify a parameter in the statement by using a colon followed by the parameter name, such as :id. Positional parameters, such as ?, aren't supported. Specify parameter values in the parameters array. Each parameter contains the following fields:
| Field | Description |
|---|---|
name |
Required. The parameter name without the colon (:) prefix. |
value |
Required. The parameter value. Supply the value as a string. |
type |
Optional. A type hint for the parameter value. |
:id and :name:{
"statement": "SELECT :id AS id, :name AS name",
"parameters": [
{
"name": "id",
"value": "42",
"type": "INT"
},
{
"name": "name",
"value": "example",
"type": "STRING"
}
],
"wait_timeout": "10s",
"on_wait_timeout": "CONTINUE",
"format": "JSON_ARRAY",
"disposition": "INLINE"
}- Boolean: BOOLEAN
- Integer: BYTE, TINYINT, SHORT, SMALLINT, INT, INTEGER, LONG, BIGINT
- Numeric: FLOAT, DOUBLE, DECIMAL, NUMERIC
- Date and time: DATE, TIMESTAMP, TIMESTAMP_NTZ
- Character: STRING, CHAR, VARCHAR
Troubleshoot SQL Statement Execution API Responses
| Response | Solution |
|---|---|
400 Bad Request |
Verify that the request includes a supported read-only statement and valid request values. |
401 or 403 |
Verify OCI authentication and your permissions for the compute cluster and queried data. |
404 Not Found |
Verify the region, compute cluster key, caller identity, and statement ID. |
503 Service Unavailable |
Wait until the compute cluster is active, then retry. |
Connect to External Applications with Spark Connect
You can use Spark Connect to run Spark code on an Oracle AI Data Platform compute cluster from a supported Python or Java application.
You can work from a local IDE or an external application while the cluster executes your DataFrame operations and Spark SQL queries. For example, you can develop a data transformation locally, run it against data available to your cluster, and retrieve the results in your application.
- A compute cluster with a status of Active.
- USE permissions or higher for the cluster and data you're using.
- Network access to the Spark Connect cluster hostname on port 443.
- The compute cluster key (ID). You can find this on the Details tab of your cluster, under General information.
- The gateway hostname for your cluster. You can find the hostname on the Connection details tab of your cluster, under either JDBC driver or ODBC driver.
- An OCI authentication profile and compatible Spark Connect client.
AI Data Platform supports Python and Java clients and has the following requirements for each:
| Client | Requirements |
|---|---|
| Python | Python 3.9–3.11, PySpark Connect 3.5.1 |
| Java | JDK 17, Maven 3.8 or later, Spark Connect JVM client 3.5.1 |
Connect to Spark Connect with a Python Client
This Python example includes the connection setup needed to authenticate with OCI and create a remote Spark session.
spark_connect_example.py and requirements.txt provided in this bundle: Spark Connect Examples.
Note:
The supplied example disables reattachable execution for the documented Spark 3.5.1 client:spark.client.disable_reattachable_execute()Connect to Spark Connect with a Java Client
This Java example includes the connection setup needed to authenticate with OCI and create a remote Spark session.
SparkConnectExample.java and pom.xml provided in this bundle: Spark Connect Examples.
Spark Connect Troubleshooting
The provided table lists common problems you may encounter when configuring Spark Connect connections to Oracle AI Data Platform and provides potential causes.
| Problem | What to check |
|---|---|
| The application cannot connect | Confirm that the cluster is active and your environment can reach the gateway hostname on port 443. |
| Authentication fails | Check the OCI configuration-file path, profile name, and credentials. Refresh expired session credentials. |
| Authorization fails or the resource cannot be found | Check the hostname and cluster key. Confirm tenancy enablement and permission to use the cluster. |
| A query cannot access a table | Check the catalog, schema, and table name, and confirm that the authenticated identity has access to the data. |
Python reports a missing pyspark or oci module
|
Install the supplied dependencies and run the example using .venv/bin/python.
|
| Python loads an unexpected Spark version | Use the documented command with PYTHONPATH and SPARK_HOME removed. |
| Java reports a missing dependency or incompatible library | Follow the setup instructions supplied with the Java bundle and use its specified dependency versions. |