Manage Libraries

This section covers how to use and manage libraries connected to your compute clusters.

Libraries

You can install libraries to your compute clusters to expand options available when running jobs.

You can add libraries to make third-party or custom code available to your compute clusters while executing notebooks or workflow jobs.

Libraries can be installed to extend the out of the box capabilities of compute clusters. For example visualization options, connectivity options (e.g. JDBC JARs), extractions (e.g. extracting text from PDF) or transformations.

Libraries installation option is available in the Library tab if your cluster is Active. Your library file should be a .jar file or a Wheel (*.whl) file or a Requirements.txt file.

You can also add initialization scripts during the creation of a cluster or by modifying an existing cluster. For more information, see Modify a Cluster.

Note:

Support for pip install command and PyPi coming soon.

Install a Library from a Workspace or Volume

You can install a library that is in your workspace or volume to expand cluster options for attached notebooks and jobs.

Libraries can only be added from a workspace or a volume where you have appropriate permissions. You can view libraries that are installed on a cluster at any time from the cluster's Library tab.

If the library file you want to install is not already available in your workspace or volume, you can upload the library from your local machine to your workspace first and then install at the cluster.
  1. Navigate to your workspace and click Compute.
  2. Click your cluster, then click the Library tab.
  3. Click Install library icon Install Library.
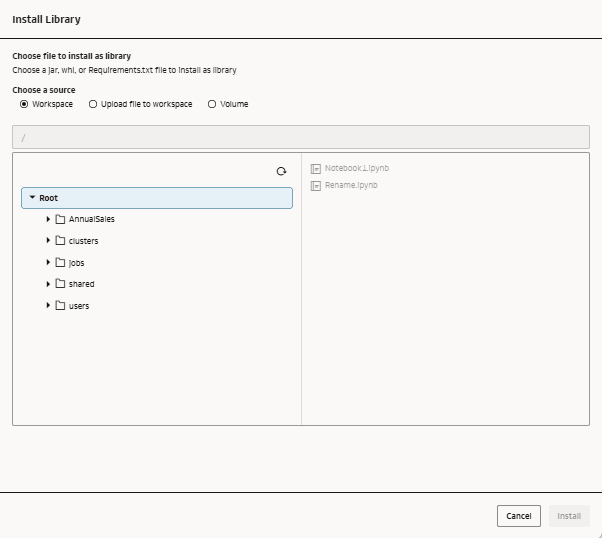
  4. Select whether your library is part of a Workspace or Volume.

    Install Library page open with Workspace option selected

  5. Navigate to the library and select it. Click Install.
  6. Once the library is installed, restart the cluster by clicking Actions, then Restart.
    When the cluster status is Active again, you can use the library in your code inside a notebook or workflow job.

Install a Library from an Uploaded File

You can install a library to your workspace from an uploaded file to expand cluster options for attached notebooks and jobs.

  1. Navigate to your workspace and click Compute.
  2. Click your cluster, then click the Library tab.
  3. Click Install library icon Install Library.
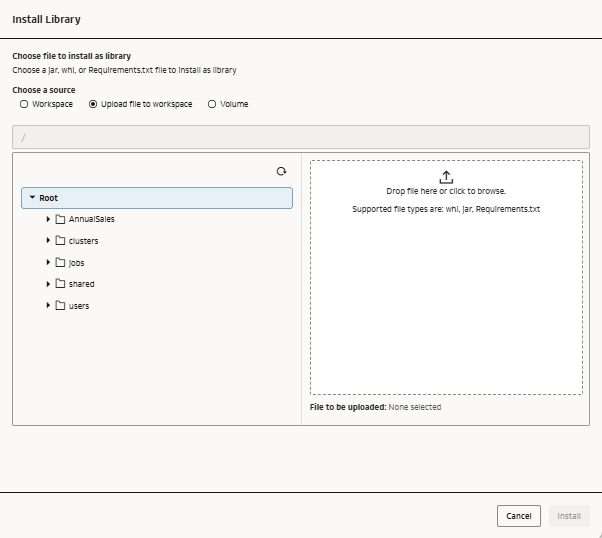
  4. Select Upload file to workspace.

    Install Library page with Upload file to workspace option selected

  5. Browse to the file that contains your library or drag and drop it into the window.
    Your library file must be a .whl or .jar format or a text file with the name requirements.txt. For more information on the requirements.txt file, see Requirements File Format.

    Here is an example of a requirements.txt file:

    plotly==6.0.1
    pandas==2.2.3
    matplotlib==3.10.1
  6. Click Install.
  7. Once the library is installed, restart the cluster by clicking Actions, then Restart.
    When the cluster status is Active again, you can use the library in your code inside a notebook or workflow job.

Uninstall a Library

You can uninstall an unwanted or no longer needed library from clusters you own.

  1. Navigate to your workspace and click Compute.
  2. Click your cluster, then click the Library tab.
  3. Next to the library, click Actions three dot icon Actions then click Uninstall.
  4. Click Uninstall.