Tutorial: Build Your First Integration From Scratch
Let's walk through how to create, design, activate, run, and monitor your first integration completely from scratch. You work inside a project. A project contains related resources, including integrations, connections, and more. You can design, manage, and monitor everything in one place.
- What Do I Learn from this Tutorial?
- Step 1. Create a Project in Which to Design, Manage, and Monitor Your Integration
- Step 2. Create an Integration
- Step 3. Create a Trigger Connection to Allow Your Integration to Receive Messages
- Step 4. Specify How the Trigger Connection Receives Messages in the Integration
- Step 5. Design How the Integration Receives Messages
- Step 6. Define a Business Identifier to Track Message Delivery at Runtime
- Step 7. Activate and Run the Integration
- Step 8. Monitor Message Delivery Status at Runtime
- Learn More About The Features in this Tutorial
What Do I Learn from this Tutorial?
- Creating a project in which you perform all design, management, and monitoring tasks.
- Creating and configuring an adapter connection that lets your integration receive inbound messages.
- Creating and configuring an integration that takes either of two paths to
process the inbound message:
- If an email address is specified
- If an email address is not specified
- Running (triggering) the integration by specifying a simple message consisting of a name, an optional flow ID, and an email address.
- Monitoring the results of the integration run.
Step 1. Create a Project in Which to Design, Manage, and Monitor Your Integration
You manage the entire life cycle of an integration from within a project.
- In the navigation pane, click Projects.
- Click Add, then select Create.
- In the Name field, enter
My First Project. - Leave all other fields as they are, then click
Create.
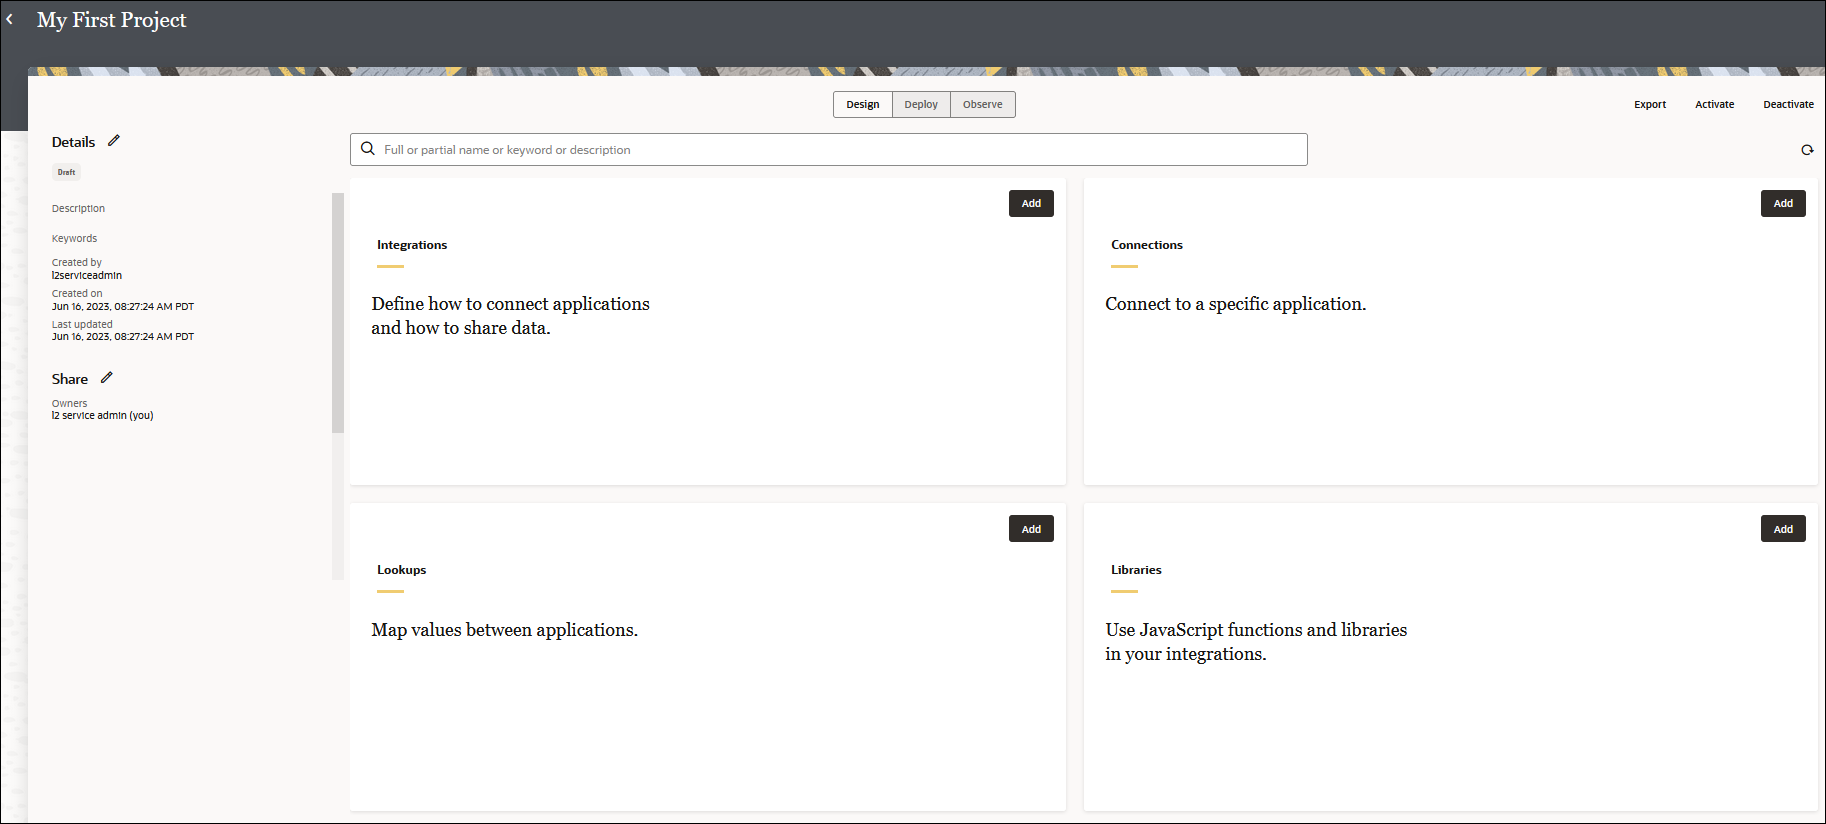
The page for your first project is displayed. Your project contains sections for creating, designing, deploying, and monitoring your integration.
Step 2. Create an Integration
Let's create your first integration inside the project.
- In the Integrations section, click
Add.
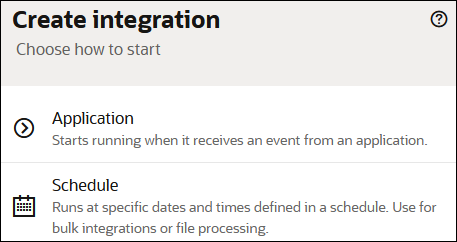
The Add integration panel opens.
- Click Create, then select
Application.
- In the Name field, enter
Hello World. - Leave all other fields as they are, then click
Create.
The integration canvas opens with an option for creating a trigger connection. The trigger connection lets your integration receive inbound messages from an application.

Step 3. Create a Trigger Connection to Allow Your Integration to Receive Messages
Now let's create a trigger connection inside the integration canvas. The trigger (source) connection allows your integration to receive inbound messages from an application.
- In the Connections panel, click Add
trigger.
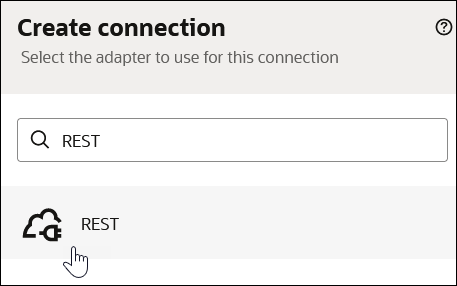
The Create connection panel opens.
- Enter
RESTin the search field. - Select REST as the adapter connection to
use. For this tutorial, the REST Adapter processes inbound messages
sent to Oracle Integration.
The page for configuring the REST Adapter opens.
- Enter the following information.
Field Description Name Enter Trigger1.Role Select Trigger. Roles perform the following tasks.
- Trigger: Enables an inbound application (endpoint) to trigger (run) the integration.
- Invoke: Enables your integration to invoke an outbound application (endpoint).
- Ignore all other fields, and click Create.
The page for configuring security and delivery methods for the REST Adapter appears.
- Enter the following information:
Field Description Security From the list, select OAuth 2.0 Or Basic Authentication to secure incoming messages. Access type Ensure Public gateway is selected. This access type uses the public internet to receive messages. - Click Test to confirm that you configured the connection successfully. When testing completes, a success message is displayed.
- Click Save.
- Click Back
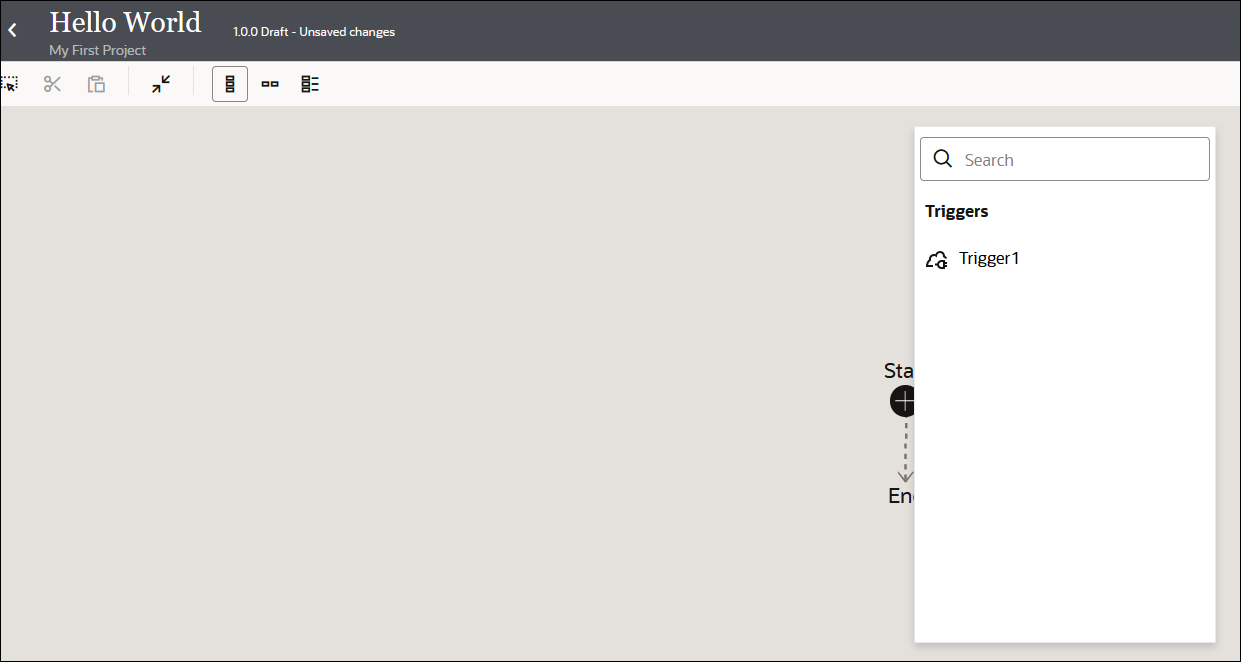
 to return to the integration canvas. A menu shows that the newly-created
Trigger1 connection is available for selection.
- Enter the following information.
Step 4. Specify How the Trigger Connection Receives Messages in the Integration
Now let's configure the REST Adapter connection in the integration. During configuration, you specify details such as the operation, the relative resource URI, the query parameters, and the message payload content.
- Select Trigger1.
The Basic Info page of the Adapter Endpoint Configuration Wizard opens. This wizard enables you to configure the Trigger1 connection for use in the integration.
- In the What do you want to call your
endpoint field, enter
helloWorld, then click Continue to access the Resource Configuration page. - Enter the following information.
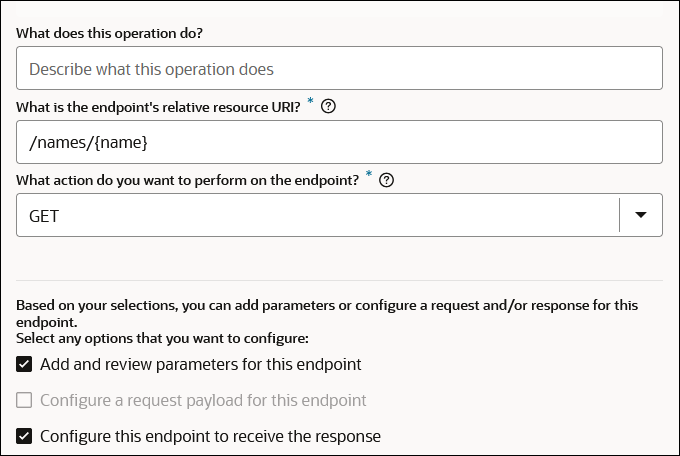
Field Description What is the endpoint's relative resource URI Enter the following: /names/{name}What action do you want to perform on the endpoint Select GET. Select any options that you want to configure Scroll to the bottom of the page and ensure that the following options are selected. - Add and review parameters for this endpoint
- Configure this endpoint to receive the response
The completed Resource Configuration page looks as follows.
- Click Continue to access the Request
Parameters page.
- In the Specify Query Parameters section, click Add.
- Double-click the row in the Name column to enter
a value.

- Enter
email, then select string from the Data Type list. - Click Add again.
- Enter
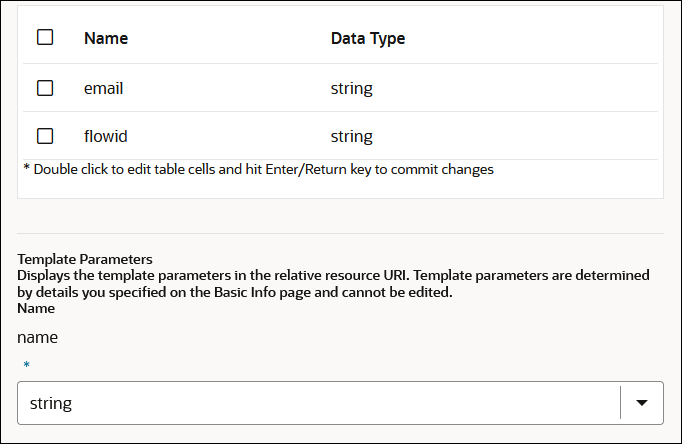
flowid, then select string from the Data Type list.Both query parameters are displayed. Note also that the name template parameter from the relative resource URI you specified in Step 3 is also included. You select these parameters later when designing the business logic for your integration.
- Click outside the flowid row.
- Click Continue to access the Response page.
- Enter the following information.
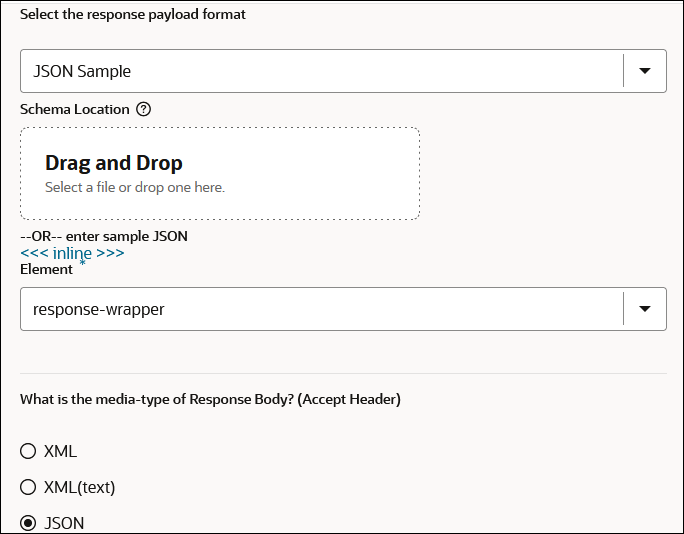
Field Description Select the response payload format Select JSON Sample. <<< inline >>> Click this field and enter the following content, then click OK. { "Hello" : "Name", "Message" : "Email Sent", "Email" : "EmailAddress" }Element Ensure response-wrapper is selected. What is the media-type of Response Body Ensure JSON is selected. The completed Response page looks as follows.
- Click Continue to access the Summary page.
- Review your selections, then click Finish.
The REST Adapter trigger connection is now fully configured for use in the integration.
Step 5. Design How the Integration Receives Messages
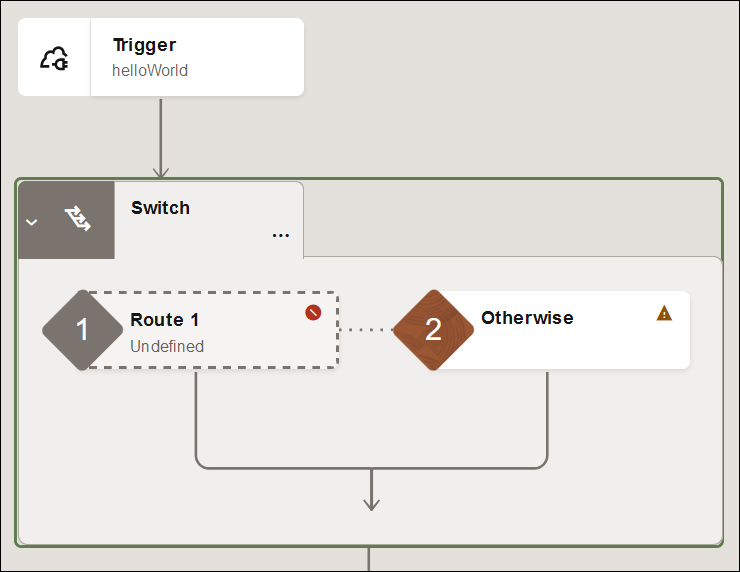
- Route 1: This path is taken if you specify an email address.
- Otherwise: This path is taken if you don't specify an email address.
Note:
You use the Expression Builder to design much of the business logic for your integration. Be careful while entering your expressions. Simple mistakes such as forgetting a comma or entering an extra blank space can cause validation failure.Design the Route 1 path of the integration
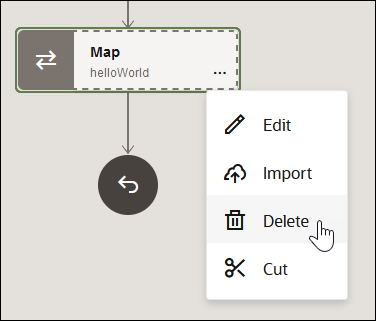
Let's first delete the map action that was automatically created when you configured the REST Adapter trigger connection in the integration. Instead, you add the necessary map actions for mapping source data to target data inside both switch action paths.
- In the map action, click
Actions
 , then select Delete.
- Click Delete when prompted.
Now let's add a switch action to define routing expressions in your integration. The switch action takes the first path that evaluates to true. The other paths are ignored.
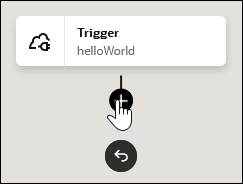
- Hover over the line below the trigger connection and click
Add
 .
.
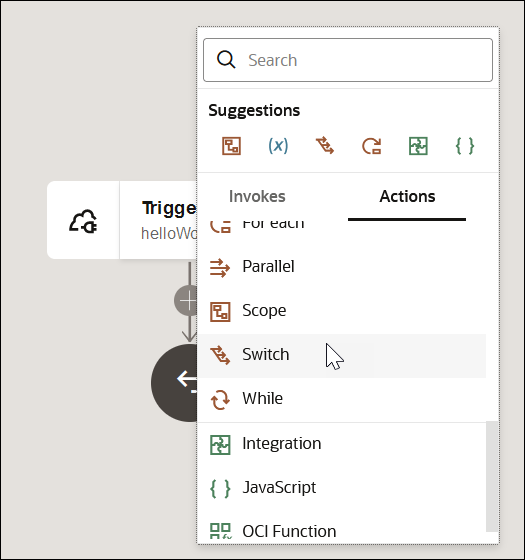
- Click Actions, then Switch.
- In the switch action, click
Actions
 , then select Add, and then
Otherwise.
A switch action with two branches is displayed.
- Hover your cursor inside Route 1, and select
Actions
 , then Edit
 .
.
The Configure route panel opens.
- Click Edit
 .
.

- Enter
sendEmailas the name for the switch action, then click Apply .
.
- To the right of the Value field, click
Switch to Developer View
 .
.
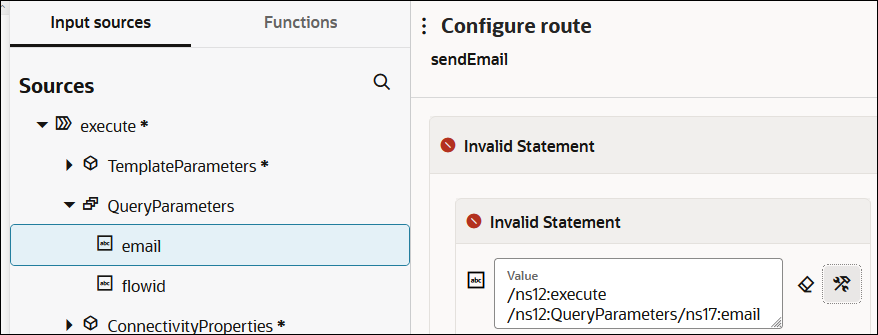
- In the Sources tree, expand QueryParameters. These are the query parameters you defined when configuring the REST Adapter in the integration.
- Drag email to the Value
field. This parameter lets you specify the email address that gets logged to the
activity stream when you test and run the integration.
- In the Operator list, select !=.
- In the Value field, enter two single quotes
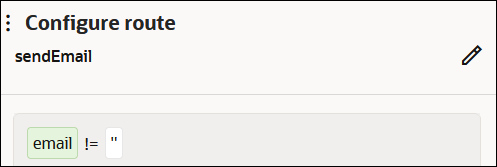
''with no blank space in between.The completed routing expression looks as follows. When the email address that you specify at runtime is not an empty value, this route of the switch action is taken.
Note:
As you design this integration, note that an error icon can appear on the right side of the page. Click this icon for details. Errors may occur due to mistakes you make in the Expression Builder. Follow the instructions in the Error panel to resolve the errors. Other errors that appear are resolved as you complete the design of all parts of this integration. Click outside the error panel to close it.
- Click Save, then click outside the Configure route panel to close it.
Now let's add a logger action. This action enables you to log messages to the activity stream at runtime for diagnostic purposes.
- Hover your cursor inside Route 1, and select
Actions
- Drag your cursor along the line below Route 1 until the
Add
 icon appears.
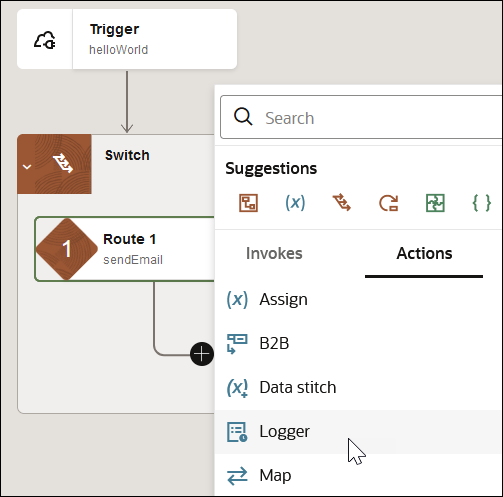
- Click Add
 , then select Actions, then
Logger.
- The Configure logger panel appears. The
Input Sources and Functions tabs appear in
the upper left part of the panel. You use the elements available under these tabs to build
a logger expression.
- Click Edit
 .
.
- Enter
logincomingas the name for the logger action, then click Apply .
.
- To the right of the Logger message field, click
Switch to Developer Mode
 .
.
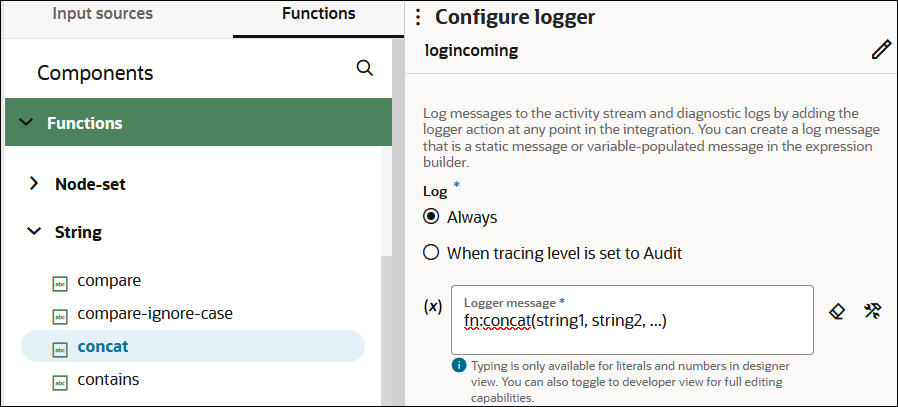
- Click the Functions tab, then expand String.
- Drag a concat function into the
Logger message field.
- Remove the content between the parentheses.
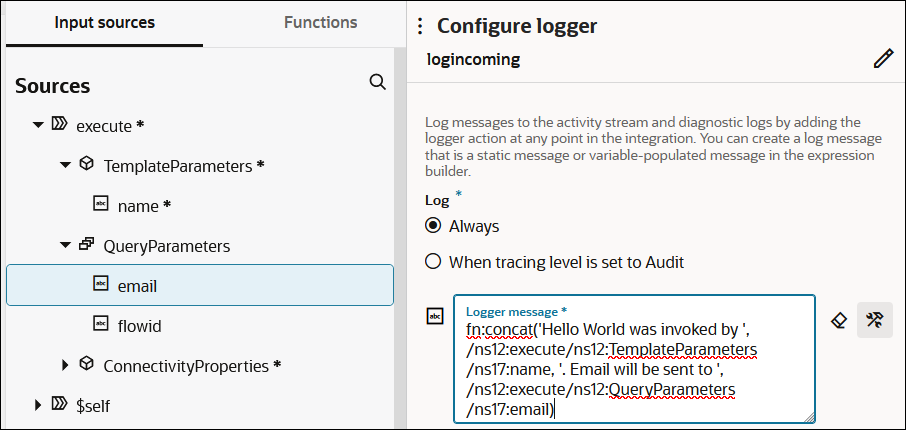
- After the opening parenthesis, enter the following:
'Hello World was invoked by ',Ensure that you enter a blank space before the single quote and after the comma.
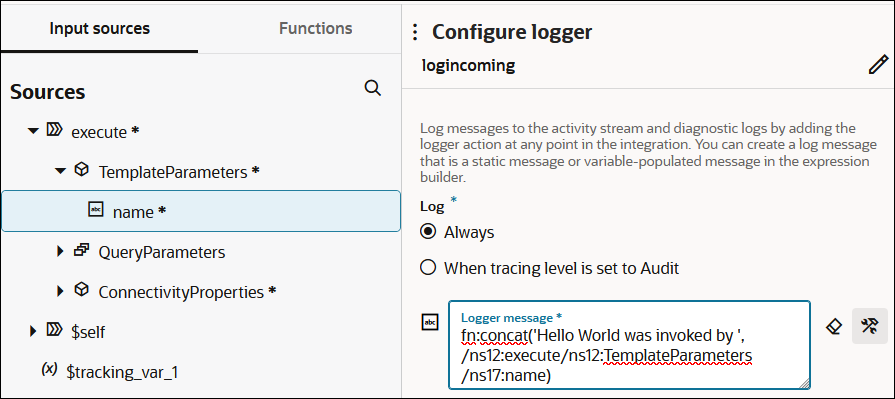
- Click the Input sources tab, and expand TemplateParameters.
- Drag name before the closing parenthesis.
- Before the closing parenthesis, enter the
following:
, '. Email will be sent to ',Note the single blank space after the last comma.
- Expand QueryParameters.
- Before the closing parenthesis, drag email.
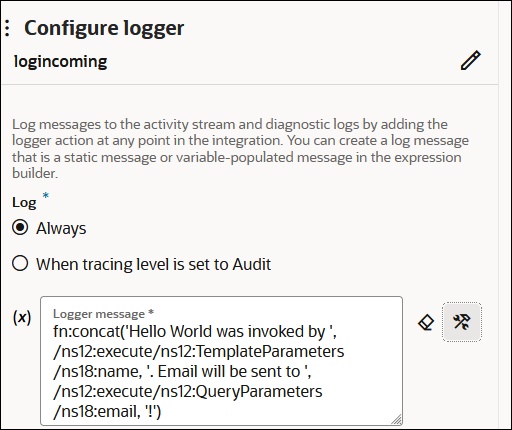
- Before the closing parenthesis, enter the
following:
, '!'The completed logger action looks as follows.
- Click Switch to Designer View
 to toggle to designer view, which shows a more user-friendly version of the
expression.

- Click Save, then click outside the Configure logger panel to close it.
Now let's assign an optional secondary business identifier to track payload fields in messages during runtime. Each integration requires at least one business identifier (known as the primary business identifier) to track the status of your running instance (for example, was the run successful or did the run fail). Later in this tutorial, you assign the primary business identifier from a separate location in the integration canvas.
- Click Edit
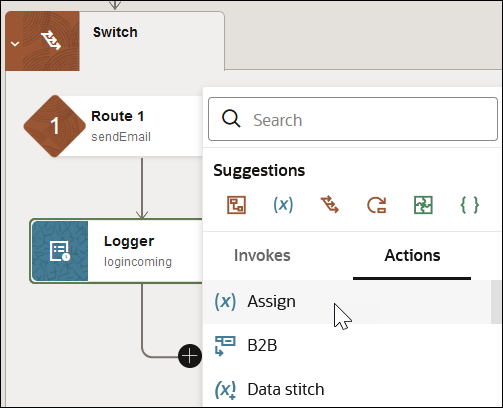
- Drag your cursor along the line below Logger until the
Add
 icon appears.
- Click Add
 , then select Actions, then
Assign.
- Click Edit
 .
.
- Enter
assignSecondaryTrackingas the name for the assign action, then click Apply .
.
- Click Add
 .
.
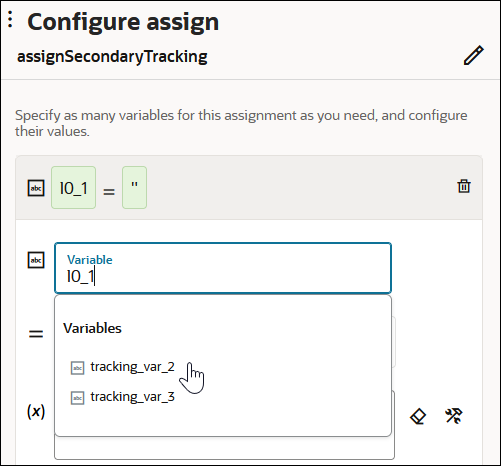
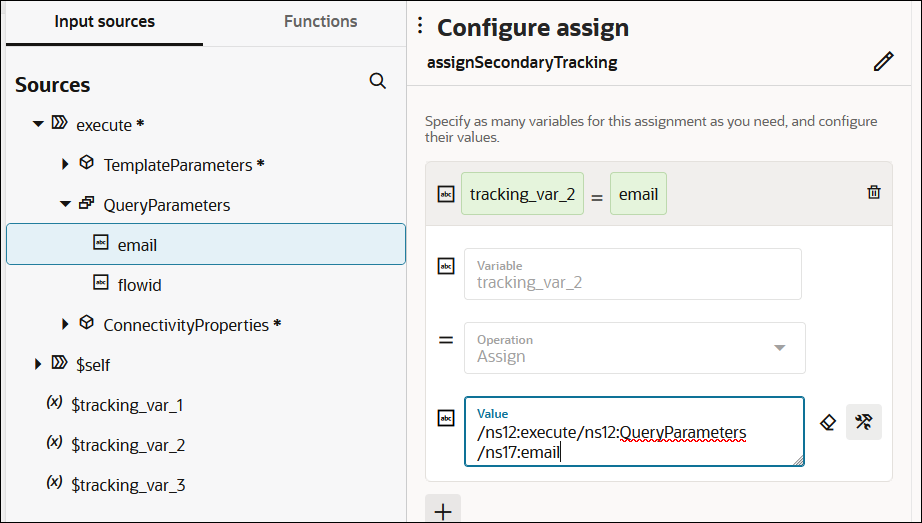
- Click inside the Variable field, and select
tracking_var_2 from the list.
- To the right of the Value field, click
Switch to Developer View
 .
.
- Clear the content from the Value field.
- Expand QueryParameters, and drag
email into the Value field.
- Click Save, then click outside the Configure assign panel to close it.
Now let's design the contents of the notification email you receive after running the integration.
- Click Edit
- Drag your cursor along the line below Assign until the
Add
 icon appears.
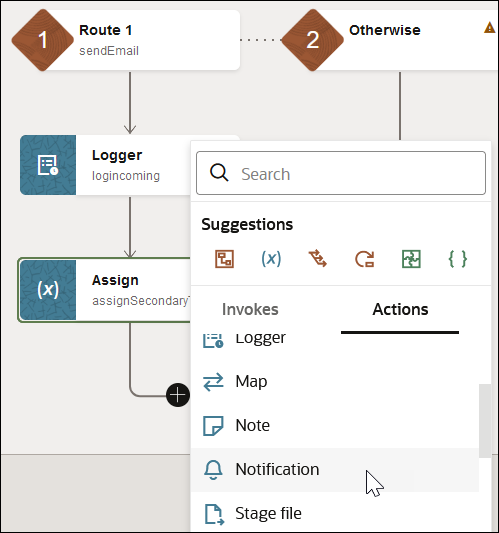
- Click Add
 , then select Actions, then
Notification.
The Configure notification panel opens.- Click Edit
 .
.
- Enter
sendEmailas the name for the notification action, then click Apply .
.
- Click the To field.
The Sources panel opens.
- Click Switch to Developer View
 .
.
- Expand QueryParameters, and drag email into the To field.
- Click the From field.
- Expand QueryParameters, and drag email into the From field.
- Click Switch to Developer View
 again.
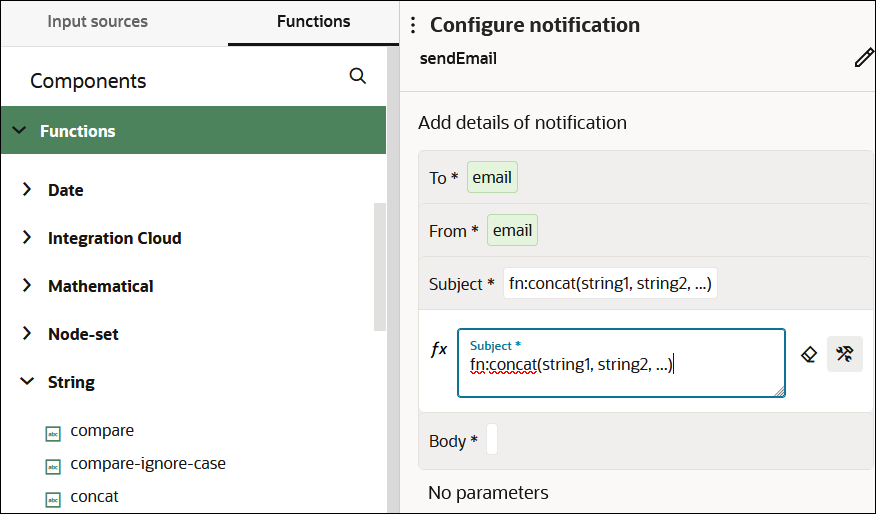
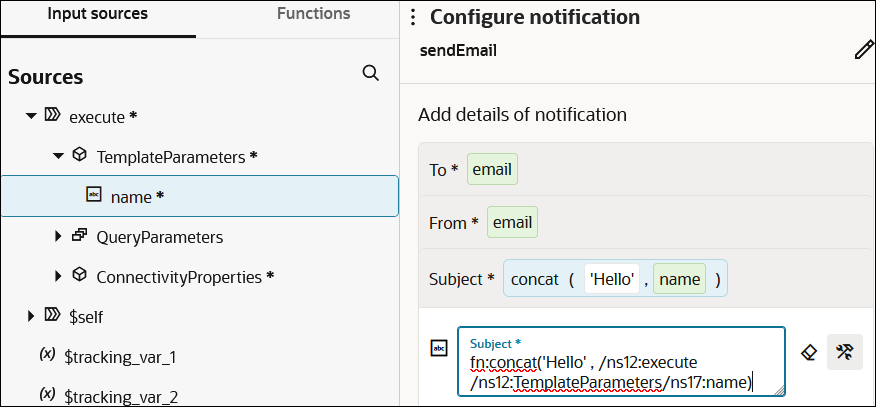
- Click the Subject field.
- Click the Functions tab, then expand String.
- Drag concat into the
Subject field.
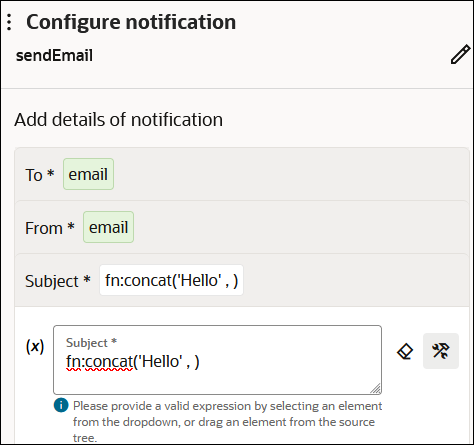
- Remove the content between the parentheses.
- After the opening parenthesis, enter the
following:
'Hello' ,Note the blank space after the comma.
- Click the Input sources tab, expand
TemplateParameters, and drag name
into the concat function before the closing parenthesis.
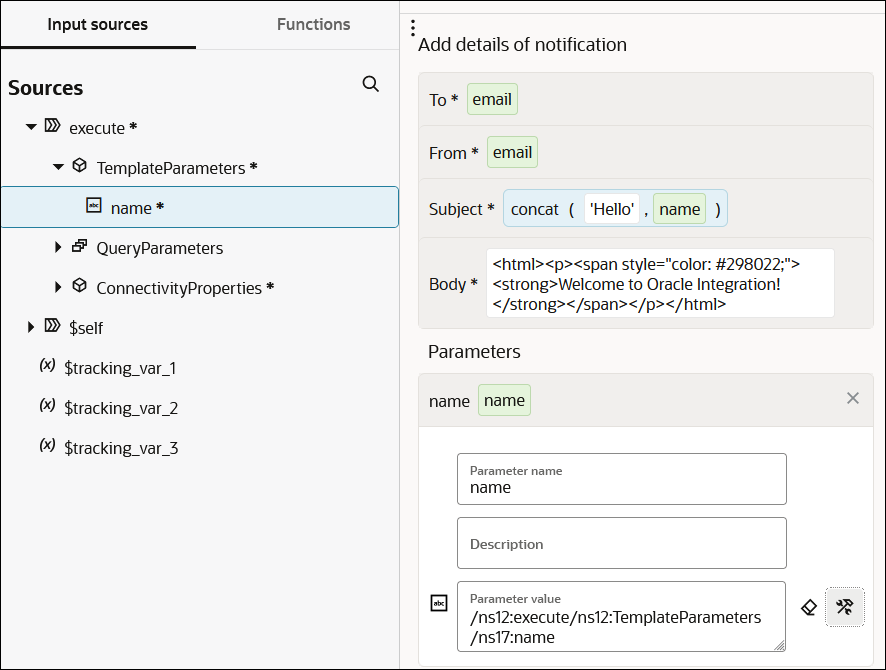
- Click the Body field and enter the following
text. This is the email message you receive when the integration runs
successfully.
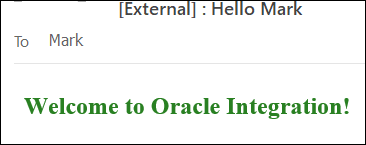
<html><p><span style="color: #298022;"><strong>Welcome to Oracle Integration!</strong></span></p></html> - Click
 in the No parameters section at the bottom.
- In the Parameter field, enter
name. - Click the Input sources tab, expand
TemplateParameters, and drag name
into the Parameter value field.
- Click Save, then click outside the Configure notification panel to close it.
- Click Edit
- Drag your cursor along the line below Notification until the
Add
 icon appears.
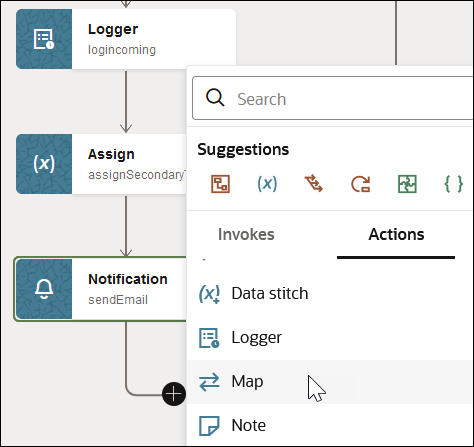
- Click Add
 , then select Actions, then Map.
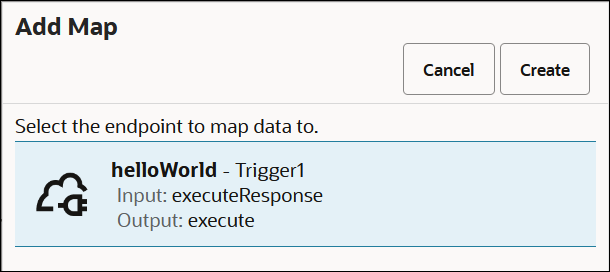
The Add Map panel opens.
- Select the helloWorld endpoint to which to map
data, and click Create.
The mapper opens.
- Expand Template Parameters and Query Parameters in the Sources section and Response Wrapper in the Target section.
- Perform the following mappings:
- Drag the source Name element to the target Hello element.
- Drag the source Email element to the target Email element.

- Click Validate.
- Click Back
 to exit the mapper and return to the integration canvas. Your mappings are
automatically saved.
- Select the helloWorld endpoint to which to map
data, and click Create.
- Above the integration, click
Horizontal to see a horizontal view of the integration.
 .
.
You have now completed configuration of the first route of the switch action.

Design the Otherwise path of the integration
Now let's design the second (Otherwise) path of the integration.
- Drag your cursor along the line to the right of
Otherwise until the Add
 icon appears.
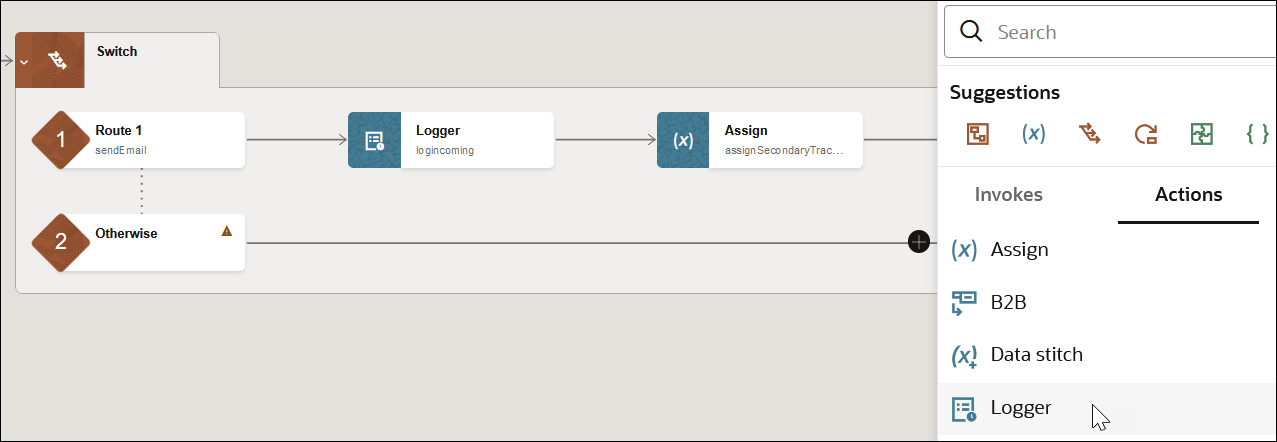
- Click Add
 , then select Actions, then
Logger.
- Click Edit
 .
.
- Enter
logincomingWithoutEmailas the name for the logger action, then click Apply .
.
- In the Logger message field, click
Switch to Developer Mode
 .
.
- Click the Functions tab, then expand String.
- Drag a concat function into the Logger message field.
- Remove the content between the parentheses.
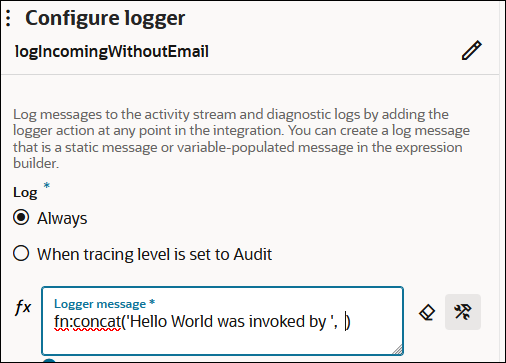
- After the opening parenthesis, enter the
following:
'Hello World was invoked by ',Note the single blank space after the comma.
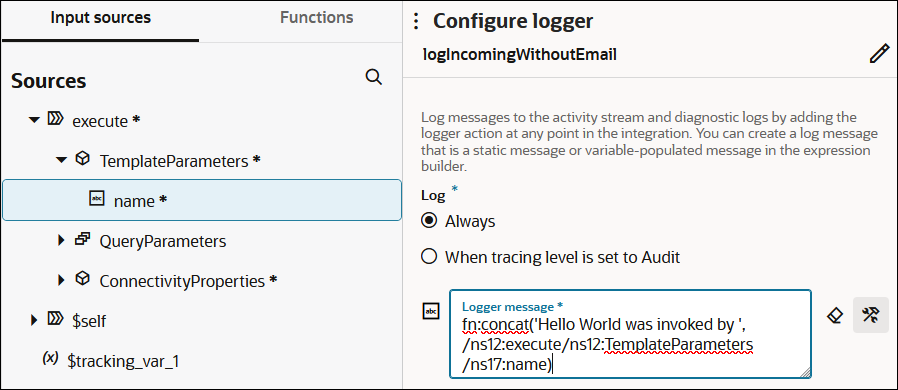
- Click the Input sources tab, and expand TemplateParameters.
- Drag name before the closing parenthesis.
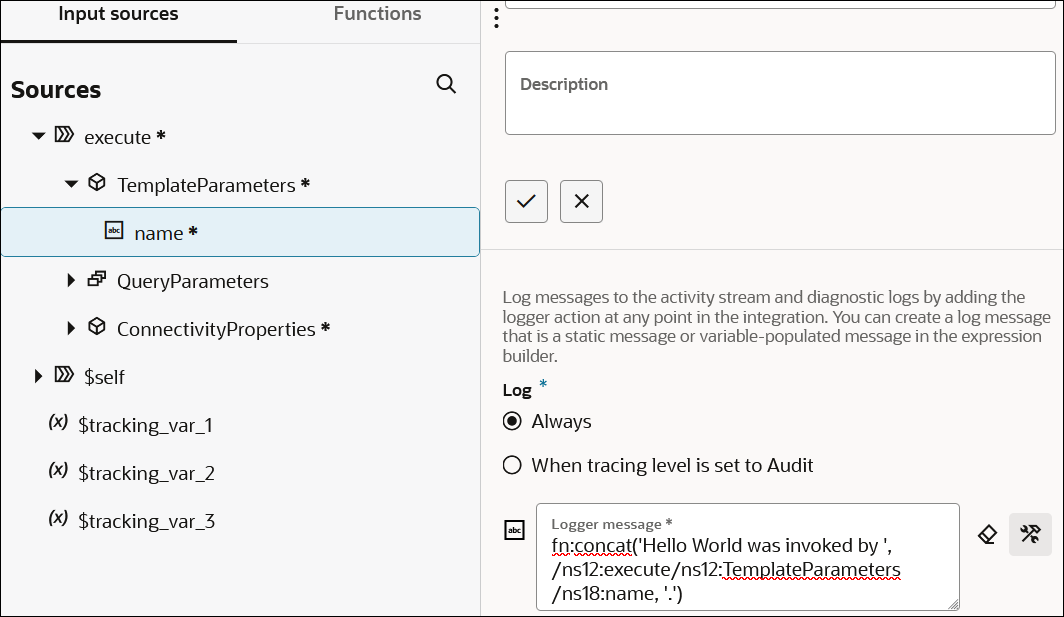
- Before the closing parenthesis, enter the
following:
, '.'
- Click Save, then click outside the Configure logger panel to close it.
- Click Edit
- Drag your cursor along the line to the right of the
Logger until the Add
 icon appears.
- Click Add
 , then select Actions, then Map.

The Add Map panel opens.
- Select the helloWorld endpoint to which to map
data and click Create.

The mapper opens.
- Expand Template Parameters in the Sources section and Response Wrapper in the Target section.
- Drag the source Name element to the target
Hello element.

- Click Validate.
- Click Back
 to exit the mapper and return to the integration canvas. Your mappings are
automatically saved.
Both routes are now configured.

- Select the helloWorld endpoint to which to map
data and click Create.
Step 6. Define a Business Identifier to Track Message Delivery at Runtime
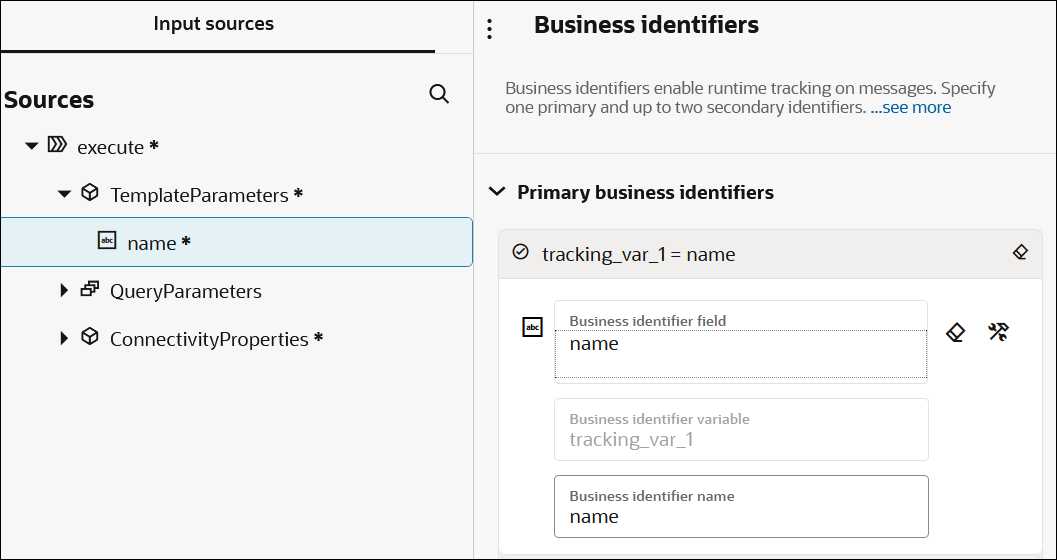
Business identifiers enable you to track payload fields in messages during runtime. Each integration requires a primary business identifier. Without specifying a business identifier, you cannot complete design integration or run your integration.
- Above the integration, click Business
Identifier
 .
.
- Expand TemplateParameters, and drag
name to the Business identifier
field.
- Click Save, then click outside the Business identifiers panel to close it.
- Expand TemplateParameters, and drag
name to the Business identifier
field.
- Check for any red error icons. If you see any, click the icon for details and resolve those errors.
- Click Back
 to exit the integration canvas and return to the project page.
Step 7. Activate and Run the Integration
You are now ready to activate the integration to the runtime environment. Once activated, you can run the integration.
- In the Integrations section, click
Actions
 , then select Activate.

- Keep the tracing level set to Production.
- Click Activate.
- Click Refresh
 periodically.
The integration status changes to Active.

You are now ready to run the integration and send a message.
- In the Integrations section,
click Actions
 , then select Run.
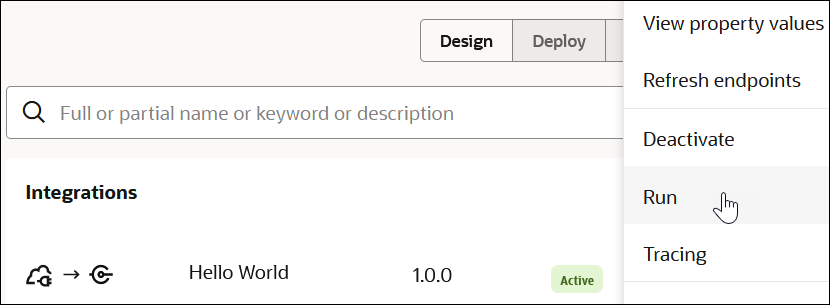
The Configure and run page enables you to run and test REST Adapter trigger-based integrations. This page provides a way of testing the sending of an inbound message from an actual application.
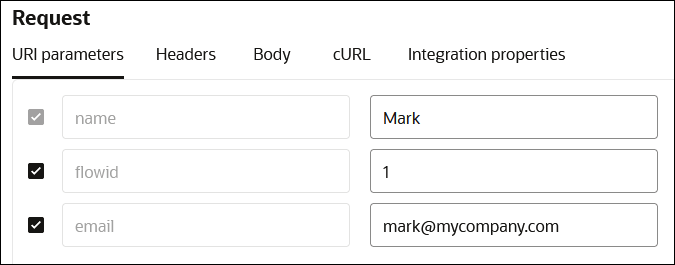
- In the Request section,
specify your name, a flow ID number, and your email address.
- Click Run to send your inbound message to the integration.
- Click Refresh
 periodically.
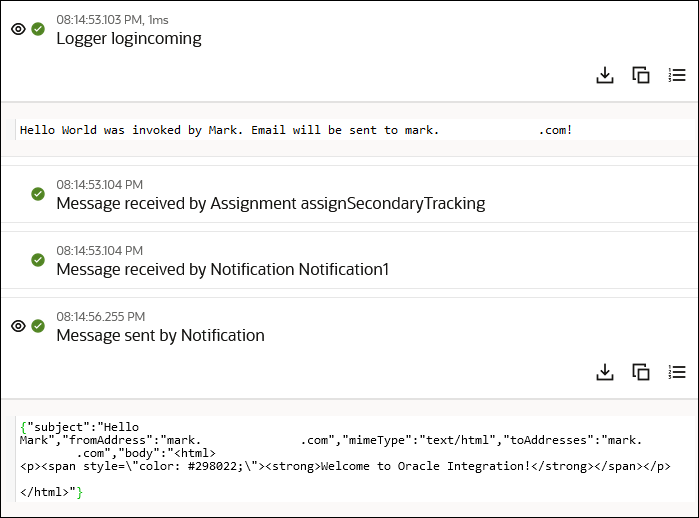
The Activity stream panel opens and shows the movement of the message through the actions that you designed (switch, logger, mapper, and others). The unique instance ID that was created for this integration run is displayed at the top. All milestones in this activity stream are green, indicating the successful delivery of this message.
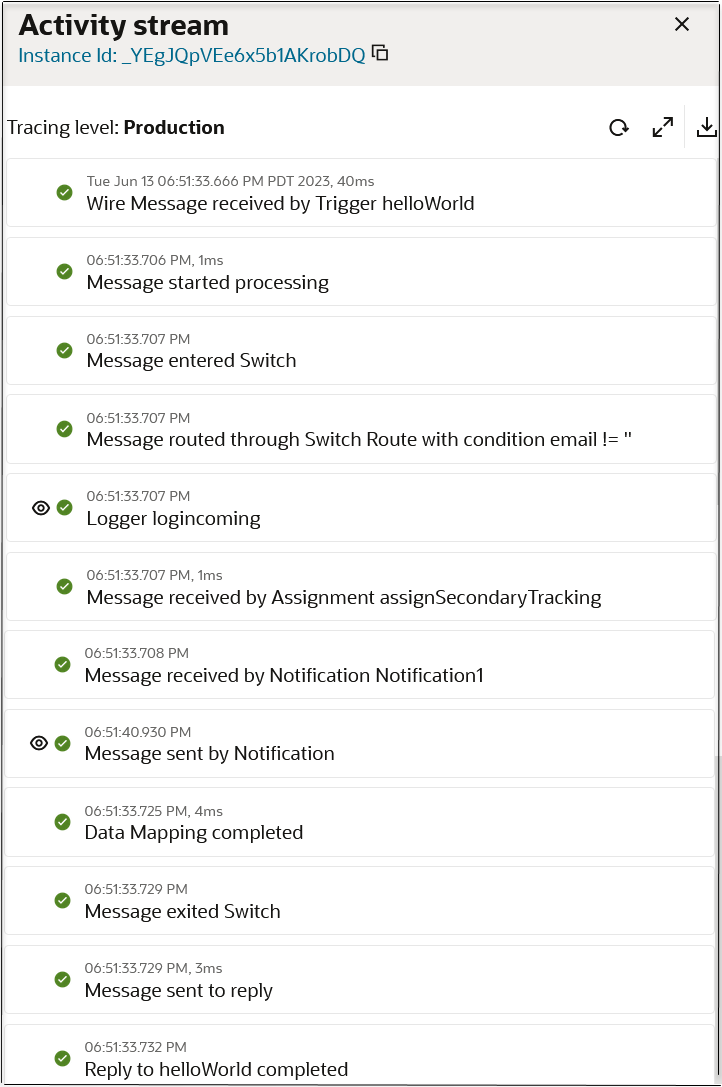
- Click View
 next to the logger and notification actions to view the message payload that
passed through the integration.
Step 8. Monitor Message Delivery Status at Runtime
- Close the Activity steam panel and click
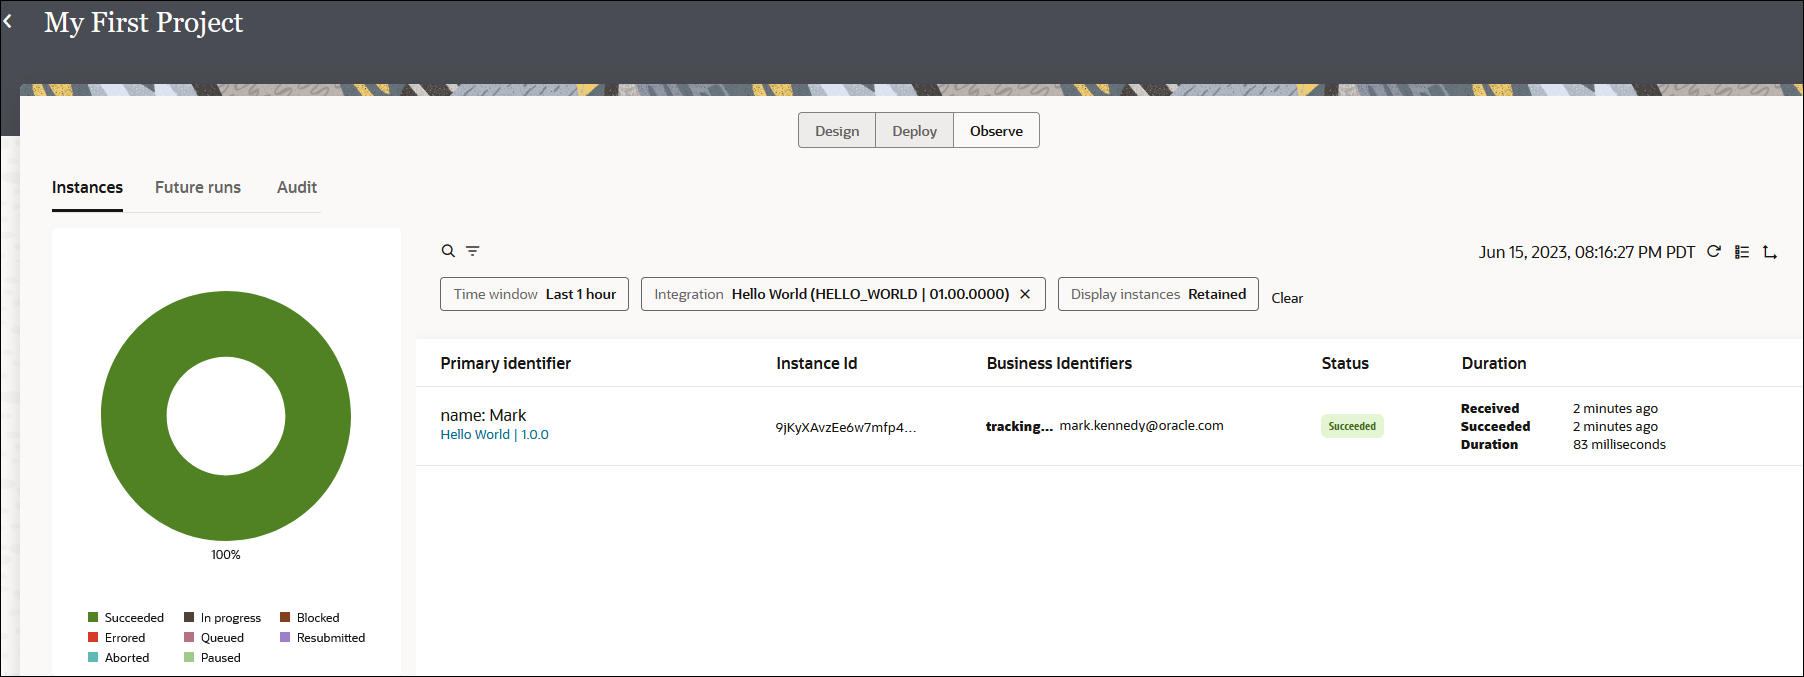
Track instances.
The Observe tab in your project opens. This tab enables you to monitor the status of your integration instance. The status of the instance is displayed as Succeeded.
- Check your email inbox for a new message.
- Open the email and note the following message:
Congratulations! You have successfully created, designed, activated, run, and monitored your first integration. See the sections below for more information about the capabilities used in this tutorial.
Learn More About The Features in this Tutorial