Tutorial: Build Your Second Integration From Scratch
Let's walk through how to create, design, activate, run, and monitor a second integration completely from scratch. For this tutorial, you create an integration that invokes a weather application to return a weather report for a city that you specify.
- What Do I Learn with this Tutorial
- Step 1. Complete Prerequisites
- (Optional) Step 2. Test the API Key Outside of Oracle Integration
- Step 3. Create a Project
- Step 4. Create an Integration
- Step 5. Create a Trigger Connection to Define a City Parameter and the Content of the Weather Report Response
- Step 6. Create an Invoke Connection to Call the OpenWeather Application
- Step 7. Specify How the Invoke Connection Retrieves the Latitude and Longitude Coordinates for the City
- Step 8. Specify How the Invoke Connection Retrieves the Weather Report for the City
- Step 9. Map the Weather Report Response Returned from the OpenWeather Application
- Step 10. Define a Business Identifier
- Step 11. Activate and Run the Integration
- Step 12. Monitor the Integration
- Learn More About The Features in this Tutorial
What Do I Learn with this Tutorial
- Creating a project in which to perform all design, management, and monitoring tasks.
- Creating an integration in which to design your business requirements.
- Creating and configuring a trigger connection in which you define a city parameter and the contents of the weather report to receive back from the OpenWeather application (city, latitude, longitude, and other content).
- Creating and configuring an invoke connection to obtain the latitude and longitude coordinates for the specified city from the OpenWeather application.
- Creating and configuring a second invoke connection to obtain the weather report from the OpenWeather application.
- Specifying a city to start the integration and receiving the weather report back for that city from the OpenWeather application.
- Monitoring the results of the integration run.
Step 1. Complete Prerequisites
When you configure the REST Adapter as an invoke connection to use in this integration, you select the API Key Based Authentication security policy. This policy requires you to specify an API key. Create an account at the OpenWeather application to obtain an API key.
- Go to the OpenWeather Application.
- Create an account to use the application.
- Sign in by specifying your email address and password.
- Click API keys or click your profile link in the upper right corner.
- Copy and save your API key value.
(Optional) Step 2. Test the API Key Outside of Oracle Integration
When you test REST Adapter configuration later in this tutorial, a message appears indicating that the API key is not validated as part of the test. You must validate the API key separately. While there may be nothing to indicate that your API key value is invalid, it is typically a best practice to test your connection outside of Oracle Integration to completely validate the API key.
https://api.openweathermap.org/?appid=API_key_value&units=imperialWhere API_key_value is the key you obtained from the
OpenWeather application.
For example, from a third-party tool such as Postman, you specify and test the
URL and query parameter values for appid and units.
Because this tutorial returns the temperature in degrees Fahrenheit,
imperial is specified. You can also specify metric to
return the temperature in degrees Celsius.

Step 3. Create a Project
You manage the entire life cycle of an integration from within a project.
- In the navigation pane, click Projects.
- Click Add, then select Create.
- In the Name field, enter
My Weather Project. - Leave all remaining fields as they are, then click
Create.
The page for your project is displayed. Your project contains sections for creating, designing, deploying, and monitoring your integration resources (integrations, connections, lookups, and JavaScript libraries).
Step 4. Create an Integration
Let's now create an integration inside the project.
- In the Integrations section, click
Add.
The Add integration panel opens.
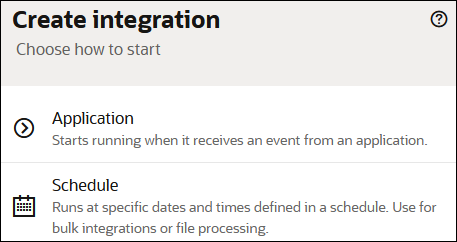
- Click Create, then select
Application.
- In the Name field, enter
Weather By
            City
. - Leave all remaining fields as they are, then click
Create.
The integration canvas opens with an option for creating a trigger connection. The trigger connection enables your integration to receive inbound messages from an application.

Note:
As you design this integration, an error icon can appear on the right side of the page. Errors may occur due to mistakes you make in the mapper or Adapter Endpoint Configuration Wizard. Other errors that appear are resolved as you complete the design of all parts of this integration. Click the error icon to view details. To resolve the error, you can either follow the instructions in the Error panel or wait to see if your completed design resolves the issues. Click outside the Error panel to close it.Step 5. Create a Trigger Connection to Define a City Parameter and the Content of the Weather Report Response
Let's now create a trigger connection inside the integration canvas. The trigger (source) connection allows you to define a city parameter and the content of the weather report to receive back from the OpenWeather application (city, latitude, longitude, and other content).
- In the Connections panel of the integration canvas, click
Add trigger.
The Create connection panel opens.
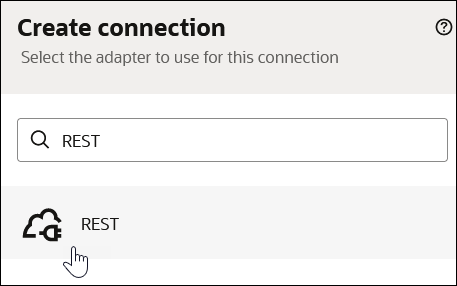
- Enter
RESTin the search field. - Select REST as the adapter connection to
use. For this tutorial, the REST Adapter processes inbound messages
sent to Oracle Integration.
- The page for configuring the REST Adapter opens.
- Enter the following information.
Field Description Name Enter Rest_Trigger.Role Select Trigger. Roles perform the following tasks.
- Trigger: Enables an inbound application (endpoint) to trigger (run) the integration.
- Invoke: Enables your integration to invoke an outbound application (endpoint).
- Trigger and Invoke: Enables you to create a connection that can be used as both a trigger and invoke. For example, you use the connection as a trigger in one integration and as an invoke in another integration.
- Leave all remaining fields as they are, then click
Create.
The page for configuring security and delivery methods for the REST Adapter trigger connection appears.
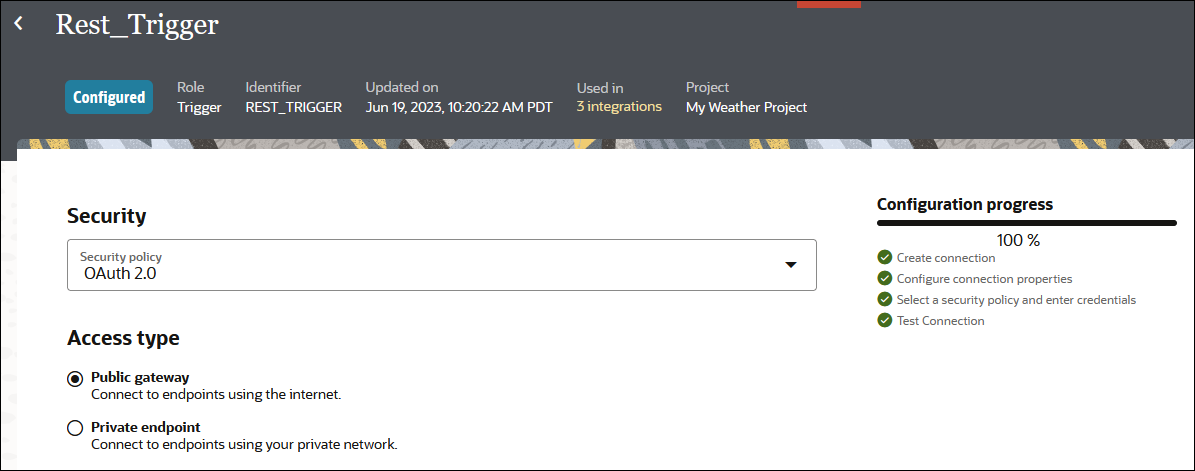
- Enter the following information:
Field Description Security Select OAuth 2.0 to secure incoming messages. Access type Ensure Public gateway is selected. This access type uses the public internet to receive messages. - Click Test to confirm that you configured the
connection successfully. When testing completes, a success message is displayed.
Configuration progress is now 100% complete.
- Click Save.
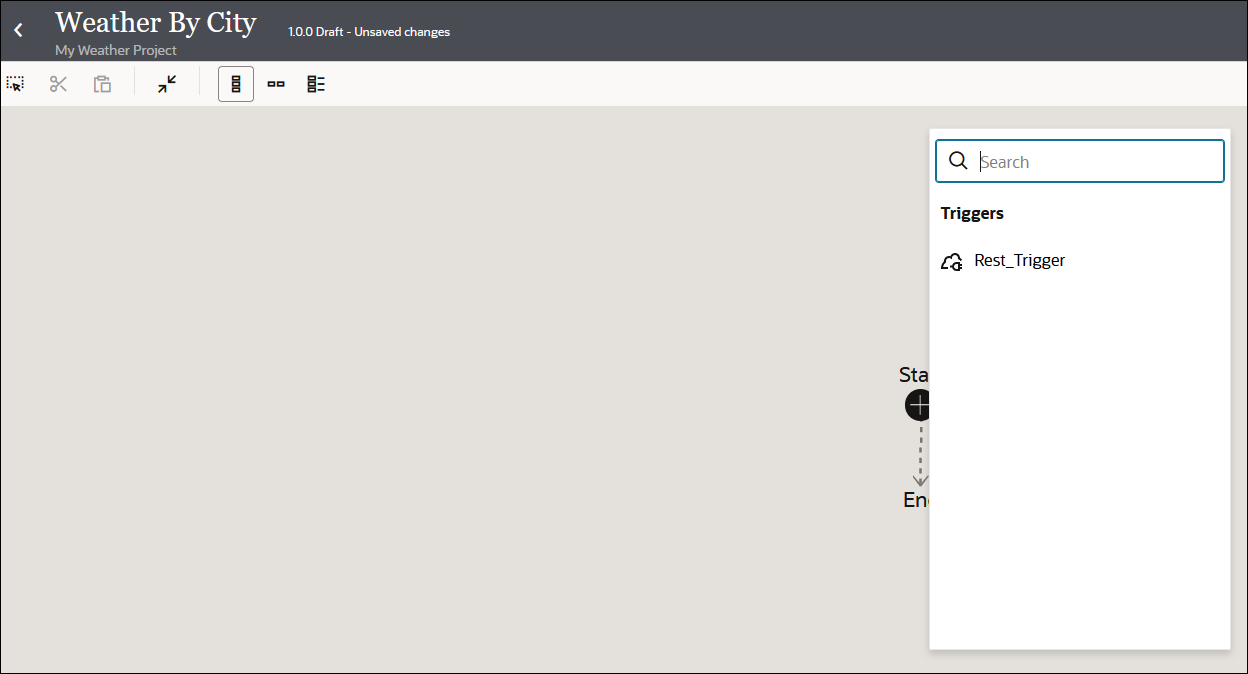
- Click Back
 to return to the integration canvas. A menu shows that the newly-created
Rest_Trigger connection is available for selection.
Let's now configure the REST Adapter trigger connection in the integration. During configuration, you specify details such as the operation, the relative resource URI, the query parameters, and the message payload content.
- Enter the following information.
- In the integration canvas, click the Rest_Trigger
connection shown in the menu.
The Basic Info page of the Adapter Endpoint Configuration Wizard opens. This wizard enables you to configure the Rest_Trigger connection for use in the integration.
- In the What do you want to call your endpoint field,
enter
GetWeatherByCity, then click Continue to access the Resource Configuration page. - Enter the following information.
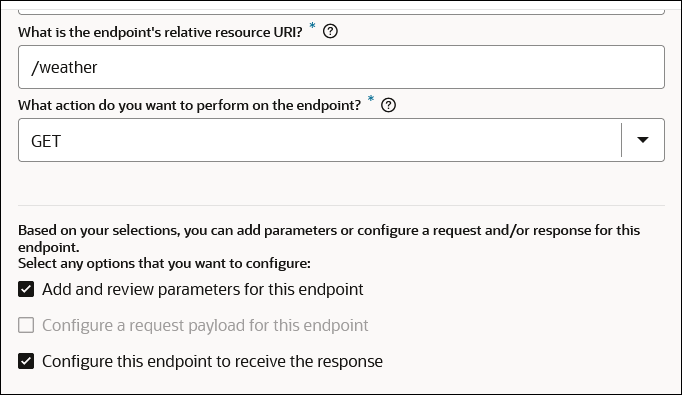
Field Description What is the endpoint's relative resource URI Enter the following: /weatherWhat action do you want to perform on the endpoint Select GET. Select any options that you want to configure Scroll to the bottom of the page and select the following options: - Add and review parameters for this endpoint
- Configure this endpoint to receive the response
- Leave all remaining fields as they are.
The completed Resource Configuration page looks as follows.
- Click Continue to access the Request Parameters
page.
- In the Specify Query Parameters section, click Add.
- Double-click the row in the Name column to enter
a value.

- Enter
city, then select string from the Data Type list.
At runtime, you specify the city on the Configure and run page to receive a weather report.
- Click outside the city row.
- Click Continue to access the Response page.
- Enter the following information.
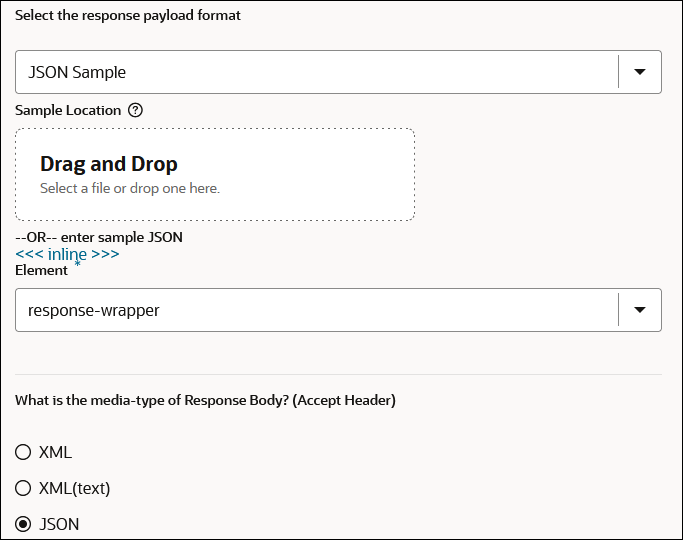
Field Description Select the response payload format Select JSON Sample. <<< inline >>> Click this field and enter the following content, then click OK. { "city" : "Timbuktu", "longitude" : 1.1, "latitude" : 1.2, "country" : "AF", "description" : "clear sky", "temp" : 20.6 }Element Ensure response-wrapper is selected. What is the media-type of Response Body Ensure JSON is selected. The completed Response page looks as follows.
- Click Continue to access the Summary page.
- Review your selections, then click Finish.
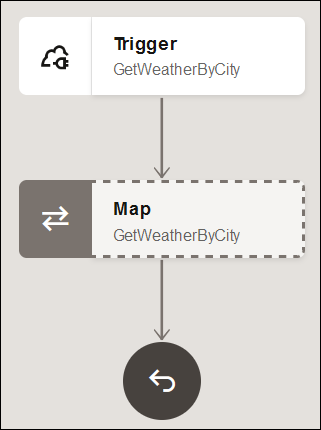
The REST Adapter trigger connection is now fully configured for use in the integration. A map action is also automatically created for mapping data between the trigger connection and the invoke connection that you create in the next section.
Step 6. Create an Invoke Connection to Call the OpenWeather Application
Let's now create an invoke connection inside the integration canvas to call the OpenWeather application and receive weather information.
- In the right pane, click Invokes
 .
.
The Create connection panel opens.
- Click Create Connection
 to create a new connection.

- Select REST as the adapter connection to use. For
this tutorial, the REST Adapter invokes the OpenWeather
application.
- Enter the following information.
Field Description Name Enter Weather.Role Select Invoke. This role enables your integration to invoke the OpenWeather application. - Leave all remaining fields as they are, then click
Create.
The page for configuring security and delivery methods for the REST Adapter invoke connection appears.
- Enter the following information:
Field Description Connection Type Select REST API Base URL to secure the message. Connection URL Enter the following. https://api.openweathermap.org/Security policy Select API Key Based Authentication. This is the authentication security used by the OpenWeather application. API Key Enter the API key you obtained in Step 1. Complete Prerequisites. API Key Usage Expand Optional security, then enter one of the following key usages. This is how the key is passed to the OpenWeather application. The value of imperialindicates that we want to return the temperature in degrees Fahrenheit.?appid=${api-key}&units=imperialThis tutorial describes how to return the temperature in degrees Fahrenheit. If you want, you can return the temperature in degrees Celsius by specifying the following value:?appid=${api-key}&units=metricAccess type Ensure Public gateway is selected. This access type uses the public internet to send messages. 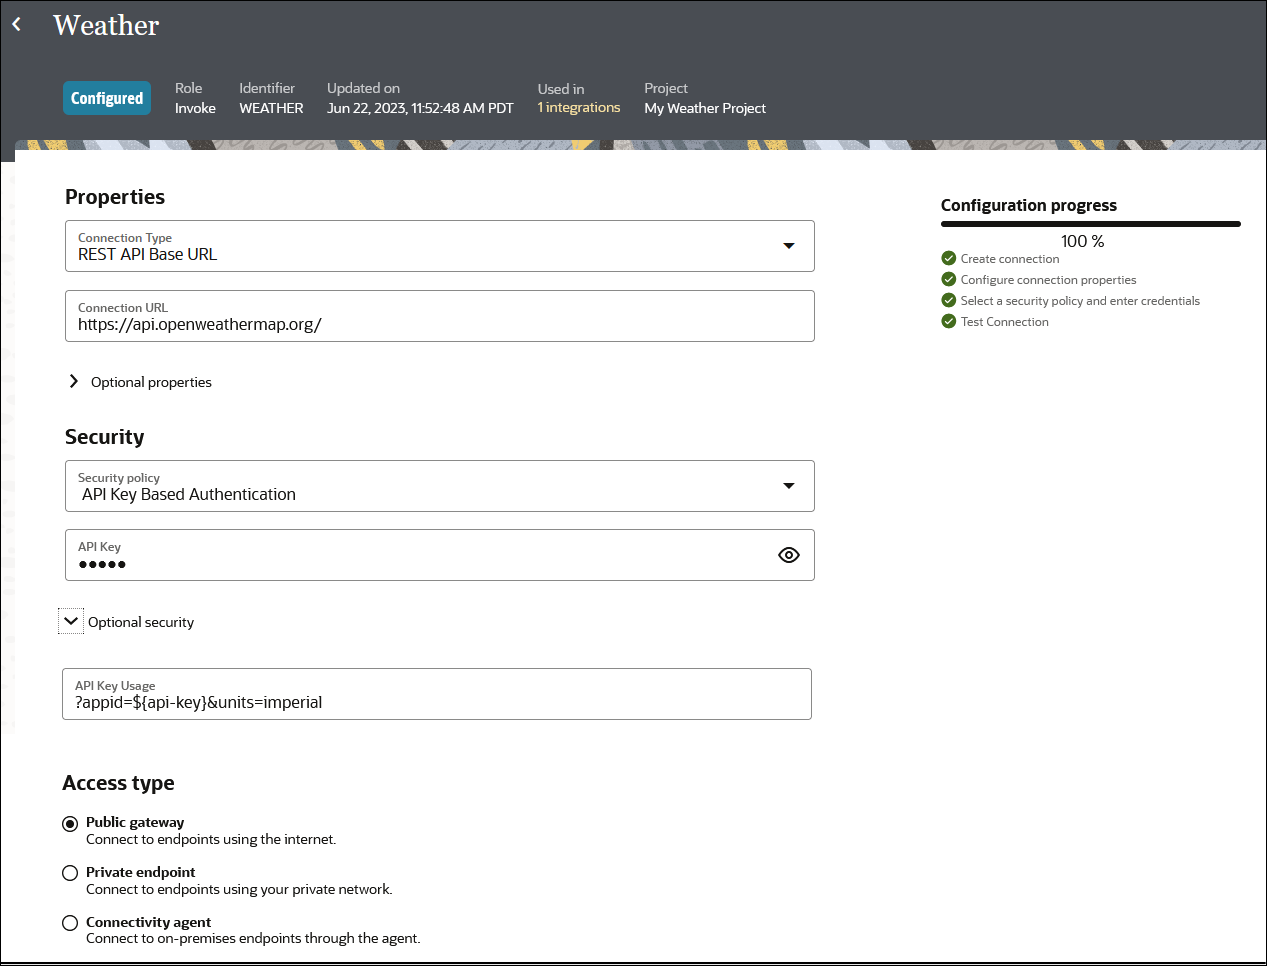
- Click Test to confirm that you configured the
connection successfully. When testing completes, the following message is displayed.
Connection Weather was tested successfully.
   The API key is not validated as part of this test. You must validate
   the API key separately before using them with this security policy.
While the API key may be completely valid, it cannot be completely validated from within Oracle Integration. You have the option of completely validating the API key in (Optional) Step 2. Test the API Key Outside of Oracle Integration.
- Click Save.
- Click Back
 to return to the integration canvas.
- Enter the following information.
Step 7. Specify How the Invoke Connection Retrieves the Latitude and Longitude Coordinates for the City
Let's now configure the REST Adapter invoke connection in the integration to retrieve the latitude and longitude coordinates for the city you specify when running the integration. During configuration, you specify details such as the operation, the relative resource URI, the query parameters, and the message payload content.
- Drag your cursor along the line below the
GetWeatherByCity trigger until the Add
 icon appears.
- Select Invokes, then select the
Weather connection.
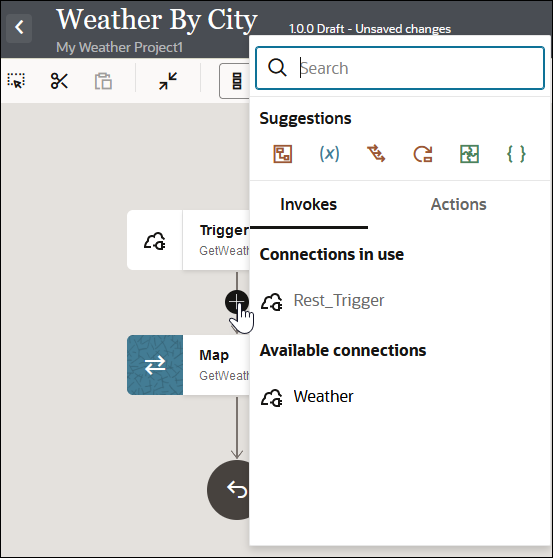
The Adapter Endpoint Configuration Wizard opens.
- Enter the following information.
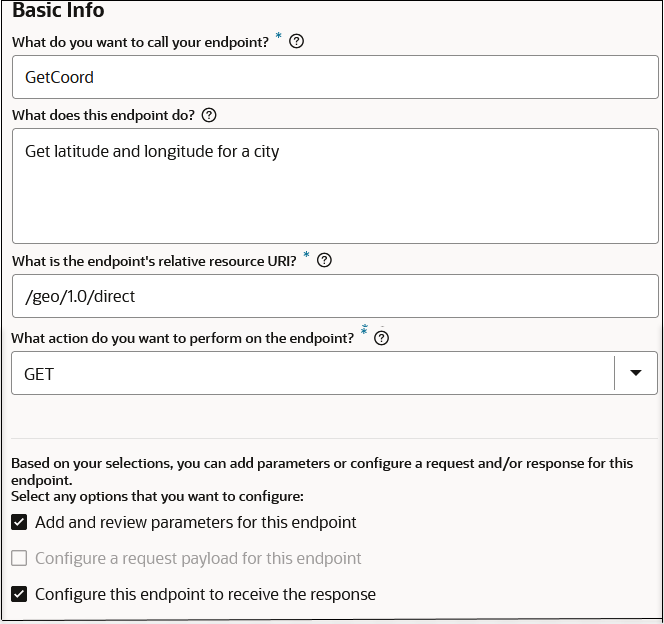
Field Description What do you want to call your endpoint Enter the following: GetCoordWhat does this endpoint do Enter the following: Get latitude and longitude for a cityWhat is the endpoint's relative resource URI Enter the following: /geo/1.0/directWhat action do you want to perform on the endpoint Select GET. Select any options that you want to configure Scroll to the bottom of the page and select the following options: - Add and review parameters for this endpoint
- Configure this endpoint to receive the response
- Leave all remaining fields as they are.
The completed Basic Info page looks as follows.
- Click Continue to access the Request Parameters
page.
- In the Specify Query Parameters section, click Add.
- Double-click the row in the Name column to enter a value.
- Enter
q, then select string from the Data Type list.
- Click outside the q row.
- Click Continue to access the Response page.
- Enter the following information.
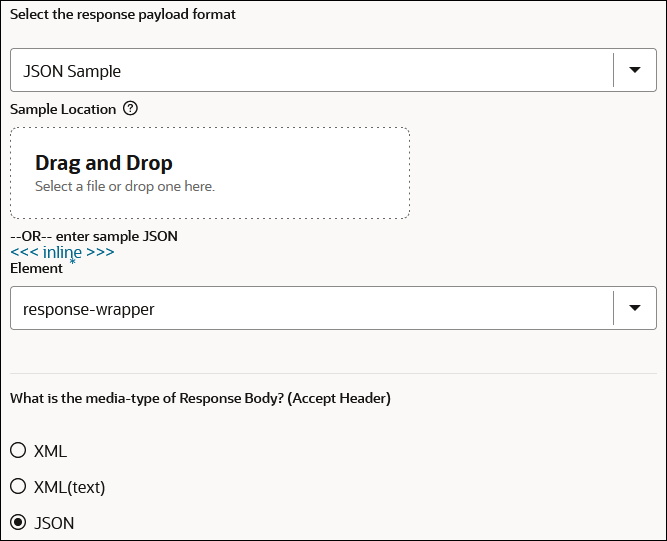
Field Description Select the response payload format Select JSON Sample. <<< inline >>> Click this field and enter the following content, then click OK. [ { "name" : "London", "local_names" : { "af" : "Londen", "ascii" : "London", "az" : "London", "ca" : "Londres", "da" : "London", "de" : "London", "en" : "London", "eu" : "Londres", "feature_name" : "London", "fi" : "Lontoo", "fr" : "Londres", "gl" : "Londres", "hr" : "London", "hu" : "London", "id" : "London", "it" : "Londra", "la" : "Londinium", "lt" : "Londonas", "nl" : "Londen", "no" : "London", "pl" : "Londyn", "pt" : "Londres", "ro" : "Londra", "sl" : "London", "tr" : "Londra", "zu" : "ILondon" }, "lat" : 51.5085, "lon" : -0.1257, "country" : "GB" }, { "name" : "London", "local_names" : { "ascii" : "London", "de" : "London", "en" : "London", "feature_name" : "London", "fi" : "London", "fr" : "London", "lt" : "Londonas", "nl" : "London", "pl" : "London", "pt" : "London" }, "lat" : 42.9834, "lon" : -81.233, "country" : "CA" }, { "name" : "London", "local_names" : { "ascii" : "London", "en" : "London", "feature_name" : "London" }, "lat" : 39.8865, "lon" : -83.4483, "country" : "US", "state" : "OH" }, { "name" : "London", "local_names" : { "ascii" : "London", "en" : "London", "feature_name" : "London" }, "lat" : 37.129, "lon" : -84.0833, "country" : "US", "state" : "KY" }, { "name" : "London", "local_names" : { "ascii" : "London", "ca" : "Londres", "en" : "London", "feature_name" : "London" }, "lat" : 36.4761, "lon" : -119.4432, "country" : "US", "state" : "CA" } ]Element Ensure response-wrapper is selected. What is the media-type of Response Body Ensure JSON is selected. The completed Response page looks as follows.
- Click Continue to access the Summary page.
- Review your selections, then click Finish.
- Above the integration, click Horizontal
 to see a horizontal view of the integration. Note that after you created and
configured the GetCoord invoke connection in the integration, a map
was automatically added after it.

When you configured the GetWeatherByCity trigger connection in the integration canvas, a map was automatically created. Let's now configure the first map.
- Double-click the map between the GetWeatherByCity
trigger connection and GetCoord invoke connection.

The mapper opens.
- In the Sources section, expand Query Parameters.
- In the Target section, expand Query Parameters.
- Drag the source City element to the target
Q element. This maps the city to its latitude and longitude
coordinates. You created these query parameters earlier when you configured the trigger
and invoke connections in the Adapter Endpoint Configuration Wizard.

- Click Validate and wait for the following message to
appear.
Map to GetCoord successfully validated. - Click Back
 to exit the mapper and return to the integration canvas. Your mappings are
automatically saved.
Step 8. Specify How the Invoke Connection Retrieves the Weather Report for the City
Let's now configure a second REST Adapter invoke connection in the integration to obtain the weather report from the OpenWeather application.
- Drag your cursor along the line after the GetCoord
invoke connection until the Add
 icon appears.

- Select Invokes, then select the
Weather connection again.
The Adapter Endpoint Configuration Wizard opens.
- Enter the following information.
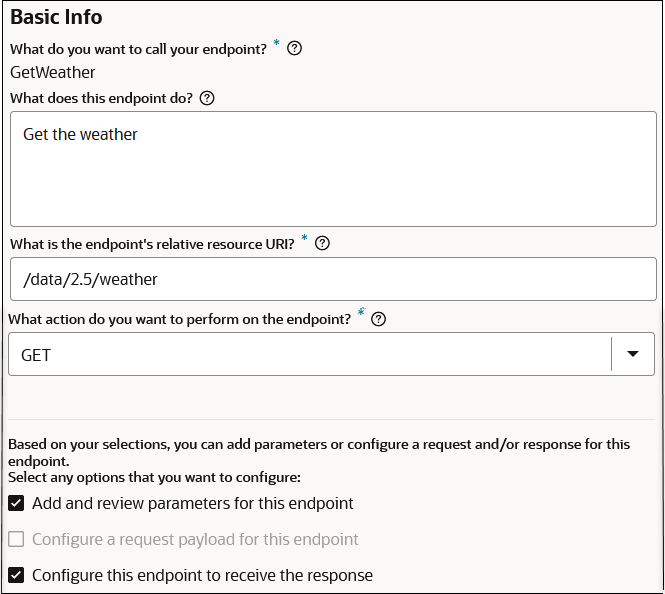
Field Description What do you want to call your endpoint Enter the following: GetWeatherWhat does this endpoint do Enter the following: Get the weatherWhat is the endpoint's relative resource URI Enter the following: /data/2.5/weatherWhat action do you want to perform on the endpoint Select GET. Select any options that you want to configure Scroll to the bottom of the page and select the following options: - Add and review parameters for this endpoint
- Configure this endpoint to receive the response
- Leave all remaining fields as they are.
The completed Basic Info page looks as follows.
- Click Continue to access the Request Parameters
page.
- In the Specify Query Parameters section, click Add.
- Double-click the row in the Name column to enter a value.
- Enter
lat, then select float from the Data Type list. - Click Add again.
- Double-click the row in the Name column to enter a value.
- Enter
lon, then select float from the Data Type list.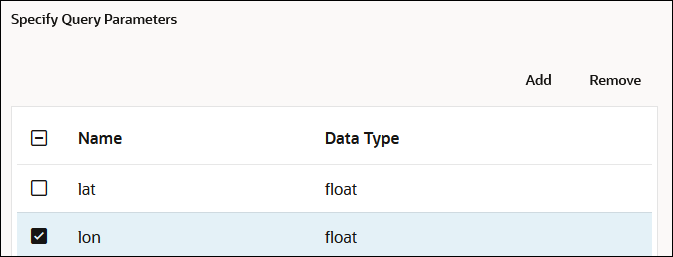
- Click outside the lon row.
- Click Continue to access the Response page.
- Enter the following information.
Field Description Select the response payload format Select JSON Sample. <<< inline >>> Click this field and enter the following content, then click OK. { "coord" : { "lon" : -122.08, "lat" : 37.39 }, "weather" : [ { "id" : 800, "main" : "Clear", "description" : "clear sky", "icon" : "01d" } ], "base" : "stations", "main" : { "temp" : 282.55, "feels_like" : 281.86, "temp_min" : 280.37, "temp_max" : 284.26, "pressure" : 1023, "humidity" : 100 }, "visibility" : 10000, "wind" : { "speed" : 1.5, "deg" : 350 }, "clouds" : { "all" : 1 }, "dt" : 1560350645, "sys" : { "type" : 1, "id" : 5122, "message" : 0.0139, "country" : "US", "sunrise" : 1560343627, "sunset" : 1560396563 }, "timezone" : -25200, "id" : 420006353, "name" : "Mountain View", "cod" : 200 }Element Ensure response-wrapper is selected. What is the media-type of Response Body Ensure JSON is selected. The completed Response page looks as follows.

- Click Continue to access the Summary page.
- Review your selections, then click Finish.
When you configured the GetCoord invoke connection in the integration canvas, a map action was automatically created. Let's now map the latitude and the longitude coordinates to the call to get the weather from the OpenWeather application.
- Double-click the map between the GetCoord invoke
connection and GetWeather invoke connection.

The mapper opens.
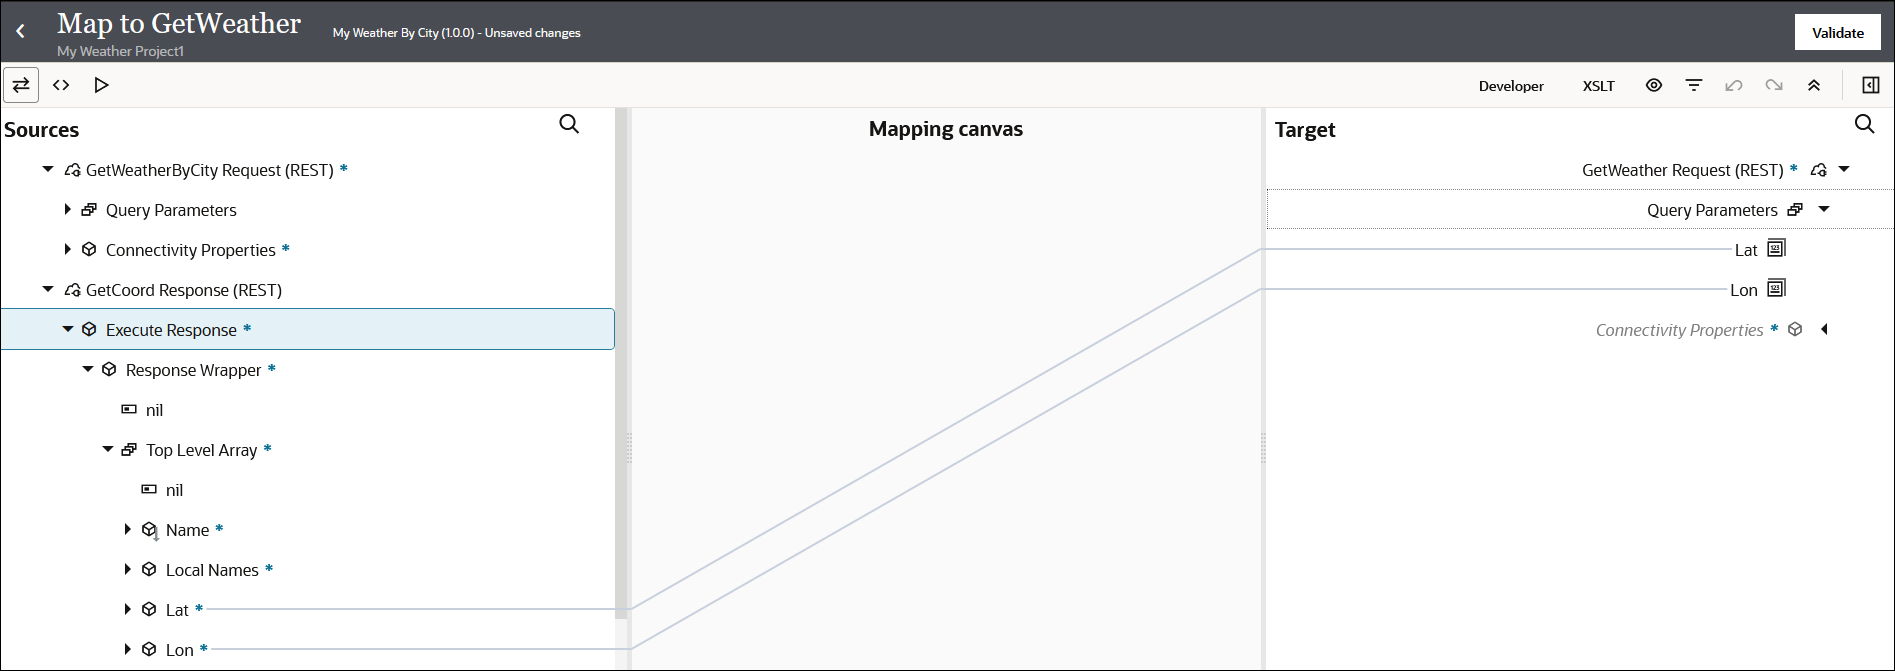
- In the Sources section, expand GetCoord Response (REST), then Execute Response, then Response Wrapper, and then Top Level Array.
- In the Target section, expand GetWeather Request (REST), and then Query Parameters.
- Perform the following mapping:
- Drag the source Lat element to the target Lat element.
- Drag the source Lon element to the target Lon element.
- Click Validate and wait for the following message to
appear.
Map to GetWeather successfully validated. - Click Back
 to exit the mapper and return to the integration canvas. Your mappings are
automatically saved.
Step 9. Map the Weather Report Response Returned from the OpenWeather Application
When you configured the GetWeather invoke connection in the integration canvas, a map action was automatically created. Let's now map the response information you receive back from the OpenWeather application.
- Double-click the map after the GetWeather invoke
connection.

The mapper opens.
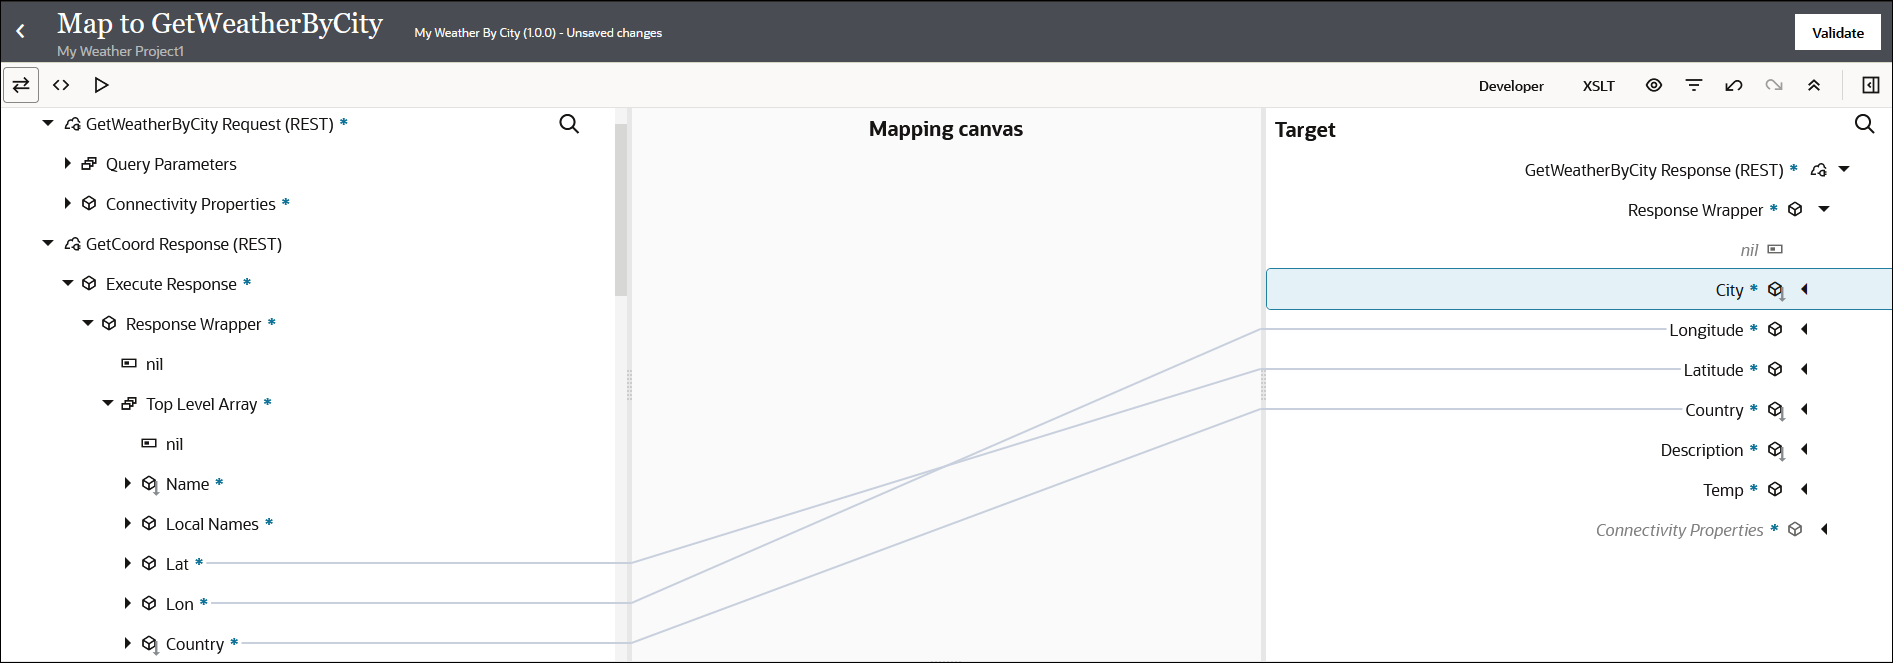
- In the Sources section, expand GetCoord Response (REST), then Execute Response, then Response Wrapper, and then Top Level Array.
- In the Target section, expand GetWeatherByCity Response (REST), and then Response Wrapper.
- Perform the following mapping:
- Drag the source Lat element to the target Latitude element.
- Drag the source Lon element to the target Longitude element.
- Drag the source Country element to the target
Country element.
- Scroll down in the Sources section and expand GetWeather Response (REST), then Execute Response, then Response Wrapper, and then Weather.
- Drag the source Description element to the target
Description element.

- Collapse the source Weather element in the Sources section.
- Scroll down in the Sources section and expand the Main element.
- Drag the source Temp element to the target
Temp element.

- Collapse the source Main element in the Sources section.
- Scroll down in the Sources section and drag the
source Name element to the target City
element.

- Click Validate and wait for the following
message.
Map to GetWeatherByCity successfully validated. - Click Back
 to exit the mapper and return to the integration canvas. Your mappings are
automatically saved.
Step 10. Define a Business Identifier
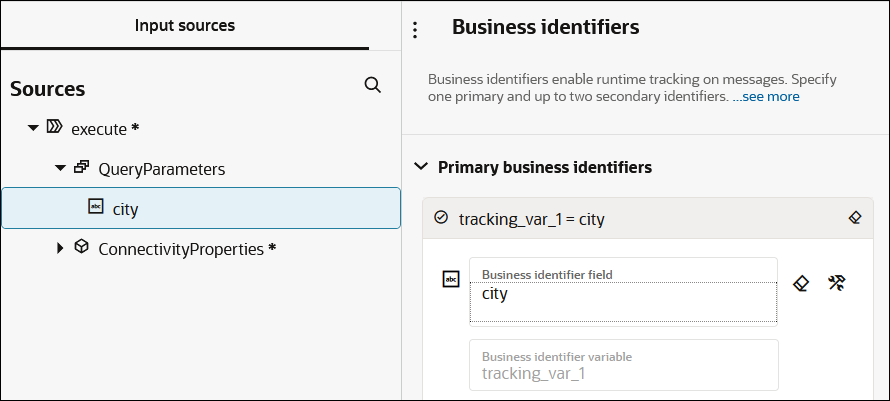
Let's now define the primary business identifier for the integration. Business identifiers enable you to track payload fields in messages during runtime. Each integration requires a primary business identifier.
- Above the integration, click Business
Identifier
 .
.
- Expand QueryParameters, and drag
city to the Business identifier
field.
- Click Save, then click outside the Business identifiers panel to close it. The business identifier you specify here is visible when you monitor your completed integration instance in the Observe tab in Step 12. Monitor the Integration.
- Expand QueryParameters, and drag
city to the Business identifier
field.
- Check for any red error icons. If you see any, click the icon for details
and resolve those errors.
The complete integration design looks as follows.

- Click Back
 to exit the integration canvas and return to the project page.
Step 11. Activate and Run the Integration
You are now ready to activate the integration to the runtime environment. Once activated, you can run the integration.
- In the Integrations section,
click Actions
 , then select Activate.
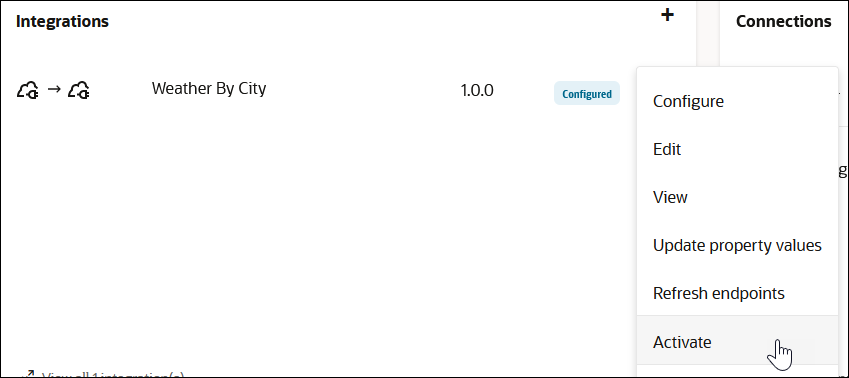
- Click Activate. Keep the tracing level set to Production. If you receive runtime errors, the Debug (Not recommended) selection provides detailed information in the activity stream and is useful for testing and troubleshooting any runtime errors.
- Click Refresh
 periodically.
The integration status changes to Active.
You are now ready to run the integration and send a message.
- In the Integrations section,
click Actions
 , then select Run.
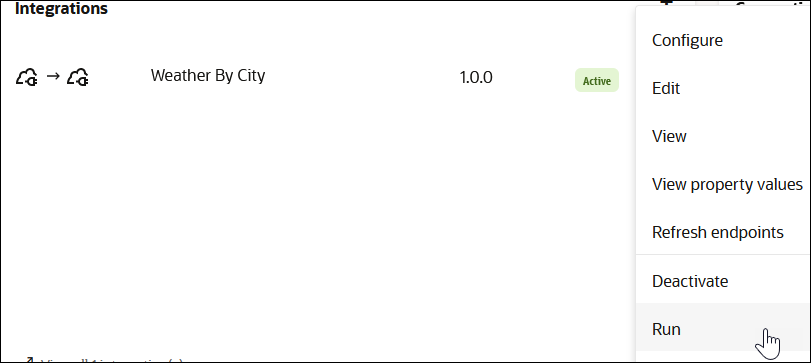
The Configure and run page enables you to run and test REST Adapter trigger-based integrations. This page provides a way of testing the delivery of an inbound message to your integration.
- In the Request section,
specify a city, and click Run to send your inbound message to the
integration.

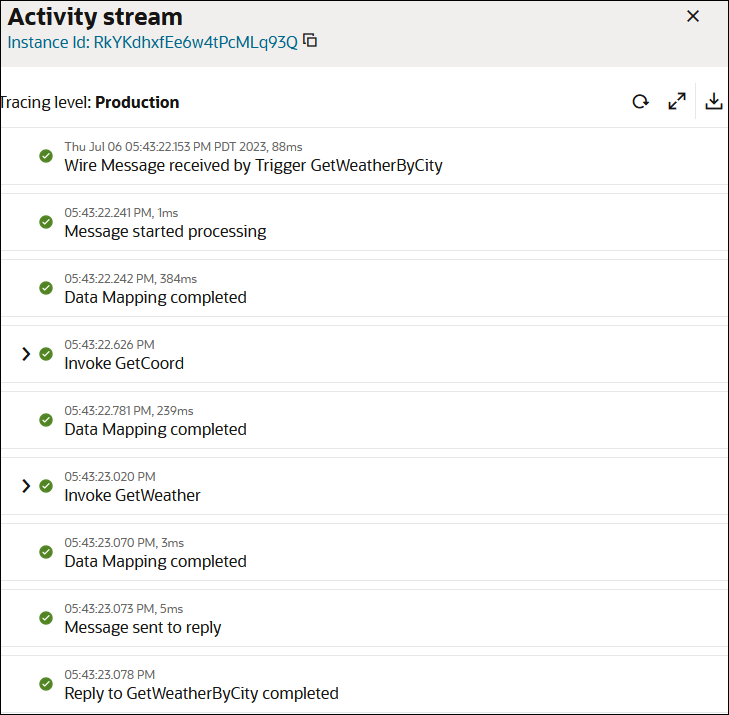
The Activity stream panel opens and shows the movement of the message through the actions that you designed (triggers, invokes, and maps). The unique instance ID that was created for this integration run is displayed at the top. All milestones in this activity stream are green, indicating a successful run of this integration instance.
.
- View the response message at the bottom of the Configure and run page. The
temperature of the city you specified is displayed (for this example, Chicago), along with
its longitude and latitude coordinates, country, and current weather description.
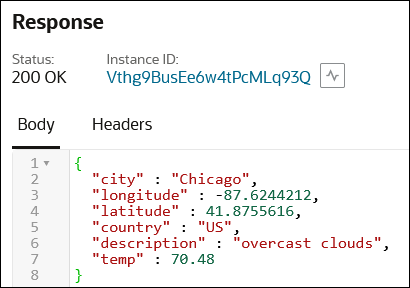
The response information you received back from the OpenWeather application is based on the target-to-source element mappings you performed in the GetWeatherByCity map in Step 9. Map the Weather Report Response Returned from the OpenWeather Application.
Step 12. Monitor the Integration
- Close the Activity steam panel and click
Track instances.
The Observe tab in your project opens. This tab enables you to monitor the status of your integration instance. The status of the instance is displayed as Succeeded. Note that the primary business identifier (city) that you defined in Step 10. Define a Business Identifier is visible in the Primary Identifier column.

Congratulation! You have successfully created, designed, activated, run, and monitored your second integration. See the section below for more information about the capabilities used in this tutorial.