Take your dynamic process to the next level

Now that you’ve got the basics down, let’s make some improvements to the dynamic process using milestone and structured process activities, adding conditions and events, and working with plan item lifecycles.

The following topics build on a basic dynamic process application. See Learn dynamic processing basics.

Set a Stage's Activation

By default, stages become available at the same time.

Let’s change it so that the Treatment stage isn’t available until the Screening stage is complete.
  1. Close the test runtime tab, and return to the Emergency Process tab in design time.
  2. Select the Treatment stage (click where it says “Treatment”) and open its properties for editing.
  3. Select the Conditions tab. Click Create Condition create condition icon in the Activation table.
  4. In the expanded Activation condition pane, complete settings.
    1. Enter Treatment stage starts when in the Label field.
    2. Click Create Event create event icon in the Events table. Leave the default settings of Previous Stage and Complete selected, and click Create.

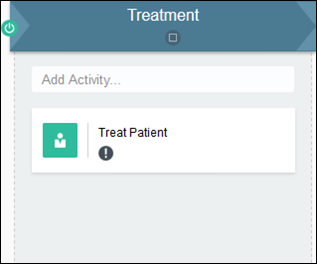
    Notice that the Treatment stage now displays an activation symbol indicating an activation condition.

    Description of er-example-stage-activation.png follows
    Description of the illustration er-example-stage-activation.png

  5. Test activate again.

    Click Test, then Activate. Leave Add Me to All Roles selected, and click Activate. You’re test activating a new version, overriding the version you previously activated. After successful activation, click Try in Test Mode. See Test Activate the Application.

  6. Try out your changes in runtime.
    1. From My Apps, start a new application, enter sample values, and submit. Select Dynamic Process in the navigation pane and open the new dynamic process instance.
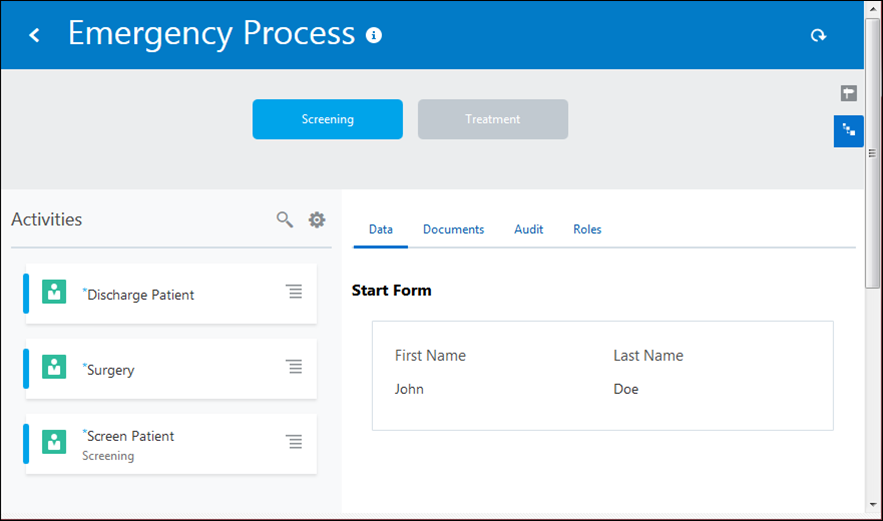
    2. Notice that the Treat Patient activity no longer displays, because it doesn’t start until the Screening stage is done. Click Stage stage icon and notice that the Treatment stage is gray, indicating that it’s inactive.
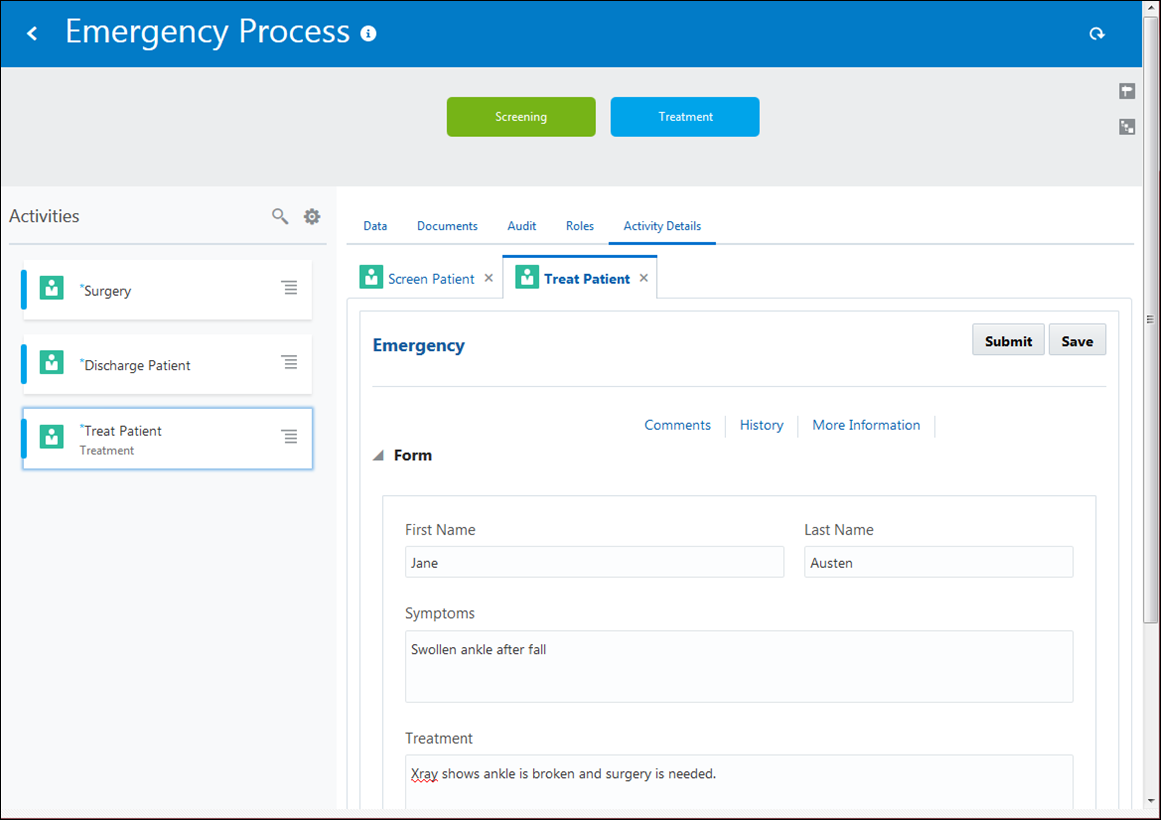
    3. Complete the Screen Patient activity, adding symptom text, and click Submit. Notice how the Treatment stage and activity become available.
    4. Complete the Treat Patient activity. Notice how the symptom text was retained. This is because the human task wasn’t created until the activity became available (Screening stage was complete), so the activity’s data, or payload, included the symptom text you submitted.
    Each plan item has properties, and can have activation, termination, or completion conditions that control its state—for example, when it is active, available, or terminated. Want to learn more about plan item activation? See About Process and Plan Item Lifecycles.

Add a Milestone

Milestones indicate that something occurred or a condition was met. Use milestones so users get updated on what’s transpired in a running process instance.

  1. Close the test runtime tab, and return to the Emergency Process tab in design time.
  2. Add a milestone in the Screening stage.
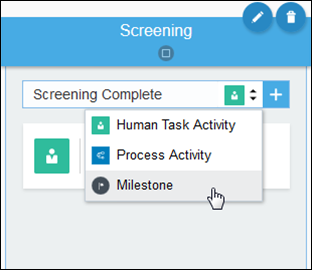
    1. In the Add Activity field, enter Screening Complete.
    2. Click the activity icon and choose Milestone, and click Add Activity add activity icon.
  3. Edit the milestone’s properties.
    1. Click the Conditions tab. Click Create Condition create condition icon to create a Completion condition called Screening complete when.
    2. Click Create Event create event icon to add an event and select Screen Patient from Activities and Complete. Click Create. (Note that you can add multiple events to a condition and specify an AND or OR condition between them.)
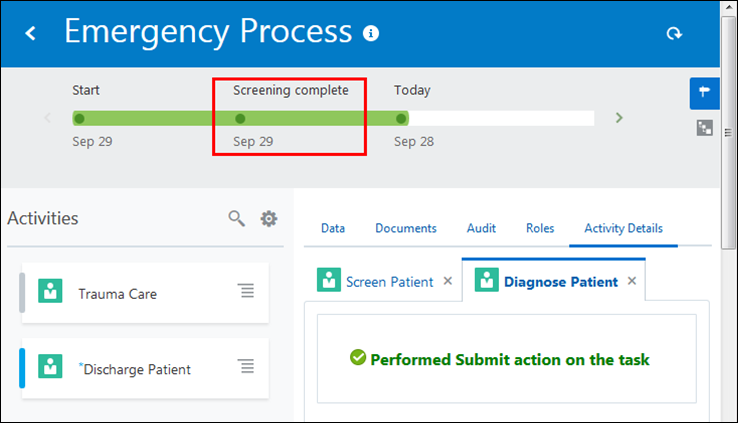
      Notice that the milestone now displays an activation symbol indicating an activation condition.
  4. Test activate and try out your changes in runtime.
    With the Milestone view displayed, submit the Screen Patient activity, and watch the milestone progress bar show the completed milestone.

Control Plan Item Behavior Using Markers

Markers control the behavior of plan items (activities, stages, and processes), such as whether they’re required, repeatable, manually activated, and if they auto complete. Depending on the plan item, different markers are available.

By default when you create an activity, it becomes required (the Required marker is selected by default for the activity). You can deselect Required and make changes to the behavior of the activity, but you have to configure one of the following options. Otherwise, you'll get validation errors.
  • The activity has one activation condition based on events.

  • The activity uses a condition in its marker.

  • The activity has a milestone added to it.

Right now, all activities in the Emergency Room example are required. Let’s make some changes.

  1. Make the Screen Patient activity not required.

    On the Emergency Process tab, select the Screen Patient activity and edit its properties. Under Markers, deselect Required. Notice that the activity no longer displays a Required Required icon icon.

    Note that the Screen Patient activity has a milestone (Screening Complete) added to it.

  2. Make the Surgery human task activity repeatable, manually activated, and not required.

    Edit its properties, select Repeatable, deselect Required, and select Manually Activated.

  3. Set conditions to the Repeatable and Manually Activated markers.
    1. Click Edit in the Repeatable marker. The Property pane opens.
    2. In the Property pane, click Create Data Condition on the Data Driven section.
    3. In the Create Data Condition dialog box, select Simple as the condition type and enter Surgery repeatable condition in the Name field.
    4. Define condition as formArg is equal to formArg and click Create.
    5. In the Property pane, click Save.
    6. Repeat the steps above for the Manually Activated marker, only this time enter the condition name as Surgery manually activated condition.

      Notice that the Surgery activity’s marker icons now reflect the new marker choices.

      Description of er-example-markers1.png follows
      Description of the illustration er-example-markers1.png

  4. Test activate, try in test mode, and view your changes in runtime.

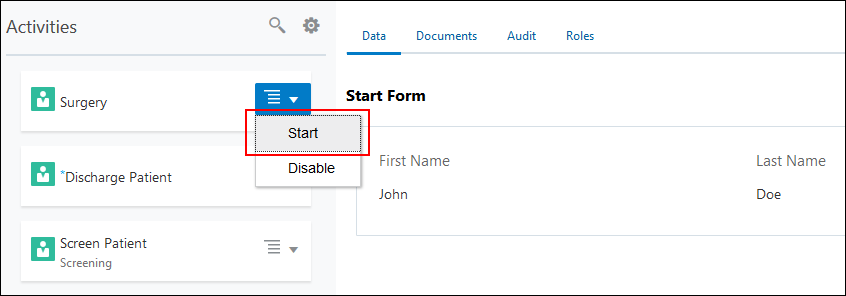
    You’ll notice that you cannot open the Surgery activity by selecting it in the Activities section of your dynamic process. This is because it is set to manually activated.

  5. Start and complete the Surgery activity.
    1. Select its Actions menu, and choose Start. Click OK to confirm.

      Note that you can now select and open the Surgery activity.

      Description of er-example-markers3.png follows
      Description of the illustration er-example-markers3.png

    2. Select, complete, and submit the Surgery activity.

      After you submit, notice that Surgery activity displays again in the Activities list because it is set to repeatable.

    3. After completing all required activities, a Close option appears at the top of the page for completing the process. Click Close.

Define Roles and Their Permissions

Roles in dynamic processes provide maximum flexibility. You create roles and define the process elements they apply to and the permissions granted.

  1. Click the Roles button.

    The Roles tab lists roles defined for the dynamic process. Two default roles, Process Owner and Process Viewer, are provided. Let’s adapt these default roles for the dynamic process.

  2. Click Edit for the Process Owner role. Change the Name field to Doctor.
  3. Click the Members field and select the user you used to sign in to Oracle Integration.
  4. Edit the existing permission for the doctor role.

    Notice that the existing permission allows the doctor role to perform all actions in the process. Change the permission’s Name field to Perform all actions in process. Click the triangle to collapse the permission, and click Save.

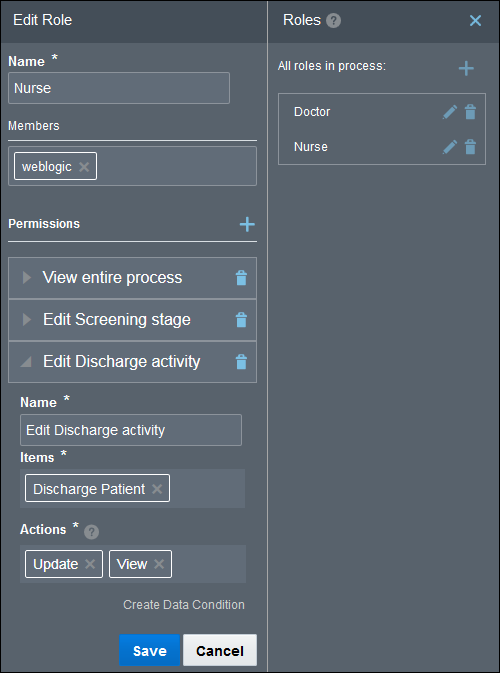
  5. Edit the Process Viewer permission for a nurse role.
    1. Click Edit for the Process Viewer role and change the Name field to Nurse.
    2. Click the Members field and select your sign-in user name. (Normally, the nurse and doctor roles would be assigned to different users.)
    3. Notice that the existing permission allows the nurse role to view all actions in the process. Change the permission’s Name field to View entire process and collapse it.
  6. Add a permission that lets the nurse edit the Screening stage. Click Add add icon in the Permissions table to create a permission, expand it, and complete its settings.
    1. In the Name field, enter Edit Screening stage.
    2. In the Items field, select Screening from Stages.
    3. In the Actions field, select Update and View.
    4. Collapse the new permission.
  7. Add a permission that lets the nurse edit the Discharge activity. Click Add add icon to create a permission, expand it, and complete its settings.
    1. In the Name field, enter Edit Discharge activity.
    2. In the Items field, select Discharge Patient from Activities.
    3. In the Actions field, select Update and View.
  8. Click Save.

You can temporarily override roles at runtime. But setting roles and permissions in design time ensures they’re retained for all deployments.

Want to learn more about roles in dynamic processes? See Create Process Roles and Override Roles Assigned to a Process.

Set Assignees for Human Task Activities

Each human task needs one or more assignees. Let’s assign the roles you created to the human task activities.

  1. Assign the Doctor role to the Treat Patient activity.
    1. Select the activity, click Edit Properties, and choose General under Implementation options.
    2. In the Assignees field, click Edit.
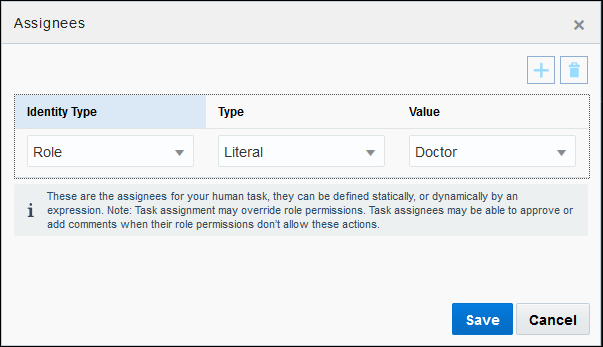
    3. In the Assignees window, click Add add icon. In the Identity Type field, select Role. In the Value field, select Doctor.
    4. Click Save, then Close.
  2. Repeat the step above to assign the nurse role to the Screen Patient and Discharge activities, and the doctor role to the Surgery activity.

Set the Process to Complete or Close

Dynamic processes, like stages and activities, follow a lifecycle where they move through states such as active, completed, and closed. (Note that termination ends the plan item.)

When you start a process instance, the dynamic process is active. All stages and activities are started and available, unless a condition affects their activation. Whether you set the process to auto complete determines whether processes close or complete at the end of their lifecycle. Let’s experiment to see the differences.

  • By default, dynamic processes do not auto complete, which means that the Complete option appears when all stages and required activities contained within them are completed, terminated, or disabled.

  • Setting a process to auto complete means that once all required activities are complete, the Close option appears and all non-required activities disappears and “No activities available to act on” appears. You can return to the instance, but can’t work on any remaining non-required activities.

  1. In runtime, create and run a dynamic process instance. On the Dynamic Processes list, notice the Active Active icon icon. Open and complete all required activities. (Note that a required activity might not be visible: If you complete the discharge activity but not the screen activity, no Complete option appears even with no required activities shown, because the required but not yet started treatment activity in the Treatment stage hasn’t completed.)

    Notice that after completing all required activities, a Complete option appears at the top of the page for completing the process.

  2. Instead of clicking Complete, click Exit Exit icon to return to the dynamic processes list.

    Notice that the instance is still active, because there are non-required activities.

  3. Open the instance again and click Complete.

    The instance is no longer in the list. If you search for it using the Completed filter, it displays Completed icon. You can even open it and select Close, which changes its icon to Closed icon.

    Now let’s see the difference when the process is set to auto complete.

  4. Switch to design time and open the process properties at the top of the page by clicking Edit Edit Properties icon.
  5. In the process properties pane, select Auto Complete under Markers.
  6. Change the title of the process that displays for instances on the Dynamic Processes page and at the top of instances.

    Optionally, enter a new title in the Title field to appear for all runtime instances, such as “Emergency Room Process”. (Leave the quotation marks.)

  7. Test activate and view your changes in runtime.
    1. Notice that the new title you entered appears in the Dynamic Processes instance list.
    2. Complete all required activities. Notice that the top link now shows Close instead of Complete, and the remaining non-required activity disappeared and was replaced with “No activities available to act on.”

Want to learn more about process lifecycle? See Process State Model and Define Process Completion and Termination.

Explore Embedding Process Runtime Components

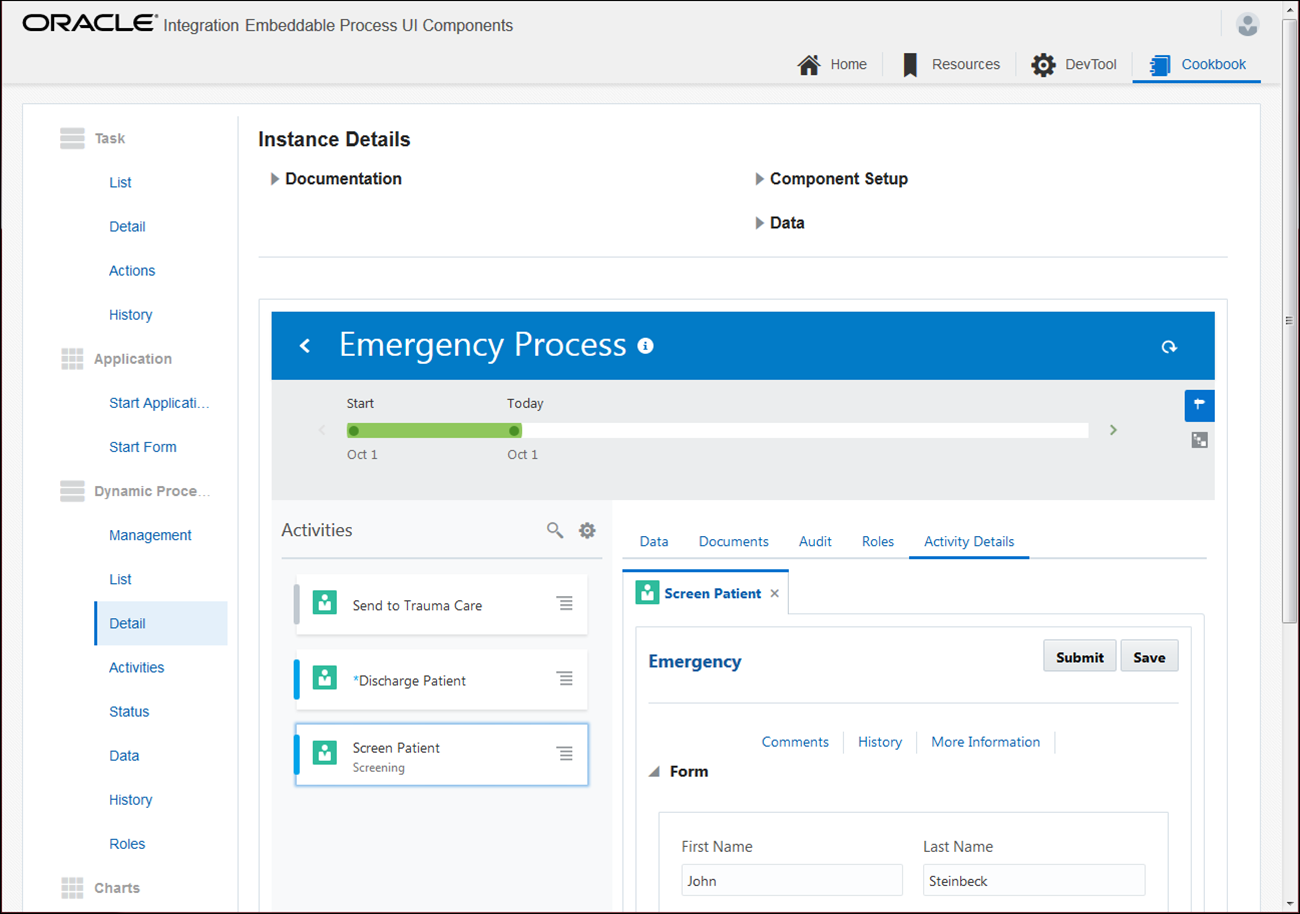
What if you want users to start and run dynamic processes from another application or service, or display only certain portions of the runtime experience, such as activities and details? Use Embeddable Process UI Components (also called snippets) to embed selected runtime components.

To explore dynamic process runtime components using the cookbook:
  1. Copy and paste the design time URL into a new browser tab.
  2. Change the end of the URL, starting with /ic/, to /ic/pub/components.
    Use this URL format: https://host:port/ic/pub/components
    The Oracle Integration Embeddable Process UI Components page opens.
  3. Connect to your server.
    Under Server Setup, complete the username and password fields with the same credentials you use to sign in to Oracle Integration, and click Apply. A message displays that the connection was successful.
  4. Explore dynamic processes components in the cookbook.
    1. Select the Cookbook tab.
    2. Select My Apps in the side pane and create a dynamic process instance.
    3. Select components listed under Dynamic Process. For example, select Detail under Dynamic Process as if in runtime.

Explore Advanced Dynamic Process Topics

Here are some other areas to explore in the dynamic process editor.