27 Fusion Applications Connector APIs

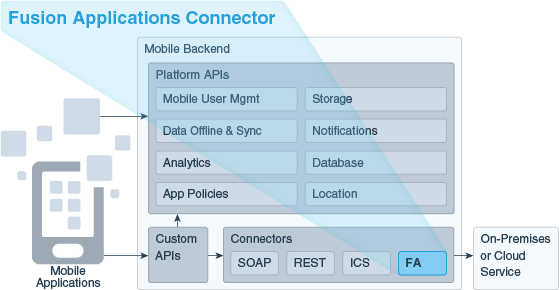
Oracle Mobile Cloud Service (MCS) enables you to create Fusion Applications (FA) Connector APIs to connect to Oracle Fusion Applications. As a service developer, you can create connector APIs to make it easier to call these external services from the implementations of your custom APIs.

A Fusion Applications Connector API enables a mobile backend to use and expose data from one or more resources available from an Oracle Fusion Applications instance.

When configuring the connector API, you need to enter runtime credentials each time you need to access a Fusion Applications service, but customers of Fusion Applications-based services should only have to sign in once to the mobile app to access the Oracle Cloud application. You can create an app that lets users sign in just once with their identity domain credentials. To see how to set up single sign-in, see Configuring Oracle Cloud Applications as the Identity Provider.

How Fusion Applications Connector APIs Work

A Fusion Applications Connector API enables a mobile backend to use and expose data from resources available from Fusion-based software-as-a-service (SaaS) instances, such as Oracle Human Capital Management Solution (HCM), Oracle Supply Chain Management (SCM), and Oracle Customer Relationship Management Solution (CRM). These suites of modular services help you with customer and employee management, sales and supply chain management, and more.

Use the Fusion Applications Connector API wizard to quickly and easily create a connector API with a customized selection of resources from a Fusion Applications service or Fusion-based service.

Here are the some of the advantages to using a Fusion Applications Connector API:

  • Makes it easier for customer to explore Fusion-based services through resource discovery.

  • Makes it easier for you to see all the resources, child resources, and resource attributes available in a given resource instance.

  • Lets you provide easy to identify and comprehend user-friendly names and descriptions for the resources and their attributes in the connector.

  • Provides a rich test client that lets you test with Fusion Applications query parameters.

Fusion Applications Connector API Flow

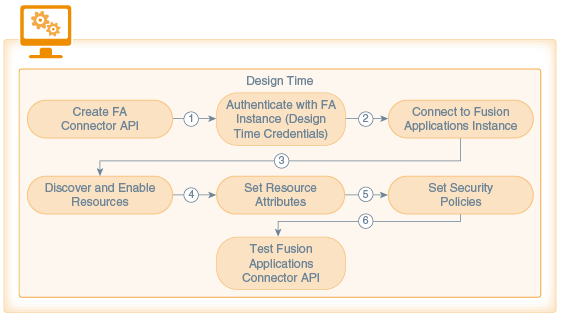
Here’s how the design-time flow for a Fusion Applications Connector API design-time goes:

  1. Connector Creation phase. An unbound Fusion Applications Connector API is created with the Fusion Applications Connector API wizard.

  2. Connection phase. Design time credentials are passed and a connection to the Fusion Applications instance is made. The design time credentials are saved in the Credentials Store Framework (CSF) in MCS. The Fusion Applications service description, the Fusion Applications Describe, is retrieved from the external service.

  3. Resource Discovery phase. MCS locates the Fusion Applications instance via the Describe URL provided. When authentication is confirmed, MCS downloads and parses the Describe resource and displays the list of resources exposed by the Fusion Applications service. The resources list is examined and the desired resources to access from the custom code are enabled.

    In addition, descriptions for each attribute may be provided. Attribute values are available only at runtime and can’t be changed during design time.

    Whenever you enable or disable resources or refresh the list of available resources, the changes are time stamped and tracked in a work area. Each instance of the connector API has one work area and the contents of that work area are saved as part of the configuration when the connector API is saved.

  4. Attribute Setting phase. Attributes are selected or de-selected based on the requirements for the connector. Values for resource attributes are modified as needed.

  5. Runtime Security phase. The Oracle Web Services Manager (Oracle WSM) security policy to be used at runtime is configured.

  6. Testing phase. The configuration is saved. The enabled resources are displayed on the Test page and tested. Mobile user credentials are provided to test the connector API.

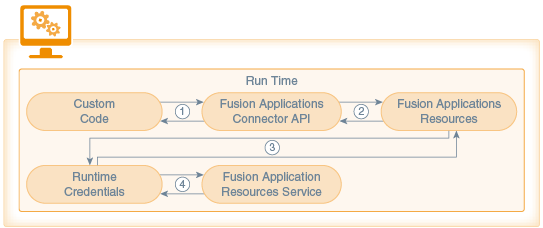
Here’s how the runtime flow goes:

  1. Custom code calls the Fusion Applications Connector API. Information is then passed to the connector implementation. The implementation extracts the payload from the request.

  2. The connector implementation checks whether or not the resource is enabled. If the endpoint is a GET request, a fields query parameter is added to the request so that the attributes returned by the Fusion Applications service are limited to only those attributes that were enabled for the resource at design time.

  3. Runtime credentials (which are based on the security policies selected during design time) are added to the request and the request is sent to the Fusion Applications service.

  4. Information is passed back from the Fusion Applications service to the connector API and finally back to the custom code.

How Do I Create a Fusion Applications Connector API?

The Fusion Applications Connector API wizard will walk you through the following stages of creating the connector API:

  1. Setting Up the Basics. Name the API and provide a description. When you click Create, the API exists in a Draft state.

  2. Connecting To and Selecting Resources. Locate the Fusion Applications service through the Describe URL that you provide and select the resources available from the service.

  3. Selecting Attributes. Choose the attributes for each resource and child resource.

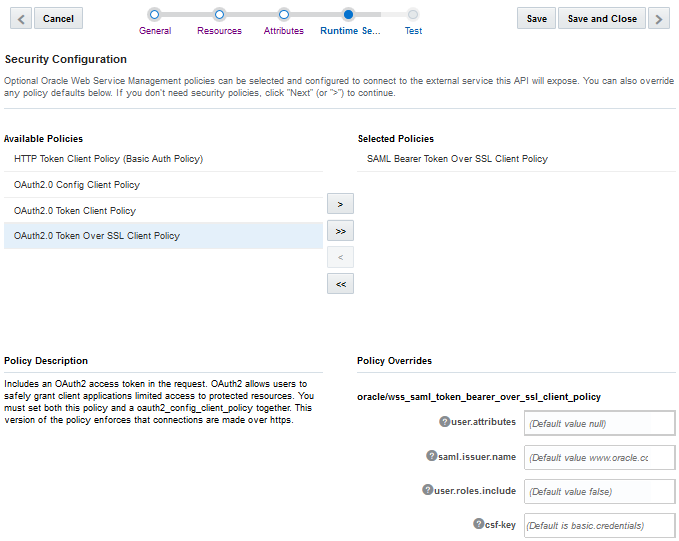
  4. Setting the Runtime Security. Select the runtime security policies you need to connect to the runtime Fusion Applications instance.

  5. Testing the Connector API. Test your endpoint to validate the connection to the service.

Setting the Basic Information for Your Fusion Applications Connector API

Before you begin configuring your connector, you must provide some initial basic information like the connector API name, a brief description, and a local URI (from which the connector API will available to the custom code):
  1. Make sure that you’re in the right environment to create the connector.
  2. Click open the side menu icon and selectApplications > Connectors from the side menu.
    The Connectors page appears. If no connector APIs have been created yet, you'll see icons for REST, SOAP, ICS, and Fusion Applications. When at least one connector API exists, you'll see the connector landing page where existing connector APIs are listed. You can filter the list to see only the connector APIs that you're interested in or click Sort to reorder the list.
  3. Click Fusion Applications if this is the first connector API to be created or New Connector and select Fusion Applications.

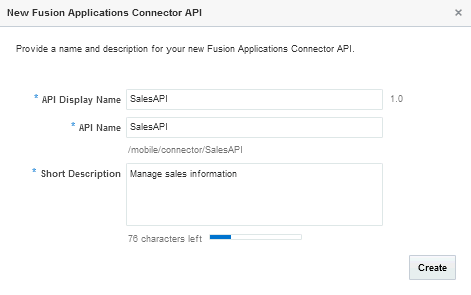
    Each time you create a Fusion Applications Connector API, the New Fusion Applications Connector API dialog appears. This is where you enter the basic information for your new connector API.

  4. Identify your new Fusion Applications Connector API by providing the following:
    1. API Display Name: Enter a descriptive name (an API with an easy-to-read name that qualifies the API makes it much simpler to locate in the list of connector APIs).
      For example, myFAServiceAPI.

      For new connectors, a default version of 1.0 is automatically applied when you save the configuration.

    2. API Name: Enter a unique name for your connector API. The default value is a simplified form of the value that you entered for the API Display Name.
      For example, myFAServiceAPI.

      By default, this name is appended to the relative base URI as the resource name for the connector API. You can see the base URI below the API Name field.

      Note:

      The connector API name must consist only of alphanumeric characters. It can’t include special characters, wildcards, slashes /, or braces {}. A validation error message is displayed if you enter a name that is already in use.

      If you enter a different name for the API here, the change is automatically made to the resource name in the base URI.

      Other than a new version of this connector API, no other connector API can have the same resource name.

    3. Short Description: Provide a brief description, including the purpose of this API.
      This is the description of the API that will be displayed on the Connectors page when this API is selected. The character count below this field lets you know many characters you can add.
    After you've filled in all the required fields, click Create.The connector API is created and the General page of the Fusion Applications Connector API wizard is displayed.
  5. Set the timeout values if needed.

    Connecting to the Fusion Applications instance can take several minutes. You can increase the timeout values to reduce the chances of a connection time out but be aware that the values that you apply at design time are also applied at runtime when the connector calls on the instance. If you do set timeout values, be sure to save your edits to the General page before proceeding to the next step of the wizard.

    Note:

    If you are in a non-development environment, set these values appropriately for the environment that you’re working in. Alternatively, don’t enter values for these fields and let the environment-level timeout policies take effect.

    If you’re a mobile cloud administrator, you can open the policies.properties file to see the value of the network policies for the environment that you’re working in from the Administration page. Otherwise, ask your mobile cloud administrator for the values. To learn about environment policies, see Environment Policies.

    • HTTP Read Timeout: The maximum time (in milliseconds) that can be spent on waiting to read the data. If you don’t provide a value, then the default value (20 seconds) of the environment-level HTTP Read Timeout policy is applied.

    • HTTP Connection Timeout: The time (in milliseconds) spent connecting to the remote URL. A value of 0mms means an infinite timeout is permitted.

  6. Click Save to save your current settings.
    If you want to stop and come back later to finish the configuration, click Save and Close. You can always edit your configuration when it's in a Draft state. You can always click Cancel at the top of the General, Rules, and Security wizard pages to cancel that particular configuration operation. You’ll be taken back to the Connector APIs page.
  7. Click Next (>) to go to the next step in configuring your connector API.

Connecting to a Fusion Applications Instance

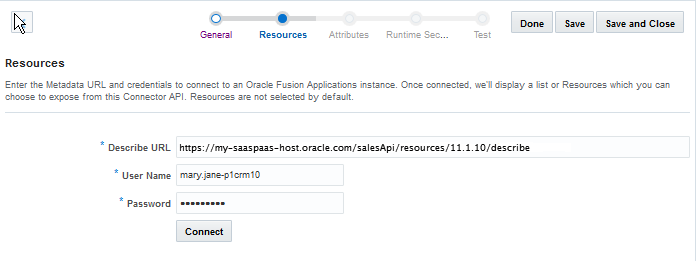
This is where you specify the Oracle Fusion Applications instance that you want to create a connection to via the Describe resource.

Making a connection consists of the following actions:

  • Providing the Describe URL to access the metadata of the Fusion Applications instance that you want

  • Providing access authentication (that is, your design time credentials)

  • Connecting to the server hosting the resources

You perform these operations on the Resources page of the Fusion Applications Connector API wizard.

Creating a Fusion Applications Instance Connection

  1. Click the Resources navigation link.
  2. In the Describe URL field, enter the address of the describe resource where the Oracle Fusion Applications instance can be accessed.
    Use the describe resource to retrieve the metadata of a resource, which includes the fields and attribute values in the resource, the resource operations, and any child resources.

    You get the Describe URL from the administrator of the Oracle Fusion Applications.

    The URL takes the form http://host:port/api-name/resources/version/resource-path/describe.

    For example: https://myhost:8080/CommonAPI/resources/1.1/incidents/describe.

    You can save time by verifying that the URL you’re providing is trusted at trustedsource.org, otherwise, even if you’re connector API is configured correctly, the connection will fail. See Common Custom Code Errors.

  3. Enter the user name and password that you were given to access the resource.
    These are the design time credentials that enable you to access the Oracle Fusion Applications instance. You should’ve received these credentials when you registered with Oracle Fusion Applications.
  4. Click Connect.
    The resources in the Fusion Applications instance are retrieved. Making the connection can take a few minutes. You can stop the connection by clicking Abort in the Connecting dialog to stop the process. You’ll be returned to the Resources page.
After the connection is made, the Describe URL and your design time credentials are preserved for this connector API.

Selecting Fusion Applications Resources

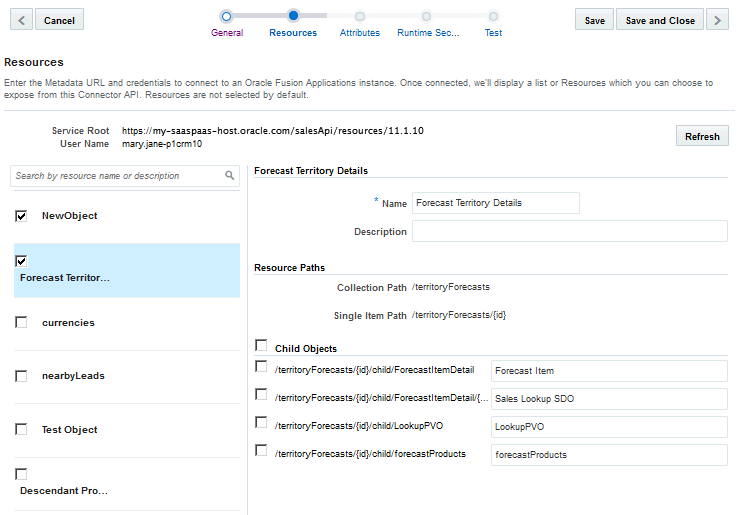
When the connection to the server hosting the resources is made, the Resources page of the wizard displays a list of all the resources in the given Oracle Fusion Applications resource instance. You create a custom configuration by selecting a combination of top-level resources and child resources. You can see the address of the server hosting the fusion application services (http://host:port/api-name/resources/version) in the Service Root field along with the design time credentials user name above the resources.

A list of resources is displayed on one side of the Resources page. All the resources are unselected by default. Select at least one resource to include it in your Fusion Applications Connector API configuration. When you select a resources, its description, resource paths, and any child resources are displayed in the right panel.

  1. Select a resource to enable it and add it to the connector API configuration.

    If the list is long, enter a resource name or its description in the Search field to locate a resource.

    When you perform a search and the resource is a child of another resource, it’s displayed at the same level as the parent resource in the list. Child resources are displayed in the form <parent_resource>/<child_resource>.

    If you change your mind about a selection, you can disable a resource to exclude it by selecting it again. If the resource has child resources, the parent resource and all of its child resources are removed

  2. Select a resource to see its details, including any child (nested) resources in the right panel of the page.

    The details panel always shows the top-level resource and all of its child resources even if the resource you currently have selected in the resources list is not a top-level resource.

    Click Refresh to get the most up-to-date list of resources. When you click Refresh, the current list of resources is discarded. To get the latest set of resources, MCS must make a connection to the Describe resource again. You’ll get a confirmation dialog asking you to confirm that you want to discard the current set of resources. If you click Confirm, you’ll be taken back to the initial display of the Resources page where you’ll have to re-enter the Describe URL and your design time credentials.

  3. (Optional) Provide a friendly name for the resource or a description in the Name field in the Details section.

    Friendly names for resources are displayed on the following Attributes page.

    The Collection and Single Item paths for the top-level resource, which you can see just above the child objects are the relative paths at which the resource collection and the single item resource are available. These paths are relative to the service root shown at the top of the page.

  4. (Optional) Select individual child resources to include in your configuration.

    Click Child Objects to include all the child resources of the selected top-level resource in your configuration

    All child resources are displayed at the same level. That is, nested child resources are not visibly distinct in the list.

    Each child resource is listed in the form of a relative path of the collection containing the child resource.

    Click Remove in the dialog box to continue or Cancel to stop the removal.
  5. (Optional) Provide a friendly (identifiable) name for the child resource in the Name field.
  6. Click Next (>) to go to the next step in configuring your connector API.

Setting Resource Attributes

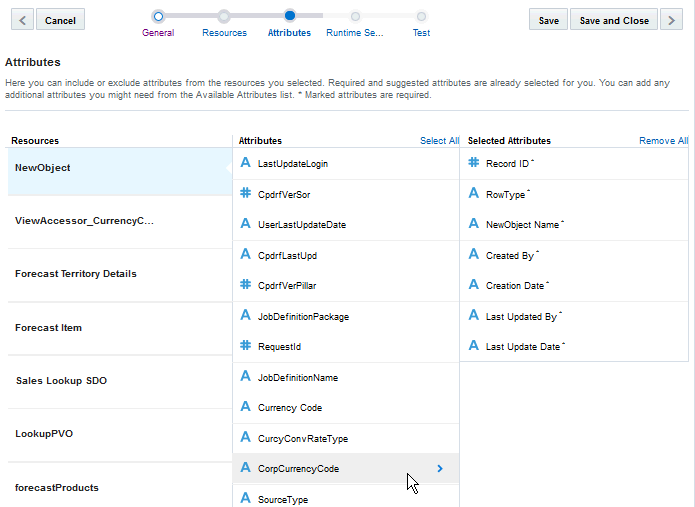
On the Attributes page, you can select the optional attributes you want for each of your selected resources. Any required attributes are automatically added to the configuration. Select a resource from the Resources list, view the available attributes for the resource in the next column, and then select the specific attributes you want to include in the connector configuration:
  1. Click the Attributes navigation link.

    On the Attributes page, you’ll see three columns. The first column, Resources, is the list of resources you previously selected. The second column, Attributes, lists all the attributes that you can select for a particular resource. The last column, Selected Attributes, lists required and optional attributes that are pre-selected for you. When you select an attribute in the second column, it’s added to the list of selected attribute.

  2. Select a resource from the Resources list.
  3. Add an attribute for the selected resource in the Attributes to your configuration by clicking Select Attribute:

    Use your browser’s search function to locate specific attributes.

    Click Select All to move all the attributes to the Selected Attributes list.

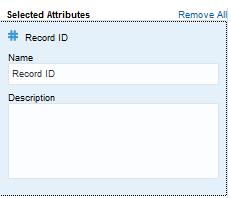
  4. (Optional) Click an attribute in the Selected Attributes list and provide a friendly name and description for it:

    Click Remove All to clear all attributes except the required ones from the list.

  5. Click Save to save your configuration.
    If you change your mind about the attributes your want, remove the ones you don’t want (don’t worry, they’ll be added back to the Attributes list) and make new selections.
  6. Click Next (>) to go to the step in configuring your connector API.

Editing the Fusion Applications Connector API

If you know that the resources available through the describe resource have changed, you can refresh it to see the most up-to-date list of resources.

Note:

As long as the Fusion Applications connector API is in Draft state, you can edit the connector configuration
  1. Click the Resources navigation link.
    The page displays only the resources you originally selected.
  2. Click Refresh.
    When you click Refresh on the Resources page, you’ll be told that the current resources will be discarded. If you click Confirm in the dialog, you’ll be taken back to the initial view of the Resources page, where you’ll have to re-enter the Describe URL and your design time credentials. The URL is re-queried and the latest resources are then displayed. The refresh action doesn’t change any of the resource selections, friendly names, or descriptions that you’ve already provided. However, if you connect to a different service by entering a different Describe URL, you’ll see a completely new set of resources and you’ll have to provide friendly names for the ones you select.
  3. Confirm the refresh action.
    The Resources page is displayed at the authentication phase. The Describe URL and the design time credentials you provided previously are shown.
  4. Click Connect to reconnect to the Fusion Applications service or enter a new Describe URL and your design time credentials if you want to change to a different Fusion Applications service.
  5. Change the enabled settings for the resources as needed.
    If you reconnected to the same service, your previous selections are kept.
  6. Click Save.
  7. Click Next (>) to go to the step in configuring your connector API.

Setting Runtime Security for the Fusion Applications Connector API

The Fusion Applications service determines the security policies used by the service. You have the option of selecting the corresponding client policies for the connector API from the Runtime Security page.

The Fusion Applications Connector API supports OAuth Authentication, HTTP Basic Authentication, and Security Assertion Markup Language (SAML). To learn more about these policies, see Security Policy Types for Fusion Applications Connector APIs.

  1. Click the Runtime Security navigation link.
  2. Select one or more security policies and move them to the Selected Policies column.
    When you select a policy, you can see its description below the Available Policies panel.
  3. Specify values for the policy overrides for each policy (if applicable) if you don’t want to use the default values.
    To override a property, enter or select a value other than the default. For a description of policy properties, see Security Policy Properties.

    To set a Credential Store Framework (CSF) Key value, see Providing a CSF Key.

  4. Click Save to save your work or Save and Close to save your work and exit the Fusion Applications Connector API wizard.
  5. Click Next (>) to go to the next step, testing the connector.
Providing runtime security credentials is necessary when you’re configuring the connector, but you don’t want customers who run the mobile apps that use Fusion-based services to have to enter credentials to access the services every time they sign in to the app. To see how to allow mobile app users to sign in once, see Configuring Oracle Cloud Applications as the Identity Provider.
Providing a CSF Key

You must set the csf-key property with your runtime credentials to allow you access and test the active integration.

Provide a CSF Key in one of the following ways:

  • Select an existing key from the Available Keys list in the Select or Create a New API Key dialog. A description of the selected key is displayed below the list.

    When you select the key, its name appears in the Key Name field. Click Select to add the key. The other fields in the CSF Key Details pane are used only when creating a key.

  • Click New Key in the dialog and create a new basic (CSF) credentials key as described in Create a New CSF Key.

To learn about CSF keys, see CSF Keys and Web Service Certificates.

Creating a New CSF Key
  1. Click the keys icon in the csf-key field.
  2. Click New Key in the Select or Create a New API KEy dialog box.
  3. Enter a key name that is descriptive and easy-to-read. Note that after you create the key, you can’t change the key name.
  4. Enter a brief description of the key's purpose.
  5. Enter your runtime credentials for the service to which you are connecting.
    Contact your Fusion Applications administrator to obtain the credentials used to call the Oracle Fusion Applications service at runtime. Most likely, you’ll only need to do this once for each Fusion Applications instance (all services are called with the same app credentials).
  6. Repeat the password in the confirmation field.
  7. Click Save to continue working in the dialog.
    The key name value appears as the override value on the Security page. Note that the value of the key that you create pertains only to the environment in which it’s set.
If you want to edit some aspect of an existing CSF key, then select it from the Available Keys list and modify the fields as needed. To learn about CSF Keys, see CSF Keys and Web Service Certificates.
Setting a Web Service Certificate
Here the steps for setting the overrides for a Web Service certificate. However, for this release, don’t override the values for keystore.sig.csf.key because orakey is the only valid value for all of these certificate keys.
  1. Select a security policy.
    The properties for the policy are displayed in the Policy Overrides section.
  2. Select an alias from the drop-down list in the field for the certificate key (certificate keys are denoted by the keystore prefix) and select an alias.
    Unlike CSF Keys, you can’t modify a Web Service certificate. You can only select a different alias.
Only mobile cloud administrators can create a new Web Service Certificate. If you don’t know the alias for the certificate you want, ask your mobile cloud administrator for the alias. To set CSF keys and certificates from the Administration page, see CSF Keys and Certificates..

Testing the Fusion Applications Connector API

When you’ve finished configuring your Fusion Applications Connector API, test the endpoints. You test one endpoint at a time.
  1. Click the Test navigation link.
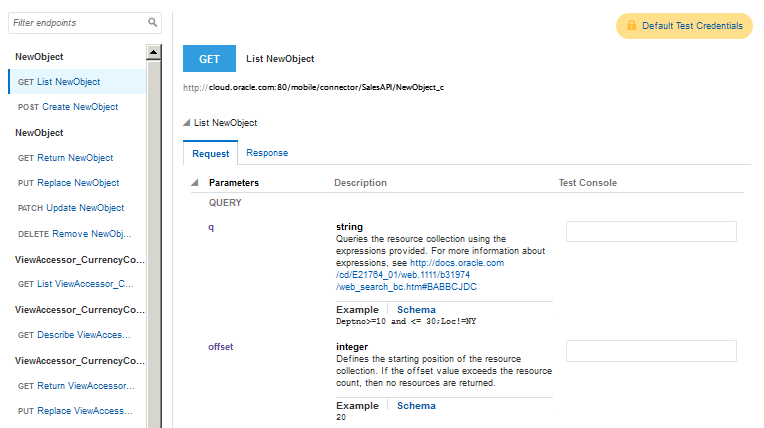
  2. Select the endpoint you want to test.
    Endpoints are listed on the left side of the page. Enter a partial resource name in the filter field to narrow the list to make it easier to find the endpoint you want. When you select an endpoint, the method, the resource name, and the URI of service is displayed on right side of the page.
  3. Set the default test credentials if you’re in the design phase and just want to see if your endpoints are valid, or if you want to test multiple endpoints during the session. Otherwise, skip this step and fill out the fields in the Authentication section for each method you test.
    1. Click Default Test Credentials at the top of the page.
    2. Select a mobile backend to associate the API with and the version of the mobile backend.
    3. If both OAuth and HTTP Basic Authentication are enabled for the mobile backend, select one in the Authentication Method field to use for testing.
    4. Click Save to apply the credentials.
  4. Click Request and expand Parameters.
    When you select a GET method, all the available query parameters are displayed on the Request tab.
    1. For a GET method, enter a parameter value.
      You can enter a value in the empty field next to the parameter description to test with or use the value, if any, provided in the example.

      Ordinarily, when invoking Fusion Application services, you could use the expand parameter to include the data for a child resource in a response when querying the parent resource. However, in the Fusion Applications connector, field parameters are implicitly added to the requests sent to the Fusion Application service.

      Note that the service is unable to handle the field parameters in the request and the expand parameter when both are used together.

      To ensure that data for both the parent and child resources are included in the response, you must add field parameters that explicitly list the attributes for both parent and child. For example, let’s say you had a parent resource, employee, with the attributes FirstName and LastName and the child resources, directReports, assignments, and photo with the respective attributes, PersondId, AssignmentName, and Image. You’d add a field parameter with the following values:

      fields=FirstName, LastName; directReports:PersonId; assignments:AssignmentName; photo:Image

      If you do use the field parameter, be aware that the values that you provide in the parameter override the selections you made on the Attributes page.

    2. (Optional) Click Example to view the example body, if one was provided. For methods other than GET, enter an alternate example to test with by clicking Use Example. The provided example body is copied into the text box. You can edit the example as needed.
    3. (Optional) Click Schema to view the request body schema if one was provided.
  5. Expand HTTP Headers and click Add HTTP Header to add a header.
    Select the header that you want to include for testing purposes and provide a value in the text field.
  6. Expand Authentication, select the mobile backend and its version that are associated with this API, and enter your mobile user credentials. If both OAuth and Http Basic Authentication are enabled for the mobile backend, select one in the Authentication Method field to use for testing.
  7. Click Response.
  8. Expand the status code and click Example or Schema to review the example or schema for the response body, if you provided one.
  9. Click Test Endpoint.
    Test Endpoint toggles to Cancel Test when you click it. If you want to stop the test for any reason, then click Cancel Test.

    If you want to make changes to the testing parameters, click Reset to clear all the fields.

To be sure your connector API configuration is valid, you should test it thoroughly (not just from the Connector API Test page) before publishing it. You should also test the custom API (with its implementation) that uses this connector API. Essentially, if you’re ready to publish the connector API, then you should also be ready to publish the custom API that calls it.

If you need to make changes to a connector API that's in the Published state, create a new version of it. For information on creating a new version, see Creating a New Version of a Connector.

Getting the Test Results

Test results are displayed at the bottom of the Test page. The result indicator is the response status:

  • 2xx: indicates a successful connection

  • 4xx: indicates a user error occurred

  • 5xx: indicates a server error occurred

Status Code Description
200 OK Successful connection.
400 BAD REQUEST General error when fulfilling the request, causing an invalid state, such as missing data or a validation error.
401 UNAUTHORIZED Error due to missing or invalid authentication token.
404 NOT FOUND Error due to an invalid connector ID. An associated connector with the given ID couldn’t be found.
500 INTERNAL SERVER ERROR General error when an exception is thrown on the server side.

Security Policy Types for Fusion Applications Connector APIs

You'll need to set a security policy to protect the information you want to send or receive. When determining what policies to set, consider whether the connection to the service involves transmitting proprietary or sensitive information. Adding a security policy ensures the authentication and authorization of the data transmitted.

From the Security page, you can select one or more Oracle Web Services Manager (Oracle WSM) security policies, including OAuth2, SAML, and HTTP Basic Authentication.

Security Policy Type Description

OAuth2 and the Client Credential Flow

MCS supports OAuth2, a system where an Authentication server acts as a broker between a resource owner and the client who wants to access that resources. Of the different flows (security protocols) offered by OAuth2, the Client Credentials Grant Flow is used in MCS to secure connections. This flow is used when the client owns the resources (that is, the client is the resource owner).

HTTP Basic Authentication

HTTP Basic authentication allows an HTTP user agent to pass a user name and password with a request. It's often used with stateless clients, which pass their credentials on each request. It isn't the strongest form of security though as basic authentication transmits the password as plain text so it should only be used over an encrypted transport layer such as HTTPS.

Security Assertion Markup Language (SAML)

SAML is an XML-based open standard data format that allows the exchange of authentication and authorization credentials among a client, an identity provider, and a service provider. The client makes a request of the service provider. The service provider verifies the identity of the client from the identity provider. The identity provider obtains credentials from the client and passes an authentication token to the client, which the client then passes to the service provider. The identity provider verifies the validity of the token for the service provider and the service provider responds to the client.

For a list of the security policies supported for Fusion Applications Connector APIs, see Security Policies for Fusion Applications Connector APIs. For descriptions of security policy properties that can be overridden, see Security Policy Properties.

CSF Keys and Web Service Certificates

In MCS, the Oracle Credential Store Framework (CSF) is used to manage credentials in a secure form. A credential store is a repository of security data (credentials stored as keys) that certify the authority of users and system components. A credential can hold user name and password combinations, tickets, or public key certificates. This data is used during authentication and authorization.

CSF lets you store, retrieve, update, and delete credentials (security data) for a web service and other apps. A CSF key is a credentials key. It uses simple authentication (composed of the user name and the password for the system to which you’re connecting) to generate a unique key value. You can select an existing CSF key or create one through the Select or Create a New API Key dialog. To select or create a CSF key, see Providing a CSF Key.

A Web Service Certificate allows the client to securely communicate with the web service. It can be a trusted certificate (that is, a certificate containing only a public key) or a certificate that contains both public and private key information. Web Service Certificates are stored in the Oracle WSM keystore. You set the overrides by selecting an alias from the drop-down list for the property, keystore.sig.csf.key. The alias for this property is mapped to the alias of the key used for signing. If no value is selected, the default value, orakey, is used (for this release, the only valid value for this property is orakey).

When you select a policy, you can see which properties are listed in the Policy Overrides.

Note:

It isn’t necessary to set all the overrides for a policy; however, you should be familiar enough with the security policies that you’ve selected to know which overrides to set for each policy.

CSF keys, certificates, and their respective values are specific to the environment in which they’re defined. That is, if there are multiple environments, A and B, and you’re working in environment A, then only the CSF keys and certificates for the security policies in use by artifacts in that environment are listed in the CSF Keys dialog. A different set of keys and certificates will be displayed in environment B. It is also possible for keys with the same key name but with different values to exist in multiple environments.

A CSF key can be deployed to another environment, however, because CSF keys are unique to an environment, only the key name and description are carried over to the target environment. You won’t be able to use that key in the new environment until it’s been updated with user name and password credentials by the mobile cloud administrator.

To set CSF keys and certificates from the Administration page, see CSF Keys and Certificates.

Using Your Fusion Application Connector API in an App

To use a connector in a mobile app, you first have to wrap calls to the connector API in a custom API and deploy that API. Such a custom API could also contain additional logic to process the data returned from the call to the connector.

This allows the app to access the connector's functionality by calling the custom API. The syntax for a call to a connector API is the same as you would use when calling any other API from custom API implementation code. See Calling Connector APIs from Custom Code.

Alternatively, you can do this automatically. See Generating Custom APIs for Connectors.

You make calls to connector APIs using JavaScript code in the custom API's implementation. When you implement a custom API, you can view the available connectors and their details in a special version of the API Catalog that’s available to custom APIs. (The API Catalog that’s available to client apps doesn’t contain connector APIs.)

Troubleshooting Fusion Applications Connector APIs

A great source of debugging information are the system message logs. Depending on your role, you or your mobile cloud administrator can go to the Administration view and click Logs to see any system error messages or click Request History to view the client (4xx) and server (5xx) HTTP error codes for the API's endpoints and the outbound connector calls made within a single mobile backend.

By default, only TLSv1.1 and TLSv1.2 protocols are used for outbound connections. If you need to use an older version of a SSL protocol to connect to an external system that doesn't support the latest versions of SSL, you can specify the SSL protocol to use for the connector by setting the Security_TransportSecurityProtocols environment policy. The policy takes a comma-separated list of TLS/SSL protocols, for example: TLSv1, TLSv1.1, TLSv1.2. Any extra space around the protocol names is ignored. You can use the SSLv2Hello protocol to debug connectivity issues with legacy systems that don't support any TLS protocol. Note that this policy can’t be used to enable SSLv3 endpoints. See Environment Policies and Their Values for a description of the policy and the supported values. Be aware that this policy must be manually added to a policies.properties file that you intend to export.

Caution:

Be aware when setting the policy that older protocols are vulnerable to security exploits.

You won't be able to test a Fusion Applications connector that hasn't been modified since June 2017 unless you save the connector first. Saving the connector regenerates the RAML from the descriptor. You can see when the connector was last modified by selecting it on the Connectors page and expanding the History panel.