Working with Custom Validations

Custom validations enable you to add custom business logic to enforce data rules on your node types and hierarchy sets. You work with custom validations on the Validations tab of the inspector for the node type or hierarchy set that the validation was created for.

Considerations

  • You must have the Owner or Metadata Manager permission on at least the dimension to create, edit, or delete a custom validation.
  • Node type validations are executed for all nodes in the viewpoint by node type.
  • Hierarchy set validations are executed for all nodes in the viewpoint, as long as the viewpoint is a hierarchy.
  • Validations are run on the state of nodes after a request is run (that is, what the node will look like after the request is committed). You cannot run a validation on the state of a node before a request is run.
  • Validations are enforced when a request is submitted, approved, committed, or a validation is performed. The following table describes which custom validations are run when validations are performed in different contexts:
Validation Context Validations Run
Validate a request Custom validations are run for request items that meet either the trigger actions or trigger properties
Validate a viewpoint with an open request Custom validations are run for all nodes in the viewpoint, including the request items
Validate viewpoint outside of a request Custom validations are run for request items that meet the trigger properties, but not the trigger actions

Creating a Custom Validation

  1. Inspect the node type or hierarchy set that you want to add a validation for. See Inspecting a Node Type or Inspecting a Hierarchy Set.
  2. On the Validations tab, click Create.
  3. Enter a name and, optionally, a description for the validation, and then click Create.

    The validation is displayed in the validation inspector.

  4. From the validation inspector, click the Definition tab.
  5. Click Edit.
  6. Define the validation by entering the following information:
    • Enabled flag: Specify whether or not a custom validation is enforced. Validations are disabled by default, and you can only enable them when these conditions are met:
      • A valid expression is defined
      • At least one trigger action or property is configured
      • A failure message is defined

      Note:

      You can also enable or disable validations from the Validation tab of the node type or hierarchy set inspector. See Editing, Enabling, Disabling, or Deleting a Custom Validation, below.
    • Expression: Click Define Expression define expression (or define expression depending on your theme) to open expression builder and then define the business logic for the validation. See Using Expressions to Define Custom Business Logic.

      The expression for a validation must return a Boolean value. If the expression returns a value of True, the validation is passed. If the expression returns a value of False, the validation fails and the failure message is displayed.

    • Trigger Action: Select one or more request actions that will cause the validation to run.
    • Trigger Properties: Select one or more properties that will cause the validation to run if they are updated.
      • For node type validations, all properties that are assigned to that node type are available to be selected.
      • For hierarchy set validations, all properties that are assigned to any node type that is referenced by the hierarchy set are available to be selected.

      Tip:

      Validations are run for every trigger action and trigger property in a request. That means that if you add several trigger properties and all of them fail, you will receive several failure messages. You should add the minimum number of trigger properties or actions that still enforce your business logic on a request.

    • Request State: Select the state in which custom validations are run in the context of a request:
      • Committed (Default): The validation is evaluated against data after the request items and actions have been applied to the viewpoint. Nodes that are removed or deleted in the request are excluded when evaluating data conditions in the Committed state.
      • Visualized: The validation is evaluated against data before the request items and actions have been applied to the viewpoint. Nodes that are removed or deleted in the request are included when evaluating data conditions in the Visualized state.

        Note:

        Validations using the Visualized state are only run when validating request items and do not run when validating a viewpoint.
    • Failure Message: Enter the message to display to users if the validation fails.
  7. Click Save.

Editing, Enabling, Disabling, or Deleting a Custom Validation

From the node type or hierarchy set inspectors, select the Validations tab to view the validations for that object.

To edit a validation:

  1. From the Validations tab of the inspector, click the name of the validation that you want to edit.
  2. Perform an action:
    • From the General tab of the validation inspector, click Edit to edit the validation name or description.
    • Select the Definition tab and then click Edit to edit the validation definition.
  3. When you are finished editing the validation, click Save.

To enable, disable, or delete a validation:

  1. From the Validation tab of the node type or hierarchy set inspector, click Edit.
  2. In the Actions column next to the validation that you want to take action on, click action, and then select an option:
    • Enable (available only if the validation is disabled)
    • Disable (available only if the validation is enabled)
    • Delete
  3. Click Yes on the confirmation message, and then click Save.

Custom Validation Example

In this example, we will add a validation to the Account node type in the Corporate Planning application that says that all node names must begin with the same character as that node's parent. The following screenshot shows the custom validation that we created.
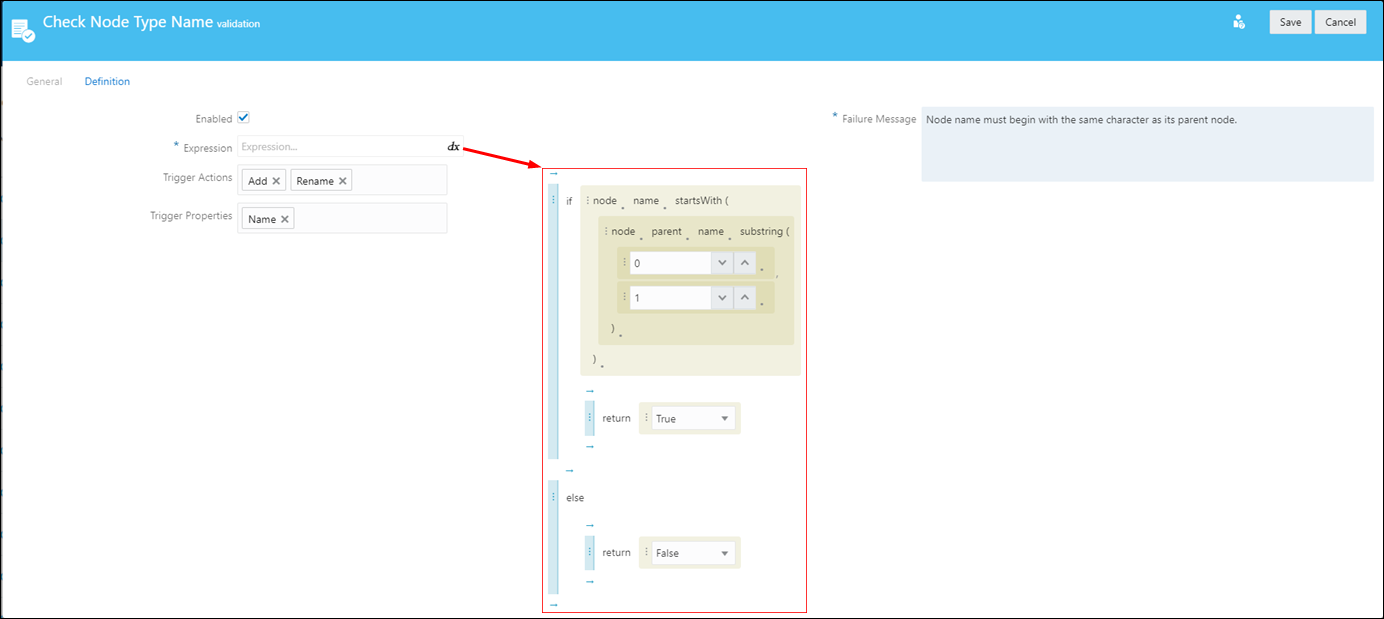

screenshot of account node type with description following

The validation has this definition:

  • The Enabled flag is set to True.
  • The expression returns a value of True if the node name starts with the same character as the first character in the node parent's name, and a value of False if it doesn't.
  • The trigger actions for the validation are Add and Rename, and the trigger property is Name.
  • A failure message indicates that the validation fails if the account node doesn't start with the same character as its parent node.

To test the validation, let's try to submit a request that adds node for the Account node type whose name starts with a character that is different from the first character of its parent. In this case, under the parent node OFS_Total Revenue, we will attempt to add a node named Project Revenue.
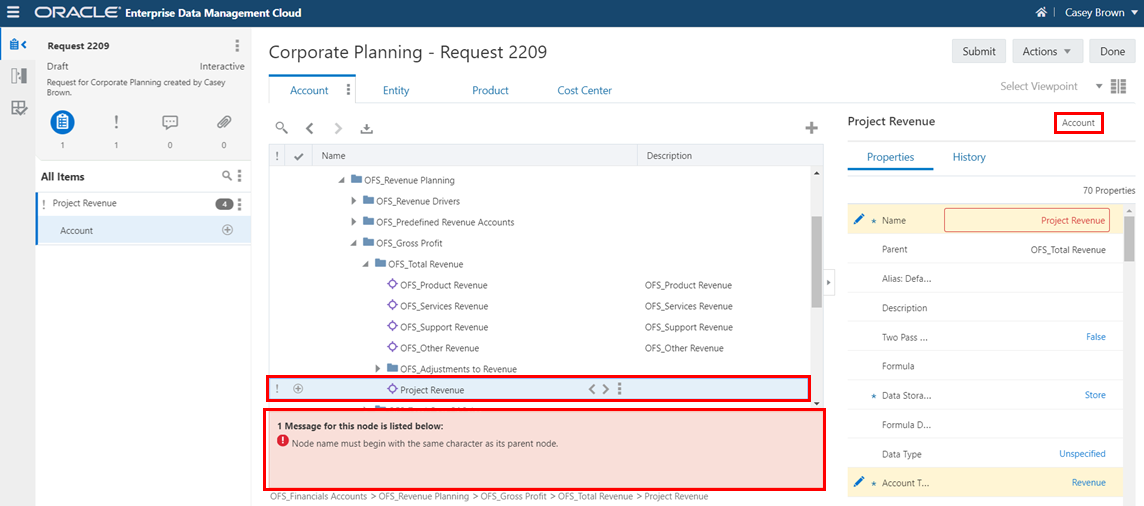

screenshot shows the validation error

When we submit the request, we get a validation error that the node name must begin with the same character as its parent node.