Writing Back Data from the Cloud EPM to the Oracle Autonomous Database
The EPM Integration Agent supports write-back by enabling you to move data from your Oracle Fusion Cloud Enterprise Performance Management applications to the Oracle Autonomous Database on a local network. To use this feature, register a data export application to export data to a selected reporting data warehouse in the Oracle Autonomous Database.
Additionally, the agent can execute two event scripts during the write-back execution: BefExport and AftExport. Using a BefExport event, you can perform any action before inserting data to the table or you can override the default insert processing. Using an AftExport event, you can do any post processing cleanup after inserting data to the table.
The write-back feature is supported for agents running in both SYNC and ASYNC modes.
To write back data to the Oracle Autonomous Database:
-
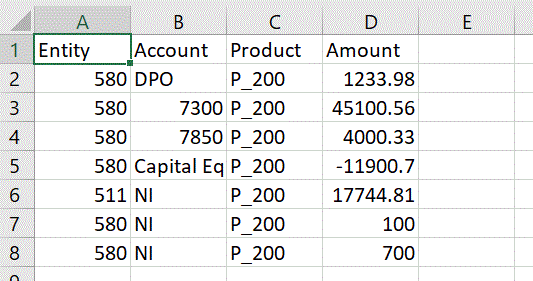
In Data Integration, create a file that contains one header row from the source data that you want to write back.
The header row must exactly match the dimension name in the target dimension. You can use an alias for a column name in the SQL query to the dimension name.

-
Save the file as a CSV format file with a header row.
Upload the file using the file browser when registering the application.
-
Register a data export application with the type Data Export to Oracle Autonomous Database.
-
From the Data Integration home page, and then Actions, select Applications.
-
On the Applications page, click
 .
.
-
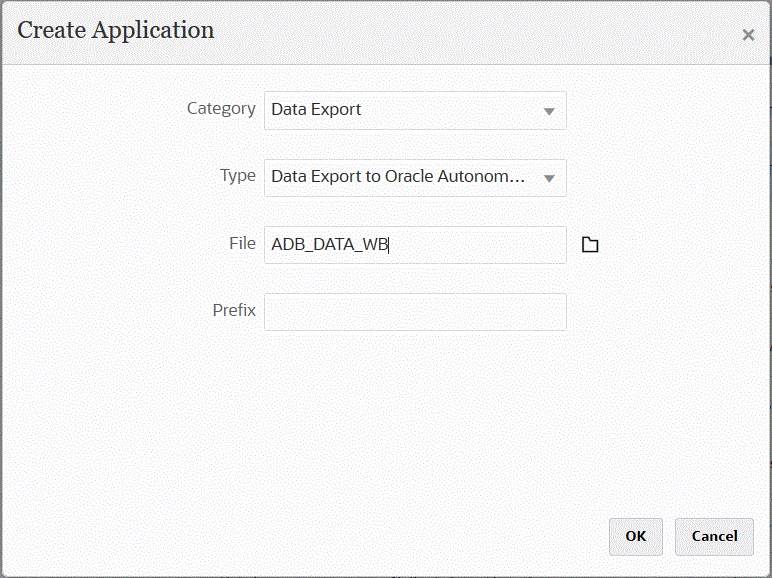
From Create Application, then Category, select Data Export.
-
From Type, select Data Export to Oracle Autonomous Database.
-
From File, select the file that you created in step 2.
Click
 to browse for the file on the File Browser page.
-
In Prefix, specify a prefix to make the application name unique.
The prefix is concatenated with the application name to form a unique application name. For example, if you want to name an application with the same name as an existing one, you can assign your initials as the prefix.
-
Click OK and then click Save.
-
-
On the Application page, click
 next to the Data Export to Oracle Autonomous Database source
application and then select Application Details.
-
Go to Application Details Dimensions tab for the Data Export to Oracle Autonomous Database source application and verify that the column names in the header record match exactly the column name or column alias in the table to which you are loading data.
Names are case-sensitive.
For more information, see Setting the Application Detail Dimensions for the Write-Back.
-
On the Application Details page, click the Options tab.
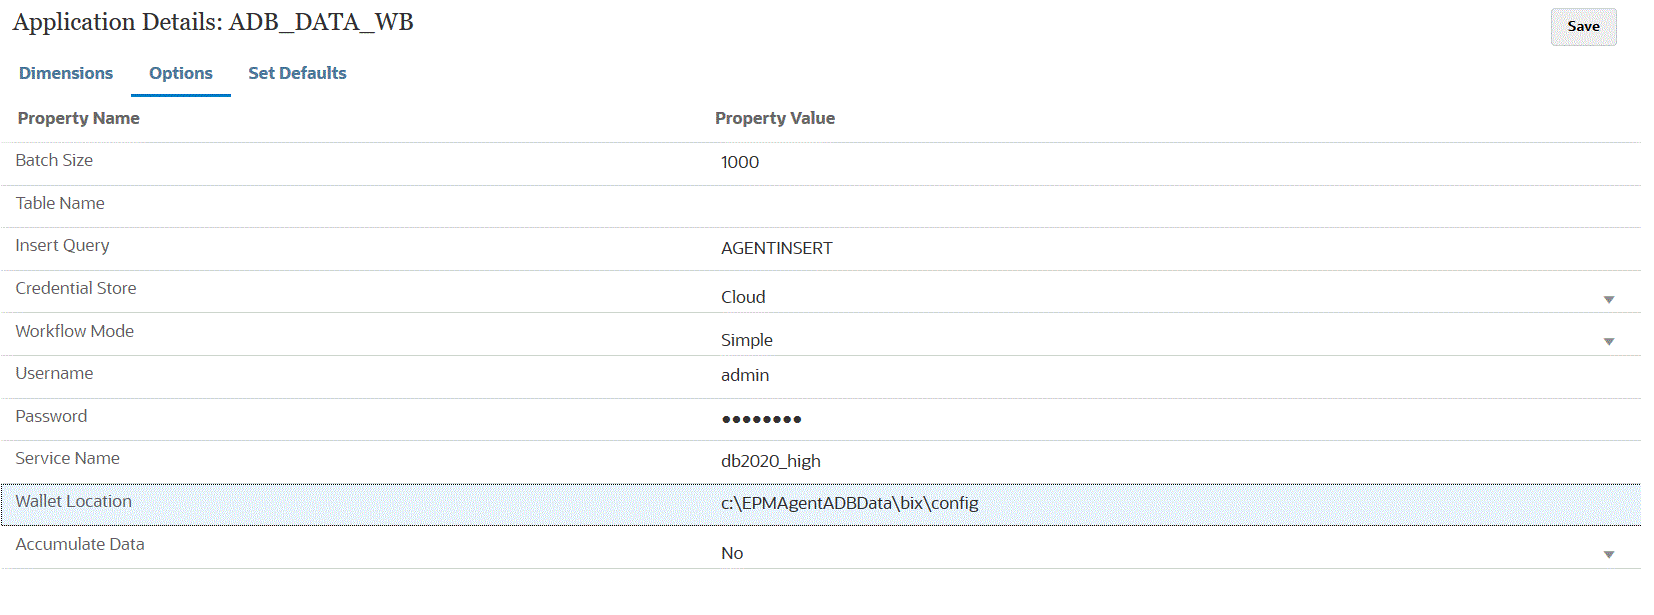
- In Batch Size, specify the number of rows read at a time from
the file to memory.
This parameter is mainly used for performance. When data is loaded, this setting determines how many records are stored in the cache. For example, when 1000 is specified; 1,000 records are stored in cache. Similarly, when 5000 is specified, 5,000 records are stored in cache and commit.
Determine this setting by Server Memory and adjust as needed.
-
In Table Name, specify the table name to which to load the data.
The name of the dimensions in the data export to on-premises application must match the names of the columns in the table. The system generates the INSERT statement to load the data automatically and inserts text for all fields.
If you specify a table name in this field, do not specify an INSERT statement in the Insert Query field.
-
In Insert Query, specify the name of the SQL query associated with the custom INSERT statement created on the Query Definition page.
INSERT query must contain the table and columns for values and the dimension name of the application. Using this method, you can provide a user-friendly dimension name and also use SQL functions like TO_DATE, TO_NUMBER and other functions to perform data type conversions and other string operations. For more information, see Writing Back with a Custom INSERT Query.
If you specify an INSERT query, do not specify a table name in the Table Name field.
-
In Credential Store, specify the type of credential store used by the EPM Integration Agent.
Available types of credential stores include the following:
- Cloud
- File
For the Cloud credential store type, store the username/password/connect string in the application.
For a File credential store type, create a file that stores the JDBC URL, user name and password for the Oracle Autonomous Database connection. The URL format must include the JDBC URL, path to wallet folder, user name, and password. The file name must be named
appname.credand stored in theconfigdirectory.The file must contain the following lines:
jdbcurl=jdbc:oracle:thin:@<tns_name>?TNS_ADMIN=<path_to_wallet_folder>An example of an entry in the
.credfile might look like this:jdbcurl=jdbc:oracle:thin:@epmdevdb0_low?TNS_ADMIN=C:\ATP Connection\epmdevdb0_wallet username=apps password=w+Sz+WjKpL8[Note:
The password used for both credential store types must be encrypted.
When the type is a "Cloud" store, type the password in the user interface in the usual way. The system encrypts and stores the password.
When the type is a "File" store, you must encrypt the password using the
encryptpasswordutility and store the password in the file. For more information about encrypting your password, see Encrypting the Cloud EPM User Password. -
In Workflow Mode, specify the method for how data is loaded.
By default, the data load process in Data Management is designed with a well-defined process flow that provides a full audit of the data load process and the ability to drill down and view data in Workbench. However, a full data flow may contribute to lengthy processing times due to archiving of data for audit purposes. Workflow mode options provide scalable solutions when processing large volumes of data, or when an audit is not required, and performance is a key requirement.
The three workflow mode options are:
- Full
- Full (no archive)
- Simple
The Full option is the default flow for loading data. Data is loaded in the standard way between the staging tables, data can be viewed in Workbench, and drill down is supported.
The Full (no archive) option loads data in the same manner as the full mode, but data is deleted from the staging tables at the end of the data load process. Data can be viewed in the Workbench only after the import step. No drill down is available with the full (no archive) mode. This method is useful when you want to review and validate the data during load process but auditing or drill down is not a requirement.
This method does not provide performance improvement but limits space usage since data is not persisted for future reference.
The Simple option limits data movement between the staging tables. No drill down is available, and the data cannot be viewed in the Workbench. This method provides performance improvement and is useful when you do not require auditing or drill down.
The Simple option limits data movement between the staging tables. No drill down is available, and the data cannot be viewed in the Workbench. This method provides performance improvement and is useful when you do not require auditing or drill down.
-
In Username, specify the user name that you used to connect to the Oracle Autonomous Database.
If you connect to the Oracle Autonomous Database using SQL Developer, specify the SQL Developer username and password.
-
In Password, specify the password that you used to connect to the Oracle Autonomous Database.
-
In Service Name, specify the service name.
You can find the service name by opening the
tnsnames.orafile and selecting a service name associated with the connection. A service name is an alias mapped to a database network address contained in a connect descriptor.You are required to select a service name when you connect to the database. The service names for Autonomous Data Warehouse connections are in the format:
-
databasename_high
-
databasename_medium
-
databasename_low
These services map to the
LOW,MEDIUM, andHIGHconsumer groups.For example, if you create an Autonomous Database with a Data Warehouse workload type and specify the database name as
DB2020, your service names are:-
db2020_high
-
db2020_medium
-
db2020_low
If you connect using the
db2020_lowservice, the connection uses theLOWconsumer group.The basic characteristics of these consumer groups are:
-
HIGH: Highest resources, lowest concurrency. Queries run in parallel.
-
MEDIUM: Less resources, higher concurrency. Queries run in parallel.
You can modify the MEDIUM service concurrency limit. See Change MEDIUM Service Concurrency Limit for more information.
-
LOW: Least resources, highest concurrency. Queries run serially.
-
-
In Wallet Location, specify the location of the directory where your wallet has been downloaded to and unzipped in the EPM Integration Agent server.
-
In Accumulate Data, enter yes to summarize Account data before export and group the results by one or more columns.
Enter no not to summarize the Account data before export and not group the results by one or more column.

-
Click Save.
-
Integrate the Cloud EPM application with the data export to Oracle Autonomous Database application by completing the following tasks.
Task Description More Information General Add or edit an integration for file-based and direct integration sources. Defining a Data Integration Map Dimensions Map the columns in the data source to dimensions in the target application. Map Members Map dimensions to identify how source field values translate to target dimension members. Mapping Members Options Define options for importing and exporting data. Also, define any source filters. Setting Data Integration Options Run the Integration When the integration is executed, the EPM Integration Agent initiates the export process in the Cloud EPM. The agent downloads the export data. Based on the selected method, the agent also constructs the appropriate INSERT statement and loads the data to the target table.
You can review the exported data by downloading the output file from the Process Details. The database column names for the write-back are specified as the column headers in the generated file as shown below.
Run the Integration