Creating and Saving the Manifest File
Office 365 uses the Oracle Smart View for Office (Mac and Browser) manifest file to provide users with access to Smart View on a Mac or in a browser.
- Create a folder on your local drive for storing manifest files.
-
Log in to your cloud environment; for example:
- If you are an Oracle Fusion Cloud Enterprise Performance Management service administrator for Planning, log in to your Planning environment.
- If you are an Oracle Essbase administrator, log in to your Essbase environment.
-
Once logged in, go to the Create Manifest File page,
CreateManifest.html, by manually changing the business process URL as follows:For Cloud EPM environments:
https://serviceURL/HyperionPlanning/CreateManifest.htmlFor Essbase environments:
https://serviceURL/essbase/sv/CreateManifest.htmlNote:
If your browser language is set to one of the 27 non-English languages supported by the Smart View user interface, then the Create Manifest File page is displayed in that localized language. See Specifying Localized Versions of Smart View (Mac and Browser) for more information.
See Figure 4-1 in About the Manifest File for an example of the Create Manifest File page.
-
Enter the required URLs in Domain URL, and then
click the Add button,
 .
.
Add application login domain URLs in the following scenarios:
-
Your non-OCI environment uses more than one application login domain
In this scenario, use the following format for the domain URLs:
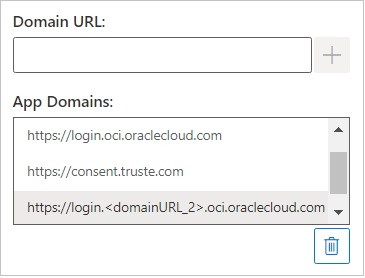
https://login.<domainURL>.oraclecloud.comIn this example, these URLs appears in the App Domains list: the default login URL (<domainURL_default>) and verification URLs appear at the top of the list; the additional login URL (<domainURL_2> is added to end of the list:

-
You're in an OCI environment using Oracle Identity Cloud Service (IDCS)
The following is an example of a domain URL format in an OCI environment
https://login.<domainURL>.oci.oraclecloud.comThe format of your URL may differ.
You must also add an IDCS URL in the Domain URL field in the following format:
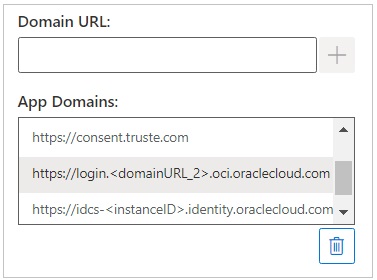
https://idcs-<instanceID>.identity.oraclecloud.comIn the following example, the visible portion of the App Domains list contains the following URLs: a certification URL (https://consent.truste.com) appears at the top of the visible list (not in view are the default login URL and the default https://login.oci.oraclecloud.com URL); an additional login URL (<domainURL_2>, and the IDCS URL (idcs-<instanceID>.identity.oraclecloud.com) are listed under the default https://consent.truste.com URL:

The URLs are added to the App Domains list.
By default, the domain URL from which you accessed the Create Manifest File page is already added to App Domains, along with two additional URLs related to application domain login verification, as described in About the Manifest File.
Note:
For more information on multiple login domains, see Working with Multiple Login Domains.Tip:
For the correct domain URL syntax, log in to the appropriate cloud service, copy the URL, paste the URL into the Domain URL field, and then click Add.You must add all login domains used in your environment. Any time a domain (URL) is accessed that is not defined within the manifest file after sideloading or deploying the Smart View add-in, Excel launches this URL in the browser and loading fails. This is an indication to add that domain to the manifest, regenerate the manifest file, and sideload or redeploy.
-
-
Customize your manifest file in the following ways to fit your
requirements.
-
Rename the Smart View ribbon tab name, described in Changing the Smart View Ribbon Tab Name
-
Add commands to the right-click menu, described in Adding Commands to the Right-Click Menu
-
Select additional languages, described in Specifying Localized Versions of Smart View (Mac and Browser)
-
Enable support for functions, described in Enabling Functions Support and Functions Builder
-
Enable extensions in Smart View, described in Enabling Extensions in Smart View (Mac and Browser)
Additionally, see these topics if you require:
-
Generate a unique ID for the manifest file for use in a multiple manifest scenario, described in Working with Multiple Manifest Files
-
Reuse an existing manifest file, described in Reusing a Previously-Saved Manifest File
-
-
Review and finalize your changes to the manifest, and then click
Create Manifest.
At the prompt, enter a name for the manifest file and choose a location to save it.
Note:
Do not include spaces in the manifest file name.
By default, the manifest file is saved to the location you’ve specified as the download location for your browser; typically, the
Downloadsfolder. -
Move the manifest file you just created from
Downloadsto the folder you created earlier for storing manifest files. - Continue with Sideloading and Logging In to test before deploying; then complete the deployment process with Deploying the Manifest File to Office 365 Users.