Retaining Invalid Members on Flex Forms
In flex forms, you can retain invalid members on the sheet after a refresh.
When entering member names in a flex form, errors may occur; for example, you may:
- Mistype or misspell a name, creating an invalid member in the cell
- Make an error when copying and pasting member names from one sheet to another, or within the same sheet, resulting in invalid members
- Enter a member name that is beyond the form definition, resulting in an invalid
member
See Example of Member Name Entered that is Outside of Form Definition
Before the 23.07 update, when these situations occurred, the rows or columns with invalid members were removed from the sheet upon refresh, making it difficult to know what the issue was, and forcing you to reenter member names.
Starting in the 23.07 update, the flex form can retain any invalid members on the form after refresh. To accomplish this, the Cloud EPM Service Administrator enables the Show invalid members for flex form check box under Smart View Options in the Layout tab of the form definition, described in Enabling the Invalid Member Option.
Note:
- The Show invalid members for flex form check box is enabled only when Enable flex form for rows or Enable flex form for columns, or both, are enabled.
- In rows and columns containing multiple dimensions, if even a single member is invalid, all members on the row or column are highlighted as invalid. For example, if a row contains the Tablet and Current members, and you type Tablet correctly, but type Currnt in error, both the Tablet and Currnt members will be highlighted as invalid. You should examine all the highlighted member names and correct those that are typed incorrectly.
- After inserting a blank row or column into the flex form and clicking Refresh, if no member names were entered, then the inserted row or column is highlighted as an invalid member row or column and remains on the flex form as a blank row or column.
- Attempting to delete an entire row or column by selecting the invalid member cells of a row or column and pressing the Delete key will result in invalid members in the member cells upon refresh. To delete entire rows or columns on a flex form, use the delete entire row or delete entire column operations in Excel.
Following are some example scenarios that show you how to work with invalid members on the sheet.
Example of Misspelled Member Name
For example, based on the Vision application form, HR Expenses, you open the form as a flex form. The Service Administrator has enabled the Smart View options, "Enable flex form for rows" and "Show invalid members for flex form."
Figure 9-11 Flex Form Containing No "7690: Meals" Member
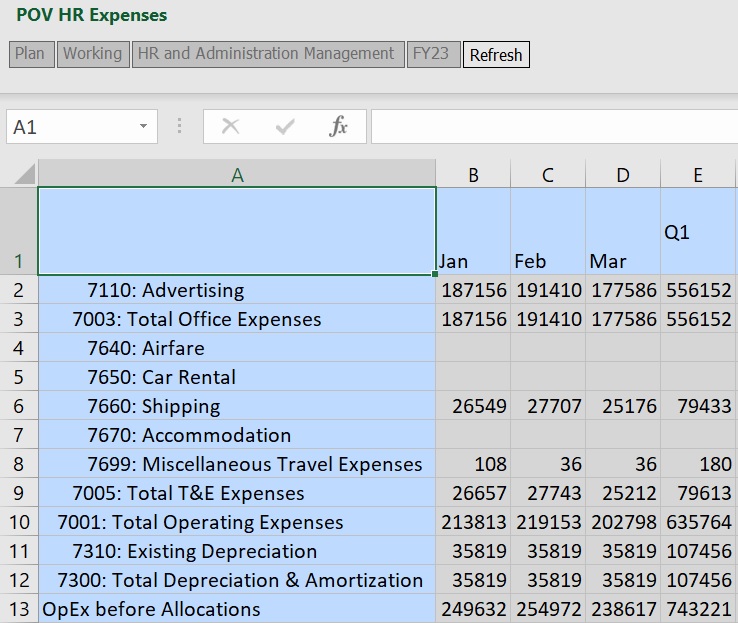
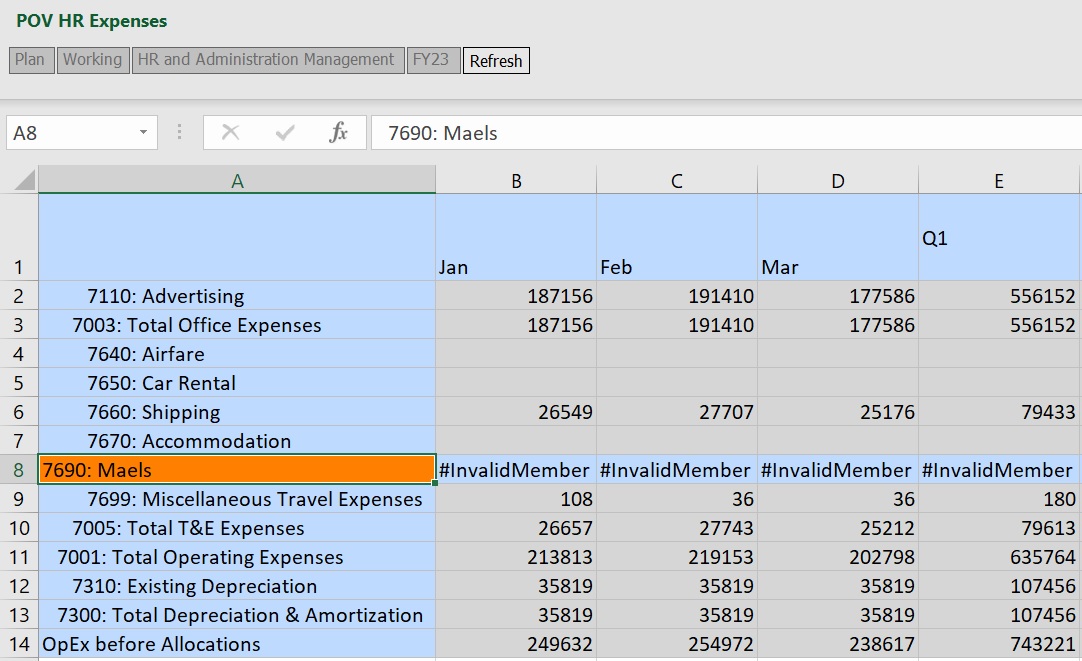
You notice that the "7690: Meals" member is not present on the form so you set out to add it. You insert a row on the grid and begin typing, but make a spelling error. After clicking Refresh, Smart View calls out the row for you with the member cells highlighted and the data cells displaying #InvalidMember.
Figure 9-12 Flex Form with Invalid Member Row Highlighted
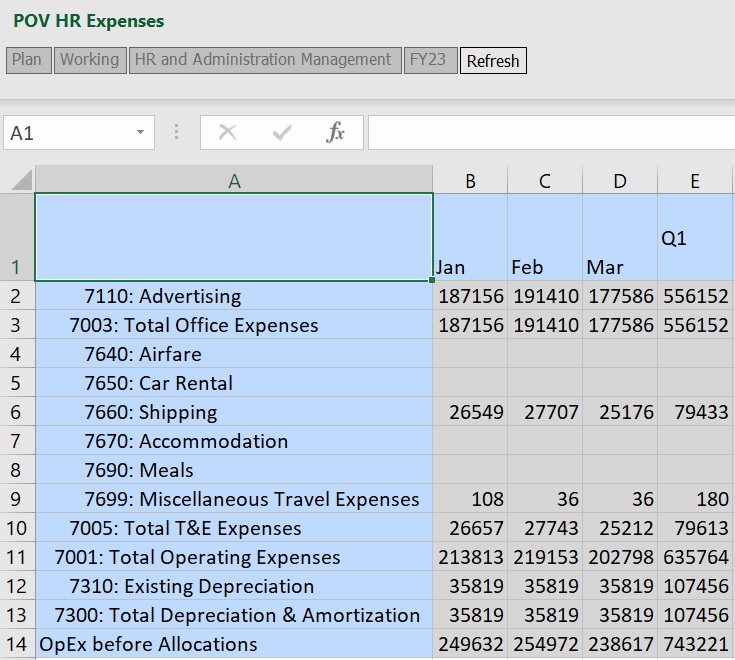
After fixing the spelling error, click Refresh and note that the flex form is displayed correctly, with the valid member names and data.
Figure 9-13 Flex Form with Error Corrected and Valid Members Displayed
Example of Missing Member Name on Multi-Dimension Row
#InvalidMember is displayed on the flex form in Smart View when a row or column has multiple members and you miss entering a member on a member cell in that row or column. In the following example, there are two dimensions on the rows. You added three rows after row 17. The members from the Product dimension in Column A, rows 18, 19, and 20, were typed correctly. But you did not type any entries in the same rows in Column B. Those cells are missing the member name from the Scenario dimension. This is the result after clicking Refresh.
Figure 9-14 Flex Form with Missing Member Names in Column B, Rows 18, 19, and 20
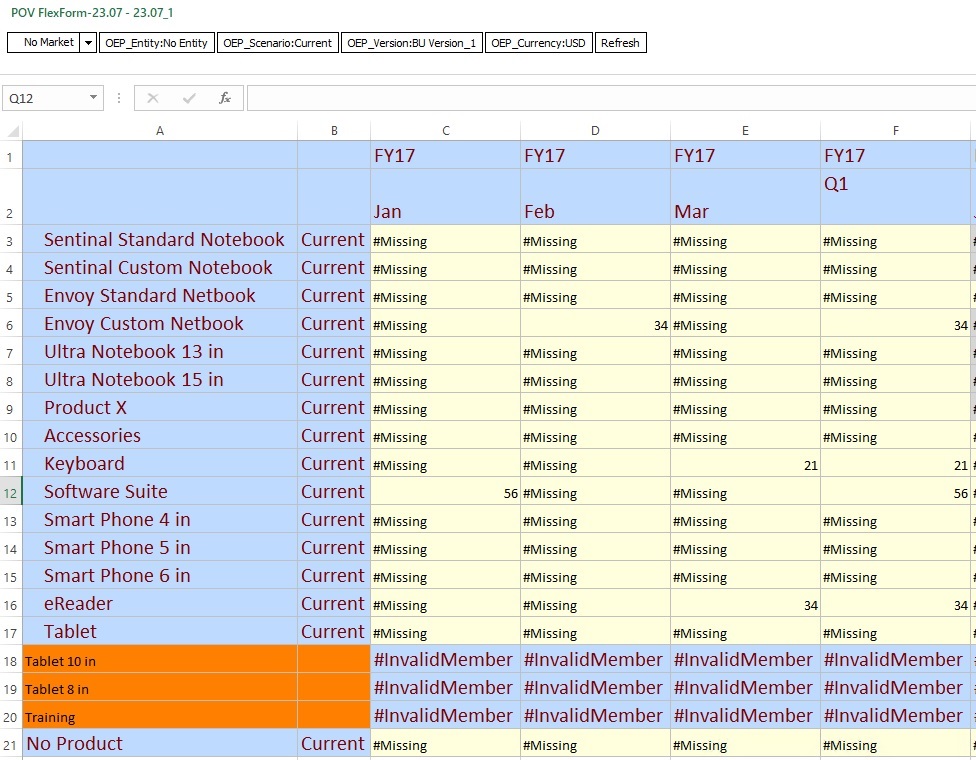
To correct this issue, add the "Current" member in Column B, rows 18, 19, and 20, and then Refresh.
Example of Member Name Entered that is Outside of Form Definition
#Invalidmember is displayed on the flex form in Smart View when you enter a member that is beyond the form definition.
For example, suppose that in the form, the Year dimension is limited to FY17, FY18, and FY19. But in the application outline, the dimension contains many more members, such as FY20, FY21, FY22, and FY23.
When designing a flex form, if the Service Administrator has selected the "Flex beyond form definition" option for the Year dimension, then you may add members that are outside of the form definition, such as FY20. If the "Flex beyond form definition" option is not selected, then adding a member that is outside of the form definition will result in invalid members, even though the members exist in the outline.
In the following case, the "Flex beyond form definition" option was not selected for the Year dimension on the column. You add a column and enter FY20, and then click Refresh. Note below that column I now contains invalid members.
Figure 9-15 "Flex beyond form definition" Is Not Selected and Member Is Outside of Form Definition
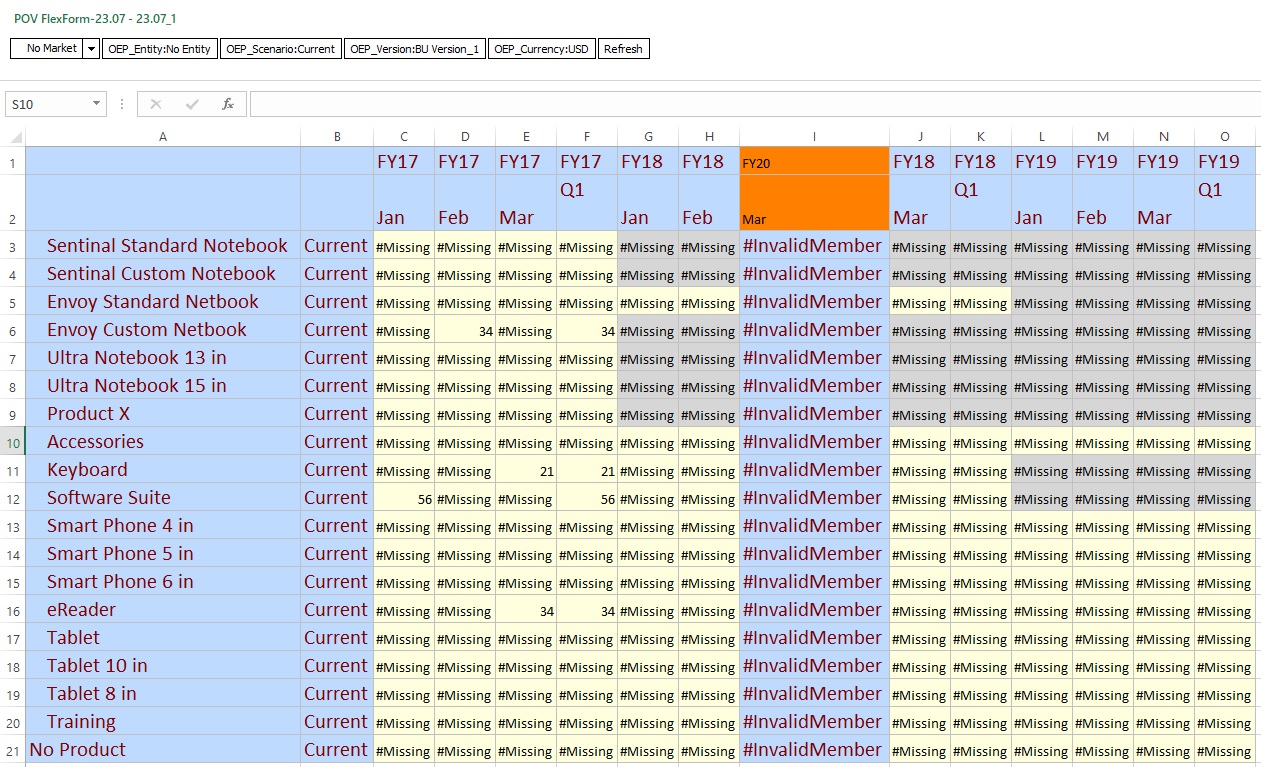
To remedy this, your Service Administrator should select the Flex beyond form definition option for the Year dimension. With this option selected, you may enter the members that are outside of the form definition, click Refresh, and retain the members on the flex form.
Enabling the Invalid Member Option
Enabling the new Show invalid members for flex form check box lets users easily, see, understand, and correct any error they may have made in entering member names in flex forms.
To retain invalid members on a flex form, a Service Administrator performs these steps from the Oracle Fusion Cloud Enterprise Performance Management web interface:
- From the Navigator, under Create and Manage, click Forms.
- Select an existing form to edit or, in the Form and Ad Hoc Grid Management page, click the Actions drop-down menu and click Create Simple form.
- In the form definition page, under Smart View Options in the Layout tab, select the Enable flex form for rows and Enable flex form for columns check boxes, as you require. You may select one or both of these options.
- Select the Show invalid members for flex form check box. This option is displayed only when a row or column flex option is selected, as described in the previous step.
- Optionally, for individual rows or columns, in Dimension Properties, enable the Flex beyond form definition option, as you require.
- Save the form.
For more information on setting this option, see:
- Administering FreeForm
- Administering Planning