Insert Images Into an RTF Form Template
Once opened in Word, standard images can be added to the RTF template document using normal Word features. You can also:
- Insert an uploaded image into a form
- Insert multiple uploaded images into a form
- Insert a repeating picture into a form
Special consideration needs to be given to:
Insert an uploaded image into a form
For forms generated as PDF, RTF and XML documents, you can include an image that was uploaded by the user during the interview. This applies to images for both global and child entities. To do this:
- Ensure that an upload control has been added to the interview in Policy Modeling. The upload control needs to accept image file types (that is, at least one of *.jpg, *.jpeg, *.gif or *.png). For more information, see Attach Documents to Interviews. Note that if the Extensions Allowed field for the upload control is left blank, any image file type can be uploaded.
- In your RTF template in Word, put your cursor in the place where you would like to the image to appear.
- Click the Field button on the Publisher ribbon.
- In the Field dialog box, select the field named <name of upload group control>_uploaded_image_data.
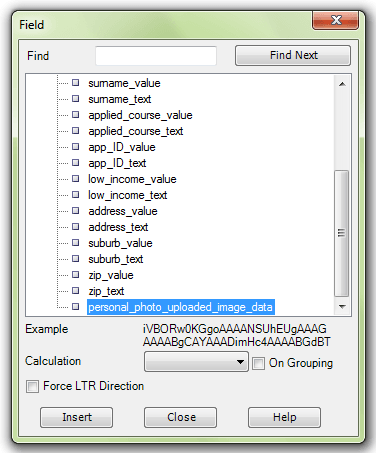
- Click Insert. (Alternatively, you can select a field in the Field dialog and drag and drop it to the desired location in your template.)
- Click Close.
- Double-click on the field in the template to open the Oracle Analytics Publisher Properties dialog box.
- Click on the Advanced tab.
- Enter the code for the image, that is:
<fo:instream-foreign-object content-type="image/where the file type is any of the image types supported by Analytics Publisher (jpg, jpeg, gif or png).filetype"><?upload_group_control_name_uploaded_image_data?></fo:instream-foreign-object>
For example: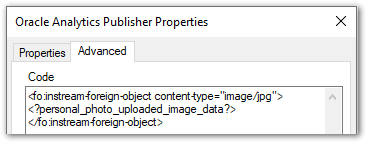
- Click OK and save the template.
An example of an image attached to an interview and then inserted into a generated form is:


When including an uploaded image in a generated document be aware that:
- Only some animated GIF files are supported by Analytics Publisher and the end user’s document reader itself may limit the playing of animated GIFs. For this reason, only static GIFS are recommended for upload.
- If there are several images that were uploaded by the user using a single upload group control, only the first image file will be included in the generated form. You can either:
- Prevent the user from uploading multiple images by configuring the upload control to have a maximum of one file. For more information, see Limit the Number of Attachments Allowed.
- Allow the user to upload an unspecified number of images by using a single upload group control but collecting the image at the entity level (see below).
Insert multiple uploaded images into a form
To allow the user to upload an unspecified number of images, you can create an entity and collect the image at the entity level. To do this:
- In Policy Modeling, Create an Entity (for example, 'the photo').
- Add an entity collect for that entity to the interview screen where you want the user to upload their images.
- Add an upload group to the entity collect. (If using a new upload group, this will automatically associate the upload group with the correct entity. If using an existing upload group, you will need to specify the entity to which the upload group belongs.)
- Change the number of attachments allowed to 1.
- Change the text of the Add upload button (for example, to 'Upload', to avoid any confusion with the purpose of this button versus the Add entity instance button).
-
Change the appearance of the entity collect to look more like an upload collect rather than an entity collect.
- In your form template, create an entity group with:
- A For Each data field. This needs to have the code
<?for-each:list-.entity_name/entity_name?> - A field for the upload. This needs to have the code
<fo:instream-foreign-object content-type="image/where the file type is any of the image types supported by Analytics Publisher (jpg, jpeg, gif or png).filetype"><?upload_group_control_name_uploaded_image_data?></fo:instream-foreign-object> - An End data field. This needs to have the code
<?end for-each?>.

- A For Each data field. This needs to have the code
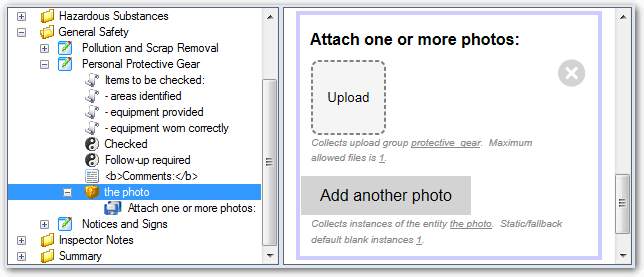
An example of multiple images attached to an interview and then inserted into a generated form is:

The resulting form when multiple images have been attached to an interview would look like this:

Insert a repeating picture into an RTF form template
You can have a picture repeated in a form depending on the value of a particular attribute. To do this, you need to specify the Analytics Publisher code for the image in the RTF form template. That is:
- Add the image to the template.
- Right-click the image and select Format AutoShape.
- Select the Alt Text tab.
- Enter the Analytics Publisher code in the Alternative text field.
Information on the Analytics Publisher code required to replicate shapes in a template can be found in Designing and Publishing Pixel-Perfect Reports in Oracle Analytics Server.
Tip: An example of displaying star images to represent a child's diet rating is shown in the Interview Summary Document form in the Healthy Eating example policy model.
Images in forms generated as Excel or HTML documents
To include images in RTF form templates that will be generated as Excel or HTML documents:
- Insert a dummy image in the RTF template.
- Right-click the image and select Format Picture.
- In the Format Picture dialog box, select the Alt Text tab.
- Enter the following syntax in the Alternative text field to reference the image:
url:{'http://image location'}. For example,url:{'http://www.oracle.com/images/ora_log.gif'}.