Create an Opportunity Qualification Program
Tip: These instructions are designed for your Eloqua administrator to setup and configure your automated CRM Integration program, so that it will thereafter be available for selection within Oracle Eloqua or Oracle Guided Campaigns for the purposes of Automated Opportunity Qualification.
The Automatic Opportunity Qualification Program is a discretionary part of Oracle Guided Campaigns, and it is designed to automatically create new Sales Leads and Opportunities based on responses in account-based marketing campaigns. Currently, related data flows are supported in the context of Eloqua CX Sales CRM integration. For more information, please refer to Oracle Guided Campaigns.
Prior to starting your CRM Integration set-up you need the following items enabled within your Oracle Eloqua instance.
- Decision Steps
- Upsert Actions
- Marketing Activity Sync
- Eloqua Campaign Lead Table
CRM Integration program overview
The CRM Integration program needs to be created manually in your Oracle Eloqua instance. It is necessary to include a listener as the input (so that you can push contacts to it from your other programs, or your Oracle Guided Campaigns campaigns). It will also be necessary to include Oracle Sales decision steps and Oracle Sales action steps to validate your contacts for processing.
Integration setup
The integration flow will primarily consist of two elements, the decision steps which will reference your Oracle Sales instance), and the actions which will enact the data synchronization with your Oracle Sales instance.
Note: All decision and action steps need to be set-up and mapped by your Eloqua Administrator prior to your program setup.
Program actions
Users of Oracle Guided Campaigns can utilize an Account Engagement Score Decision step to evaluate threshold based uniquely on Campaign and Account. there is also a Unity Decision step as part of the Unity Integration App that allows you to score based on your unity data, uniquely by Product and Account.
The program flow will consist of 3 types of actions that need to be configured.
- Eloqua native program decision steps - these reference the Eloqua contact record.
- Oracle CX Sales Integration app decision steps - these reference additional Eloqua database tables or the Oracle Sales data housed within the Eloqua database.
- Oracle Sales Action steps - these are either create, update or upsert calls made to your Oracle Sales instance or additional back-end Eloqua integration database tables.
Imports
There is one type of Import that needs to be configured:
- Opportunity Import - The purpose of this import is to sync the Opportunity ID created in your Oracle Sales instance to pull it back to Eloqua for association to Leads created within the campaigns.
Below is a diagram showing the template flow for the integration program:

Note: The step numbers below all relate to ones on the above diagram as an illustration.
CRM Integration program setup
Listener)
A listener added to your program will make it feasible to drive contacts into the program from other sources, this is necessary if you wish to add contacts in from your campaigns created within Oracle Guided Campaigns.
The program listener is required as your first step to facilitate the receipt of contacts from your other sources, such as campaigns created in Oracle Guided Campaigns.

Native Eloqua Decision steps
Step 1: CX Sales Account is not blank
This Eloqua decision step validates whether CRM Account ID is blank. A CRM Account ID needs to be present in your chosen Eloqua field for the Opportunity flow to work as needed.

Step 8: Compare Account Engagement score to 'n'
This Eloqua decision step references the Account engagement score by campaign to compare against your chosen value. The Account Engagement Score by campaign Decision Step is made available to all Oracle Guided Campaigns customers.
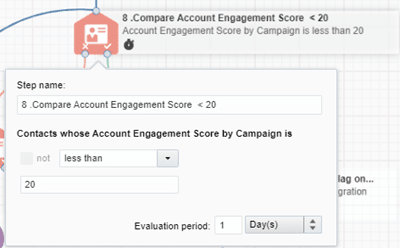
(You can define the score thresholds that you wish to use, as well as the evaluation period)
If you have Oracle Unity you can also use the Unity decision step to get scores from your Unity instance, which is unique by Product and Account
Oracle Sales Integration app decision steps
Oracle CX Sales decision steps use decision rules setup in the Oracle CX Sales Integration app under Decisions. After the rules are setup in the app, you reference them from the integration program using the Oracle CXSales decision step.
The decision steps will reference the records in your Oracle Sales instance or additional data stored in Eloqua to validate that the record has values where necessary, and that those values are valid as far as the requirements for your integration.
Note: Oracle CXSales decision steps are currently only available to Oracle Guided Campaigns customers. For more details on this, see the Oracle CX Sales Integration app Help Center.
Decision rules are set within the CX Sales Integration app under Decisions.

Step 2: Does the Opportunity Exist?
The decision rule is a filter rule that will query the CampaignOpportunity ID along with the CRM Campaign ID referenced from the campaigns. The step needs to validate if that data is blank or not. (if NOT is checked, then value presence will result to true and flow down the yes path.)

Step 4: LeadID is not blank.
The decision step is a filter rule that will query the CampaignLead ID along with the CRM Lead ID and the CRM Campaign ID referenced from the campaigns.
The step needs to validate if the field is blank or not. (if NOT is checked, then value presence will result to true and flow down the yes path.) The purpose of this is to ensure that only one Lead is created for an Account (per campaign).

Dedupe contacts
This decision step will deduplicate to ensure that only a single lead is created per account (per campaign). This dedupe rule deduplicates by Company name + Campaign ID, to ensure that per processed batch from a single campaign, only one contact for each account is routed down the yes path.

Actions
Note: For more information on creating actions, see the Oracle CX Sales Integration app Help Center.
Step 5: Create Lead
This rule requires a create Lead call. For the core mapping that you wish to set up, Campaign ID must be included on this call.

For this step you must include these mappings:
- Add Owner_id and its value
- In Advanced mapping mode: Source.CampaignId from Eloqua campaign ID from Campaign Object > mapped into your Oracle Sales campaign number field.
- Add Account Party ID (ES Account ID) on Eloqua contact record mapped into your corresponding Oracle Sales field.
In the Update Callback Section:
- Add Lead_id mapping to CRM campaign lead ID (Unique identifier)
- Add Oracle Sales campaign number mapping to CampaignId
- Oracle Sales Account Party Id to Eloqua LeadCampaign table's account id field

Step 10: Set Conversion Flag on Lead
Updates the Lead object in Oracle Sales to set the EligibleForConversion flag to true. This requests Oracle Sales to convert the lead to an Opportunity.
- Mapping: CRM Campaign Lead ID to the LeadID field in Eloqua
- Advanced mapping: write the value 'true' to the EligibleForConversion flag field
Note: This process is not immediate and is asynchronous. The updates will occur after the next ESS batch job on the Oracle Sales instance.

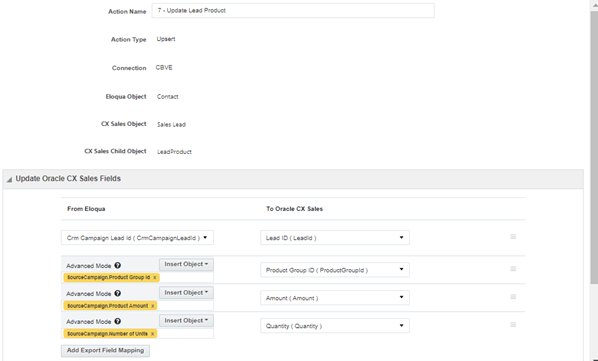
Step 7: Update Lead Product
Updates the SalesLead object in Oracle Sales with the product record and details.
Mapping:
- CRM Campaign Lead ID into LeadID
- Advanced Mapping: into Amount
- Advanced Mapping: into Quantity
- Advanced Mapping: into Product group ID
Step 6: Link to Existing Lead
This upsert action step will create an association from the contact to the existing Lead, by creating a LeadContact as a child object of the SalesLead.

Step 3: Link to existing Opportunity
This upsert action step will create an association from the contact to the existing Opportunity object by creating a OpportunityContact as a child object of the Opportunity.
Note: Creation of this object can take up to 15 minutes.

Opportunity Import
Note: For more information on creating imports, see the Oracle CX Sales Integration app Help Center.
Filter
Filter needs to be determined to be able to fetch the data from Oracle Sales. The Filter can be a SQL query including multiple fields.

For this filter to function, Opportunity ID needs to not be 'null'.
Mapping

Campaign Lead data in Eloqua
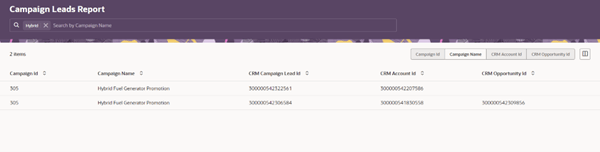
For the Eloqua users of a Oracle Guided Campaigns enabled instance, a new report exists within Eloqua to see the Campaign Lead data that has been created as a result of your Lead or Opportunity qualification configuration as per the above imports and actions.
To access the report, in Eloqua, Orchestration  > Campaigns and then click Actions > Campaign Leads Report.

This gives you a new interface that shows you any Leads created by your Lead or Opportunity qualification processes. You can use the search to filter your results, for example to just a Campaign in particular.
Tip: You can use the search to filter your results, for example to just a Campaign in particular: