Creating step actions
Important: Oracle Sales was formerly known as Oracle Sales Cloud. All instances of Oracle Sales Cloud have been changed to Oracle Sales across the app user interface.
Note: This page outlines how to create step actions in the Oracle CX Sales Integration app. You can also create campaign actions, create response actions, or automatically create actions.
Actions are data transactions between Oracle Eloqua and Oracle CX Sales (formerly Oracle Sales Cloud). The Step Actions page is where you create the types of actions to be used in a program or campaign when using the app. You can create the following types of actions:
- Create: Create new records in Oracle Sales.
- Update: Take existing Oracle Eloqua contacts and update their information in Oracle Sales.
Prerequisites
To create a step action:
- In the Oracle CX Sales Integration app, click Actions.
- Click Add Action and select a connection for which you want to create a new action.
- Complete the action details:
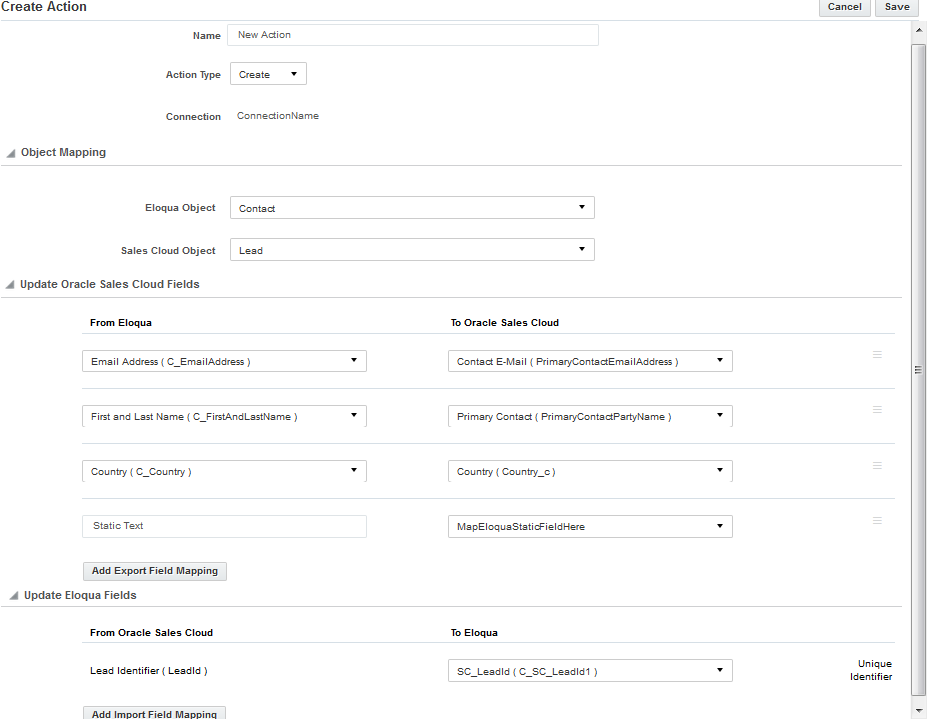
- Name: Enter a name for the action.
- Action Type: Click the drop-down list to select an action type to either create or update contact records.
- Connection: The connection cannot be modified.
- Object Mapping: To see available fields for mapping, select an Eloqua Object and CX Sales Object and click Fetch. The unique identifiers for field mappings will be determined once the Fetch button is clicked. Top-level objects from your Oracle Sales instance are available in the CX Sales Object list.
Note: The Fetch button is only available for Oracle CX Sales (formerly Oracle Sales Cloud) version R12 or higher. Older versions of Oracle CX Sales automatically load fields to be mapped.
- Update Oracle CX Sales Fields: For each set of fields, specify the Oracle Sales field that will be mapped to Oracle Eloqua contacts. If you are updating contact records, the unique identifier is the first mapping shown in this list. Add more mappings by clicking Add Export Field Mapping. Click the menu
 to delete the mapping, or switch the field type to static text, static date, or dynamic date. You can also allow blank fields to be sent from Oracle Eloqua to Oracle Sales when using the Update action type. This option is only available for fields that are not required.
Warning: Do not check the Allow null fields to be sent option when mapping to a Oracle Sales date field type. An error will occur.
- Update Eloqua Fields: For each set of fields, specify the Eloqua field that will be mapped to Oracle Sales contacts. If you are creating contact records, the unique identifier is the first mapping shown in this list. Add more mappings by clicking Add Import Field Mapping. Click the menu to delete the mapping or switch a From Oracle CX Sales field type to static text, static date, or dynamic date.
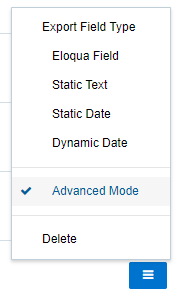
- If you select Advanced Mode from the , you can enter multiple values to be sent to a single Oracle Sales field: Eloqua Object, Date, or Dynamic Date. You can also type static text into the box as needed. For contacts, you can use advanced mode to select contact and related account fields. For CDOs, advanced mode allows you to select a CDO and its related contact and account fields.

- If you select Advanced Mode from the
- Import Rules: Specify data priority.
- Data Priority: Select the priority of data to resolve conflicts on imports, such as Bulk API and CRM Integration. If leads and contacts are being imported to Eloqua contacts, there may be situations where a lead and contact with the same email address exist. Eloqua's data priority can be used to instruct Eloqua which source, lead or contact, is higher priority. If the contact import is set to have a higher priority than the lead import, the data imported from the contact will not be overwritten by the lower priority lead data. Higher priority sources are never overwritten by lower priority sources. Data priority needs to be specified as part of an action to ensure that higher priority sources are not overwritten by lower priority sources from other imports.
- Click Save.
Your action is created and can be used in a program or campaign.
Click the menu icon to modify the action. You can edit, enable, disable, or view report data for the action. If an action is disabled, you can delete it. If you attempt to delete an action that is used on a canvas, a warning message will display, but it can be overwritten if desired.

Important: If an action is being used within a program or campaign and the action is disabled, contacts will not be processed until the action is enabled. Once the action has been re-enabled, the app will process all contacts.
Getting started with the Oracle CX Sales app