Configuring connections
Important: Oracle Sales was formerly known as Oracle Sales Cloud. All instances of Oracle Sales Cloud have been changed to Oracle Sales across the app user interface.
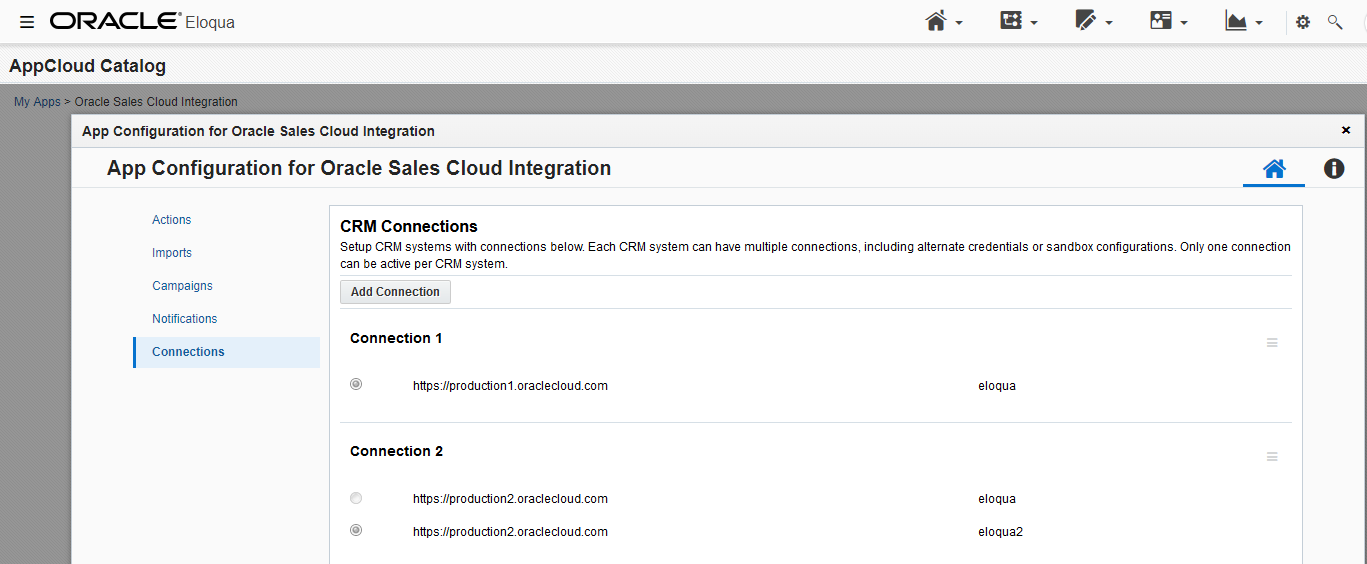
The Connections page in the Oracle CX Sales Integration app lists all of your CRM connections and associated credentials.
To configure connections:
- In Eloqua, click the cloud menu
 icon on the right hand side to expand it. This menu is located on the My Eloqua Dashboard, landing page editor, email editor, and campaign canvas.
 - From the Apps list, click Oracle CX Sales Integration. The App Configuration for Oracle CX Sales Integration page is displayed.
- In the Oracle CX Sales Integration app, click Connections.
- Click Add Connection.
- Complete the connection details:
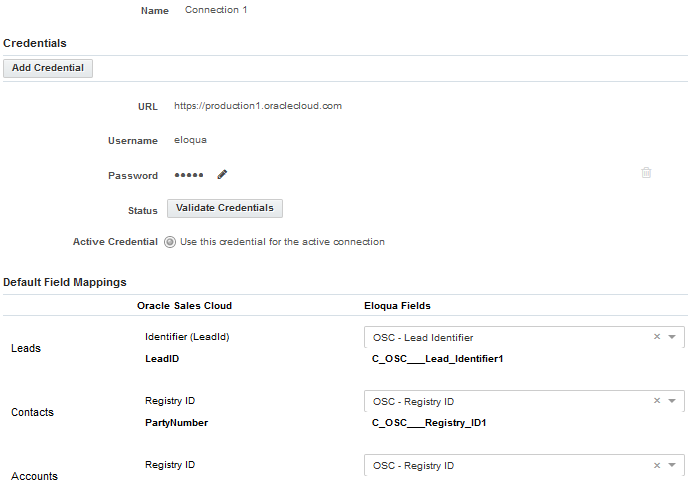
- Name: Enter a unique name for the connection. Connections cannot be renamed. The connection name will included in the name of any default actions, imports, and programs.
- Add one or more credentials:
- URL: Enter the URL for the CRM connection.
- Username: Enter user name credentials for the connection.
- Password: Enter password credentials for the connection. Click Show Password to display the characters in the Password field. Click Validate Credentials to verify that proper access to Oracle CX Sales is available. Click the resulting Valid or Invalid status message to view details.

Note: In order for a credential to be added, deleted, or set to default, the connection must first be saved for the change to persist.
- Activate one credential for the connection by selecting the Active Credential radio button.
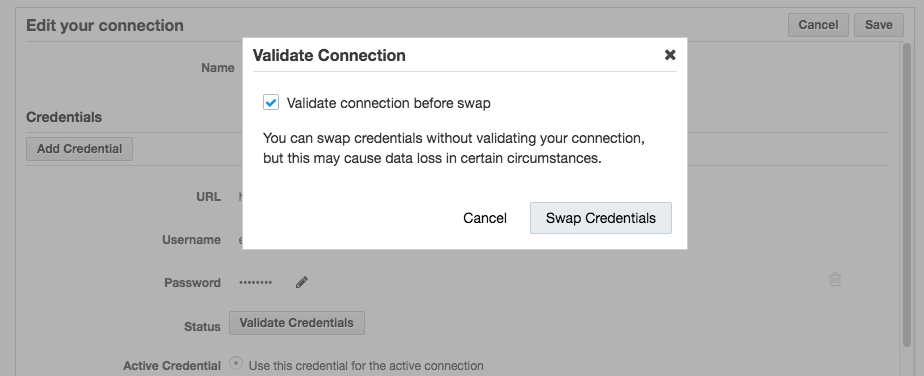
Important: When editing your connection and activating a different credential, you are given an option whether to validate credentials before swapping. The validation option is recommended and selected by default. If the validation option is not selected, the credential swap occurs instantly and the imports and actions are not disabled, which may result in action and import errors.
- Default Field Mappings: Select the Eloqua fields to map to the corresponding CX Sales Unique Identifier fields.
- Leads: Select an Oracle Eloqua field to map to the Lead Identifier field for Oracle CX Sales contacts.
- Contacts: Select an Oracle Eloqua field to map to the Registry ID field for Oracle CX Sales contacts.
- Accounts: Select an Oracle Eloqua field to map to the Registry ID field for Oracle CX Sales accounts.
- Click Save. The Create Default Assets page is displayed.

- Select the actions, imports, and programs that you want to create. For more details, see creating default assets.
- Click Create. Selected default imports, actions, and programs are created with a name that includes the name of your connection. The imports are created in the disabled state and actions are created in the enabled state. To enable or disable them, go to the Imports or Actions tab and click the corresponding menu icon
 . If you selected default programs, a message displays the folder where you can find them.
Modifying a connection
To modify an existing connection:
- In the Oracle CX Sales Integration app, click the Connections tab.
- Click the connection's menu icon and select any of the following options:
- Create Action: Click to create an action and automatically associate it with the current connection.
- Create Import: Click to create an import and automatically associate it with the current connection.
- Edit: Open the connection in Edit mode so that you can add, modify, or delete a credential and modify its field mappings. You cannot modify the name of a credential.
- Create Default Assets: Create default imports and actions if you did not already do this as part of the connection set up.
- Migrate Native Assets: Run the migration wizard to automatically migrate assets from your native Oracle CX Sales integration.
- Add Credential: Open the connection in Edit mode so that you can add, modify, or delete a credential and modify its field mappings.
- Delete: You can delete connections if there are no associated actions or imports. A confirmation dialog will list any dependencies. The dependent actions and imports need to be disabled and deleted before deleting the connection.
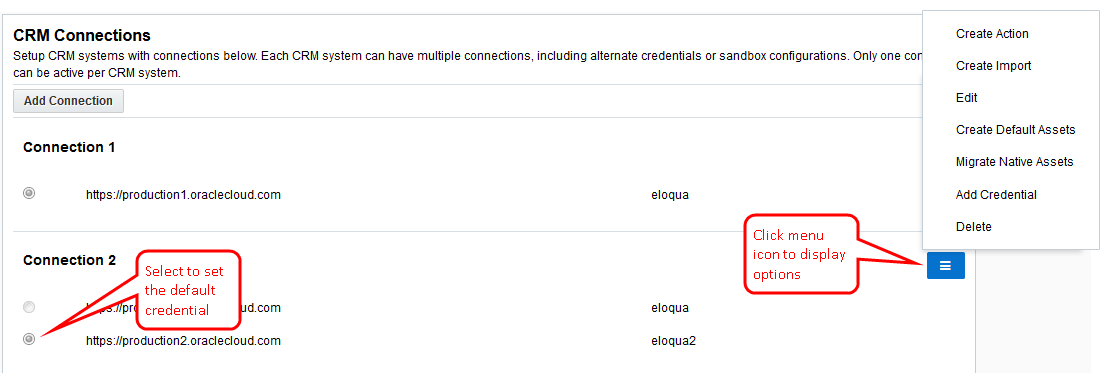
- If a connection has multiple credentials, you can select the radio button to set the default credential. Only one credential per connection can be active at once.
Oracle CX Sales Integration app