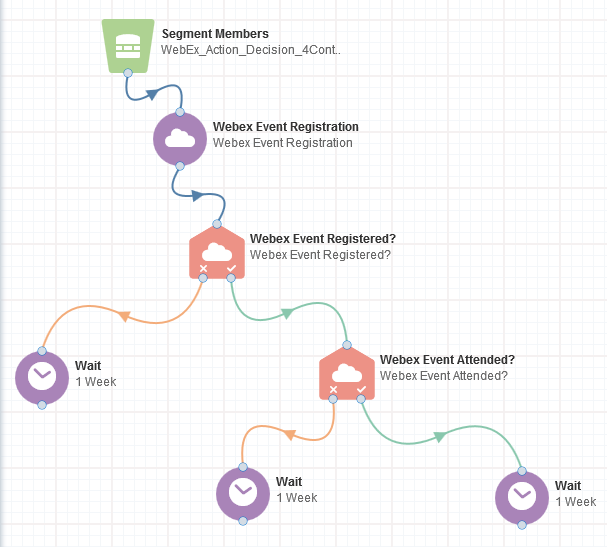
Routing contacts based on WebEx attendance or registration
Using Oracle Eloqua's WebEx integration, you can route contacts in your multi-step campaign or program based on whether or not they have registered for, or attended a WebEx event or meeting.
Important: When you create events in WebEx, do not select the Delete from My Meetings when Complete option. Otherwise, WebEx API errors can occur and Eloqua's WebEx app cannot access needed event data.
To route contacts based on their WebEx event/meeting attendance or registration:
-
Open an existing campaign or program, or create a new one.
- Drag the appropriate WebEx element, from the Decisions section, onto the canvas:
- WebEx Event Registered? to route contacts based on event registration.
- WebEx Meeting Registered? to route contacts based on meeting registration.
- WebEx Event Attended? to route contacts based on event attendance.
- WebEx Meeting Attended? to route contacts based on meeting attendance.
- Double-click the element to open the configure screen. The window that opens enables you to do the following:
- Change the name of the step to something more meaningful
- Configure the element
- Choose to route contacts that resulted in an error to another step (see campaign canvas elements for more information).
- Click the Edit icon to configure the decision. The configure screen varies slightly depending on whether you are configuring a registration or attendance service.

Registration:
- Select User: Select a WebEx user for this service. Administrators with appropriate permissions can add and modify WebEx users by re-configuring the app.
- Select Event: Input the event or meeting key. You can find this by looking up your scheduled meetings and events in WebEx.
- Click Find Event to confirm that you have input a valid ID.
Attendance:
- Select User: Select a WebEx user for this service. Administrators with appropriate permissions can add and modify WebEx users by re-configuring the app.
- Input the event or meeting key. You can find this by looking up your scheduled meetings and events in WebEx.
- Select Event: Click Find Event to confirm that you have input a valid ID. You will be routed to the next configuration screen.
Set the Attendance Duration. Specify the length of time, in minutes, that a contact has to attend a meeting or event in order for them to count as having attended.
Select Only accept contacts if they have attended for the specified duration or longer, to exclude contacts that are below the threshold.
Example: If an individual attended only 2 minutes of a 60 minute event, you might not want to consider them as an attendee in your next campaign steps.
Note: It takes WebEx 48-72 hours to make attendance data available. Place a Wait step before the attendance decision to hold contacts for 72 hours.
- Click Save.
- Test your configuration.
When a contact flows into the decision step, Eloqua calls out to WebEx to determine whether the contact meets the criteria, and routes them down the appropriate path of the campaign.