Creating contact fields
You can create your own custom contact fields to meet your organization's needs.
Note: You can have a maximum of 250 custom contact fields.
A contact field can be one of the following types:
- Picklist: Allows the user to select one option from a list of options. Configure your picklist before you create this type of contact field.
- Multi-select picklist: Allows the user to select multiple options from a list of options. Configure your picklist before you create this type of contact field.
- Check box: Allows the user to turn on or off a single option.
- Text box: Allows the user to type into the field. You can set up the text box to allow for text, numbers (with decimals), or dates. If you are allowing for text, the limit is 100 characters for small text fields or 32,000 for large text fields. See Data types (date and numeric formats) for more information about format of text box fields.
Consider the data type as this will impact the user interactions with this field in the Oracle Eloqua UI, in forms, as well as in reporting.
To create a contact field:
-
Click Settings
 and then click Fields & Views in the Database Setup section.
 - Create the contact field:
- In the classic UI, on the Fields tab, click Add
 . Then select Add Contact Field.
 - In the Redwood experience, on the Fields tab, click Add Contact Field.
Classic UI
Redwood experience

- In the classic UI, on the Fields tab, click Add
- Configure the field:
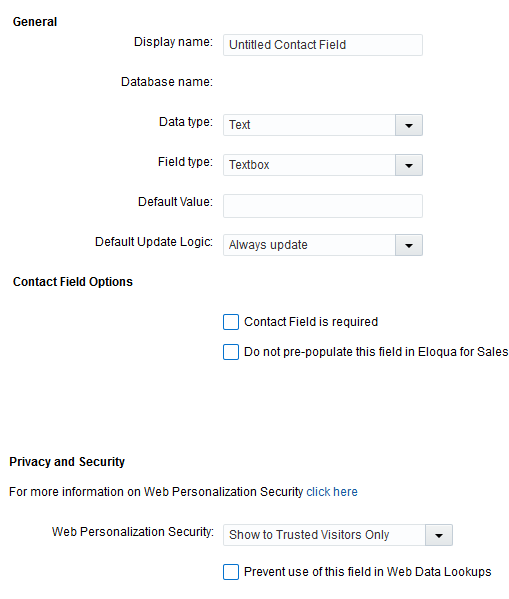
- Display Name: This name will be used throughout Oracle Eloqua when referencing the contact field.
- Data Type: Select a data type for your contact field from date, large text, numeric, or text. Based on your selection, the field type options will populate. If you want to use a picklist with the field, then use the text data type. If you want the field to be a checkbox, you can use text, numeric, or date data types.
- Field Type: Select the field type. The options vary depending on the data type selected above. The field type will be use to determine how the field is displayed to users.
- Output Format Type: For date and numeric data types, then choose an option for how you want the field value to be displayed to users. The available formats are provided by Eloqua or those setup by your administrator. Learn more about the formats.
- Picklist values: For picklist based field types, choose the picklist.
- Value for checked and Value for unchecked: For checkbox field types, provide the values when the checkbox is selected or not.
- Default State: If you have selected a checkbox field type, specify whether the field is checked or unchecked by default.
- Default Value: This is an optional field to enter a default value for the contact field.
Contact field is required: Select this check box to make the field mandatory. In the Redwood experience, this requirement will always be checked when using the field.
-
Default Update Logic: The default update logic controls when to update this contact field in the database.
- Always: Always update the contact field whenever it is submitted.
- Update if blank: Only update the contact field if the field is currently blank.
- Update if new email address: Only update the contact field if the field contains a valid email address.
- Update if new value is not blank: Only update the contact field if the data provided is not blank. This prevents you from overwriting data with a blank value.
- Configure the Privacy and Security section:
- Web Personalization Security: Select the behavior of the contact field when used by field merges and web data lookups. Learn more about web personalization security.
- Prevent use of this field in Web Data Lookups: Select this check box to prevent the field value from being used in data look-ups. For example, you might turn this on if the field is capturing highly personal or confidential information about the contact.
- Save your changes.
After creating your contact field, you may want to add the field to a contact view. Learn more about contact views.
Configuring web personalization security