Editing forms in the Classic Design Editor
Important: You can no longer create new assets using the Classic Form Design editor or copy assets created in the Classic Form Design editor. All legacy form assets continue to be editable using the same Classic Form Design Editor. Additionally, classic forms will still function in their landing pages and capture form submission data. Customers can leverage the Save As and Save As Template features for their classic forms to save them as responsive forms in our new Design Editor. Learn more in our product notice.
To edit a form:
- Edit the content of the form as needed:
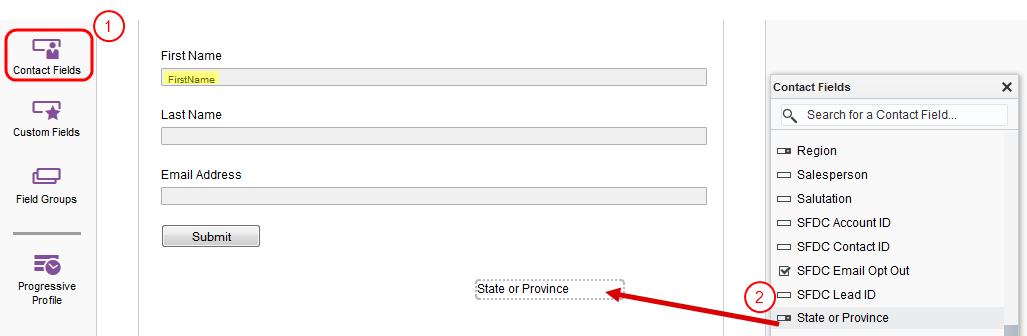
- To add fields to the form, click an icon in the left panel to open the field chooser. Then double-click the field you want to add. Learn more about these form fields.
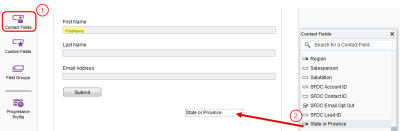
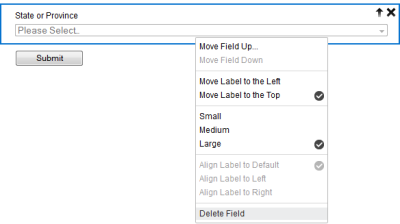
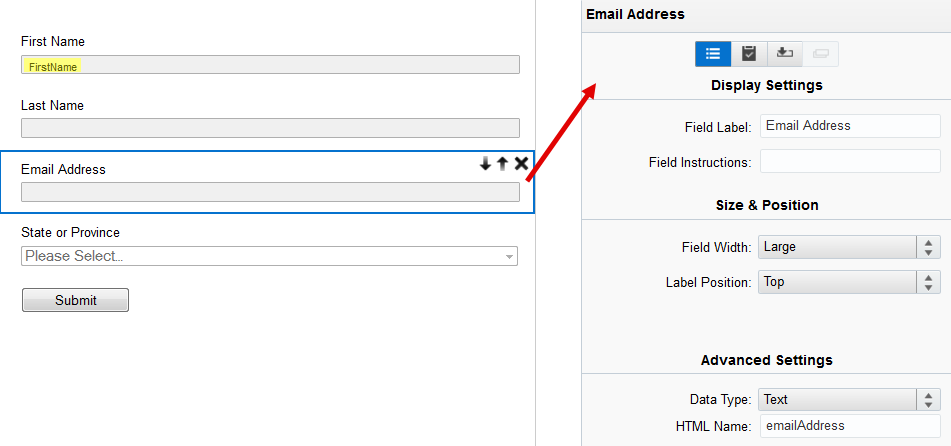
- To configure the field, click the field and use the configuration menu. Learn more about configuring form fields.

- To remove a field from the form, right-click the field, then click Delete Field.
- To add fields to the form, click an icon in the left panel to open the field chooser. Then double-click the field you want to add. Learn more about these form fields.
- Configuring the form processing. See Processing form data for more information.
- Click Save.
Note: If you no longer need a form, you can delete it as part of your regular maintenance to keep the application from becoming cluttered with too many old forms. A form cannot be deleted if it is being used in an asset or campaign. You will receive an error message when you try to delete it. The Dependency Viewer then opens, and shows you the objects which are dependent on that form. You must resolve these dependencies before you can delete the form.
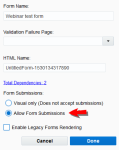
Configuring the form settings
- Name: The name of the form. This name should be descriptive so that the purpose of the form is clear.
- Validation Failure Page: The landing page to which the submitter is re-directed if the form is unavailable, or if the form is not completed properly. Select a landing page from the drop-down list next to the field.
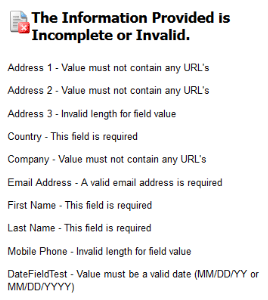
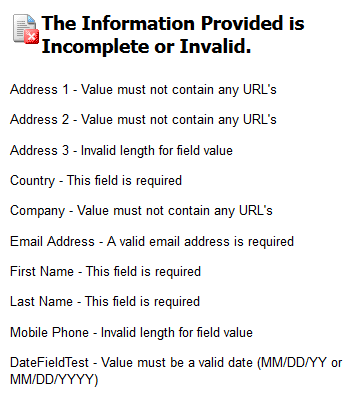
If you do not select a Validation Failure Page and are using external forms or blind form submits, Oracle Eloqua will display the following HTML page as a response to any invalid fields. As in the following example, the errors presented will match the validation errors that occur per form field.
- HTML Name: The HTML name for the form. This is the name that is referred to when uploading a landing page that uses this form. The name cannot contain any spaces. When you stop typing, Oracle Eloqua will automatically check for the validity and availability of the name you have selected. If the name is valid and available, you will see a green check mark next to the field.
Note: Oracle Eloqua automatically generates an HTML name for your form. You can use this generated name, or create a new one.
- Form submissions:
- Visual only: The form will remain visible but will not accept submissions via the landing page or endpoints (API). Marking a form visual only prevents spam attacks on old or new forms.
Note: If a form is set to Visual only, a user who tries to submit the form via the landing page will see an error message.

Additionally, if a user tries to submit a form marked as Visual only via API request, they will also see an error message.
- Allow form submissions: Visible to everyone and can capture submission data (this is the default option).
- Visual only: The form will remain visible but will not accept submissions via the landing page or endpoints (API). Marking a form visual only prevents spam attacks on old or new forms.

