Define an Ingest Job
You can define how the ingest job will display in Fusion Unity Data Platform by selecting the source of the data that the Fusion Unity Data Platform will use. You can then define how the data from your source files are mapped to the attributes in the data model data.
- Create an ingest job.
- Define how the ingest job will display in Fusion Unity Data Platform.
- Define how fields from your source files are mapped to the attributes in the data model.
- Set up load field mappings.
- Create a source object.
- Map source object fields to data model attributes.
Create an Ingest Job
To create an ingest job:
- Sign in to Oracle Fusion Cloud Applications with a user account that has the required Integrations access.
- From the navigator, select and a screen similar to the following is displayed.
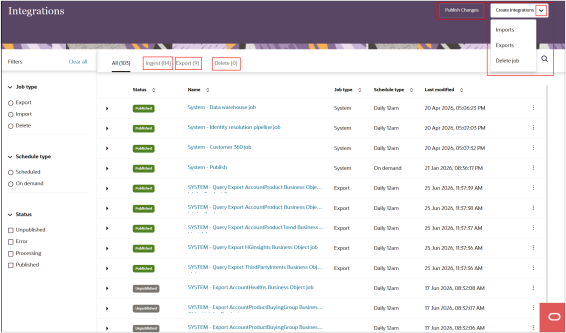
- Select Create Integrations and select one of the job
types from the drop-down list:
- Imports
- Exports
- Delete job
- For example, if you select Imports, the Create
Ingest Job page is displayed.Note: You can open and close the different sections on the page by selecting the Arrow icon or by clicking anywhere in the section heading.
- Enter a Name and Description and select and authenticate a Destination.
Define Job Details
The job details section lets you define how the ingest job will display in Fusion Unity Data Platform. You'll also need to select the source of the data that Fusion Unity Data Platform will use. Here's an example of the Job details area:
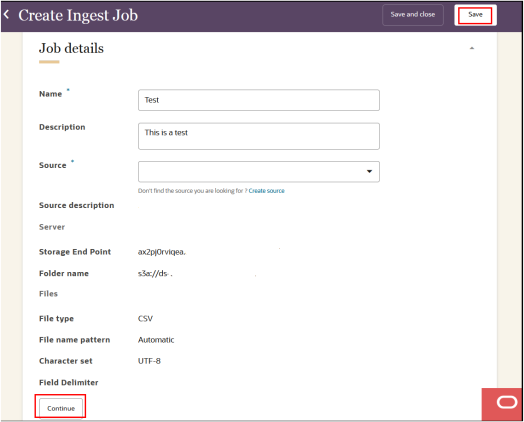
- Enter the details for the ingest job.
- Name: Enter a name. The name must be 1 or more characters, up to a maximum of 50. Other than underscores (_) and hyphens (-), special characters aren't allowed. The first character can't be a space. You can use characters from all languages supported in the language settings.
- Description: Enter a description. This field is optional, but it's highly recommended to add descriptions for any entity created. This helps all other users get more context when using and navigating Fusion Unity Data Platform. The description can have a maximum of 512 characters with no restrictions on characters used. You can use characters from all languages supported in the language settings.
- Source: This is the source of the data you want to bring into Fusion Unity Data Platform. Use the drop-down list to view all the sources that have been created and make a selection. When you select a source, the details of the source will display. Review the details and make sure they're correct and up to date. You can also create a new source by selecting Create source. See the Create a Source Object section for more information.
- Once you've confirmed that the details are correctly configured, select Continue.
Map Fields from Source Files to Data Model Attributes
Field mapping lets you define how fields from your source files are mapped to the attributes in the data model.
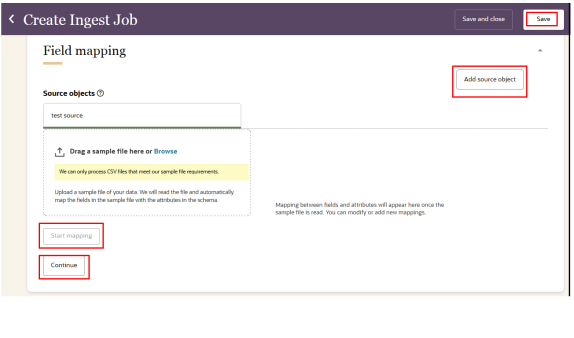
After loading the field mapping for the ingest job, you'll need to do the following:
- Review the configurations and make changes as needed.
- Define how the data that's ingested into Fusion Unity Data Platform will be formatted.
Based on the source type selected, you'll need to complete specific details for the destination.
- To select an Oracle Sales source, see Set Up the Ongoing Import of Oracle Sales Data.
Set Up Load Field Mapping
- Automated field mapping
- Manual field mapping
To set up manual field mapping, you'll need to do the following:
- Create a source object
- Add a sample file of the source fields
Create a Source Object
To create a source object:
- From the Manual section, select Create source object.
- Enter a name for the source object. The name must be 1 or more characters, up to
a maximum of 50. Other than underscores (_) and hyphens (-), special characters
aren't allowed. The first character must be a valid letter. You can use
characters from all languages supported in the language settings.Important: The name you give the source object will decide the files that are processed when the job runs. For example, to import address data, make sure to include "address" in the source object name so that all files with "address" in the file name will be identified for import. If you select an Automatic file name pattern when configuring the source, Fusion Unity Data Platform will use the source object name to create the file name pattern. Fusion Unity Data Platform will include compressed files and files with a prefix or suffix when matching and importing files. Be aware that the source object name you define is case sensitive.
If needed, you can edit or delete the source object. If you delete a source object, all field mappings configured for the source object will be deleted as well.
To edit or delete the source object:
- Next to the source object name, select the Action menu (the horizontal 3 dots).
- Select Edit or Delete.
To complete manual field mapping, prepare a sample file that meets the following requirements:
- The sample file is in CSV or TXT format.
- The delimiter defined in the custom regular expression for the source file matches the delimiter in the sample file.
- The sample file is less than 100MB.
To add a sample file:
- Drag the sample file to the sample file section or select Browse and select the file on your computer. You have the option to add sample values.
- Select Start mapping.
- Follow the steps in the Map Source Object Fields to Data Model Attributes section to start mapping source object fields to data model attributes.
Map Source Object Fields to Data Model Attributes
To map source object fields to data model attributes:
- For each of the mapped source fields, select Edit to start adding attributes from the data model.
- A list of recommended attributes might display for you to add. You can also use the search field to find attributes to add. You can search by data object name, attribute name, or attribute description.
- If you need to add an attribute that isn't currently part of the data model,
select Create attribute. Attributes you create will need
to be published before the ingest job runs. You can review attributes that need
to be published by selecting the Show unpublished
attributes checkbox.
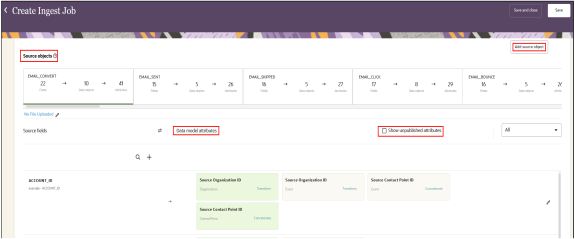
- To add the attribute, select the plus sign (+)
- To add a transformation on an attribute, select
Transform.The following transformations are available:
Name Description Concatenation Transform data from the incoming file into a concatenation, where each value is joined together with the delimiter you enter. For example, you could concatenate "Last Name" and "First Name" and store it in an attribute called "Full Name". Date Transform data from the incoming file into the Timestamp data type. For example, you can store source field "Date of Birth" in the correct type for data model attribute "Birth Date", which has a data type of Timestamp. Lookup/static Transform values from the source field to a new value in the data model attribute. URL Tansform data from the incoming file into a URL transform. A URL transform concatenates a set of key-value pairs using an ampersand character, which can then be used in URL personalization. For example, if your incoming fields are "Last_Name" and "First_Name", and you give them a key name of "lastname" and "firstname", then the URL transform stored in data model attribute "Full Name" would be in the format "firstname=First_Name&lastname=Last_Name". Note: If the field name contains a space, it will be encoded with "%20" in the actual URL.
Hash Transform data from the incoming file into a hash value. Hash transformations can be used for attribute values such as email addresses. You can only use the hash transformation for data that has the string or text data type.
You have the option of selecting one of the following algorithms for the hash transformation.
- SHA-256: Generates a 256-bit hash value.
- MD-5: Generates a 128-bit hash value.
Prefix-Suffix Transform data from the incoming file by adding characters to the beginning (prefix) and/or to the end (suffix) of a string. Replace Transform data from the incoming file by replacing all occurrences of a defined value in a string, or only the first occurrence of a value in a string. For example, if you replace all occurrences of “J” with “j” in “John James”, you get “john james”. If you select to replace the first occurrence in this string, you'll get “john James” . Substring Transform data from the incoming file by selecting a subset of the string. The value for Start position is required and defines the start position of the string. The value for End position is optional and defines the end position of the string. The value of the end position must be higher than the value of the start position. The start position is inclusive, so zero is the start position for the first character of a string. The end position is exclusive. Trim Transform data from the incoming file by removing unnecessary space from strings. You have the option of trimming space from the beginning and end of strings. Padding Transform data from the incoming file by adding padding to strings. You can use this transformation if the incoming string is shorter than the desired length. Set the desired length and padding character for the output string. The padding character is added to the beginning of strings. RegEx Advanced Transform data from the incoming file by following the Regular Expression (RegEx) pattern. You have the option of replacing all characters, or only the first or last character, and truncating your data. - To add another source object to be mapped, select Add source object.
- A single source field can be mapped to one or more data model attributes. Conversely, one or more source fields can be mapped to a single data model attribute. If you map multiple source fields to a single data model attribute, you want Fusion Unity Data Platform to store multiple values in that one data model attribute. Because of this, you need to ensure you select the appropriate transformation, so that Fusion Unity Data Platform can correctly combine those multiple values.
- A notification will display if not every data object used in a mapping has its source mapped to an incoming field. Mapping all source data object IDs ensures that duplicate data is removed before it's stored in the application. Review the Source data object IDs not mapped notification before completing field mapping. The notification will identify each unmapped data object with a color.
- A red circle indicates that the unmapped source data object ID
(
SourceXIDattribute) won't import the data successfully, even if the ingest job successfully completes. This is because the Incoming records flag for the data object is set to No which means the(insertOnly)parameter is set to false. -
Example: You map the
First nameattribute from the Customer data object to theFirstNamesource field in the sample file. You must also map the correspondingSourceCustomerIDattribute in the Customer data object to a source field in the sample file so that the data can be successfully imported. This is because the Incoming records flag for the Customer data object is set to No.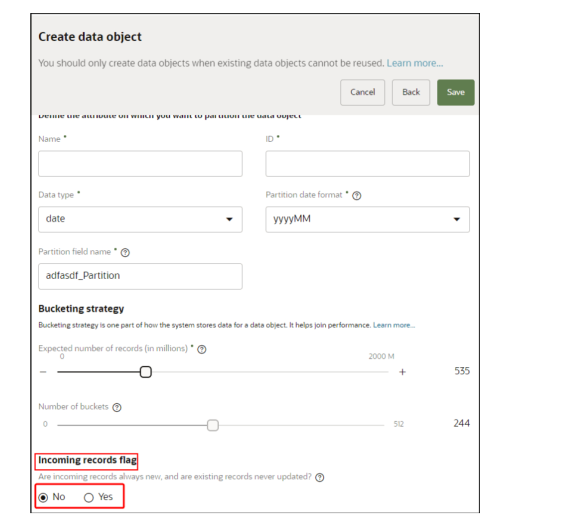
- A yellow circle indicates that the source data object ID
(
SourceXIDattribute) is unmapped, but the ingest job will still successfully import the data. This is because the Incoming records flag for the data object is set to Yes which means theinsertOnlyparameter set to true. If theSourceXIDattribute isn't mapped, Fusion Unity Data Platform will automatically add a unique identifier to theSourceXIDattribute when the data is imported. -
Example: You map the
Order Totalattribute from the Event data object to theOrder Totalsource field in the sample file, but you don’t map theSourceXIDattribute to a source field. You'll receive a warning the source data object ID is unmapped, but the ingest job will still import the data successfully. This is because the Incoming records flag for the Event data object is set to Yes.
Managing Source Fields
You can create source fields if you need to update the field mapping for an existing ingest job. To search through the existing list of source fields, select Find next to Source fields.
You can also edit and delete existing source fields if you need to update the name of the field or remove fields that you no longer need for the ingest job. Source fields you delete will also remove any field mappings you configured for that field.
To create source fields:
- Next to Source fields, select Add.
- Enter the name of the source field. You can use characters from all languages supported in the language settings.
- Update the source field as needed.
To edit source fields:
- Hover your mouse over the source field name you want to update and select Edit.
- Enter the new source field name and select the check mark. You can use characters from all languages supported in the language settings.
To delete source fields:
- Hover your mouse over the source field name you want to remove and select Delete.
- Review the confirmation message and select Yes.
Schedule and Notify Settings for the Ingest Job
You'll need to configure the schedule and notification settings for the ingest job.
To schedule the ingest job and define the notification settings:
- Configure the schedule for the ingest job:
- Select Recurring to automatically run the job on a regular schedule. If a job is still running while the next one is scheduled to run, the next scheduled run will not start until the current one completes. Two scheduled instances of the same ingest job can't run simultaneously.
- Select On demand to run the job as needed.
Here's an sample of the Schedule and notify section of the Create Ingest Job.
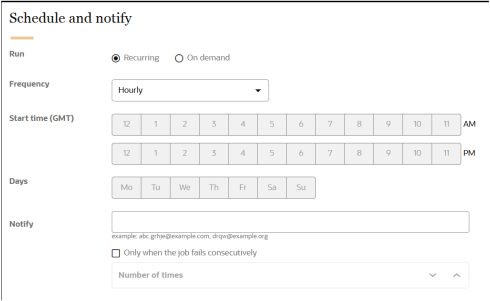
- If the job is recurring, select the Frequency, Start time, and Days it will run.
- In the field for Notify, enter the email addresses of
people to be notified when the job runs. You can use characters from all
languages supported in the language settings. Separate multiple emails with a
comma. Note: The metrics for ingest jobs in notification emails are approximations and won't always be 100% correct.
- If you only want a notification if the job fails, select the Only when the job fails consecutively checkbox.
Save and Publish the Ingest Job
After saving the ingest job you'll need to publish the changes before it can run.
To save and publish the ingest job:
- Select Save or Save and close.
- Select Publish changes to display the Change list page.
- Review the list of changes for the publish job.
- After reviewing all the changes, select Publish.
- Enable the checkbox to confirm the publish job and select Start
publish job.
A notification will display to confirm the publish job request was received and the job is waiting to start. A second notification will display when the job starts running.
When the publishing task is completed, the ingest job can run.