Cordova
This plugin makes it easy to integrate your Cordova based mobile app with the Responsys SDK.
In this topic:
Requirements
- Cordova CLI >= 9.0.1
If using Ionic,
-
Ionic CLI >= 6.7.0
-
Ionic Framework >= 5.0.5 (@ionic/angular)
Android
-
Android SDK Tools >= 26.1.1
-
Cordova Android >= 8.1.0
iOS
-
iOS 11 or later
-
Cordova iOS >= 5.1.1
Setup
Before installing the plugin, you must setup your app to receive push notifications. Follow the steps below for your platform:
Android
- Get FCM Credentials.
- Log in to the Responsys Mobile App Developer Console and enter your FCM credentials (Project ID and Server API Key) for your Android app.
- Download the
pushio_config.jsonfile generated from your credentials and include it in your project'sandroid/src/main/assetsfolder. - Copy
PushIOManager-6.45.aarand place it in the project'sandroid/src/main/libsfolder.
iOS
- Generate Auth Key.
- Log in to the Responsys Mobile App Developer Console and enter your Auth Key and other details for your iOS app.
- Download the
pushio_config.jsonfile generated from your credentials. - Open the Xcode project workspace in your
platforms/iosdirectory of the Cordova app. - Drag and drop your
pushio_config.jsonin Xcode project. -
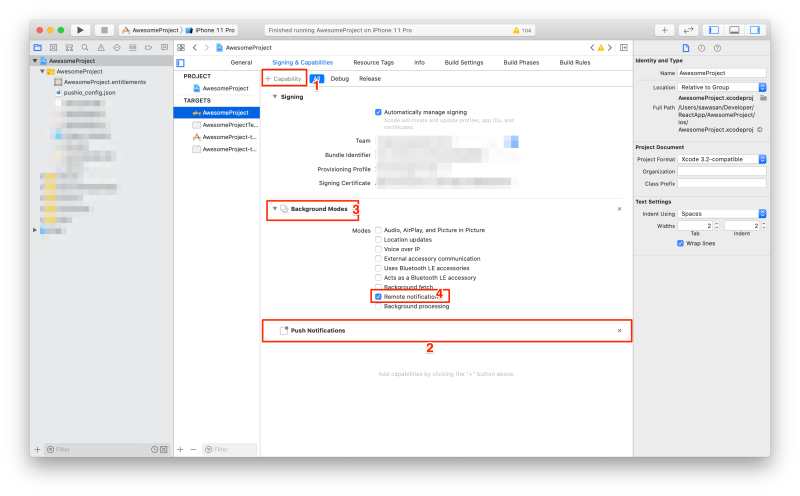
Select the root project, and under Capability, add the "Push Notifications" and "Background Modes".
-
Copy
PushIOManager.frameworkand place it in the pluginPATH_TO_cordova-plugin-pushiomanager_DIRECTORY/frameworks/folder before adding the plugin to project.

Installation
For iOS, copy
PushIOManager.frameworkand place it in the pluginPATH_TO_cordova-plugin-pushiomanager_DIRECTORY/frameworks/folder before adding the plugin to project.
Install the plugin with the Cordova CLI:
cordova plugin add https://github.com/oracle/cordova-plugin-pushiomanager
For Ionic:
ionic cordova plugin add https://github.com/oracle/cordova-plugin-pushiomanager
Integration
Android
-
Open the
AndroidManifest.xmlfile located atplatforms/android/src/mainand add the following:-
Add permissions above the
<application>tag,<uses-permission android:name="android.permission.ACCESS_FINE_LOCATION" /> <uses-permission android:name="${applicationId}.permission.PUSHIO_MESSAGE" /> <uses-permission android:name="${applicationId}.permission.RSYS_SHOW_IAM" /> <permission android:name=".permission.PUSHIO_MESSAGE" android:protectionLevel="signature" /> <permission android:name="${applicationId}.permission.RSYS_SHOW_IAM" android:protectionLevel="signature" /> -
Add an intent-filter for launching the app when the user taps on a push notification. Add it inside the
<activity>tag ofMainActivity,<intent-filter> <action android:name="${applicationId}.NOTIFICATIONPRESSED" /> <category android:name="android.intent.category.DEFAULT" /> </intent-filter> -
(Optional) Add an intent-filter for Android App Links setup. Add it inside the
<activity>tag ofMainActivity,<intent-filter android:autoVerify="true"> <action android:name="android.intent.action.VIEW" /> <category android:name="android.intent.category.DEFAULT" /> <category android:name="android.intent.category.BROWSABLE" /> <data android:host="@string/app_links_url_host" android:pathPrefix="/pub/acc" android:scheme="https" /> </intent-filter>
-
Add the following code inside the
<application>tag,<receiver android:enabled="true" android:exported="false" android:name="com.pushio.manager.PushIOUriReceiver" tools:node="replace"> <intent-filter> <action android:name="android.intent.action.VIEW" /> <category android:name="android.intent.category.DEFAULT" /> <data android:scheme="@string/uri_identifier" /> </intent-filter> </receiver> <activity android:name="com.pushio.manager.iam.ui.PushIOMessageViewActivity" android:permission="${applicationId}.permission.SHOW_IAM" android:theme="@android:style/Theme.Translucent.NoTitleBar"> <intent-filter tools:ignore="AppLinkUrlError"> <action android:name="android.intent.action.VIEW" /> <category android:name="android.intent.category.BROWSABLE" /> <category android:name="android.intent.category.DEFAULT" /> <data android:scheme="@string/uri_identifier" /> </intent-filter> </activity>
-
-
Open the
strings.xmlfile located atplatforms/android/src/main/res/valuesand add the following properties:-
Custom URI scheme for displaying In-App Messages and Rich Push content:
<string name="uri_identifier">pio-YOUR_API_KEY</string>
You can find the API key in the
pushio_config.jsonthat was placed inplatforms/android/app/src/main/assetsearlier during setup. -
(Optional) If you added the
<intent-filter>for Android App Links in the steps above, then you will need to declare the domain name,<string name="app_links_url_host">YOUR_ANDROID_APP_LINKS_DOMAIN</string>
-
iOS
-
For In-App Messages and Rich Push Content follow these steps:
-
To Enable Custom URI scheme for displaying In-App Messages and Rich Push content follow Step 1 here. You don't need to add the code. You can find the API key in the
pushio_config.jsonthat was placed in your Xcode project earlier during setup. -
Follow Step 2 here to add the required capabilities in your Xcode project for In-App messages. You don't need to add the code.
-
-
For Media Attachments you can follow this guide. Copy and paste the code provided in guide in respective files.
-
For Carousel Push you can follow this guide. Copy and paste the code provided in guide in respective files.
Usage
The plugin can be accessed in JS code using the name space cordova.plugins.PushIOManager. The following code samples use a shorthand ( PushIOManager) for the name space.
Configure And Register
-
Configure the SDK:
PushIOManager.configure("pushio_config.json", (success) => { }, (error) => { }); -
Once the SDK is configured, register the app with Responsys:
 PushIOManager.registerApp(true, (success) => {

 }, (error) => {

 });
User Identification
Associate an app installation with a user (usually after login):
 PushIOManager.registerUserId("xyz@yxz.zyx", (success) => {

 }, (error) => {

 });
When the user logs out:
 PushIOManager.unregisterUserId((success) => {

 }, (error) => {

 });
Engagements And Conversion
User actions can be attributed to a push notification using:
PushIOManager.trackEngagement(PushIOManager.engagementType.PUSHIO_ENGAGEMENT_METRIC_INAPP_PURCHASE,
(success) => {

}, (error) => {

});
In-App Messages
In-App Messages (IAM) are displayed in a popup window via system-defined triggers like $ExplicitAppOpen or custom triggers. IAM that use system-defined triggers are displayed automatically.
IAM can also be displayed on-demand using custom triggers.
- Your marketing team defines a custom trigger in Responsys system and shares the trigger-event name with you.
- Marketer launches the campaign and the IAM is delivered to the device via push or pull mechanism (depending on your Responsys Account settings)
-
When you wish to display the IAM popup, use:
 PushIOManager.trackEvent(custom_event_name, properties, (success) => {

 }, (error) => {

 });
Message Center
Get the Message Center messages list:
 PushIOManager.fetchMessagesForMessageCenter("Primary", (response) => {

 }, (error) => {

 });
If any message contains rich-content (HTML), call:
 PushIOManager.fetchRichContentForMessage(messageID, (response) => {
       // `response` is the HTML content
 }, (error) => {

 });
Remember to store these messages, since the SDK cache is purgeable.
Geofences And Beacons
If your app is setup to monitor Geofences and Beacons, you can use the following APIs to record in Responsys when a user enters or exits a Geofence/Beacon zone.
PushIOManager.onGeoRegionEntered(geoRegion, (response) => {}, (error) => {});
PushIOManager.onGeoRegionExited(geoRegion, (response) => {}, (error) => {});
PushIOManager.onBeaconRegionEntered(beaconRegion, (response) => {}, (error) => {});
PushIOManager.onBeaconRegionExited(beaconRegion, (response) => {}, (error) => {});
Notification Preferences
Preferences are used to record user-choices for push notifications. The preferences should be pre-defined in Responsys before being used in your app.
Declare the preference beforehand in the app:
 PushIOManager.declarePreference(key, label, preferenceType, (response) => {

 }, (error) => {

 });
Once a preference is declared successfully, you may save the preference using:
 PushIOManager.setPreference(key, value, (response) => {

 }, (error) => {

 });
Do not use this as a persistent (key/value) store since this data is purgeable.