OCX Responsys Android SDK
In this topic:
Requirements
Ensure that you are using the following SDK versions:
- OCX Mobile SDK (Core) >= 1.1.3
- OCX Responsys SDK >= 6.52.1
Upgrade Guide:
If your app is already using the OCX Responsys Mobile SDK, then, download the latest SDK for Responsys and Oracle.json and integrate with the app. For more information. refer to OCX Mobile Android SDK.
Step 1: Set Up an Android Platform for Your App
[1.1] Locate your project's cloud messaging credentials. See Getting Your Project's FCM Credentials for more information.
[1.2] Configure Oracle Responsys Mobile App Platform Cloud Service for your app using the Responsys Mobile App Developer Console.
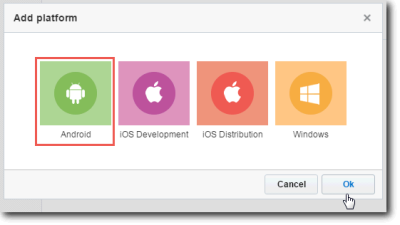
From the Mobile App Developer Console, click Add Platform, select Android, and then click Ok.
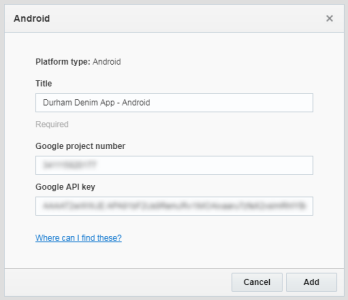
Enter your project's FCM credentials in the Android platform dialog.
| FCM Credentials | |
|---|---|
| "Google project number" field: | Sender ID |
| "Google API key" field: | Server Key |
These values enable Oracle Responsys Mobile App Platform Cloud Service to target your application through the cloud messaging platform.
Click Add.
Step 2: Download and Add OCX SDKs
Once you have entered your project's FCM Credentials, Oracle Responsys Mobile App Platform Cloud Service generates a pushio_config.json file for you to include in your application. This JSON file is packaged with your FCM Credentials which you entered in Step 1. Oracle Responsys Mobile App Platform Cloud Service uses these cloud messaging credentials to target your application properly.
[2.1] Before you obtain the SDK file, ensure that you have an assets folder in the project structure. Open your app project in Android Studio, and then select the Project view of your project. Expand the folder that shows your project name, and then expand the app folder.
- Expand the
srcfolder, and then expand themainfolder. In themainfolder, create a directory calledassets, if it is not present already. This is where you will put thepushio_config.jsonfile.
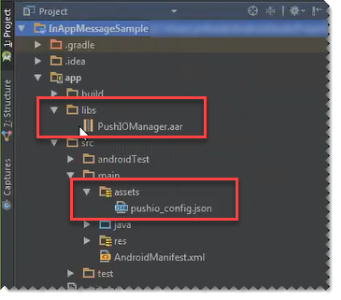
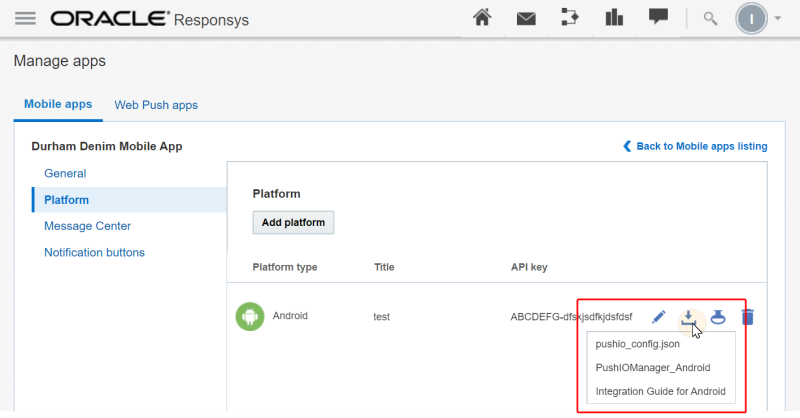
[2.2] Click the Download button for the Android platform, and select pushio_config.json to download the file. Include the file in your project's assets folder:
[2.3] Download the Oracle CX Responsys module for Android.
[2.4] Extract the downloaded zip and place the OracleCXResponsys-x.xx.aar and oracle-cx-mobile-sdk.aar files into your project's libs folder.
Step 3: Adding Dependencies
In this section, you'll update your project's build.gradle files. Android Studio projects contain a project-level build.gradle file (contained in the project's top-level folder, typically project-name/build.gradle) and a module level build.gradle file (contained in the project's app folder, typically project-name/app/build.gradle). Ensure that you edit the correct file in the following steps.
[3.1] In your module-level build.gradle file, verify that your compileSdkVersion and targetSdkVersion are set to 28 (Android SDK version 28, "Pie") and that your minSdkVersion is set to 16 (API level 16, "Jelly Bean") or higher.
android {
				compileSdkVersion 28
				.
				.
				.
				defaultConfig {
				targetSdkVersion 28
				minSdkVersion 16
				}
		}}
[3.2] Open your module's build.gradle file and add the following build rules to the dependencies section, below the existing contents:
	dependencies {
				.
				.
				.
				// Place the following SDK-specific build rules below the default Android Studio contents
				implementation fileTree(dir: 'libs', include: ['OracleCXResponsys-6.45.aar'])
				implementation fileTree(dir: 'libs', include: ['oracle-cx-mobile-sdk.aar'])
				implementation 'com.google.firebase:firebase-messaging:17.3.4'
		}
[3.3] Sync the project with the updated Gradle file.
Note: Add Oracle.json to your project before proceeding to the next step.
Step 4: Integrate the SDKs
[4.1] In your AndroidManifest.xml file (typically located in the project-name/app/src/main folder), the following user-permissions are required to use push notifications.
Put them inside the <manifest> element, above the <application> element.
Note that ${applicationId} will be substituted with the value of the package attribute in the manifest element; that is, your app and package name.
<uses-permission android:name="android.permission.INTERNET"/>

				<!-- Permission for your app to handle push notifications -->
				<permission android:name="${applicationId}.permission.PUSHIO_MESSAGE" android:protectionLevel="signature"/>
				<uses-permission android:name="${applicationId}.permission.PUSHIO_MESSAGE"/>

				<!-- Optional permission -->
		<uses-permission android:name="android.permission.ACCESS_FINE_LOCATION" />
[4.2] Add the following <intent-filter> in the AndroidManifest.xml, inside the activity that opens when the user taps on the push notification.
<!-- put inside an <activity> element -->
				<intent-filter>
				<action android:name="${applicationId}.NOTIFICATIONPRESSED"/>
				<category android:name="android.intent.category.DEFAULT"/>
		</intent-filter>
[4.3] In your main Activity class, override the onCreate() method if it is not already present, and then call PushIOManager.registerApp() from it. This ensures that registration is maintained between all application restarts.
// The following line initializes the SDK,	// ensures that any registration changes are reflected with Responsys,
				// and sets up users to receive push notifications

		PushIOManager.getInstance(getApplicationContext()).registerApp();
To defer the permission prompt for location access: By default, using PushIOManager.registerApp() causes your app to display a permission prompt for requesting location access. However, you can use the following variant to do registration without including the location data as part of the registration. You may find this useful in a scenario where your app would like to defer the request for access to the user's location.
PushIOManager.getInstance(this).registerApp( boolean useLocation );Note that if you do a registration without location data, you should also do a registration with location data at a later stage, when your app is ready to request access to the user's location. You can do this by calling the above API with the parameter value set to true.
[4.4] Set Oracle CX - Infinity account GUID
Log in to the Oracle CX - Infinity and note down the account GUID displayed under the account/profile menu at the top right of the screen. Use the GUID with setOracleCXAccountId API.
PushIOManager.getInstance(getApplicationContext()).setOracleCXAccountId("YOUR_ACCOUNT_GUID")[4.5] Add code for "known user" identification.
Responsys uses the USER_IDENTIFIER parameter to uniquely identify "known users" of your app. To do this, when the user signs in or signs up in the app, you need to call the register user ID function of the SDK (where <match_key_value> is the value of the match key field):
PushIOManager.getInstance(getApplicationContext()).registerUserId("<match_key_value>");Coordinate with the Responsys Account Admin regarding which match key field to use; the match key field must be chosen when the Account Admin creates the app channel list and it cannot be changed later. For more information about the match key, and recommendations for choosing which Profile List field to use as the match key, see the "Setting up the App Channel List" topic in the Mobile App Channel Configuration Guide.
Example of how "known user" identification works
In the following example, the match key field is CUSTOMER_ID, and let's assume that the CUSTOMER_ID values are normalized on all systems involved (that is, leading and trailing spaces are removed).
1) A customer named John Doe with a customer ID of A1B2C3D4 logs in to your app:
Username: JohnDoe
Password: ABC123
2) Next, the backend server authenticates the user, and sends the app the user's customer ID in the form of a string:
Successful Login to backend server > the customer ID A1B2C3D4 is obtained
3) Finally, the app registers the user with Push SDK Register User Identifier method:
PushIOManager.getInstance(this).registerUserId("A1B2C3D4");Push SDK User Identifier methods (Android)
public void registerUserId(String userId)- Registers a "known user"public String getRegisteredUserId()- Retrieves the registered userID of a "known user"public void unregisterUserId()- Removes the value from theUSER_IDENTIFIER_field in the App Channel List record
Ready, Set, Push!
This completes the basic Android SDK setup. Once you have built your application and have installed it on a test device or emulator on which Google Play services are installed and updated, you can test your integration.
Note: Before you test, verify with the Responsys Account Admin that he or she has completed the mobile app configuration in Responsys, as described in Responsys Mobile App Config.
[1] Obtain the Device ID: From the logging session of a test device or emulator, obtain the device ID from the following line in the log output (where device identifier string is the string unique to the test device):
Your PushIO Device ID is: <device identifier string>[2] Log in to the Mobile App Developer Console.
[3] Navigate to your app's Platform page.
[4] Click Test.
[5] Enter the Device ID and your message, and then click Send test message.
For more information about testing your app, refer to the Test App topic.
What's Next?
Now that you have completed the basic configurations, it's time to prepare your app for the additional capabilities available when you use Oracle Responsys to send your push and in-app messaging campaigns. We recommend that you continue to the following topics to add features to your app:
- Sounds & Notifications Icons
- Notification Preferences
- Location-based Push
- In-App Messaging & Rich Push
- Listening for Callbacks
- Passing Extra Data
- Engagements & Push Conversions
- Managing Interactive Notifications
- Developing Message Centers on Android
- Customizing UX for Destination URLs
- Importing external device data
- Cross-channel Conversion Tracking
- Geofences and beacons
- Debugging & Logging
Also, see our Android FAQ for troubleshooting information and answers to general questions about PushIO SDK for Android.


