Working with multilingual campaigns
Important: This feature is currently released under our Controlled Availability program. To request access to this feature, please log in to My Oracle Support and create a service request.
You can use the Email Message Designer to build content in multiple languages in your email campaign. Using multilingual contribution, you can design email campaigns that display translated content to your subscribers dynamically. This enables you to design a single message that is tailored to each recipient’s preferred language. For example, a clothing retailer could use display messages in French for their French customers, in Japanese for their Japanese customers, and so on.
The Next steps section below provides the information you need to set up your campaign for translation and to request translation. Before you begin, a Responsys Account Administrator must have completed the necessary Multilingual Collaboration configurations. You must also work with your account's Data Designer to determine how your account will handle the recipients' language preferences. For more details, see the Multilingual collaboration topic.
Next steps
To get campaign messages translated, there are three main tasks Campaign Designers must complete:
- Adding the language preference dynamic variable to the campaign's data sources
- Selecting message content regions to be translated
- Requesting translation
Adding the language preference dynamic variable to the campaign's data sources
Your campaign must include the LANGUAGE_PREFERENCE dynamic variable. This provides the language personalization data for each recipient.
To add the LANGUAGE_PREFERENCE dynamic variable:
- From the campaign designer page, locate and click Data sources.
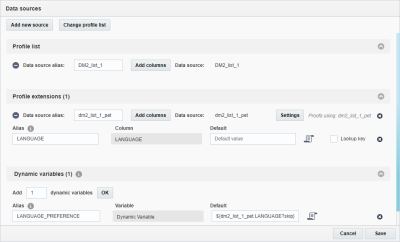
- On the Data sources dialog, enter 1 in the Add dynamic variables field, and then click OK.
- Configure the required dynamic variable, similarly to the example shown below:
- In the Alias field, type LANGUAGE_PREFERENCE. For the Multilingual Collaboration feature to work, the alias must be this value.
- In the Default field, enter the RPL script to access the recipients' language preferences. This will vary, based on the method you set up to provide the language preference. You may also need to add a Profile extension if you have stored the language preference in a PET.
- Click Save.
Selecting message content regions to be translated
Note: The following steps assume you do not have the rich text editor enabled. Learn more about the rich text editor settings.
To add a multilingual contribution widget to a region:
- With the email open in the Email Message Designer, click Dynamic Content Editor
 . This opens the Widget palette.
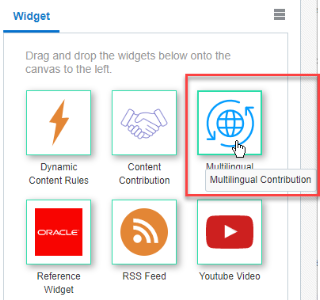
 - Add the Multilingual Contribution widget to a region by:
- Dragging the Multilingual Contribution widget to the region.
- Selecting the region from the region drop-down list, then double clicking on the Multilingual Contribution widget.
- Clicking Create Dynamic Content Region in the region's overlay, then double clicking on the Multilingual Contribution widget.
- Optionally, click Edit
 next to the region drop-down list and give the Multilingual Contribution widget region a descriptive name. This will help make it easier to identify the region later.
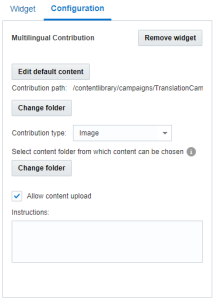
 - Use the Configuration tab to configure the widget.
- For all contribution types, you can change the Content Library folder in which the contributed translations are stored. You can also add instructions to the translators for the region.
- For HTML and image content, you can edit default content for the region.
- For images: You can change the folder from which content can be chosen. You can also allow content to be uploaded.
- Save your changes.
Requesting translation
After you have finished identifying parts of the message to be translated, you can request translation for desired languages.
The translation workflow can be used in conjunction with Campaign Approval.
- If “Request Approval” button is clicked, but translations aren’t complete, there will be a warning.
- Continuing with approval will cancel any translations and the default content will be sent.
To request translation:
- From the message designer page, click Back to Campaign.
- From the Actions menu, choose Request translation.

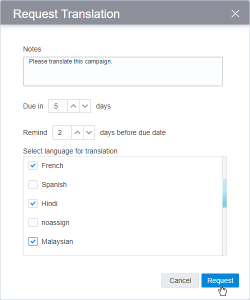
The Request translation dialog is displayed.
- In the Notes field, provide notes to translators about the purpose of the campaign.
- Set the number of days until the translations are due.
- Set the number of days until the system sends a reminder about translations due.
- Select languages into which you want the message translated. If you need a language that isn't shown here, work with your Responsys Account Administrator to configure additional languages.
- Click Request.
After you request translation, the system:
- Generates a "Language collaboration" task for each language.
- Assigns tasks to each user with an Express Email Content Translator role that is also configured for one or more of the requested languages.
- Sends email notifications to users assigned to the translation tasks.
Users with the Email Manager and Process Launcher roles will be able to see all the tasks assigned and be able to filter by campaign.
Working with translation tasks


