Designing Classic Filters
Important: This topic only applies if you do not have Audience Designer enabled for your account. If you have an account without Audience Designer and would like this feature enabled, please log in to My Oracle Support and create a service request. When Audience Designer is enabled for an account, existing classic filters can still be run, edited, and saved as another classic filter, but new classic filter cannot be created in the Filter Designer.
Note: If the Audience Designer in enabled for your account, see Simple Filters.
Classic filters provide a way to target an audience based on a wide range of criteria that include profile, activity, interaction, and other attributes. This allows you to keep all your customer records in a single, efficient list and select customers from that list as needed for each campaign, based on filter rules.
If Distributed Marketing is enabled for your account, you can also design filters that let your local marketers target their campaigns at specific segments of the audiences to which they have access -- all from the same primary profile list.
To create a filter:
- Click
 Data on the side navigation bar, and select Profile Lists. (Not seeing this choice? Refer to the Side navigation bar changes topic.)
 - Choose the list you want to work with from the Change List drop-down list.
- Click Create Filter and select Create List Filter or Create App Channel list Filter.
Important: App Channel List Filter is available only if Mobile App is enabled for your account.
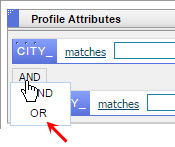
- In the Filter Designer page, drag attributes to the canvas and specify conditions for each attribute. For descriptions of all attributes, see Filter Attributes.
- Use enclosures to group rules together. When you delete an enclosure, all rules within it are deleted as well.
- To change operators, comparisons, and values, click the item you want to change and select the value you want.
- Click Get Count to quickly estimate how many recipients will result from a particular filter. Learn more about filter counts.
- Click View filter description and add a description of your filter.
- Save your filter.
Example filter
Add an Email Interaction attribute to target recipients that were sent a specific campaign.
The time frames you can use depend on which campaigns you select. For example, if you select Any campaigns, you can filter for Anytime.
However, if you select any other option, you can filter for Anytime in the last 180 days instead of Anytime.
When you select any option except Any campaigns, the dates or time ranges you specify must fall within 180 days.
Note: For the Is Less than or equal to time frame, the default value is 30 days:
Tip: When using the Campaign Categorized condition in a filter, you can select multiple values for marketing Strategy and marketing Program. Note that by default, the "Any" option will be selected for both Program and Strategy when you add these attributes to a filter. You must deselect the "Any" option if it is not needed for your filter criteria.
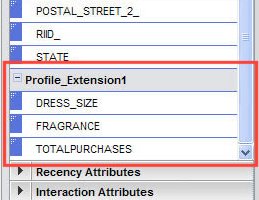
Using Profile Extension Tables (PETs) in filters
A PET is a logical extension of your main list. PETs contain additional behavioral, demographic, or profile preference characteristics of your contacts. Like your main list, each customer in a profile extension table is uniquely identified by a RIID_. For information about creating a PET, see Creating a Profile Extension.
Note: The Filter Designer does not support profile extension tables that include fields of the Maximum Text Field (to 4000 chars*) data type. As a result, you will not be able to use any PET that includes such fields.
You can define a filter using data stored in PETs. These Profile Attributes are grouped by PET in the Profile Attributes section.
In addition, you can add the Members of table attribute to the Recency, Interaction, and Import Attributes sections of the filter definition and then select the corresponding table.
To use a PET as a filter attribute:
- Drag Members of table from the Import Attributes section to the Recency, Interaction, and Import Attributes section of the filter definition.
- Click Table... and select Table....
- In the Members of Table list, select the PET you want to use and click Select.
Note: PETs that include fields of the Maximum Text Field (to 4000 chars*) data type do not appear in this list because the Filter Designer does not support PETs that include such fields.
Notes
- You can use a filter only with the list for which it was designed.
- When creating a filter in a data switch for a Program, you can use Program Entry Fields as you do with any other filter rule. For details, see Designing Programs.
- The "does not contain" condition applies only for records that contain a value, not for records with a null value. This means that your result set will include records that contain any value except the specified one, but not records with no values. For example, the rule "the State field does not contain California" will list results for New York, Pennsylvania and Texas, but not records that contain no value in the State field. To include empty records as well, add OR "State" - "is null" to the rule.
- The BETWEEN condition includes the first and last dates of the defined date range.
Note: SQL queries using the BETWEEN condition do not include the final day in a date range. To ensure consistency, add a + 1 to the SQL end date.
Recency and interaction attributes and their data sources
The following table provides information about data sources for recency and interaction filter attributes.
1 Recency attribute data is aggregated by user (profile RIID and device, if applicable). It is updated when there is a new recency event. For example, if a recipient clicked a link in an email message on April 9, 2020, that date is recorded as the Last Click Date. If they clicked a link in another email message on June 14, 2020, that date replaces the data as the Last Click Date. Recency data is available from the time your organization's Responsys account became active. Recency data is retained for profile RIIDs as long as your Oracle Responsys account exists, unless you delete a recipient's profile RIID from the system.
2 Interaction data is available depending on how you define your filter:
- If the filter condition refers to a specific campaign, link, form, or program, or a specific categorization of one of those: You can only define attributes when the event’s occurrence was within 180 days of the time the filter is executed. Responsys retains this detailed behavioral data for 180 days, as part of our standard data retention policy. For example, a filter that looks for recipients who clicked a link in the campaign named MyCampaign would only be able to look back a maximum of 180 days.
- When no specific campaign, link, form, program, or a categorization of one of those is designated: Your filter can reach beyond the 180-day time window, as those statistics are retained for profile RIIDs as long as your Oracle Responsys account exists, unless you delete a recipient's profile RIID from the system. For example, a filter that looks for recipients who clicked any links (sent to them from your organization's Responsys account) "Anytime" could find recipients who clicked a link further in the past than 180 days.
3 These Recency attributes are standard web events tracked by Adobe Analytics. You can use them to build filters that target Web behaviors. You can also combine web events tracked by Adobe Analytics with email events that are tracked by Responsys. This allows you to request all contacts who have clicked in the last 30 days and have also abandoned in the last 2 days. Or, you can filter for all contacts who have not purchased in the last 6 months, but have clicked in the last 7 days. You must set up this aggregated data in Connect.
For general information on filter data retention policy in Responsys, see the My Oracle Support knowledge base article What is the Data Retention Policy for Filters? (Doc ID 1774691.1).
Using the In Program interaction attribute
You can use the In Program attribute to include the presence or absence of a person (RIID) in a program as an interaction attribute. For example, presence or absence in a program would prevent someone from receiving another email offer while they are still in a Welcome program.
If you use In Program –> Welcome Program, the criterion is TRUE if the person (RIID) is presently in the Welcome program.
If you use Is Not In Program -> Abandon Program, the above would be FALSE if the person (RIID) is presently in the Abandon program.
Note: If you delete a filter used in a program, that program will be blocked. Review the Analyze page periodically for any blocked program information.
Saving a filter result set
You can save the results of a filter query as a set of Unique List Identifier Fields (RIIDs) in a profile extension table (PET). The resulting PET is completely independent of the filter, but is associated with the same profile list. This means that to refresh the RIIDs after you save the filter result set, you need to generate a new filter result set and save it again in the same PET.
Note: You cannot save the result set of a Program filter.
To save the filter result set
- Create and save your filter, or open an existing filter.
- Click Result Set.
The Specify Profile Extension Table dialog opens.
- In the Name field, type a unique name for the PET in which to save the filter result set.
- Select a folder for the PET from the Folder list.
- To remove duplicate records with the same email address from the result set, select the De-dupe records with same email address checkbox.
If you select this option, the PET uses the oldest record.
- Click Save.
- Click OK to close the notification message.
While the result set is being generated, you can check the Load History of the PET to see the generation progress.
To save a filter result set:
- Click Data on the side navigation bar, and select Profile Lists. (Not seeing this choice? Refer to the Side navigation bar changes topic.)
- Open the filter you want to work with.
- Click Result Set.
The Specify Profile Extension Table dialog opens.
- Type a unique name and select a folder for the PET.
- To remove duplicate records with the same email address from the result set, select the De-dupe records with same email address checkbox.
If you select this option, the PET uses the oldest record.
- Save your result set.
While the result set is generated, you can check the Load History of the PET to see the generation progress. After the filter query is successfully completed, the result set is saved in the PET with the load status Done. The Rows Added field shows the number of RIIDs saved in the PET.
To check progress of result set generation:
- Navigate to the folder that contains the PET.
- Click
 next to the PET name and select View History.
The Load History page opens, displaying all loads for the selected PET.
- Click the name of the load you want.
The name of the load is the same as the filter name.
Details of the load are displayed in the right pane. The Load Status line shows the status of the filter result set generation.
Viewing filter counts
You can get filter counts to estimate how many recipients will result from a particular filter. This helps you design filters that generate the right-sized audience for your campaign.
In classic Filter Designer, Get count gets an actual count based on the entire list.
-
You can run only one Get count at a time for your Oracle Responsys account.
-
Actual count reflects the count at the time you perform Get count and is not automatically refreshed. You can run Get count again to refresh the count.
-
If the actual count query does not finish during your session, you can see it the next time you open the Profile Lists page.
-
The calculation does not account for any exclusions you have specified for a campaign.
To get a filter count:
- With your filter open in Filter Designer, save your filter.
- Click Get Count.
After you click Get count for the first time, the actual count and last count date are added to bottom of the Filter Designer page. The count also displays on the Filters tab of the Profile Lists page and on the Manage Filters page when you expand the details for the filter.