New Filter Designer user interface - Creating filters
Important: This feature is available only if the Audience Designer is enabled for your account. If you have an account without Audience Designer and would like this feature enabled, please log in to My Oracle Support and create a service request. When Audience Designer is enabled for an account, existing classic filters can still be run, edited, and saved as another classic filter, but new classic filter cannot be created in the Filter Designer.
Note: If the Audience Designer is not enabled for your account, see Classic Filters for information about filters.
The new Filter Designer user interface provides an updated interface for creating and editing your simple filters.
You create a filter by building rules. Rules are composed of attributes and conditions. For example, a rule could filter for customers who opened a campaign (attribute) within the past 7 days (condition).
The rules are applied at the time the filter is evaluated. This means that the most current records are always selected as your list evolves through changes.
In this topic, you will learn more about:
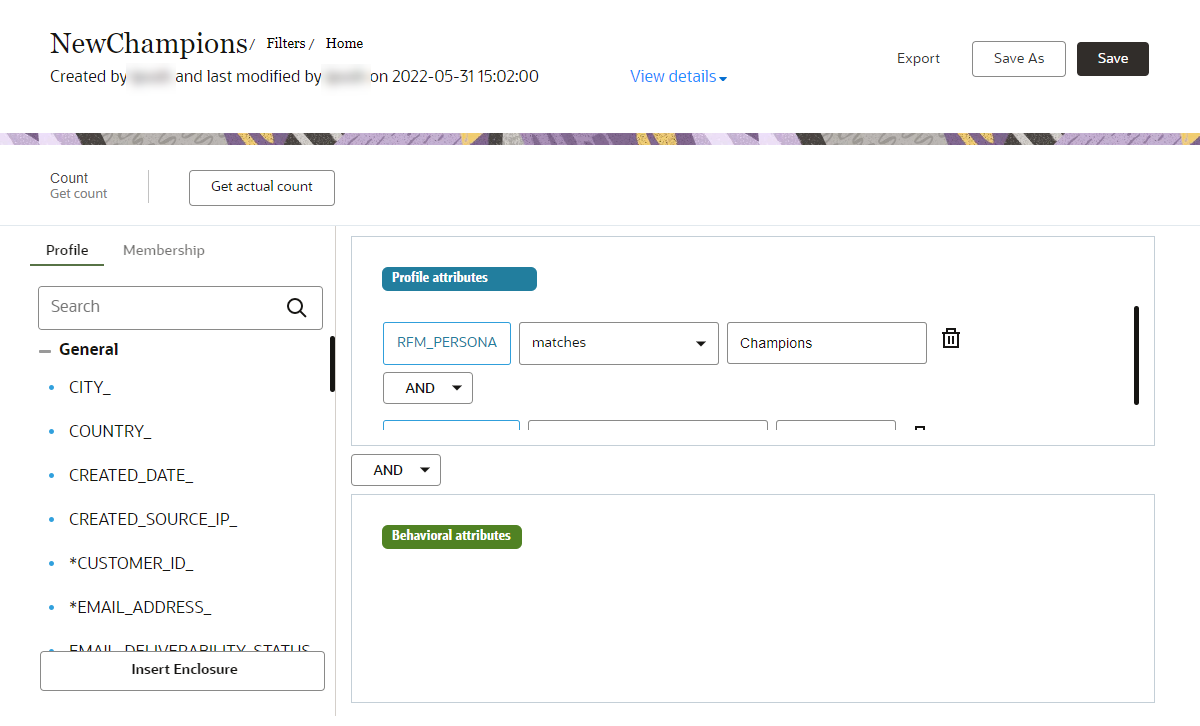
Creating simple filters
To create a filter:
- Click
 Audiences on the side navigation bar, and select Filters. (Not seeing this choice? Refer to the Side navigation bar changes topic.)
 - Click Create Filter and select your Profile List.
- If your account is enabled for App Channel List or Web Push Channel List, select your List Type.
Important: App Channel List Filter is available only if Mobile App is enabled for your account, and Web Push Filters are available only if Web Push is enabled for your account.
- Select the Filter Type you want to create. For descriptions of all attributes, see Filter Attributes.
Profile data
Includes profile and table membership attributes.By default, profile data filters can include up to 8 conditions, and behavioral filters can include up to 5 conditions.
Note: Accounts enabled with Audience Designer prior to 19C may need to log in to My Oracle Support and create a service request.
To request to change the default values, log in to My Oracle Support and create a service request. For App Channel profile filters, you can also access App Channel profile attributes. Additionally, for Web Push Channel List filters, you can access Web Push profile attributes.
Email behavior
Includes interaction and recency attributes for the email channel.Form behavior
Includes viewed form and submitted form attributes.Web behavior
Includes attributes for Omniture recency remarketing events.SMS behavior
Includes interaction and recency attributes for the SMS channel.Important: Available only if Oracle Responsys SMS is enabled for your account.
Web Push behavior
Includes interaction and recency attributes for the Web Push channel.Important: Available only if Web Push is enabled for your account.
Push behavior
Includes interaction and recency attributes for the Push channel. Available only for App Channel List filters.Display behavior
Includes the Last cookie refresh date attribute.Others
Includes Program and import attributes. - Drag attributes to the canvas and specify conditions for each attribute. Learn some tips below.
Tip: Indexed fields are indicated with an asterisk.
- Use enclosures to group rules together. When you delete an enclosure, all rules within it are deleted as well.
- To change operators, comparisons, and values, click the item you want to change and select the value you want.
- To avoid sending duplicate messages to known users who have registered from multiple devices, select the Remove duplicates from filter result checkbox. This option is only applicable to App Channel List filters and Web Push Channel List filters.
- Click Save, and give your filter a name, choose a folder, and give your filter a description.
The filter description appears in the Audience Designer canvas. Add a meaningful description so that you can easily identify the filter later.
- Click Save .
- Click Get actual count to estimate how many recipients will result from a particular filter. Learn more about filter counts.
You can now use the filter. For more information about using filters with the Audience Designer, see Audiences.
Tips for creating filter conditions
When specifying filter conditions, keep in mind the following:
- Each Profile Data filter can have up to 8 conditions.
Note: Accounts enabled with Audience Designer prior to 19C may need to log in to My Oracle Support and create a service request.
- Each Behavioral filter can have up to 5 conditions.
Note: Accounts enabled with Audience Designer prior to 19C may need to log in to My Oracle Support and create a service request.
- The "does not contain" condition applies only to records that contain a value, not for records with a null value. This means that your result set will include records that contain any value except the specified one, but not records with no values. For example, the rule “State does not contain California" will include records in New York, Pennsylvania, and Texas, but not records in California nor ones that contain no value. To include empty records as well, add OR "State" - "is null” to the rule.
- The “Between” condition includes the first and last dates of the defined date range.
Note: SQL queries using the BETWEEN condition do not include the final day in a date range. To ensure consistency, add a + 1 to the SQL end date.
- The available time frames depend on which campaigns you select. For example, if you select Any campaigns, you can filter for Anytime. However, if you select any other option, you can filter for Anytime within the last 180 days instead of Anytime. When you select any option except Any campaigns, the dates or time ranges you specify must fall within 180 days.
- For the Is Before or Equal To time frame, the default value is 30 days.
- Filtering by day/weeks is based on dynamic content rules. These are configured in the following way:
- For Profile Attributes date fields only:
- Is before or equal to a date in the future: [data source] [is before or equal to] [x] [days/weeks] [in the future]
 Example: If the current date is June 15, then the CREATED_DATE_ will happen sometime before or on June 20, but after June 15.
- Is after or equal to a date in the future: [data source] [is after or equal to] [x] [days/weeks] [in the future]
 Example: If the current date is June 15, then the CREATED_DATE_ will happen sometime on or after June 20.
- For both Profile Attributes and Behavioral Attributes:
- Is before or equal to a date in the past: [data source] [is before or equal to] [x] [days/weeks] [in the past]
 Example: If the current date is June 15, then the CREATED_DATE_ happened sometime before or on June 10.
Note: For behavioral filters, In the past will be displayed but greyed out.
- Is after or equal to a date in the past: [data source] [is after or equal to] [x] [days/weeks] [in the past]
 Example: If the current date is June 15, then the CREATED_DATE_ happened sometime on June 10 or sometime between June 10 and June 15.
- For Profile Attributes date fields only:


When using the Campaign Categorized condition in a filter, you can select multiple values for marketing Strategy and marketing Program. Note that by default, the "Any" option will be selected for both Program and Strategy, and it remains selected if you select other values in the drop-down list. You must deselect the "Any" option if it is not needed for your filter criteria.
Working with Filters
Saving a filter's result set
You can save the result of a filter query as a set of RIIDs in a Profile Extension Table (PET). The resulting PET is completely independent of the filter, but is associated with the same profile list. This means that to refresh the RIIDs after you save the filter result set, you need to generate a new filter result set and save it again in the same PET.
To save a filter result set:
-
Click
Audiences on the side navigation bar, and select Filters. (Not seeing this choice? Refer to the Side navigation bar changes topic.) - Open the filter you want to work with.
- Click Export.
The Export to Profile Extension Table dialog opens.
- Type a unique name and select a folder for the PET.
- To remove duplicate records with the same email address from the result set, select the De-dupe records with same email address checkbox.
If you select this option, the PET uses the oldest record.
- Click Save.
While the result set is generated, you can check the Load History of the PET to see the generation progress. After the filter query is successfully completed, the result set is saved in the PET with the load status Done. The Rows Added field shows the number of RIIDs saved in the PET.
To check progress of result set generation:
- Navigate to the folder that contains the PET.
- Click
 next to the PET name and select View History.
The Load History page opens, displaying all loads for the selected PET.
- Click the name of the load you want.
The name of the load is the same as the filter name.
Details of the load are displayed in the right pane. The Load Status line shows the status of the filter result set generation.
Viewing filter counts
You can get filter counts to estimate how many recipients will result from a particular filter. This helps you design filters that generate the right-sized audience for your campaign.
In new Filter Designer, Get actual count gets an actual count based on the entire list.
-
You can run only one Get actual count at a time for your Oracle Responsys account.
-
Actual count reflects the count at the time you perform Get actual count and is not automatically refreshed. You can run Get actual count again to refresh the count.
-
If the actual count query does not finish during your session, you can see it the next time you open the Profile Lists page.
-
The calculation does not account for any exclusions you have specified for a campaign.
To get a filter count:
- With your filter open in Filter Designer, save your filter.
-
Click Get actual count.
After you click Get actual count for the first time, the Get count label changes to the actual count, and the last count date is displayed.

The count also displays on the Filters tab of the Profile Lists page and on the Manage Filters page when you expand the details for the filter.