Message Center - Designing a Campaign
Note: The Message Center Campaign Workbook now has an updated interface and is now called the Message Center Campaign Designer. Campaign Designer is now enabled for all accounts, and it replaces Campaign Workbook for this channel. Unlike the Campaign Designer, there were no major changes made to the Message Designer's interface.
Use the Message Center Designer to create the message and select the app channel for the campaign. For an explanation of the components in the Message Center Designer, see Message Center Designer Overview.
Tasks:
- Configuring your message
- Enabling link tracking and external tracking
- Reviewing additional guidelines for Mobile App campaigns that use rich HTML content
Configuring your message
To change the app used by your campaign:
- Beside App name, click
 .
.A warning dialog opens.
- Click OK on the warning dialog.
The Mobile App Messaging dialog opens.
- Select a mobile app from the drop-down list.
Important: Changing the app might result in campaign errors.
- Click Save.
To insert a personalization token with the new user interface:
Note: If your account has the classic personalization token user interface, learn how to configure your token with the classic user interface.
Important: The new personalization token user interface simplifies the user experience for marketers.
A personalization token is the selection of a column whose value should be dynamically inserted in the message with the subscriber’s unique values. For example, a subscriber's first name, last name, membership status, customer number, or any value that was designed for the account’s profile list.
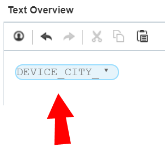
- Click
 in the Text Overview text box ribbon.
The personalization side panel displays.

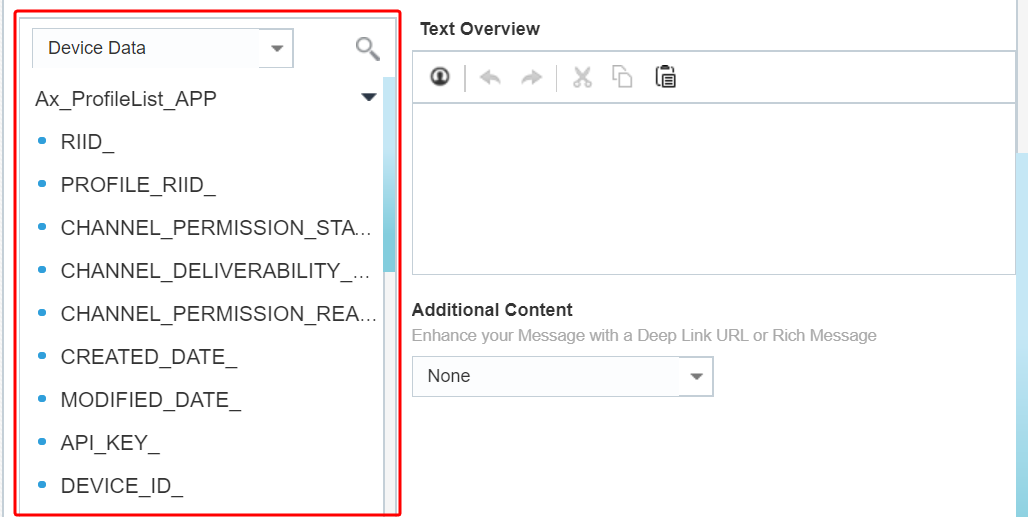
- Drag and drop or double click a column to the right to use it for personalization. Additionally, you can use
 to search for columns.
 - Optionally, click on the token to select from Styling Options.
To insert a personalization token with the classic user interface:
Note: If your account has the classic personalization token user interface, learn how to configure your token with the classic user interface.
A personalization token is the selection of a column whose value should be dynamically inserted in the message with the subscriber’s unique values. For example, a subscriber's first name, last name, membership status, customer number, or any value that was designed for the account’s profile list. Data from columns in a PET, supplemental table, segment group, or dynamic variable can be used for a personalization token as well.
- Click in the Text Overview text box ribbon.
- Drag and drop a column to the right to use it for personalization.
- Optionally, select the token's Style from the drop-down list.
- Click OK.
The personalization token now displays under Text Overview.
To include a deep link URL:
Deep linking allows you to use a URL to point to very specific points in your mobile app or in a web site, as opposed to the main screen/page.
- Select Deep Link URL from the Additional Content drop-down list.
- Enter your URL in the field.
- Click Save.
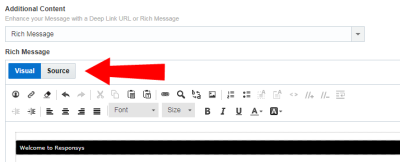
To include a rich message:
- Select Rich Message from the Additional Content drop-down list.
- Add content by either opening the content library, entering your content URL, or dragging and dropping your files onto the page.
- Optionally, you can edit your rich message with the Visual editor or the Source editor.

To preview the message:
- Click
 at the top of the page.
Your message will be saved, and a preview of the message as it will be seen by recipients is displayed.
To see errors in the Message Center Designer:
- Click Show errors at the top of the page.
Note: You need to save your message before this button will display.
- Click on an error to fix it.
To increment, specify a value for, or clear the badge count on the app icon:
App icon badges provide a visual queue to mobile app users that messages in the app are unread. A badge count drives end users to open the app to discover the fresh content indicated by the badge count.
Important: Before implementing this feature, apps must implement logic to clear the badge count on the app icon. See the Mobile App Configuration Guide for instructions.
- Click Settings at the top of the page.
- Click the App Icon Badge drop-down list and select one of the following actions:
- No Badging: Campaign will not modify the badge count on the mobile app icon.
- Increment Badge on App Icon: Every time this message is sent to the Message Center on the user's device, the badge count on the app icon will increase by 1.
Important: The following options are available only if they are enabled for your account. To enable them, go to My Oracle Support and create a service request (SR) to have the "App Icon Badging for Message Center" feature enabled.
- Specify Badge on App Icon: Every time this message is sent to the Message Center on the user's device, the badge count on the app icon will change by the amount you specify.
When you choose this option, you'll be prompted to enter a Badge Count. You can use either a single value for all recipients (positive integer), or you can personalize the badge count using RPL. For example, you can use RPL to get the personalized badge count of each individual recipient's offers, promotions, coupons, and the like within the mobile app, and then show that value as the badge count on the app icon.

- Clear Badge on App Icon: Every time this message is sent to the Message Center on the user's device, the badge count on the app icon will be cleared.
Important: Before implementing badge counts, apps must implement logic to clear the badge count on the app icon. See the Mobile App Configuration Guide for instructions.
- Click OK.

Enabling Link Tracking
Link tracking gives you the ability to track recipient clicks for the campaign. For more information, see Understanding Link Tables.
When you set up link tracking, you can either use an existing link table or automatically generate a link table.
Before you begin:
- The Account Administrator must enable automatic link table generation. Learn more about enabling this option.
- For Mobile App campaigns, the campaign must include Rich Message (HTML) content.
- In-app campaigns contain Rich Message content by default.
- For Push campaigns, you must select Notification Action: Open Rich Message.
To enable link tracking in a campaign:
- With the message open in the campaign's Message Designer, click Link Tracking.
For Push campaigns, you must select the option to include Rich Message content in your message. This causes the Link Tracking button to be displayed on the Message Designer page.
- Make sure that the Track links setting is On.
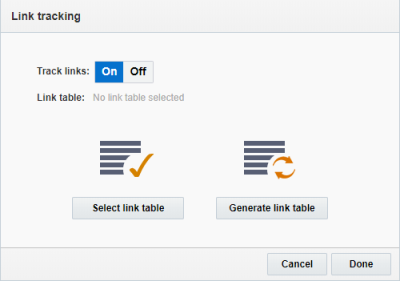
- Choose an option:
- If you want to use an existing Link Table, click Select link table and locate the link table you want to use.
- If you want to generate a new Link Table, click Generate link table. Oracle Responsys generates a link table based on the links in the HTML content.
After you select or generate the link table, you can manage the link table from the campaign Message Designer. You can replace the Link Table, edit the links, or update existing Link Table.
![]()
Enabling External Tracking
External tracking automatically appends tracking parameters to link URLs. You can enable external tracking if you use a third-party web analytics service.
Before you begin:
Before you can enable external tracking, the Account Administrator must define external tracking parameters. Learn more about these account settings.
To enable external tracking
- In the campaign Message Designer, click Link Tracking.
- Select External Tracking.
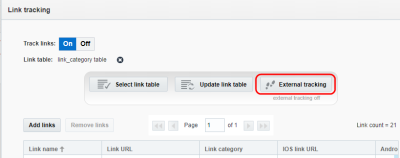
- Click On.
- In the list of available parameters, select the parameters you want to include and select or specify the values for each parameter.
The required parameters are selected by default and cannot be omitted.
- Click Done.
After you enable external tracking, use the External tracking column in the link table to manage the external tracking settings for individual links.
Additional guidelines for Mobile App campaigns that use rich HTML content
If you have designed a Mobile App campaign that uses rich HTML content, and that campaign is either being sent to a Message Center or is an In-app campaign created with the In-app Redesign setting turned on for your account, you must consider the following:
- Personalization limitations: For compatibility with future releases, we recommend that you limit the number of personalization tokens in your rich HTML content campaign messages. Oracle Responsys supports five or fewer average length personalization token-value pairs (25 characters long each).
- Dynamic Content Regions incompatible: The system does not allow use of Dynamic Content Regions (DCR) in campaigns that meet the conditions described above. Dynamic Content Region (DCR) usage for such campaigns will be disabled in a future update. When this takes effect, any launches you have scheduled for such campaigns will not work. If you do launch any campaigns with Dynamic Content Region (DCR), such campaigns will be disabled / “Closed” by Oracle.
- Editing a launched campaign: Editing or deleting a campaign that has already been launched to your mobile app's end users may cause recipients to see the modified content and not the original content. Instead, if campaign changes are required, create and launch a new campaign.
- SDK Versions: (For accounts with the In-app Redesign feature enabled when they create and launch an In-app campaign.) Messages greater than 3.5 KB will be skipped for recipients who have not upgraded their mobile app to a version using Responsys Mobile App SDK version 6.39.0 or greater. You can add a filter (SDK_VERSION_ is greater than or equal to 6.39.0) to send only to users who have upgraded their mobile app.
Next steps
To schedule the campaign launch, use the campaign designer.
- To activate the campaign, add it to a program orchestration using the Send message center campaign activity and publish the program.
Message Center - Creating a Campaign
Message Center - Designing a Campaign