Getting started with Program
This topic guides you through creating a simple program. The program is meant to illustrate the capabilities of Program, and might not represent your messaging strategies.
Note: Before continuing, we recommend that you read Understanding Program.
Before you begin
Every program requires at least one campaign and a list. To help you start designing the sample program quickly, we created the prerequisite campaigns for this sample program. Before designing the program, you need to import those campaigns and create a list. In addition, you need to create a filter that the program will use.
For more information about campaigns, see Understanding campaigns. For more information about lists, see Understanding list & data sources. For more information about filters, see Simple Filters.
About the sample program
When a customer joins your list, the Customer activated event is triggered when the program receives the activation notification from a form or during data import. Then, the program does the following:
- Sends the welcome message to each customer right away.
- Sends no further emails to customers who open the welcome email within seven days of receiving it.
- Sends a follow-up email to everyone else.
Importing campaigns for the sample program
To import campaigns:
- Download ProgramSampleFolder.zip to your computer.
- Click
 Folders on the side navigation bar.
 - Click Import.
- Click Browse and select ProgramSampleFolder.zip from your computer.
- Responsys creates a folder called ProgramSampleFolder and fills it with the prerequisite campaigns.
Creating a list and a filter
To create a list:
- Click
 Data on the side navigation bar, and select Profile Lists. (Not seeing this choice? Refer to the Side navigation bar changes topic.)
The Profile Lists page opens.
- Click Create New List.
- In the Name field, type ProgramSampleList.
- To assign the list to folder, select ProgramSampleFolder from the Folder drop-down list.
- Click Save, then Done, and close the dialog.
- Add records to the list:
- On the Profile Lists page, click the down arrow next to List Information.
- Click View Records.
- Click New Record.
- Create at least three records with your choice of details; however, the email address should always be your own email address so that you receive emails.
To create a filter:
Note: These instructions are for creating a simple filter, which requires that Audience Designer is enabled for your account. If your account does not have Audience Designer, see Designing Classic Filters.
- On the Profile Lists page, click Create Filter > Email behavior. If your account has App Channel List or Web Push Channel List enabled, then you'll click Create Filter > Create List Filter > Email behavior.
Tip: Alternatively, you can navigate to Audiences > Filters and click Create Filter and use the Filters management page to create a filter.
- Drag Opened from the Email Interaction palette onto the Behavioral attributes section of the canvas.
The condition is added to the canvas.
- Click Have and select Have Not.
- Click Any Campaigns and select Campaign...
The Select Campaign dialog opens.
- Click the ProgramSampleFolder folder, select ProgramSampleWelcomeCampaign and click Select.
- Next to the Days field, ensure that Is before or equal to is selected.
- Type 7 in the Days field.
- Click Save.
The Save dialog opens.
- In the Name field, type ProgramSampleWelcomeFilter, select ProgramSampleFolder from the Folder drop-down list, and click Save.
The filter is created.
- Close the Filter Designer.
Creating the sample program
To create the program and select settings:
- Click
 on the side navigation bar, then click Create Program. (Not seeing this choice? Refer to the Side navigation bar changes topic.)
The Create Program dialog opens.
- In the Title field, type SampleProgram.
- Select ProgramSampleFolder from the Folder drop-down list.
- Select ProgramSampleList from the List drop-down list.
- In the Description fields, type This is a sample program.
- Click Create.
The program is created, the Create Program dialog closes, and a blank canvas opens.
- Click Settings.
- In the Lifecycle Options section, type the email addresses to receive notifications about this program.
Separate multiple addresses by commas or semicolons.
- Click OK.
To design the program:
To design a program, you drag elements from the palette of the Program Designer onto the canvas as described below. Then, you set properties for each element, for example specify which campaign to send.
Tip: To see the name of each element, point at the element. To see names of all elements, click  .
.
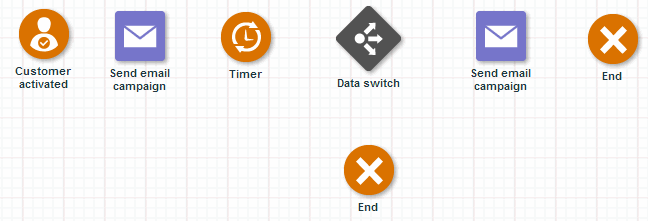
Place the elements on the canvas in the order and locations described below:
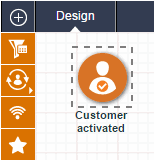
- Point at
 then drag a Customer activated event to the canvas.
This event triggers the program.
- Drag a Send email campaign activity to the canvas.

This activity sends the welcome message when the program receives the activation notification.
- Create an elapsed timer:
- Drag the Timer event to the canvas.

- Right-click the timer and select Properties.
- Select Elapsed timer from the Select Timer drop-down list.
This timer instructs the program to wait seven days before taking any other action.
- Drag the Timer event to the canvas.
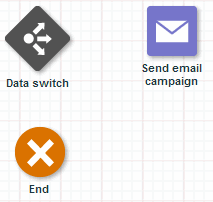
- Drag a Data switch to the canvas.

This switch selects the customers who opened the welcome message.
- Drag an End event to the canvas.

This event ends the program for customers who opened the welcome message.
- Drag a Send email campaign activity to the canvas.

This activity sends the follow-up message to customers who did not open the welcome message.
- Drag an End event to the canvas.

This event ends the program after sending the follow-up message.
- Click Save.
Your program should look like the following illustration.

Configuring the sample program
To set properties for the Customer activated event:
- Right-click Customer activated and select Properties.
- In the Stage label field, type Customer Opts In.
- In the Description field, type Customer created account on web site.
- Ensure that Email is selected in the Listen for channel activation drop-down list.
- Keep the default setting of Create a new entry in the program.
- Click Done.
To set the properties for the first Send email campaign activity:
- Right-click the first Send Email Campaign and select Properties.
- In the Stage Label field, type Welcome Campaign.
- In the Description field, type Send Welcome message to new customers.
- Click Select to select a campaign.
The Select campaign dialog opens.
- Select the ProgramSampleFolder from the Folder drop-down list, select ProgramSampleWelcomeCampaign from the Campaign drop-down list, and click OK.
- Click Done.
To set properties for the Elapsed timer:
- Right-click Elapsed timer and select Properties.
- In the Stage Label field, type Wait 7 Days.
- In the Description field, type Wait a week before contacting customers who didn’t respond to the Welcome email.
- In Wait Period, type 7 days.
- Click Done.
To set properties for the second Send email campaign activity:
- Right-click Send email campaign and select Properties.
- In the Stage Label field, type Follow-up Campaign.
- In the Description field, type Send follow-up campaign to customers who didn’t open the Welcome email.
- Click Select to select a campaign.
The Select campaign dialog opens.
- Select the ProgramSampleFolder from the Folder drop-down list, select ProgramSampleFollowUpCampaign from the Campaign drop-down list, and click OK.
- Click Done.
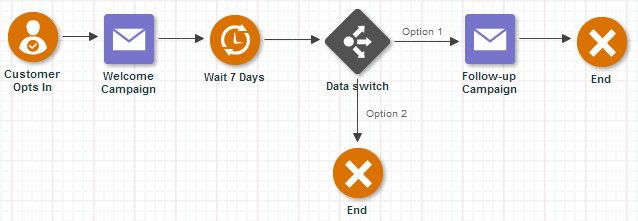
To create paths between the elements:
- Hover the cursor over Customer Opts In, grab the small square that appears on the right side of the icon and drag the line to the Welcome Campaign activity.
- Using the same method, draw a line between:
- Welcome Campaign and Wait 7 Days.
- Wait 7 Days and Data switch.
- Data switch and Follow-up Campaign.
- Data Switch and End under the switch.
- Follow-up Campaign and End at the right of Follow-up Campaign.
- Click Save.
Your program should look like the following illustration.

To set the Data switch properties:
You must define all send campaign activities and draw all paths before setting the properties of the Data switch.
- Right-click the Data switch and select Properties.
- In the Stage label field, type Follow-up.
- In the Description field, type Send follow-up email to non-active customers. End program for active customers.
- Select Filter conditions are matched from the If drop-down list.
- Select ProgramSampleFolder from the Folder drop-down list, select ProgramSampleWelcomeFilter from the Filter drop-down list, and click OK.
- In the then field, type Follow-up.
- In the Else field, type End.
- Click Done.
Validating and publishing the program
To validate and publish a program:
- To check the program for errors, click Validate.
The right pane on the canvas shows the validation results. If any errors exist, this section describes the error and provides instructions for fixing the error. The stages(s) with errors are highlighted on the canvas.
- When the program is error-free, select the Publish tab and click Publish.
A confirmation message opens.
- Click Yes.
The program is published and a confirmation message opens.
- Click OK to close the message.
- To track program progress, select the Analyze tab.
For detailed information about publishing programs, see Publishing Programs.
To unpublish a program:
When you unpublish a program, participants will be held at each stage indefinitely.
- Select the Analyze tab.
- Click Unpublish.
A confirmation message opens.
- Click Yes.
The program is unpublished and a confirmation message opens.
- Click OK to close the confirmation message.
Analyzing the program
After your program is published, you can use the Analyze tab to monitor it. The Analyze tab provides two views, Snapshot and Monitor.
About the Snapshot view
The Snapshot view shows the state of each stage within a selected timeframe. This view shows the following statistics:
- Current number of participating customers in each stage.
- Number of customers passing/failing through each stage.
- Current totals for unsubscribed and undeliverable items for the entire program.
- On-going total for number of participating customers terminated from continued program processing.
You can select a timeframe using the drop-down menus on the right side of the page.
About the Monitor view
The Monitor view shows how the audience flows through the program.
For more details about analyzing programs, see Analyzing Programs.
- Understanding Program
- Designing Programs
- Testing Programs
- Publishing Programs
- Analyzing Programs
- Understanding Performance Switches
- Understanding Program Entries
- Program Best Practices