Mapping SuiteProjects Pro Users and Exchange User Mailboxes
After you have entered the necessary information to connect Exchange Integration Manager with your SuiteProjects Pro account, Active Directory or Microsoft Entra ID (formerly Azure Active Directory), and Exchange Server or Online, you can map SuiteProjects Pro employee (user) records with the corresponding Exchange user mailboxes.
To map SuiteProjects Pro users and Microsoft Exchange users manually:
-
In SuiteProjects Pro Exchange Integration Setup, click File > Update.
If user mailboxes are stored in on-premise Exchange Server organizations and you checked the Use EWS Autodiscovery box on the Integration Settings form, a dialog appears.
-
To retrieve only the missing Exchange user mailboxes, click Yes.
-
To retrieve all Exchange user mailboxes, click No.
Note:By default, Exchange Integration Manager fetches all Exchange user mailboxes when using the Autodiscover service to retrieve the correct EWS endpoint for each user. This can take a long time depending on the number of users. To save time, you can perform an incremental update and fetch only the missing Exchange user mailboxes. For more information about EWS endpoint autodiscovery, see Connecting Exchange Integration Manager with On-Premise Exchange Server.
You can add and remove Exchange user mailboxes manually or import them from a CSV file at any time. See Editing Exchange User Mailbox Information.
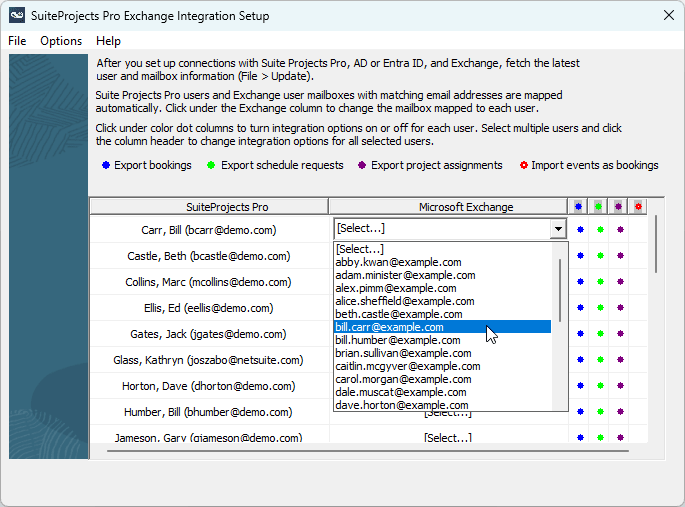
The Exchange Integration Setup window lists SuiteProjects Pro users and Exchange user mailboxes in the mapping table. Exchange Integration Setup maps SuiteProjects Pro employee (user) records and Exchange user mailboxes with a matching email address automatically. The mapping table shows
[Select ...]under the Microsoft Exchange column when there are no user mailboxes matching the email address on the SuiteProjects Pro employee (user) record. -
-
Map SuiteProjects Pro employee (user) records and Exchange user mailboxes that do not have a matching email address manually. Repeat the following steps for each row showing
[Select ...]under the Microsoft Exchange column:-
Click [Select ...].
-
Select the user mailbox for the SuiteProjects Pro user. The mapping table shows the name and email address recorded on the SuiteProjects Pro employee (user) record under the SuiteProjects Pro column.
-
-
For each SuiteProjects Pro user – Exchange user mailbox pair, select which types of SuiteProjects Pro transactions you want to export. If you have enabled the synchronization of SuiteProjects Pro bookings and Exchange calendar events (bidirectional integration), choose whether to synchronize SuiteProjects Pro bookings and Exchange calendar events for each user. Each export or synchronization feature is represented by a different color dot in the mapping table
-
A blue color dot
 indicates that SuiteProjects Pro bookings for this user are exported to the Exchange user mailbox as calendar events.
 -
A green color dot
 indicates that SuiteProjects Pro time off requests (schedule requests) for this user are exported to the Exchange user mailbox as calendar events.
 -
A purple color dot
 indicates that SuiteProjects Pro task assignments for this user are exported to the Exchange user mailbox as calendar events.
 -
A red color dot
 indicates that calendar events in the Exchange user mailbox are imported into SuiteProjects Pro as bookings for this user if the synchronization of SuiteProjects Pro bookings and Exchange calendar events (bidirectional integration) is enabled.
Click under the color dot columns turn each integration option on or off for each user.
Tip:Select multiple rows and click the column header to change the integration option for all selected users at the same time.
For more information about the bidirectional integration, see Configuring the Synchronization of SuiteProjects Pro Bookings and Exchange Calendar Events.
-
-
Click File > Save.