POs (Vendor Credits) Import Workflow
The POs (Vendor Credits) import workflow lets you:
-
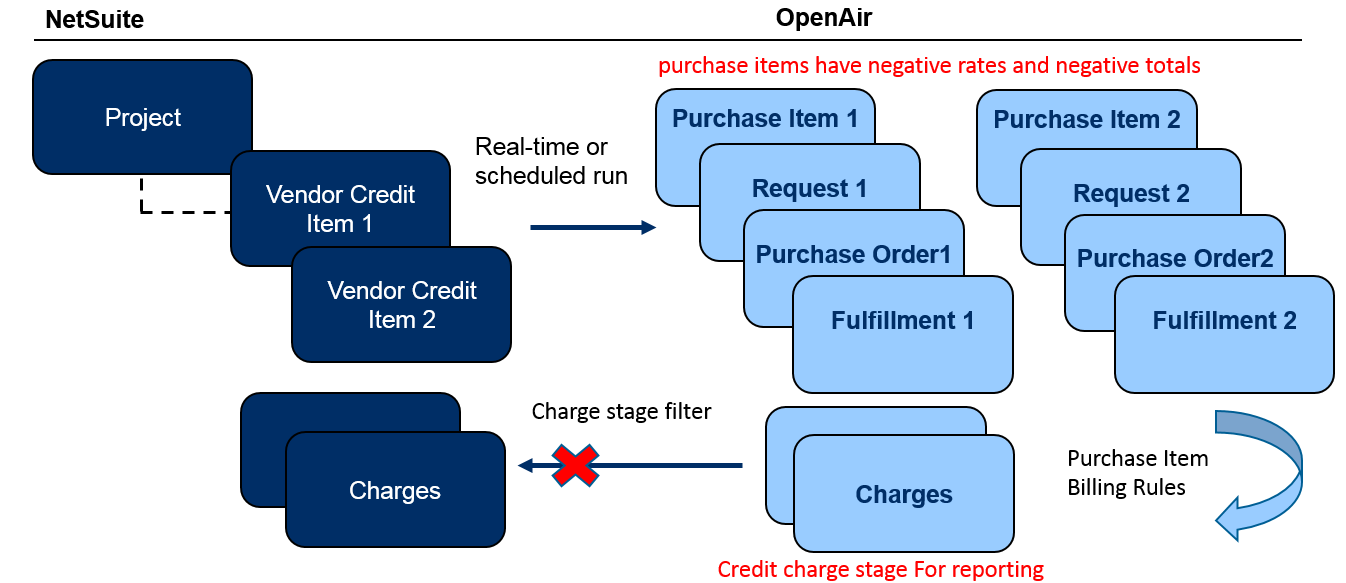
Create new vendor credit records in NetSuite first and then import them into SuiteProjects Pro as purchase order. NetSuite vendor credit details are imported as negative purchase items.
-
Update vendor credit records in NetSuite and use the NetSuite <> SuiteProjects Pro integration to update the corresponding purchase order record in SuiteProjects Pro.
When importing a vendor credit into SuiteProjects Pro as purchase order, the following records are created in SuiteProjects Pro:
-
Purchase order - A single purchase order is created or updated in SuiteProjects Pro to match the NetSuite vendor credit.
-
Purchase items - Each vendor credit line item marked for export on the NetSuite vendor credit imports into a purchase item with a negative Price and negative Total.
-
Purchase requests -A purchase request record is created for each vendor credit line item marked for export on the NetSuite vendor credit. This is because in SuiteProjects Pro, purchase request and request item in SuiteProjects Pro must be associated to a single project, whereas in NetSuite, vendor credits can reference multiple projects.
-
Request items - Each purchase request includes one request item.
-
Fulfillments - A fulfillment record is created for each purchase item.
You can import purchase orders or vendor bills from NetSuite into SuiteProjects Pro as purchase orders. The POs (Vendor Bills) and POs (Purchase Orders) import workflows are mutually exclusive. See POs (Purchase Orders) Import Workflow and POs (Vendor Bills) Import Workflow.
Changes made to purchase order records in SuiteProjects Pro after the initial import are not exported back to NetSuite.
For information about vendor credits in NetSuite, see Vendor Credits (External link to NetSuite SuiteAnswers | Answer ID 11165).
For information about field mapping definitions for this workflow, see POs (Vendor Credits) Import Field Mapping Definition.
Requirements and Downstream Dependencies
The following workflows must also be enabled:
Matching project records must exist in both NetSuite and SuiteProjects Pro before you can import vendor credits from NetSuite into SuiteProjects Pro as purchase orders.
Matching vendor records must exist in both NetSuite and SuiteProjects Pro before you can import vendor credits from NetSuite into SuiteProjects Pro as purchase orders.
After you import vendor credits from NetSuite into SuiteProjects Pro as purchase orders, you can use project billing rules to create negative product charges based on purchase items and fulfillments, add these charges to your invoices in SuiteProjects Pro, and export the invoices to NetSuite, in the same way as with vendor bills imported as purchase orders. See POs (Vendor Bills) Import Workflow.
When importing vendor credits associated with a specific project, you can create a project billing rule to exclude negative charges associated with purchase items imported from vendor credits from invoicing. This also stops negative charges from being exported to NetSuite as part of the Invoices (Invoices) or Send SuiteProjects Pro Credits (Negative Invoices) as NetSuite Credit Memos export workflows. See Excluding Charges Associated with Imported Vendor Credits from Invoicing.
Excluding Charges Associated with Imported Vendor Credits from Invoicing
You can create a project billing rule to exclude negative charges associated with purchase items imported from vendor credits from invoicing. This also stops negative charges from being exported to NetSuite as part of the Invoices (Invoices) or Send SuiteProjects Pro Credits (Negative Invoices) as NetSuite Credit Memos export workflows. This can be useful if you do not want to include the negative charges as a discount on invoices or on a credit memo to customers, but want to report on negative charges from vendor credits.
To exclude charges associated with imported vendor credits from invoicing
-
Go to Projects > Projects > [select a project associated with vendor credits]
-
Click the Create button then Purchase item billing rule under Billing rule.
The Purchase item billing rule form appears
-
Click Create next to POs From NetSuite vendor credit under the Billing rule filters form section.
The from NetSuite vendor credit filter form appears.
-
Select Yes.
-
Click OK to save the filter and return to the Purchase item billing rule form.
-
Select a Charge stage under the Other form section. Make sure the Exclude charge from invoicing box is checked on the charge stage record you select.
Note:To review the charge stages, go to Administration > Application Settings > Invoices > Charge Stages.
-
Set the Billing rule position to [First billing rule].
Important:Placing the billing rule before other purchase item billing rule ensures that the purchase items are not processed by other billing rules and that the associated purchase charges are excluded from invoicing. Billing rules run in the order specified by the Billing rule position. Purchase item billing rules can only process purchase items that have not already been processed by other billing rules ahead in the running order.
-
Click Save.
Supported Features
|
Workflow Settings |
Filters |
Advanced Mapping |
Real-Time |
SuiteProjects Pro Within NetSuite |
Monitored Fields |
|---|---|---|---|---|---|
|
|
|
|
|
|
|
-
Run the integration manually, use a scheduled integration run to create or update the SuiteProjects Pro purchase order record after you create or update the vendor credit record in NetSuite. See Running the Bulk Import and Export Integration on Demand and Scheduling the Integration to Run Automatically.
-
Setup the real-time integration to create or update the SuiteProjects Pro purchase order record when the vendor credit form is saved in NetSuite. See Configuring Real-Time Record Import from NetSuite into SuiteProjects Pro.
-
View and edit the SuiteProjects Pro purchase order record from the NetSuite UI using the SuiteProjects Pro Within NetSuite (SuiteProjects Pro NetSuite Single Sign-On Integration) feature. See Enabling Access to SuiteProjects Pro From Within NetSuite.
Setting up the POs (Vendor Credits) Import Workflow
Use the following steps to set up the workflow.
To set up the POs (Vendor Credits) import workflow in NetSuite
-
In NetSuite, do one of the following:
-
Go to Setup > Company > General Preferences (Custom Preferences), if you are using the SuiteScript 1 versions of SuiteProjects Pro SRP Integration (Bundle ID 369637) bundle scripts.
-
Go to Customization > Lists, Records and Fields > Records > [View list for
SuiteProjects Pro: Integration Settings] > [ViewSuiteProjects Pro Integration Settings Record] , if you are using the SuiteScript 2 versions of SuiteProjects Pro SRP Integration (Bundle ID 369637) bundle scripts.
-
-
Check the Vendor Credit to SuiteProjects Pro PO Integration box.
-
Click Save.
-
In NetSuite, go to Setup > Company > Enable Features, and click the Transactions subtab.
-
Check the Advanced Receiving box under the Shipping & Receiving section. The Advanced Receiving feature is required to create purchase item receipts in NetSuite.
-
Click Save.
-
To let employees view projects and items and check the Billable and Export to SuiteProjects Pro boxes for vendor credit line items and vendor credit records, go to Home > Set Preferences and check the Validate SuiteProjects Pro PO/Vendor Bill box on the Custom Preferences tab.
To set up the POs (Vendor Credits) import workflow in SuiteProjects Pro
-
In SuiteProjects Pro, go to Administration > NetSuite Connector.
-
Click the Tips button then NetSuite Connector Administration.
The NetSuite Connector administration form appears.
-
Check the POs (Vendor Credits) box under the Imports section.
-
Click Save then Close.
-
If the purchaser integration is not enabled, designate a purchaser to use when importing vendor credits into SuiteProjects Pro as purchase orders. To do so:
-
Go to Administration > Application Settings > Purchases > Purchasers > [ Select a purchaser].
-
Check the NetSuite Purchase Order Integration purchaser [
netsuite_purchaser] box. -
Click Save.
Note:To create a purchaser, you must create at least one record for each of the following record types in Administration > Application Settings > Purchases > Accounts payable locations, Receiving locations, Carriers, Shipping terms, and F.O.B. locations.
If the purchaser integration is enabled, matching employee records must exist in SuiteProjects Pro and NetSuite for employees creating purchase orders in NetSuite, and purchaser records marked as NetSuite purchaser must exist for these employees in SuiteProjects Pro. For more information about the purchaser integration, see Enable purchaser integration
-
-
Go to Administration > NetSuite Connector > Mapping.
-
Click New workflow then POs (Vendor Credits).
-
Click POs (Vendor Credits) in the list of integration workflows.
-
Modify the field mapping definition table for the Tasks (Project Tasks) import workflow as required. See Mapping SuiteProjects Pro Fields and NetSuite Fields and POs (Vendor Credits) Import Field Mapping Definition.
-
Click the switch next to the workflow name to activate
 or to deactivate
  the workflow.
 -
Click Save.
-
(Optional) Add the POs (Vendor Credits) import workflow to a workflow group and schedule it to run automatically. See Scheduling the Integration to Run Automatically.