Pull a Project from OpenAir in to Microsoft Project
When you pull a project from OpenAir to Microsoft Project, a new project file is created. Do not overwrite an existing project file. When the file in OpenAir is locked, the new file created from the pull procedure is automatically associated with the project it was pulled from in OpenAir. You can make changes to it and push it back to OpenAir. You can also choose to pull only the resources that are assigned to the project.
To pull a project from OpenAir into a new Microsoft Project:
-
Open Microsoft Project software.
-
Click the OpenAir ToolBar , select Account Settings, and enter your OpenAir account information. Refer to Account Settings for more information.
-
Click the OpenAir ToolBar and select Pull from OpenAir.
A blank Microsoft Project file is opened. Retrieving account information window displays and provides status of the operation. Click Details if you do not wish to display operation information.
-
Click Done or select the check box to Close this dialog box when complete and it closes automatically. OpenAir Export Settings window displays. It displays the selection from the previous task or Select if you've just launched Microsoft Project software.

-
Select a project using the drop-down list. These are the projects in your OpenAir account.
Note:If you select a project that is locked in OpenAir and already associated with another Microsoft Project file, the following message displays.
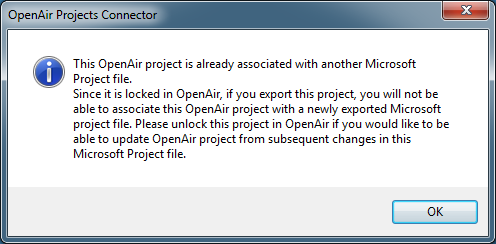
-
Click OK. Your choices are to select another project, Unlock a Project in OpenAir before you pull it, or continue to pull it even though it is locked.
Note:If you unlock it in OpenAir, repeat the procedure. Click the OpenAir ToolBar, select Pull from OpenAir, and select the project you want to pull from OpenAir .
If you do not unlock it first and continue to pull it to Microsoft Project even though it is associated with another Microsoft Project file, you will not be able to lock again and push it back to the same project in OpenAir.
-
Select the check box if you want to Lock this project in OpenAir after exporting to allow re-importing back into OpenAir from Microsoft Project.
-
If you need to alter advanced options, click Advanced and refer to Pull from OpenAir Advanced Options. From this tab, you can set priority levels to be ascending or descending, change the settings for handling the export of timesheet hours, and limit the number of resources pulled to those specifically assigned to the project you are pulling.
-
Click OK.
A prompt displays to give the file you are pulling a filename.
-
Click Yes and type a file name, and click Save. If you originally pushed the project to OpenAir, do not overwrite the original Microsoft Project file name.
Note:NEVER overwrite or save over the original Microsoft Project file! Your data will be corrupted and the file will become unusable. Refer to Frequently Asked Questions for more information. Since you are pulling the project from OpenAir, it will automatically be associated with the Microsoft Project file unless you did not lock the project when you began pulling it. The connector catches this condition and will not allow you to damage your projects in OpenAir.
-
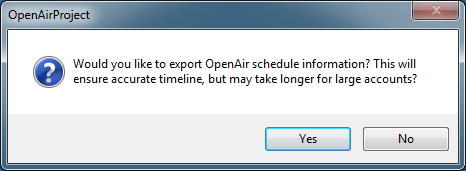
You are prompted to export OpenAir schedule information. This is recommended as it ensures an accurate timeline. Click Yes.
The project is pulled from OpenAir and displays in the Microsoft Project file.