Leave Accrual Rules
Leave accruals rules provide a structure around how time off such as vacation and personal time off, for example, is handled. First, you set up Leave accrual rules to document each type of time off accrual your company recognizes, and then you associate them to individual employees that receive that benefit within the company.
To create a Leave accrual rule:
-
Go to Administration > Application Settings > Timesheets > Leave accrual rules.
-
Select New Leave accrual rule from the Create Button.
The New leave accrual rule form appears.
-
In the Accrual section, select the Period, Hours per period, Accrual timing, and the maximum Cap (hours) for the accrual. Each time the rule is executed, the period is referenced to determine if the hours per period should be added to the accrual amount, which results in a Leave Accrual Transaction to be generated. When the Cap of hours has been reached, the rule does not create any more transactions for that defined period.
-
Next, choose one of the Lose accrued time options. Enter the Grace period (days), Delay loss accrual (days), and Carry over (hours). Check the Apply only to grace period box to only have the carry over hours applied to the grace period, if required.
Note:When the rules are executed, the lose accrued time option is considered, which creates drawn-down transactions to zero the balance of any accrual that are past the deadline for use. For example, if 40 hours remains in the employee's account and the lose accrued time option is December 31, then on January 1 the rule creates a negative 40 hours draw-down transaction to expire the accrued time balance. The Grace period and Delay loss accrual options provide another level of definition related to your time off policy since the lose accrued time options are limited. If your company observes a carryover option, then the rule can be configured with this number of hours (days) for carry over which may also be limited only to those hours (days) carried over into the grace period.
-
For employees that start during a mid-accrual period such as a mid-month hire or mid-year hire, checking the Include partial accruals box lets the rule automatically calculate a prorated amount of accrual based on hire timing.
-
Check the Consider the exact number of days in a month for partial accruals box to base calculations for partial accruals on the exact number of days in any particular month.
-
If this option is selected, the partial transactions and prorated accrual calculation considers the exact number of days in each month (for example 31 days in January, 28 in February).
-
If this option is not selected, the partial and prorated accrual calculation is based on an average 30-day month.
-
This setting requires the Include partial accruals box to be checked.
Important:It is important to set the 'Apply after' date to exclude old transactions. In most cases the date should be set to the day that the option is being activated, so that it doesn't affect anything in the past.
-
-
Check the Create transactions for employees only during dates where they are assigned to the rule box to create closed accrual leave periods.
Closed accrual leave periods can be created to prevent leave accrual transactions from being drawn-down against a closed period.
-
All the accruals/draw-downs will only be created against this leave accrual rule if created during the duration a leave accrual rule is associated with an employee.
-
Transactions created after the rule ends for an employee will be created against the next leave accrual rule its balance transfer progression. If this is the last leave accrual rule in a transfer progression for an employee, the setting is ignored.
Note:If the box is not checked, draw-down transactions can be created against this leave accrual rule during the grace period, instead of against the next applicable accrual leave rule. If the Allow transfer of negative accrual balances is not checked, these draw-down transactions are never transferred to the new accrual leave rule and lost accrued time may be higher than expected in the new accrual leave rule.
Important:It is important to set the 'Apply after' date to exclude old transactions. In most cases the date should be set to the day that the option is being activated, so that it doesn't affect anything in the past.
-
-
Check the Allow transfers of negative leave accrual balances box to enable the transfer of negative balances to the next accrual rule.
Important:It is important to set the 'Apply after' date to exclude old transactions. In most cases the date should be set to the day that the option is being activated, so that it doesn't affect anything in the past.
-
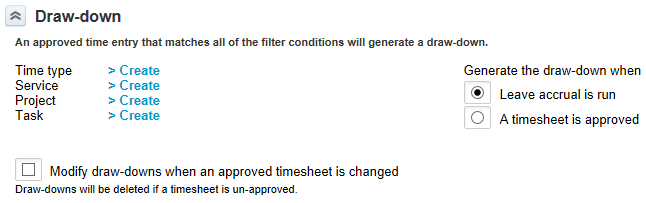
From the Draw-down section, select how entered time is applied against the leave accrual: by Time type, Service, Project, or Task. These items are typically associated with a Time off or PTO project that has been set up within the Projects application. Choose when the draw down is generated, either when the leave accrual is run or when a timesheet is approved.
 Note:
Note:As an account administrator, you can set Leave accrual rules to run on a schedule or run them manually.
-
Check the Modify draw-downs when an approved timesheet is changed box if you want any changes to approved timesheets to be reflected in the draw-downs, or to delete the draw-down if the timesheet is unapproved.
Note:If you select the A timesheet is approved option, draw-down transactions are created immediately upon timesheet approval. As timesheets may be unapproved for corrections, review the Timesheets Settings > Other settings to determine whether the leave accrual transactions will auto-adjust or require manual interaction for corrections based on timesheet changes. See Other Settings.
-
Enter any Notes if required. Check the Exclude inactive employees box to apply the rule only to active employees when running leave accrual.
-
Click Save.
To associate rules to an employee:
-
Go to Administration > Global Settings > Users > Employees. Select an Employee ID.
-
Click on the Leave accrual link. See Leave Accrual.
-
For each applicable rule, select the rule and enter the Start Date and End Date into the leave accrual row. When the rules are run, employees with the defined rules will have their accruals and draw-downs adjusted per the rule definitions. Each rule is named and includes the following:
-
Accrual definition
-
Draw-down definition
-
Editing existing leave accrual rules may affect existing historical balances of your employees. If you need to change your policies, you should contact SuiteProjects Pro Support or SuiteProjects Pro Professional Services for assistance.