Creating a Project Summary
The functionality described in this help topic is available only if the Project Summary feature is enabled for your account, and if your role permits to edit project summaries.
You can create summaries for your projects and use generative AI to get you started with the summary content. You may be able to create project summaries for all projects you can view and edit, or only for the projects you own.
You can create and keep multiple summaries for the same project at different times in the project lifecycle.
When you work with a project summary, you see the following components:
-
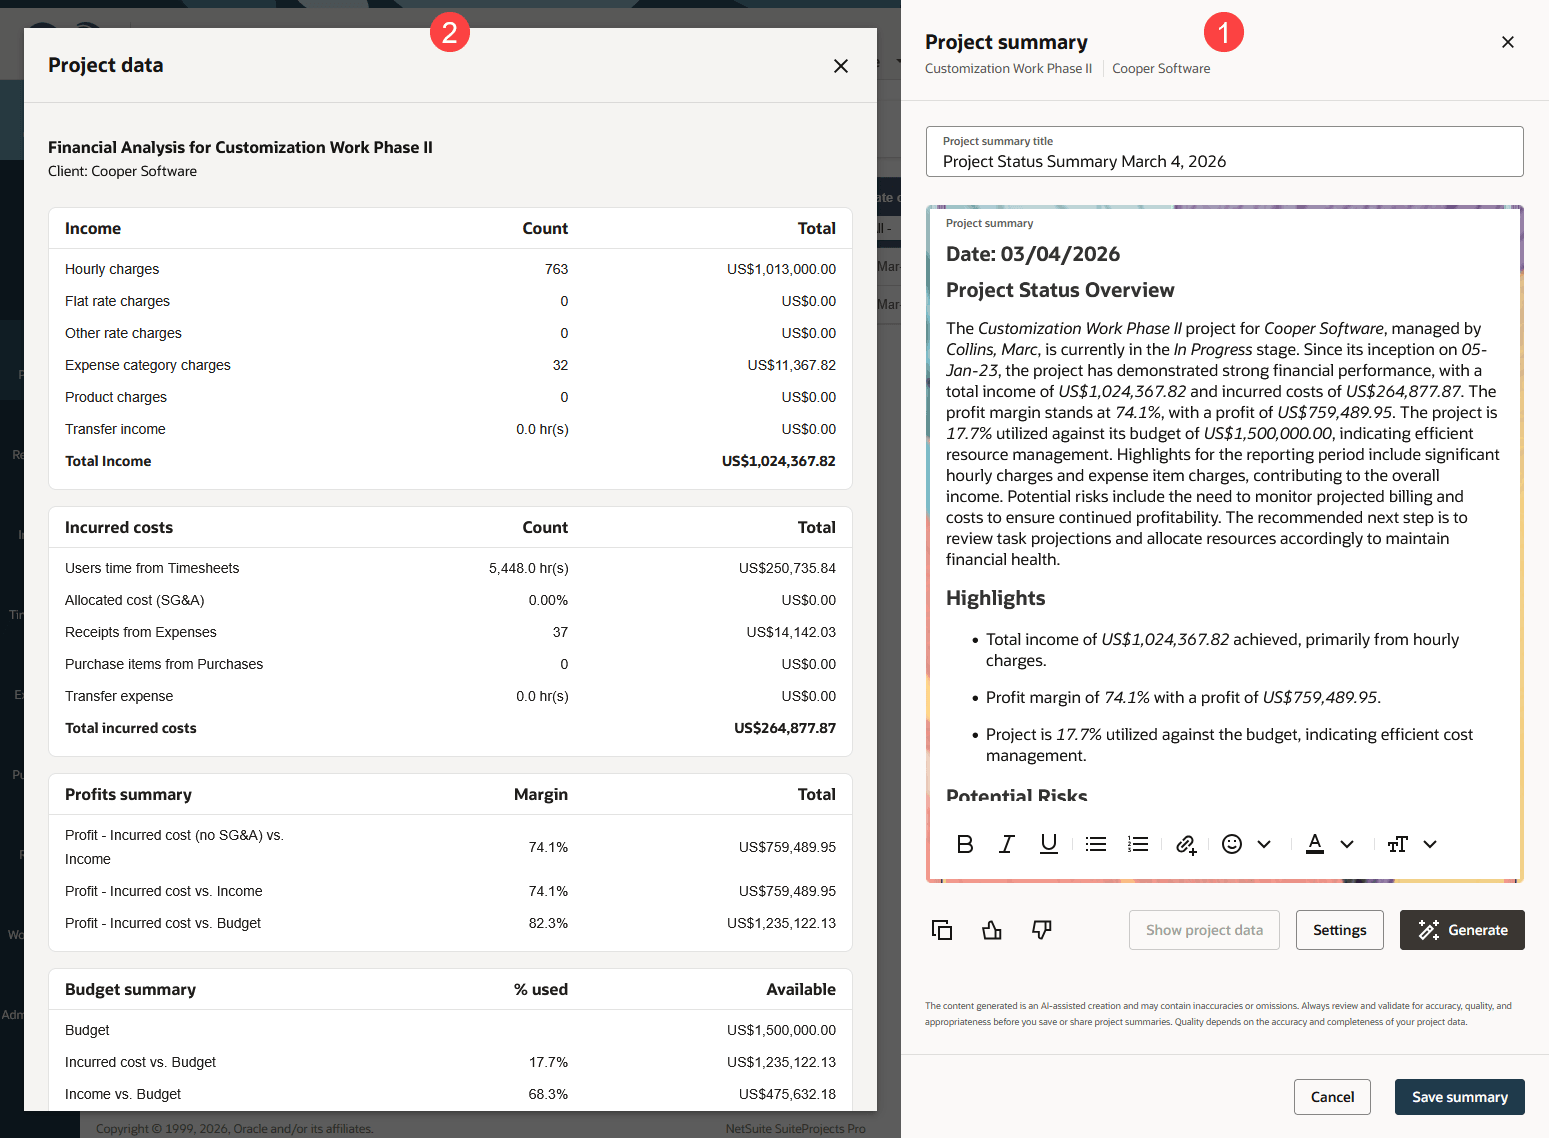
Project summary panel - The Project summary panel is the main component on the right. This is where you view, generate and modify the project summary. It shows header information including the project name and the customer name, followed by the project summary title and content.
This panel is also where you can change the personal preferences (Settings) used for all summaries you generate for any project. Settings are not linked to a specific summary or to a specific project. If you want to use different settings depending on the project you're generating a summary for, be sure to review the settings each time you generate a summary.
-
Project data panel - You can use the Project data panel to view the reports used as input data side-by-side with the generated summary. It is available on demand after you generate the summary and appears on the left. The Project data panel lets you verify the information in the generated summary and refer to the report when reviewing and editing the content.
After you create and save a summary for a project, it appears in the project summaries list under the Project Summary tab of the project record. You can access the project summary at any time from the Project Summary tab. You can delete summaries at any time. However, you can only modify the last summary created for a project; previous summaries for the same project are read-only. For more information, see Viewing or Modifying Project Summaries and Deleting a Project Summary.
To create a project summary:
-
Go to Projects > Projects > [Select a project] > Project Summary.
-
Click the Create button, and select Project summary.
Note:You can also create a project summary from the projects list. To do so, click the generate summary icon
 under the Actions column for the project you want to create the summary for.
The Project summary panel appears.
-
Click Settings.
The Settings form appears. The settings are personal preferences used for all summaries you generate for any project. They are not linked to a specific summary or to a specific project. If you want to use different settings depending on the project you're generating a summary for, be sure to review the settings each time you generate a summary.
-
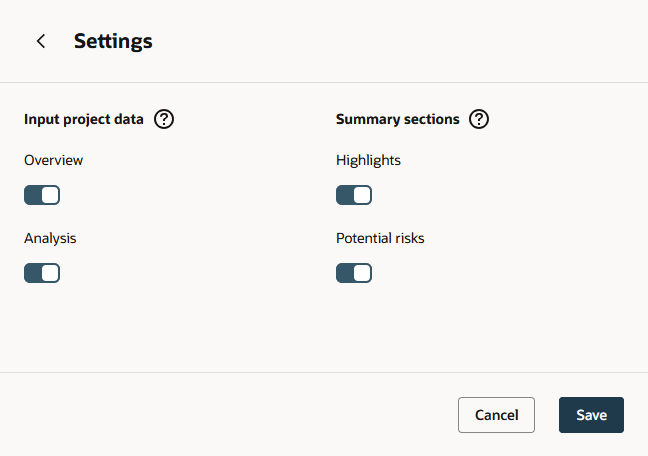
Choose the reports you want to use as input project data to generate the summary. Click the switch under the report name to include (switch toggled to the right) or exclude (switch toggled to the left) this report.
To generate a project summary, you must include at least one of the following reports as input data.
-
Overview
-
Analysis
Note:If only one report is included, the switch for this report is dimmed. You need to include another report first before you can exclude this report.
If all reports are unavailable, it isn't possible to generate a summary for the project. Reports may be unavailable for projects at a given project stage, or depending on your role.
-
-
Choose the sections you want to include in the summary. Click the switch above the section name to include (switch toggled to the right) or exclude (switch toggled to the left) this section.
The summary always includes a project status overview and you can add any of the following optional sections to the generated summary.
Click the switch for each section you want to include.
-
Highlights
-
Potential risks
-
-
Click Save.
Important:Remember that he settings are saved for all summaries you will generate for any project from now on, or until you change and save them again.
-
Click the back arrow to go back to the Project summary panel.
-
Click Generate.
Using the selected input project data, the Project Summary feature generates the summary content with the selected sections.
-
Review the content carefully and refine it as required.
Click Show project data to view the reports used as input data side-by-side with the Project summary panel. This lets you verify the information in the generated project summary and refer to the report when reviewing and editing the content.
-
Use the arrows in the Project data panel to move between the different reports.
-
Click the close icon
 to close the Project data panel.
You can make changes to the generated content inline using the rich text editor. For more information about using the rich text editor, see Working with the Rich Text Editor in SuiteProjects Pro.
You can also review the settings and click Generate again to replace the existing content. A message then appears. Unsaved changes will be lost, and the entire project summary content will be replaced with a newly generated summary. Click Generate summary to confirm the action.
Important:Always read the generated content carefully and validate for accuracy, quality, and appropriateness before you save or share AI-generated summaries. Generative AI services, such as the Project Summary feature, use creativity in their responses. A person should always validate the generated content for accuracy and quality.
The quality of generated summaries depends on the accuracy and completeness of your project data. Incomplete or outdated data may produce unreliable summaries.
-
-
Enter or edit the Project summary title.
-
Click Save summary.
-
Consider submitting feedback. If you liked the generated summary and found it useful, click thumbs-up
 . If you did not get the content you expected, click thumbs-down
  to open a short form so that you can enter and submit detailed feedback. For more information, see Giving Feedback on a Generated Summary.
 -
(Optional) Copy the project summary to the clipboard. You can then paste it elsewhere in SuiteProjects Pro, or into an external document or email message, for example. To do so, click the more options icon
 and select
  Copy.
Copy. -
(Optional) Add the project summary to the project news feed as a status update. You can share the project summary as a status update in the project news feed. See Sharing your Project Summary as a News Feed Status Update.
-
Click Cancel, the close icon
, or anywhere outside the Project summary panel to close it.