Access Model and Collection Data in a Child View
This tutorial describes how to add the detailed description of each item to a search results page. The detailed description of an item contains HTML that is typically only displayed on the product details page (PDP). But, in this tutorial, you learn how to develop an extension that displays item descriptions when a shopper is viewing items on the product list page (PLP).
The procedures in this tutorial require extensibility API classes that are only available with SuiteCommerce and SuiteCommerce Advanced 2020.2 and later releases. For more information, see the extensibility API reference.
Read the following sections to prepare for and then complete the tutorial:
contextData and contextDataRequest Properties
The key capabilities you are using in this tutorial are the contextData and contextDataRequest properties:
-
contextDatais a property of every view, but it is only populated with data in some of those views. -
contextDataRequestis a property available to views that are children of views withcontextData. You can callcontextDataRequestby passing in an array of types of data you want returned.
Views can return four types of objects and each view may support multiple object types. The object types that a view can return is specific to each view class. However, most views do not support requests.
When requests are supported and a data object is returned, its values are specific to the view instance. For example, if you are working on a product details page (PDP), contextData potentially supports requests for the product and item model. Whether contextData supports requests for both the product and item model, or just one of those models, depends on the particular product page the user is viewing.
The following table lists the parent view classes that have contextData properties and also lists the types of data that they can provide to child views.
|
contextData Object |
Class Availability |
Information Returned |
|---|---|---|
|
category |
Facets.Browse.View |
The category model |
|
item |
ItemRelations.RelatedItem.View Facets.ItemCell.View ProductDetails.Base.View |
The item model |
|
itemlist |
Facets.Browse.View |
An object that contains the item collection |
|
product |
ProductDetails.Base.View |
The parent model for a product, which also contains the item model |
Keep in mind that the availability shown in the preceding table cascades, which means that you do not have to add your child view directly into the classes listed. If your child view has a parent, grandparent, and so on, that is listed in the preceding table, contextDataRequest will be available.
Remember that contextData is only populated with data in the view classes listed in the preceding table and in the child views of the listed view classes.
Practices to Avoid
When working with current releases of SuiteCommerce and SuiteCommerce Advanced, avoid the following practices when developing extensions.
|
Practice |
Description |
|---|---|
|
Do not add a child view by extending the |
In older SCA versions, it was common to extend the childViews property of a view and then add your view as an additional property. This practice works for older SCA versions that do not support the extensibility API, but it is not recommended for current SCA versions as it does not produce a sustainable and stable extension. This approach also requires adding the view as a dependency to your file, which is not permitted for core modules. For more information, see Extensibility Layer Safe Mode in the Extensions Subtab configuration property reference. |
|
Avoid customizing the template in the theme |
For sites that use a managed theme, you cannot customize any of the theme's files. In general, you should not customize a theme's template files to implement new pieces of functionality. When developing an extension like the one in this tutorial, the goal is to add new information into your site's pages while leaving existing information intact. There is no reason to modify any existing code to facilitate that, including templates. Developing an extension like the one in this tutorial is the best way to ensure your customization remains stable across different sites and different versions. |
Prerequisites
Before you can complete this tutorial, you need to:
-
Install and configure SuiteCommerce or SuiteCommerce Advanced (2020.2 and later versions) as described in Install Your Commerce Website Applications
-
Understand the Anatomy of an Extension
-
Set up items for your Commerce website as described in Web Store Items
To develop an extension to access model and collection data in a child view
-
Use the PLP component's
addChildViews()method in your entry point file to target an existing view into which you can inject your customized view. See Create the Entry Point File for instructions. -
Create a custom view using
SCViewthat:-
Requests
itemcontext data from the parent view. -
Accesses the
contextDataobject withcontextDataRequest, passing the required field through to the template context. -
Conditionally renders the child view if, and only if, the shopper is viewing the page using the List display type.
See Create the View File for instructions.
-
-
Create the Template that renders the detailed description, which can include HTML.
Expose the Field to the Relevant Field Set
Before you start to work with the code for this extension, you need to have the field you want included in the items API response. For this tutorial scenario, you are dealing with search results on a product list page (PLP) that use the (default) search field set. So, add a standard field called Detailed Description (storedetaileddescription) to the default search field set. To learn more about modifying field sets, see Define Field Sets.
After saving the field set and record, make sure you rebuild the search index.
The code samples provided in this tutorial assume you are working with the Detailed Description (storedetaileddescription) field described in the preceding paragraph. If you choose to work with a different standard or custom field, make sure you alter the code samples accordingly.
Create the Extension Framework
You can create an extension manually or by using the gulp extension:create command as described in Create a Baseline Extension. For this tutorial, create your extension manually as described in the following steps.
-
Access the top-level extension development directory you created when you installed the extension developer tools.
-
In the top-level extension development directory, unless it already exists, create a new directory named Workspace.
-
In the Workspace directory, set up the folders for this extension so that they look like this:
Workspace/ CDRExample Modules/ CDRExample/ JavaScript/ Templates/ -
In the Workspace/CDRExample directory, create a manifest.json file and place the following code in that file.
{
    "name": "CDRExample",
    "fantasyName": "Context Data Request Example",
    "vendor": "ExampleVendor",
    "version": "1.0.0",
    "type": "extension",
    "target": "SCA,SCS",
    "target_version": {
        "SCA": ">=20.2.0",
        "SCS": ">=20.2.0"
    },
    "description": "An example extension to demonstrate contextDataRequest",
    "skins": [],
    "templates": {
        "application": {
            "shopping": {
                "files": [
                    "Modules/CDRExample/Templates/cdr_example.tpl"
                ]
            }
        }
    },
    "javascript": {
        "entry_points": {
            "shopping": "Modules/CDRExample/JavaScript/CDRExample.js"
        },
        "application": {
            "shopping": {
                "files": [
                    "Modules/CDRExample/JavaScript/CDRExample.js",
                    "Modules/CDRExample/JavaScript/CDRExample.View.js"
                ]
            }
        }
    },
    "local_folder": "Workspace\\CDRExample"
}
Create the Entry Point File
To show the Detailed Description (storedetaileddescription) field, you need to render a view and template that have access to that information. To create that view, first you need to create an entry point file.
In the Workspace/CDRExample/Modules/CDRExample/JavaScript directory, create an entry point file named CDRExample.js that contains the following code.
define('CDRExample', [
    'CDRExample.View'
], function (
    CDRExampleView
) {
    'use strict';

    return {
        mountToApp: function mountToApp (container) {
            var PLP = container.getComponent('PLP');

            if (PLP) {
                PLP.addChildViews(PLP.PLP_VIEW, {
                    'ItemViews.Price': {
                        'CDRExample.View': {
                            childViewIndex: 0,
                            childViewConstructor: function () {
                                return new CDRExampleView({PLP: PLP})
                            }
                        }
                    }
                })
            }
        }
    }
})
In the preceding code, notice that:
-
You are accessing the PLP (Product List Page) component. This is necessary because:
-
You want to use its
addChildViews()method. -
You want to access information it has on the current display type.
-
-
You add the child view using verbose syntax,
addChildViews(), which accepts two view injection targets instead of the usual one.-
The reason for this is you need to be as specific as possible. For example, there could be other instances of
ItemsView.Pricethroughout your Commerce website, and you do not necessarily want to inject your new child view into those. -
Therefore, you use the verbose method,
addChildViews(), attached to a specific visual component (the PLP component) and pass in a reference of the main PLP view, which keeps things in scope. For more information about verbose syntax, see Add a Child View.
-
Create the View File
The view is where most of the work of the extension takes place. For this tutorial, use the SCView module in the view file that you create.
If you are developing for SuiteCommerce or SuiteCommerce Advanced 2020.2.0 or later, the view generated when you use the gulp extension:create command does not implement currently recommended API methods. Starting with the 2020.2 release, you should use SCView in your extensions instead of Backbone.View. SCView extends from Backbone.View, inheriting all its methods and properties. SCView also provides additional methods for Commerce site development. For more information, see the extensibility API reference.
In the Workspace/CDRExample/Modules/CDRExample/JavaScript directory, create a file named CDRExample.View.js that contains the following JavaScript:
define('CDRExample.View', [
    'SCView',
    'cdr_example.tpl'
], function (
    SCViewModule,
    cdr_example_tpl
) {
    'use strict';

    var SCView = SCViewModule.SCView;

    function CDRExampleView (options) {
        SCView.call(this, options);

        this.template = cdr_example_tpl;
        this.contextDataRequest = ['item'];
        this.displayType = options.PLP.getDisplay().id;
    }

    CDRExampleView.prototype = Object.create(SCView.prototype);
    CDRExampleView.prototype.constructor = CDRExampleView;

    CDRExampleView.prototype.render = function () {
        if (this.displayType == 'list') {
            SCView.prototype.render.call(this);
        }
    }

    CDRExampleView.prototype.getContext = function () {
        return {
            storedetaileddescription: this.contextData.item().storedetaileddescription
        }
    }

    return CDRExampleView
})
In the preceding JavaScript, notice the following details about the CDRExampleView function:
-
You are making a
contextDataRequestfor item data. -
You are creating a custom
displayTypeproperty that uses the PLP component'sgetDisplay()method, which returns a data object about the user's current display type.
After setting the view's prototype and setting the constructor function, you override the view's render property with a custom function.
The render property on SCView is protected, which means you are allowed to override it. Before overriding a property, check the API documentation to determine if it is permitted. Never override private properties in your customizations.
The override you are putting in place for render calls the parent class's render property if, and only if, the display type ID that is passed in is list. This mechanism prevents the view from being rendered when other display types, like grid or table, are active.
Finally, in the getContext property, you create a function that defines the context object that is sent to the template. You can see that after implementing contextDataRequest in the constructor, it is here in this part of the code where you finally access the contextData.
The item() object is essentially a copy of the item model, which allows you to get the displayType property you want from it.
Create the Template
In the CDRExample/Modules/CDRExampleModule/Templates directory, create a template file named cdr_example.tpl. Put the following line in the file and then save it.
{{{storedetaileddescription}}}
Notice that the preceding value is wrapped in triple curly braces-a feature of Handlebars that prevents HTML escaping.
In cases where you are certain that the HTML you are passing into the template is safe (that is, valid HTML from a trusted, secure source), you can tell Handlebars to interpret the stringified value as raw HTML. This has the effect of injecting the HTML directly into the template's source.
Because you expect this field to always be HTML served straight from the item record stored in your NetSuite account, you can use the triple curly braces to prevent HTML escaping.
Test the Extension
Start your local server and then navigate to the local version of your Commerce website. For step-by-step instructions, see Test an Extension on a Local Server.
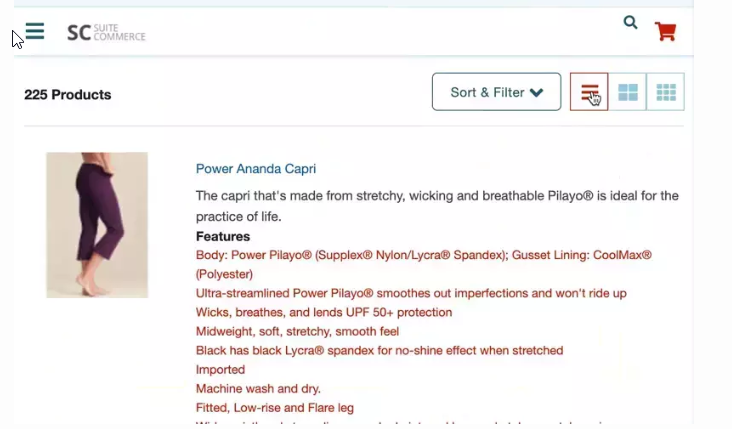
Visit a product list page and change the display type. When you view the grid and table displays, there is no change, as shown in the following screen shot.

However, when you view the list display type, you should see the detailed description for each listed product:
Troubleshoot the Extension
If you encounter these errors, double-check the code for your extension as described in the following table.
|
Error |
Potential Issue |
|---|---|
|
contextData is undefined |
Make sure you've added |
|
Detailed Description ( |
Check the data received from the items API to make sure the
If all the settings are correct and the If you get this error and the |