FAQ: SFA & Marketing
Sales Force Automation
See the questions and answers below for information on Sales Force Automation.
Sales Territories
How do sales territories route my leads?
When leads are entered into NetSuite, they are compared to the criteria in your sales territories. If a lead matches a territory's criteria, it is assigned to the territory.
Leads are compared to territories in the order you set. To prioritize your sales territories, go to Setup > Sales > Sales Territories. On the Manage Customer Territories subtab, click on a territory, and drag it up or down to change the priority of a territory.
For information on setting up sales territories, see Sales Territories.
How do I reassign leads, prospects and customers after I update my territories?
To reassign customers, you first create a group containing the customers you want to reassign at Leads > Groups > New. Then, go to Setup > Sales > Sales Territories, and click the Reassign Existing Customers subtab. Select the group of customers you want to reassign. You can clear the box in the Reassign column next to any customers you do not want to reassign. Click Save.
After reassigning leads, prospects and customers, new territories show on the record, and they are assigned to sales reps in that territory.
For more information, see Reassigning Customers to Sales Territories.
Why don't my reps appear in the Sales Rep field?
Only employees that are marked as sales reps on their employee records appear in the Sales Rep field on transactions, customer records, quotas, commission schedules and sales territories.
To mark an employee as a sales rep, a Sales Administrator can go to Lists > Employees > Employees. Click Edit next to an employee that is a sales rep. On the employee record, click the Human Resources subtab. Check the Sales Rep box, and click Save.
For more information, Marking an Employee as a Sales Rep.
Quotas
How do I view a list of quotas?
You can view a list of quotas at Forecast > Establish Quotas > List. Be sure to set filters at the bottom of the page to All to see all the quotas assigned to your reps.
For more information, see Quotas.
Opportunities
Who should use opportunities?
Opportunities are most useful for those companies that have a longer sales cycle that involve multiple estimates and offerings. Opportunities allow you to log all the activity (meetings, phone calls, e-mail messages, etc.) associated with a deal. If your sales process is efficient and straightforward or if you rarely create multiple estimates for a single deal, you probably do not need to use opportunities.
For more information on opportunities, see Opportunity Records.
Forecasting
Why aren't my opportunities showing on forecast reports?
Forecast reports include estimates and opportunities that have expected close dates within the date range of the report, not transaction dates.
Additionally, make sure that the probability of the estimate or opportunity exceeds the minimum forecast probability set by your Sales Administrator at Setup > Sales > Preferences > Sales Preferences. This company preference determines which estimates and opportunities are included in your company's forecast reports.
For more information, see Opportunities in the Forecast and Pipeline.
How do I set a default probability for opportunities and estimates?
An administrator or sales administrator can set the probability that appears by default on new estimates and opportunities at Setup > Sales > Sales Preferences. The probability can be changed from the default on an individual transaction basis.
For more information, see Sales Force Automation Preferences.
Commissions
How do I know which transactions determine commission amounts?
View the Commission Overview Report at Reports > Commissions > Commission Overview.
For more information, see Commission Overview Report.
Can I import commission data from other applications?
Yes. To import commission amounts, click Import on the Authorize Commissions page. A dialog appears with a link to download the CSV template you can use to import commission with.
When you want to import the commission amounts, click the Import button, select the file on your computer, and the amounts are listed for authorization.
For more information, see Importing Employee Commission Data.
How do I set default commission expense accounts?
All authorized employee and partner commission transactions must post to an expense account. The expense account drop-down field on the Transactions > Commissions > Authorized Employee/Partner Commissions page will default to the first available expense account if a default account is not specified.
To setup a default expense account, go to Setup > Sales > Commissions. Choose expense accounts in the Default Employee/Partner Commissions Expense Account fields, and click Save.
For more information, see Commission Preferences.
Marketing Automation
What kinds of groups can I create?
A group is a set of employees, contacts, customers, partners or vendors. You can create static or dynamic groups:
-
A static group is created by selecting members form a list or by performing a search. New members can be manually added to the group or a mass update can be performed to update the group members.
-
A dynamic group is created from a saved search. Group members are automatically updated based on the current results of the saved search.
For example, you can create an employee group of all sales reps. A new employee who is created as a sales rep is automatically added to the group. An existing employee who switches positions and is no longer a sales rep is removed from the group. You do not need to manually maintain the group.
To create a group, go to Commerce > Marketing > Personalization > Groups > New.
For more information, see Working with Records, Transactions, and Lists.
How do I create a group?
There are several ways to create a group:
-
From List - Select group members from a list of records in your account.
For example, if you click Select Customers under the From List heading, you choose individual customers from your customers list to be included in the group.
Groups created with the From List options are static groups.
-
With New Search - Search for group members by selecting criteria for the people you want to include in the group.
For example, you can click Search Customers and search for customers assigned to a certain sales rep. Then, you can make a group of all customers that were returned from the search.
You can create either static or dynamic groups from the With New Search options.
-
With Existing Saved Search - Create a group from an existing saved search in your account.
Groups created from saved searches are dynamic and constantly updated every time a new record is entered that matches the criteria of the search.
For example, if you have an existing saved search for customers with a certain sales rep, you can click Saved customer Search and create a group based on the search results. Any new customer who is assigned to that sales rep is then automatically added to the group.
For more information, see Working with Records, Transactions, and Lists.
How do I perform a letter merge with Microsoft Word 2002/XP?
The Mail Merge feature in NetSuite can be used to create form letters from information in your NetSuite account. The merge creates a zip file containing the individual letters.
To perform a letter merge, download the sample source file from NetSuite, and use it to create your letter template. Then, you can upload your template and perform the merge in NetSuite.
For more information, see Merging Letters.
How do I perform a bulk email merge?
The Mail Merge feature allows you to send personalized email in bulk to those you do business with. Messages can include CRMSDK tags which will be replaced with information from the recipients record when the email is merged and sent.
To perform a bulk email merge, first create an email template you want to use to generate the email you send. Then, create a group of recipients. Finally, go to Documents > Mail Merge > Bulk Merge.
For more information on email merge, see Merging Email.
How is bounced campaign email handled?
There are many reasons email is not delivered successfully, or bounced. Hard bounces occur when the email address is invalid or because the recipient's email server is blocking NetSuite's server. Soft bounces are due to temporary issues. NetSuite tracks the reason an email message bounced on the campaign response record for each recipient.
When a message sent to an email address results in a hard bounce, that email address is marked as a hard bounce address. Hard bounced addresses are not sent email through marketing campaigns for a set period of time. To choose how long the bounce history of an email address is maintained, go to Setup > Company > Email > Email Preferences, and select the required number of days from the Remove email addresses from Bounced Email Address list after list.
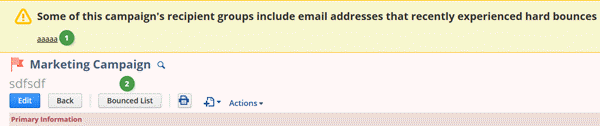
Display Bounce Warning on Campaigns
NetSuite can automatically scan your marketing campaign list for previously hard bounced email addresses and provide real time notification of entities associated with a bounced email address (1). To set this preference, go to Home > Set Preferences > Optimizing NetSuite. Clear this box if you wish to restrict automatic scanning of hard bounced email addresses in your marketing campaign. If the preference is turned off, a bounced list button is enabled (2), allowing manual screening of hard bounced email addresses. Disabling this preference is useful if you have a large campaign distribution list. For large lists, automatic screening may cause performance issues when viewing campaign records.
Hard Bounce Reasons
-
Unknown User
-
Bad Domain
-
Address Error
-
Account Closed
-
Hard Bounced - Other
Soft Bounce Reasons
-
Mailbox Full
-
Disabled Account
-
Greylisted
-
Server Too Busy
-
Soft Bounce - Other
Related Topics
How much storage space do I have in my NetSuite account?
To view how much storage space you have, log in to NetSuite 360, and click the Storage Info tab.
If you wish to purchase additional storage space or have questions about your storage, please contact your account manager.
How do I publish a knowledge base?
You can publish a knowledge base to a tab or category in your external or intranet site. To do this, go to Lists > Support > Knowledge Base.
For more information, see Publishing a Knowledge Base.
Why are my Outlook Integration buttons missing?
If you have Outlook Integration installed and the Save in NetSuite buttons are missing, please attempt one or all of the following steps to try and resolve the problem:
-
In Windows, navigate to Start > Settings > Control Panel > Add/Remove Programs.
-
Is Microsoft .NET Framework 2.0 installed?
If so, uninstall Microsoft .NET Framework 2.0.
-
In Outlook, navigate to Help > About Microsoft Outlook.
-
Click Disabled Items.
-
If Outlook Integration for NetSuite is listed, re-enable Outlook Integration.
In Outlook, go to Tools > Options. On the Other tab, click the Advanced Options button. In the Advanced Options dialog, click the COM Add-Ins button.
In the COM Add-Ins dialog, check the box next to NetSuite for Outlook. (If NetSuite for Outlook is not listed, click the Add button, and enter the following path in the Add Add-In dialog: C:\Program Files\NetSuite\Outlook\NSAddinShimS, then click OK.)
After you have checked NetSuite for Outlook, click OK.
-
Is the Outlook Integration for NetSuite listed?
If so, make sure that the Outlook Integration for NetSuite is checked.
Note:Highlight Outlook Integration for NetSuite and take note of any information in the Location and Load Behavior field. This information will be useful should you need to call NetSuite customer support.
-
If none of these suggestions fix the problem, try uninstalling and reinstalling Outlook Integration.