Customizing Mobile Actions
You can set up mobile actions for events associated with page or page elements. Both pages and page elements have on load events. Button, icon, and table elements have additional events for clicking or tapping. Field elements have events for selection, scanning, and validation.
The action types available for events on page and page elements are the same. You can choose the appropriate action type based on the event. For example, set up action types for page navigation and submission for on click rather than on load events.
To customize mobile actions:
-
To set up a mobile action for a page event, do the following:
-
Access the Mobile - Page page.
For instructions, see Customizing Mobile Pages.
-
On the Mobile - Page page, select an action in the following fields:
-
On Load Action - Select the mobile action you want to trigger during the initial page load.
-
After Load Action - Select the mobile action you want to trigger after the initial page load.
-
-
-
To set up a mobile action for a page element event, do the following:
-
Access the Mobile - Page Element page.
For instructions, see Customizing Mobile Page Elements.
-
On the Mobile - Page Element page, click Edit.
-
Next to an event field, like the On Click Action field, click the plus icon to create a mobile action or the open icon to edit the currently selected one.

Alternatively, select a mobile action to replace the current one. You can skip step 3.
-
On the Mobile - Page Element page, you can select the action for an event, like an on click or on scan event.
The events that are available depend on the page element type. For more information, see the following topics:
-
-
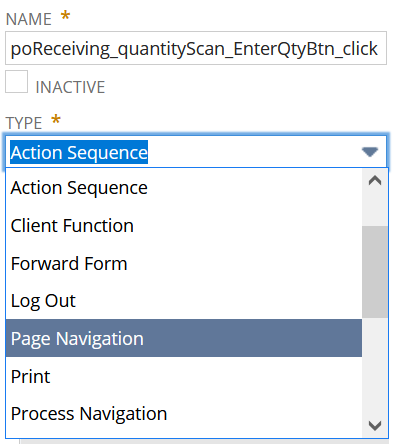
To create or edit a mobile action, on the Mobile - Action page, you can set or modify the following required fields:
-
Name - A unique name for the mobile action.
-
Type - The type of mobile action you want to set up.
-
-
Click Save.
-
After you complete your mobile process customizations, make sure you update the app. See Compiling Mobile Customizations.
Mobile Actions for Menu Navigation
On menu pages, you can add button elements for navigation. For the on click event associated with each icon or button, you can set up the following action types on the Mobile - Action page:
-
Logout
-
Page Navigation - See Mobile Actions for Page Validation and Navigation.
-
Process Navigation - Used to navigate to the first page of a mobile process. If you select this action type, set up the following:
-
In one of the Target fields, select a standard or custom process.
-
Choose the first page for the mobile process. For more information, see Customizing Mobile Processes.
-
-
URL Navigation - Used to navigate to a web address. In the Target URL field, enter the absolute URL or external page.
Mobile Actions for Page Validation and Navigation
Button and table elements include on-click events to which you can assign mobile actions for navigation and data validation. Certain types of mobile actions enable you to store or save data as shown in the following list:
-
Page Navigation - Used to navigate to an independent page or a dependent one within a mobile process. This action type includes the Retain State option to keep values stored in the state even after you visit the target page.
For example, you check the Retain State box for the Page Navigation action on the standard Select Warehouse page. The mobile action redirects you to the Main Menu page. It carries over your selected warehouse, so you can process only the orders and items within that location
You can also set up this action on a menu page, to navigate to a process-dependent or an independent mobile page. See Mobile Actions for Menu Navigation.
-
Forward Form - Used to navigate to the next page within the mobile process, with an option to perform data validation. It pushes the data you enter on a mobile page to the state.
In standard mobile process, the entry pages include an Action Button element that has a Forward Form action and a Back Button element. The Back Button element is predefined with the action that navigates to the previous page within the process flow.
-
Submit Form - Used to save and submit data entered on a mobile page to a NetSuite record. It also navigates to another page.
Like the Page Navigation action, you can also set the Retain State box for a Submit Form action. However, this setting for Submit Form actions does not retain state values if you have already visited the target page. This restriction prevents duplicate submission of data into NetSuite records.
Example
Within the WMS work order picking process, the Enter Quantity page displays the Enter Quantity and Bin Empty buttons. The Enter Quantity button calls a Forward Form action to validate data, store data, and navigate to the next page in the process flow. In case of insufficient quantity, you can tap the Bin Empty button. It calls a Page Navigation action to redirect you to the Select Pick Task page without storing any data. On the last entry page of the process flow, the button calls a Submit Form action to validate, submit, and redirect to a target page.
To set up these action types, on the Mobile - Action page of the event, do the following depending on your customization requirements:
-
For navigation with server-side validation, you can enter values in the following fields:
-
Validation Script ID and Validation Deployment ID - For Forward Form actions, enter the script and deployment ID for the RESTlet that validates data from the server side.
The data from the RESTlet's response is stored in the state.
-
Script ID and Deployment ID - For Submit Form actions, enter the script and deployment ID for the RESTlet that validates and submits the data from the server side
The data from the RESTlet's response is saved in a NetSuite record.
-
HTTP Method - Select the type of network request that calls the RESTlet configured in the action.
-
Convert Response to Object - (Optional) Check this box to indicate that you want to convert the response from the validation RESTlet into an object.
-
-
For navigation with client-side validation through Submit or Forward Form actions, you can enter values in the following fields:
-
Client File Path - Enter the file cabinet path to the client script that validates data from the client side.
-
Client Function Name - Enter the name of the function you want to call from the client script to validate data from the client side.
For information about mobile APIs that you can use for NetSuite WMS, see SCM Mobile API.
-
-
For the three page navigation types, you must add an input parameter that defines your target page. For Submit or Forward Form actions, if you set up server-side validation and navigation, you can add more input or output parameters that pass data to or from the RESTlet, respectively. For more information, see Input Parameters for Navigation.
-
For Forward Form and Submit Form actions, you can set up a RESTlet that is called before or after the main action. In the following fields, select a Restlet type of action:
-
Before Action RESTlet - Restlet action called before a Forward Form or Submit Form's main action.
-
After Action RESTlet - Restlet action called after a Forward Form or Submit Form's main action.
For example, if you add fields to a mobile page, set up RESTlets in these two fields. Set up a Before Action RESTlet that validates the field data before a Forward Form or Submit Form action is called. Then, set up an After Action RESTlet that submits data from your additional fields after the action is called. You can assign the RESTlets used in the standard mobile processes. For more information, see Setting Up Additional Fields Through Mobile Customization.
To add parameters to your Restlet actions, see Input Parameters for Data Validation, Storage, or Submission.
-
To view the complete list of fields for each mobile action type, see Configuring Pages and Actions for Custom Mobile Processes.
Mobile Actions for Data Submission
The Submit Form action type performs both data submission and page navigation usually during a click action on a button or table. These page elements appear toward the end of the standard mobile process flow. Some standard processes enable multiple ways of submitting data, which may depend on the item type or system rules. They all submit and save data collected from the previous pages to the NetSuite transactions associated with the mobile process. They also display the confirmation or summary page.
Along with the main Submit Form action, you can set up additional mobile actions that perform tasks before or after the click action. On the Mobile - Action page, when you select the Submit Form action type, you can set up these fields for additional mobile actions:
-
Before Action RESTlet
-
After Action RESTlet - In this field, you can choose the mobile action, UpdateAdditionalData, used in standard mobile processes. It submits data collected from additional page elements added to a mobile process using the script, customscript_mobile_rl_create_record, and its deployment, customdeploy_mobile_rl_create_record.
For sample customizations that include this field, see Setting Up Additional Fields Through Mobile Customization and Setting Up Image Capture or File Upload.
For more information about these fields, see Mobile Actions for Page Validation and Navigation.
Mobile Actions for Page Element Events
For the On Load Action of page elements, except table elements, you can assign a mobile action that loads data or default settings. To set up default values using the On Load Action, see Assigning Default Values to Field Elements.
Depending on the page element type, you can set up other events such as the following:
-
On Select Action for Drop Down element types
-
On Scan Action or On Validate Action for Text Box element types
On the Mobile - Action page for the event, you can set up the following mobile actions:
For the On Scan Action, you can set up mobile actions for page navigation and validation, aside from those in this list. See Mobile Actions for Page Validation and Navigation.
-
Client Function - Runs a function from a custom client script. You can set up Client Function actions also for on load events of a page. See step 1 of the instructions in Customizing Mobile Actions.
To set up, enter values in the following fields:
-
Client File Path - Enter the file cabinet path to your custom client script.
-
Client Function Name - Enter the name of the function you want to run from the client script.
For information about mobile APIs that you can use for NetSuite WMS, see SCM Mobile API.
-
-
Restlet - Runs a RESTlet that performs tasks based on the event. You can use Restlet actions also for on load events of a page. See step 1 of the instructions in Customizing Mobile Actions.
Tip:To retrieve data from NetSuite records, you can set up Restlet or Saved Search actions. With Restlet actions, you can retrieve data from multiple records or sources.
For example, the standard Print button has a Restlet action for the Before Print Action that is called before the main Print action. It retrieves and stores the data you use in the print templates. To see how you can set up this Restlet action, see Setting Up Print Button Actions.
To pass data to and from the RESTlet, you can add input and output parameters. See Adding Parameters to Mobile Actions.
-
Saved Search - Runs a saved search from which you can retrieve data.
To set up, in the Saved Search field, select a saved search from the list.
-
State - Retrieves the value of a key from the state. You can retrieve data captured from a previous page and stored in the state.
To set up, in the State Path field, enter the state path for the key that contains the value you want to retrieve.
Example: dataRecord:scriptParams:barcodeLotname
This example shows the state path for the on load event of the Scan/Enter Lot field on the Enter Lot page. The mobile action retrieves the name of the lot item, which is captured from the previous page in the process flow. It associates the lot item with the lot number you enter on the current page.
For more information about states, see Working with Mobile State Data and Keys.
-
Show Message - For the on click event of Dynamic Text elements, this action displays a message on a popup window. You can use this action also for on load events of mobile pages.
To set up, in the Message field, select an existing message or add your own message. You can choose a dynamic or static message.
For more information, see Displaying Messages in Dynamic Text Elements.
To view the complete list of fields for each mobile action type, see Configuring Pages and Actions for Custom Mobile Processes.
Mobile Action Sequence
You can set up an action sequence for any of the following mobile action types: Restlet, Print, Forward Form, or Submit Form. You can set up multiple actions that are called by the main action of a single event. You can add conditions that determine when the main action can perform the sub-actions in the sequence.
Example
In the Pack Station app, the Add Carton button has an action sequence for its On Click Action. The sequence includes sub-actions to store the carton details, print the carton label, and then redirect you to the Pack Items page.
On the Mobile - Action page of the event, add each action in the sequence on the Action Sequence subtab using the following fields:
-
Sub-action Sequence # - Enter the number that indicates the position of the sub-action within the sequence. Assign the number 1 to the first sub-action to be called.
-
Sub-action Of - Select the main action to which you want to associate this sub-action.
-
Sequence Condition - (Optional) Enter an expression that evaluates to true, which calls the sub-action, or false, which skips the action.
-
Sequence Action - Select or add the mobile action you want to set up for this sub-action.
To view the complete list of fields for each mobile action type, see Configuring Pages and Actions for Custom Mobile Processes. For information about setting up dynamic values in parameters and other customization fields, see Working with Mobile State Data and Keys.