Customizing Mobile Page Elements
Page elements enable you to display messages, enter data, or show data in table format. You can add elements to a page, information screen, or popup window. You can choose a page within a mobile process or an independent one, like a menu page.
For new and existing elements, you can apply the same basic settings available in mobile configuration. These settings include the label, layout, and visibility condition. In addition to these basic settings, you can set up actions and source records through mobile customization. The settings vary depending on the following types of page elements:
-
Field element types - Date, Drop Down, Dynamic Text, Text Area, Text Box, UOM
-
Table element types - Data Table, Search Grid, Transfer Table
-
Button element types - Action Button, Back Button, Icon
To customize mobile page elements:
-
Access your custom mobile process:
-
Using the Administrator role, go to Setup > Custom > Mobile - Applications.
-
On the Mobile - Applications List page, click View next to the mobile app.
-
On the Mobile - Process List page, click View next to the custom mobile process that contains the page.
-
-
On the Mobile - Process page, on the Pages subtab, click the name of the mobile page on which you want to add an element or that contains the existing element you want to customize.
-
On the Mobile - Page page, on the Page Elements subtab, do one of the following:
-
To edit an existing element, click Edit next to the element name.
-
To add an element, click New Mobile - Page Element.
The Mobile - Page Element page appears.
-
-
In the following fields, you can change or assign the page element settings:
-
Name - Enter a unique name for the page element.
-
Parent Page - Select the custom mobile page to which you want to associate this element.
-
Label - Select an existing label or, to create a label, click the plus icon beside the field.
-
Type - Select the page element type.
-
-
Depending on your mobile requirements, you can customize additional settings based on the element type. For guidelines and instructions, see the following topics:
For button elements only, see the following topics:
For table elements only, see the following topics:
Other optional settings enable you to set up date restrictions and disabled fields. To view the list of settings for each element type, see Configuring Mobile Page Elements.
To set up mobile actions for button elements, see Customizing Mobile Actions.
-
If you clone a standard table, you can check the Override Standard Element box to override selection from it.
Even if you tap a row on both the standard table and your copy, the app follows your selection from the copy. Along with this setting, you can hide the standard table from the mobile page. For more information, see Configuring Mobile Table Elements.
-
Click Save.
To add more elements to the page, repeat from step 3.
-
After you complete your mobile process customizations, make sure you update the app. See Compiling Mobile Customizations.
Page Element Visibility and Loading
By default, all page elements appear on a mobile page during the initial load. You can hide an element or apply a condition that controls how it appears on a mobile page. For field and table elements, you can also add a mobile action for loading.
On the Mobile - Page Element page, you can set up loading and visibility in the following fields:
-
Visibility Condition - Enter one of the following settings for the page element's visibility:
-
True - To display the element on the mobile page, enter this value or leave the field blank
-
False - To hide the element, enter this value
Alternatively, you can enter an expression that evaluates to true or false and determines when the field should appear on a page. You can include a state path to the data you want to evaluate as true or false, as in the following example:
({{features:inventorystatus}} === 'T' && {{state:dataRecord:scriptParams:itemType}}!= "noninventoryitem")
With this condition, the element should appear only when you use the Inventory Status feature and the item is not a non-inventory type. It uses state data to determine the type of item selected on the app. For more information about state data, see Working with Mobile State Data and Keys.
-
-
Include Hidden Element in Load Events - If the page element is hidden and you want to include it in page load events, check this box.
To reduce load time, NetSuite doesn't include hidden elements during a page load, by default.
To show dynamic text elements using toggles, see Displaying Dynamic Text Through Toggles.
To hide icons from independent menu pages, see Configuring Menu Icons on Independent Mobile Pages.
Disabling Page Elements
For button and some field elements, you can set the following fields to disable them on mobile pages:
-
Disable Field Condition - You can disable a button, field, or an entire UOM page element.
-
Disable Condition for Quantity Only - For UOM page elements, you can disable the quantity subfield only.
-
Disable Condition for Unit Only - For UOM page elements, you can disable the unit subfield only.
In these condition fields, you can enter a true or false value. To set up a dynamic value, you can enter a condition or expression that evaluates to true or false. For more information about dynamic settings, see Accessing Data Stored in the State or Displaying Messages in Dynamic Text Elements.
Disabled subfields can be automatically populated through bar codes that you scan or settings from the NetSuite UI. If you disable the quantity only, changing the unit on the app automatically converts the quantity value. It doesn't change the unit on the associated order transaction.
If you disable the UOM page element and it evaluates to false, its subfields remain enabled regardless of their individual settings.
Arranging Page Elements
You can arrange the elements on a mobile page, including those that appear based on a visibility condition. When you customize layout and position, consider the types and number of elements you want to show on a page.
A mobile page automatically displays a vertical scroll bar, depending on the screen size of your mobile device. It displays a horizontal scroll bar for table elements and grids to show more columns. A page also adjusts automatically to accommodate elements that appear based on a condition.
To arrange page elements on a mobile page, on the Mobile - Page Element page, you can set values in the following fields:
-
Layout - For Action Button, Icon, Text Area, and Dynamic Text element types, select either of the following layout options.
-
Inline - Arranges elements horizontally on a page.
-
Block - Arranges elements vertically on a page.
Other element types follow the block layout and cannot be modified.
Icon element types occupy half the space of a line in an inline layout, even if you add only one icon. A line can display a maximum of two icons.
UOM element types include a set of two subfields that appear side by side in the same line: a quantity field and a dropdown list of units.
-
-
Display Order - Enter the number that indicates the page element's position on a mobile page.
In an inline layout, page elements are arranged from left to right, starting with the lowest display order number.
-
Content Area - For Action Button and Back Button element types, select either Body or Footer.
Other element types appear in the body of mobile pages.
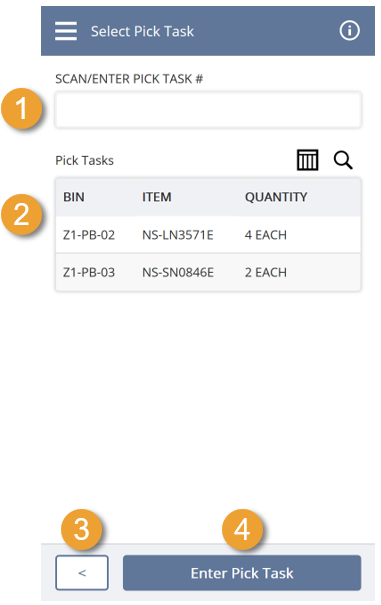
The following image of the standard Enter Item page shows how elements appear based on the settings provided in the accompanying table.
|
Callout Number |
Page Element Settings and Values |
|---|---|
|
1 |
Element type: Text Box Display order: 1 |
|
2 |
Element type: Data Table Display order: 2 |
|
3 |
Element type: Data Table Toggle State: Hide Display order: 3 |
|
4 |
Element type: Back Button Content area: Footer Display order: 4 |
|
5 |
Element type: Action Button Content area: Footer Layout: Inline Display order: 5 |
Changing Button Sizes
You can change the size of an Action Button element that does not appear at the footer of a mobile page. The label of a button adjusts accordingly to its size.
In the Button Size field, the default size is the blank option. You can select one of the following options to increase the button size:
-
Medium - increases the default size by 200%
-
Large - increases the default size by 300%
When increasing the size of a button, consider its layout, whether Inline or Block. If it appears in the same line as other buttons in an Inline layout, the other ones might move to the next line. For more information about layouts, see Arranging Page Elements.
Data Sourcing for Drop Down Elements
Drop Down element types can obtain data from saved searches or multiple sources, like records and sublists. From either of these data sources, you can choose the column that contains the values for selection in the dropdown list.
On the Mobile - Page Element page, you can map the element with the column from your data source using the following fields:
-
Input ID - Enter the internal ID of the column that uniquely identifies the values you want to show in the dropdown list.
Example: internalid - The internal ID of the column that contains the internal ID of each inventory status record.
Tip:If you want to set up a static dropdown list, you can enter an array of values in the Input ID and Input Value fields. Then, leave the On Load Action and Response Key fields blank.
For example, to display a list of statuses, enter the following array in both fields: ['Good', 'Damaged', 'Undefined'].
-
Input Value - Enter the internal ID of the column that contains the values you want to show in the dropdown list.
Example: name - internal ID of the column that contains the inventory statuses
-
On Load Action - Select or create the mobile action that fetches data from the specified columns during the initial page element load.
Alternatively, to create an action, click the plus icon beside the field.
To match your data source, select or create an action that has the appropriate type. If your data source is a saved search, select a Saved Search type of action. Otherwise, select a Restlet type of action. Then, you can set up the saved search or the RESTlet script that references the data source.
If you create your custom RESTlet script, you can also add functionality that assigns a default value for the Drop Down element. For more information, see Assigning Default Values to Field Elements.
-
Response Key - Based on your On Load Action setting, do one of the following:
-
If you specified a Saved Search action, enter data.
-
If you specified a Restlet action, enter the key that contains the RESTlet's response. This key must contain the values you want to appear in the dropdown list.
For example, you can enter status, the key in the state that contains inventory statuses.
-
Assigning Default Values to Field Elements
For Date, Drop Down, Text Box, and UOM element types, you can set up static or dynamic default values. On the Mobile - Page Element page, you can set up default values through either of the following fields:
-
Default Value - For a static value, you can enter the text that you want to assign as the default value for the element. For a dynamic value, you can enter a state path to the key that contains the text.
Example: state:dataRecord:scriptParams:itemfrmBarcode:barcodeSerialname
This example, taken from the Scan/Enter Serial Number field, retrieves the value stored in the barcodeSerialname key from the state.
For more information about state paths, see Accessing Data Stored in the State.
For Text Box element types, you can enter if-else statements to set up a conditional expression that determines the default value. The expression must not exceed 300 characters.
-
On Load Action - You can set up a custom RESTlet that provides the default value for the element during a page load.
For more information about mobile actions, see Customizing Mobile Actions.
If you set up a default value for a Text Box element, you can also check the Automatically Submit Default Value box. For a standard mobile process, after the field is populated with a default value, NetSuite automatically submits the page. If the field is on the last entry page within the process, it submits data captured from the current and previous pages.
For example, you only have one staging bin location in your warehouse. You assign it as the default staging bin for the mobile picking process. On your mobile device, while the staging bin entry page loads, the bin field is populated with this default value. Without requiring any action from your end, NetSuite automatically submits the page and displays the confirmation page.
Through Mobile Configuration, you can set up automatic default value submission for Text Box elements in a standard mobile process. See Configuring Mobile Page Elements.
Validations applied to a mobile page, its fields, or both, may affect automatic submission. NetSuite cannot perform a submit action when a page or field validation error occurs.
If you enable automatic submission for custom mobile processes, NetSuite automatically calls the mobile action for the primary button on the page. To set up a primary button, you can check the Is Primary box for the Action Button element. For its On Click Action, you can set up your own Restlet type of mobile action that performs the automatic submission. Make sure you customize an Action Button element that appears on the same page as the Text Box element. For more information about Action Button settings, see Configuring Mobile Page Elements.
To set up mobile actions, see Customizing Mobile Actions.
Note that the Automatically Submit Default Value box becomes hidden if you set up a mobile action for the After Load Action. This setting does not override the After Load Action, which you can set up on the same mobile page.
For more information, see Mobile Actions for Page Element Events.
Data Capturing and Storage for Page Elements
You can store the data captured through field or table elements on a mobile page. The stored data are shared across the pages within a mobile process. You can also save them in NetSuite records.
In the standard process flows, the data from each page are stored in the state by default. If you add fields to your custom pages, you can also store their values in the state. At the end of the process flow, the stored data for NetSuite records are saved accordingly.
To set up data capturing and storage, map the page element to a field from a NetSuite record or sublist. If you want to store the data temporarily, you can map it to a NetSuite record or state object. Depending on the element type, on the Mobile - Page Element page, you can set the following fields:
-
Record Name - Enter the internal ID of the NetSuite record that contains the field you want to map to this page element
Example: employee - internal ID of the employee record
Alternatively, you can temporarily store data in the following ways:
-
To store data used across the pages of a mobile process, but not saved in a NetSuite record, enter aux. This setting pertains to the auxParams state object that stores temporary data. When you reach the end of the process flow, any stored data gets deleted from the state.
-
To store data used in a NetSuite record, but not saved, enter the record name only.
For example, the item receipt record does not contain a field for the purchase order ID, but this detail is required to create item receipts. You can temporarily store purchase order IDs during the purchase order receiving process to automatically generate item receipts.
For both cases, leave the Sublist Name and Field Name fields blank.
-
-
Sublist Name - For field element types, except Dynamic Text, you can save data in a field that belongs to a sublist of the NetSuite record. Enter the internal ID of the sublist.
Tip:Leave this field blank if you want to save data in a transaction body field, which does not belong to sublists.
Example: emergencycontact - internal ID of the emergency contact sublist in the employee record.
-
Field Name - For field element types, except Dynamic Text, enter the internal ID of a standard or custom NetSuite field that belongs to the record or sublist.
Example: firstname - internal ID of the First Name field in the emergency contact sublist
Note:The data captured from the page element is saved in this NetSuite field.
-
Regular Expression - (Optional) For Text Box and UOM element types, you can enter an expression that validates the data you want to capture for the NetSuite record or sublist field you enter in the Field Name field.
Example: ^[0-9]*$ - This expression indicates that only numbers are accepted in the NetSuite field, so the same restriction should be applied to the page element.
If you want to set up complex validations, you can set up a mobile action for the On Validate Action instead.
After you fill out these fields, you can add buttons that call the appropriate action to store data into the state or save them in NetSuite records. Standard pages in the middle of process flows contain a button for pushing data into the state. Those at the end of process flows contain a button for saving data in NetSuite records.
To view the instructions for a sample customization scenario, see Setting Up Additional Fields Through Mobile Customization.