Sample Custom Form Script
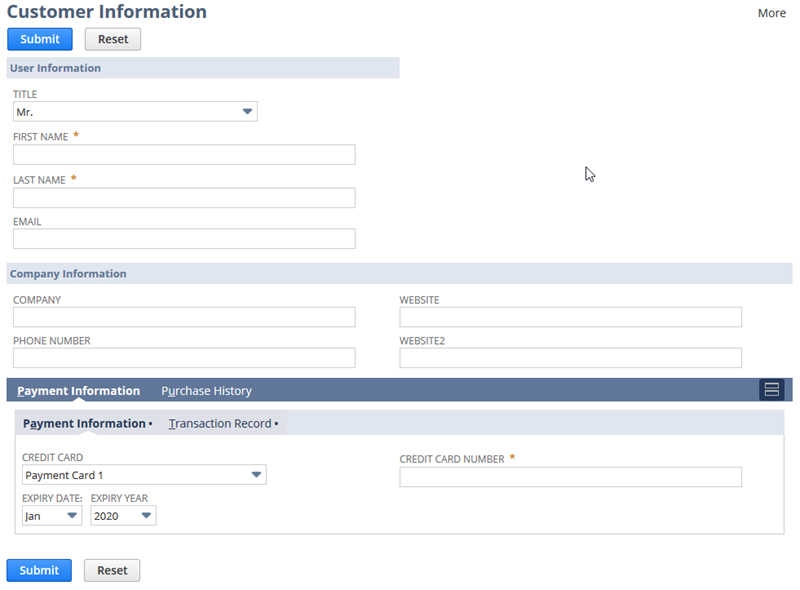
The following screenshot displays a form created by a Suitelet. You can use the sample code provided below to create this form.
Steps for Creating a Custom Form with SuiteScript 2.1
First, create a script file. To create this file, do one of the following:
-
If you want to copy and paste the completed script directly from this help topic, go to the Complete Custom Form Script Sample.
-
If you want to walk through the steps for creating the script, complete the following procedure.
To create a custom form, complete the following steps:
-
First, create a Suitelet and add the necessary JSDoc tags.
/** *@NApiVersion 2.1 *@NScriptType Suitelet */ -
Add the define function to load the N/ui/serverWidget Module module.
/** *@NApiVersion 2.1 *@NScriptType Suitelet */ define(['N/ui/serverWidget'], function(serverWidget) { }; -
To enable a Submit button, create an onRequest function. In the onRequest function, add an if statement to check if the request method is 'GET'. After the if statement, create a return statement to support the GET request method.
Note:This sample is divided into four sections, as noted in the code comments. Each part shows where to add the corresponding sample code. Section two of the sample code is referenced in Steps for Adding a Tab to a Form. Section three of the sample code is referenced in Steps for Adding a Sublist to a Form sections.
/** *@NApiVersion 2.1 *@NScriptType Suitelet */ define(['N/ui/serverWidget'], function(serverWidget) { function onRequest(context){ if(context.request.method === 'GET'){ context.response.writePage(form); // Section One - Forms - See "Steps for Creating a Form" // Section Two - Tabs - See "Steps for Adding a Tab to a Form" // Section Three - Sublist - See "Steps for Adding a Sublist to a Form" }else{ // Section Four - Output - Used in all sections } } return { } }; -
In section one, call the createForm method using serverWidget.createForm(options).
var form = serverWidget.createForm({ title: 'Enter Customer Information' }); -
In section one, create Field Groups to organize the fields using Form.addFieldGroup(options). Use the properties defined in serverWidget.FieldGroup to control the appearance and behavior of the field groups.
var usergroup = form.addFieldGroup({ id : 'usergroup', label : 'User Information' }); usergroup.isSingleColumn = true; var companygroup = form.addFieldGroup({ id : 'companygroup', label : 'Company Information' }); -
In section one, add a Submit button to your form using Form.addSubmitButton(options). CCustomize the button text by changing the
labelproperty.form.addSubmitButton({ label: 'Submit' }); -
In section one, create the fields you need using Form.addField(options). Don't forget to set the
id,type, andlabelproperties correctly. Use thecontainerproperty to specify the field group.Use the properties defined in serverWidget.Field to customize your fields. This sample uses Field.isMandatory to define several required fields, and Field.defaultValue to set the default value of the Company name field.
Some fields, such as the email and phone fields, provide basic error checking to make sure the field contents meet the requirements for the field. For more information, see serverWidget.FieldType.
Note:When modifying or adding custom fields, use the
custpage_prefix to the identifier to avoid conflicts with standard fields.var select = form.addField({ id: 'titlefield', type: serverWidget.FieldType.SELECT, label: 'Title', container: 'usergroup' }); select.addSelectOption({ value: 'Mr.', text: 'Mr.' }); select.addSelectOption({ value: 'MS.', text: 'Ms.' }); select.addSelectOption({ value: 'Dr.', text: 'Dr.' }); var fname = form.addField({ id: 'fnamefield', type: serverWidget.FieldType.TEXT, label: 'First Name', container: 'usergroup' }); fname.isMandatory = true; var lname = form.addField({ id: 'lnamefield', type: serverWidget.FieldType.TEXT, label: 'Last Name', container: 'usergroup' }); lname.isMandatory = true; form.addField({ id: 'emailfield', type: serverWidget.FieldType.EMAIL, label: 'Email', container: 'usergroup' }); var companyname = form.addField({ id: 'companyfield', type: serverWidget.FieldType.TEXT, label: 'Company', container: 'companygroup' }); companyname.defaultValue = 'Company Name'; form.addField({ id: 'phonefield', type: serverWidget.FieldType.PHONE, label: 'Phone Number', container: 'companygroup' }); form.addField({ id: 'urlfield', type: serverWidget.FieldType.URL, label: 'Website', container: 'companygroup' }); -
In section four, define a variable for each field in this sample.
var delimiter = /\u0001/; var titleField = context.request.parameters.titlefield; var fnameField = context.request.parameters.fnamefield; var lnameField = context.request.parameters.lnamefield; var emailField = context.request.parameters.emailfield var companyField = context.request.parameters.companyfield; var phoneField = context.request.parameters.phonefield; var urlField = context.request.parameters.urlfield; -
In section four, use
context.response.writeto create an output statement. This statement shows how the Submit button works by displaying the field data as output.context.response.write('You have entered:' + '<br/> Name: '+ titleField + ' ' + fnameField + ' ' + lnameField + '<br/> Email: ' + emailField + '<br/> Company: ' + companyField + '<br/> Phone: ' + phoneField + ' Website: ' + urlField);
Steps for Adding a Tab to a Form
This sample uses the code created in Sample Custom Form Script to show how to add tab and subtab UI components to a form.
Keep in mind the following limitations when adding tabs to a form:
-
You cannot add a single tab. If you create a single tab, the contents of the tab appear on the form without the tab bar.
-
A tab won't show up until you've added an object to the form. After you have added a field, you can set the
containerproperty to indicate where the field appears on the tab.
-
In section two, use Form.addTab(options) to add two tabs to the form. You can use Tab.helpText to add inline help text to guide users.
Note:A value for
tab.idmust be all lowercase and have no spaces. When adding a tab to an existing page, use thecustpageprefix to avoid conflicts with standard tabs.// Section Two - Tabs var tab1 = form.addTab({ id : 'tab1id', label : 'Payment' }); tab1.helpText = 'Help Text Goes Here'; var tab2 = form.addTab({ id : 'tab2id', label : 'Inventory' }); -
In section two, use Form.addSubtab(options) to add two subtabs. Set the
tabproperty to tab1id to position the subtab on the first tab you created.form.addSubtab({ id : 'subtab1id', label : 'Payment Information', tab: 'tab1id' }); form.addSubtab({ id : 'subtab2id', label : 'Transaction Record', tab: 'tab1id' }); -
In section two, add more fields to your form. To assign a field to a tab, use the
containerproperty to indicate the tab where you want to place the field.The following sample adds a Credential field to the form. Credential fields are text fields used to store credentials in NetSuite. When you submit the form, the credit card number is encrypted and not shown in plain text. For information about using Credential fields, see Form.addCredentialField(options).
//Subtab One Fields var ccselect = form.addField({ id: 'cctypefield', type: serverWidget.FieldType.SELECT, label: 'Credit Card', container: 'subtab1id' }); ccselect.addSelectOption({ value: 'PayCard0', text: 'Payment Card 0' }); ccselect.addSelectOption({ value: 'PayCard1', text: 'Payment Card 1' }); ccselect.addSelectOption({ value: 'PayCard2', text: 'Payment Card 2' }); var expmonth = form.addField({ id: 'expmonth', type: serverWidget.FieldType.SELECT, label: 'Expiry Month', container: 'subtab1id' }); expmonth.updateLayoutType({ layoutType: serverWidget.FieldLayoutType.STARTROW}); expmonth.addSelectOption({ value: '01', text: 'Jan' }); expmonth.addSelectOption({ value: '02', text: 'Feb' }); expmonth.addSelectOption({ value: '03', text: 'Mar' }); expmonth.addSelectOption({ value: '04', text: 'Apr' }); expmonth.addSelectOption({ value: '05', text: 'May' }); expmonth.addSelectOption({ value: '06', text: 'Jun' }); expmonth.addSelectOption({ value: '07', text: 'Jul' }); expmonth.addSelectOption({ value: '08', text: 'Aug' }); expmonth.addSelectOption({ value: '09', text: 'Sep' }); expmonth.addSelectOption({ value: '10', text: 'Oct' }); expmonth.addSelectOption({ value: '11', text: 'Nov' }); expmonth.addSelectOption({ value: '12', text: 'Dec' }); var expyear = form.addField({ id: 'expyear', type: serverWidget.FieldType.SELECT, label: 'Expiry Year', container: 'subtab1id' }); expyear.updateLayoutType({ layoutType: serverWidget.FieldLayoutType.ENDROW}); expyear.addSelectOption({ value: '2020', text: '2020' }); expyear.addSelectOption({ value: '2019', text: '2019' }); expyear.addSelectOption({ value: '2018', text: '2018' }); var credfield = form.addCredentialField({ id : 'credfield', label : ' Credit Card Number', restrictToDomains : 'www.mysite.com', restrictToScriptIds : 'customscript_my_script', restrictToCurrentUser : false, container : 'subtab1id' }); credfield.maxLength = 32; // Subtab Two fields form.addField({ id: 'transactionfield', type: serverWidget.FieldType.LABEL, label: 'Transaction History - Coming Soon', container: 'subtab2id' }); //Tab Two fields form.addField({ id: 'inventoryfield', type: serverWidget.FieldType.LABEL, label: 'Inventory - Coming Soon', container: 'tab2id' }); -
In section four, define a variable for each field you have added to the tabs. In this sample, these variables show how the Submit button works.
var ccField = context.request.parameters.cctypefield; var ccNumber = context.request.parameters.credfield; var expMonth = context.request.parameters.expmonth; var expYear = context.request.parameters.expyear; -
In section four, update the output to show the variables when the Submit button is clicked.
context.response.write('You have entered:' + '<br/> Name: '+ titleField + ' ' + fnameField + ' ' + lnameField + '<br/> Email: ' + emailField + '<br/> Company: ' + companyField + '<br/> Phone: ' + phoneField + ' Website: ' + urlField + '<br/> Credit Card: ' + ccField + '<br/> Number: '+ ccNumber + '<br/> Expiry Date: ' + expMonth + '/' + expYear);
Steps for Adding a Sublist to a Form
This sample uses the code created in Steps for Adding a Tab to a Form to show how to add a sublist to a form.
-
In section three, add a sublist to the form using Form.addSublist(options). Set the
tabproperty totab2idto position the sublist on the second tab. This is an inline editor sublist. For information about sublist types, see serverWidget.SublistType.var sublist = form.addSublist({ id : 'sublistid', type : serverWidget.SublistType.INLINEEDITOR, label : 'Inventory', tab: 'tab2id' }); -
In section three, add a button to the sublist using Sublist.addButton(options). In this example, the button doesn't do anything, but you can use the
functionNameproperty to specify the function triggered when the button is clicked.sublist.addButton({ id : 'buttonId', label : 'Print ', functionName: '' // Add the function triggered on button click }); -
In section three, add fields to the sublist using Sublist.addField(options). For more information about supported field types, see serverWidget.FieldType.
Note:Sublist.addField(options) does not support the inline HTML field type.
sublist.addField({ id : 'datefieldid', type : serverWidget.FieldType.DATE, label : 'Date' }); sublist.addField({ id : 'productfieldid', type : serverWidget.FieldType.TEXT, label : 'Product' }); sublist.addField({ id : 'qtyfieldid', type : serverWidget.FieldType.INTEGER, label : 'Quantity' }); sublist.addField({ id : 'upfieldid', type : serverWidget.FieldType.CURRENCY, label : 'Unit Cost' });
Complete Custom Form Script Sample
This script sample uses the define function, which is required for an entry point script (a script you attach to a script record and deploy). You must use the require function if you want to copy the script into the SuiteScript Debugger and test it. For more information, see SuiteScript 2.1 Global Objects.
The following code creates a Suitelet that generates a custom form containing several field types, tabs, a sublist, and a submit button. For steps to create this script, see Sample Custom Form Script.
/**
* @NApiVersion 2.1
* @NScriptType Suitelet
*/
define(['N/ui/serverWidget'], function(serverWidget) {
function onRequest(context) {
if (context.request.method === 'GET') {
// Section One - Forms - See 'Steps for Creating a Custom Form' in topic 'Sample Custom Form Script'
var form = serverWidget.createForm({
title: 'Customer Information'
});
var usergroup = form.addFieldGroup({
id: 'usergroup',
label: 'User Information'
});
usergroup.isSingleColumn = true;
var companygroup = form.addFieldGroup({
id: 'companygroup',
label: 'Company Information'
});
var select = form.addField({
id: 'titlefield',
type: serverWidget.FieldType.SELECT,
label: 'Title',
container: 'usergroup'
});
select.addSelectOption({
value: 'Mr.',
text: 'Mr.'
});
select.addSelectOption({
value: 'MS.',
text: 'Ms.'
});
select.addSelectOption({
value: 'Dr.',
text: 'Dr.'
});
var fname = form.addField({
id: 'fnamefield',
type: serverWidget.FieldType.TEXT,
label: 'First Name',
container: 'usergroup'
});
fname.isMandatory = true;
var lname = form.addField({
id: 'lnamefield',
type: serverWidget.FieldType.TEXT,
label: 'Last Name',
container: 'usergroup'
});
lname.isMandatory = true;
form.addField({
id: 'emailfield',
type: serverWidget.FieldType.EMAIL,
label: 'Email',
container: 'usergroup'
});
var companyname = form.addField({
id: 'companyfield',
type: serverWidget.FieldType.TEXT,
label: 'Company',
container: 'companygroup'
});
companyname.defaultValue = 'Company Name';
form.addField({
id: 'phonefield',
type: serverWidget.FieldType.PHONE,
label: 'Phone Number',
container: 'companygroup'
});
form.addField({
id: 'urlfield',
type: serverWidget.FieldType.URL,
label: 'Website',
container:'companygroup'
});
              form.addSubmitButton({
    label: 'Submit'
});
// Section Two - Tabs - See 'Steps for Adding a Tab to a Form' in topic 'Sample Custom Form Script'
var tab1 = form.addTab({
id: 'tab1id',
label: 'Payment'
});
tab1.helpText = 'Help Text Goes Here';
var tab2 = form.addTab({
id: 'tab2id',
label: 'Inventory'
});
form.addSubtab({
id: 'subtab1id',
label: 'Payment Information',
tab: 'tab1id'
});
form.addSubtab({
id: 'subtab2id',
label: 'Transaction Record',
tab: 'tab1id'
});
// Subtab One Fields
var ccselect = form.addField({
id: 'cctypefield',
type: serverWidget.FieldType.SELECT,
label: 'Credit Card',
container: 'subtab1id'
});
ccselect.addSelectOption({
value: 'PayCard0',
text: 'Payment Card 0'
});
ccselect.addSelectOption({
value: 'PayCard1',
text: 'Payment Card 1'
});
ccselect.addSelectOption({
value: 'PayCard2',
text: 'Payment Card 2'
});
var expmonth = form.addField({
id: 'expmonth',
type: serverWidget.FieldType.SELECT,
label: 'Expiry Date:',
container: 'subtab1id'
});
expmonth.updateLayoutType({
layoutType: serverWidget.FieldLayoutType.STARTROW
});
expmonth.addSelectOption({
value: '01',
text: 'Jan'
});
expmonth.addSelectOption({
value: '02',
text: 'Feb'
});
expmonth.addSelectOption({
value: '03',
text: 'Mar'
});
expmonth.addSelectOption({
value: '04',
text: 'Apr'
});
expmonth.addSelectOption({
value: '05',
text: 'May'
});
expmonth.addSelectOption({
value: '06',
text: 'Jun'
});
expmonth.addSelectOption({
value: '07',
text: 'Jul'
});
expmonth.addSelectOption({
value: '08',
text: 'Aug'
});
expmonth.addSelectOption({
value: '09',
text: 'Sep'
});
expmonth.addSelectOption({
value: '10',
text: 'Oct'
});
expmonth.addSelectOption({
value: '11',
text: 'Nov'
});
expmonth.addSelectOption({
value: '12',
text: 'Dec'
});
var expyear = form.addField({
id: 'expyear',
type: serverWidget.FieldType.SELECT,
label: 'Expiry Year',
container: 'subtab1id'
});
expyear.updateLayoutType({
layoutType: serverWidget.FieldLayoutType.ENDROW
});
expyear.addSelectOption({
value: '2020',
text: '2020'
});
expyear.addSelectOption({
value: '2019',
text: '2019'
});
expyear.addSelectOption({
value: '2018',
text: '2018'
});
var credfield = form.addCredentialField({
id: 'credfield',
label: ' Credit Card Number',
restrictToDomains: 'www.mysite.com',
restrictToScriptIds: 'customscript_my_script',
restrictToCurrentUser: false,
container: 'subtab1id'
});
credfield.maxLength = 32;
// Subtab two Fields
form.addField({
id: 'transactionfield',
type: serverWidget.FieldType.LABEL,
label: 'Transaction History - Coming Soon',
container: 'subtab2id'
});
// Tab Two Fields
form.addField({
id: 'inventoryfield',
type: serverWidget.FieldType.LABEL,
label: 'Inventory - Coming Soon',
container: 'tab2id'
});
// Section Three - Sublist - See 'Steps for Adding a Sublist to a Form' in topic 'Sample Custom Form Script'
var sublist = form.addSublist({
id: 'sublistid',
type: serverWidget.SublistType.INLINEEDITOR,
label: 'Inline Sublist',
tab: 'tab2id'
});
sublist.addButton({
id: 'buttonId',
label: 'Print ',
functionName: '' // Add the function triggered on button click
});
// Sublist Fields
sublist.addField({
id: 'datefieldid',
type: serverWidget.FieldType.DATE,
label: 'Date'
});
sublist.addField({
id: 'productfieldid',
type: serverWidget.FieldType.TEXT,
label: 'Product'
});
sublist.addField({
id: 'qtyfieldid',
type: serverWidget.FieldType.INTEGER,
label: 'Quantity'
});
sublist.addField({
id: 'upfieldid',
type: serverWidget.FieldType.CURRENCY,
label: 'Unit Cost'
});
context.response.writePage(form);
} else {
// Section Four - Output - Used in all sections
var delimiter = /\u0001/;
var titleField = context.request.parameters.titlefield;
var fnameField = context.request.parameters.fnamefield;
var lnameField = context.request.parameters.lnamefield;
var emailField = context.request.parameters.emailfield;
var companyField = context.request.parameters.companyfield;
var phoneField = context.request.parameters.phonefield;
var urlField = context.request.parameters.urlfield;
                var ccField = context.request.parameters.cctypefield;
var ccNumber = context.request.parameters.credfield;
var expMonth = context.request.parameters.expmonth;
var expYear = context.request.parameters.expyear;
                context.response.write('You have entered:'
    + '<br/>  Name: '+ titleField + ' ' + fnameField + ' ' + lnameField
    + '<br/>  Email: ' + emailField
    + '<br/>  Company: ' + companyField
    + '<br/>  Phone: ' + phoneField + ' Website: ' + urlField
    + '<br/>  Credit Card: ' + ccField
    + '<br/>  Number: '+ ccNumber
    + '<br/>  Expiry Date: ' + expMonth + '/' + expYear);
}
}
return {
onRequest: onRequest
};
});