Importing of Zengin Bank Fee Schedule
You can transfer bank fee schedules in CSV format into NetSuite using the Import Assistant.
Before you attempt to import data with the Import Assistant, you need to set up CSV files and review the formatting noted in the section below carefully to avoid errors and ensure that data is imported with correct values. For help preparing files for CSV import, see Guidelines for CSV Import Files.
Make sure that the Run Server SuiteScript and Trigger Workflows preference is enabled in your account. For more information, see Setting CSV Import Preferences.
On your CSV file, enter the bank matrix using the sample format below:
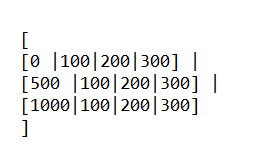
The matrix must be enclosed in a bracket and every subgroup in the matrix must be followed by a pipe (|) delimiter. The subgroup enclosed in brackets represent the line amounts on the bank fee matrix.
Maximum of three rows or subgroups are only allowed when creating a bank fee matrix.
In this example, in the first subgroup:
[0|100|200|300]
-
0 represents the start of the first amount range.
-
100 represents the bank fee for Same Bank and Same Branch.
-
200 represents the bank fee for Same Bank and Different Branch.
-
300 represents the bank for Different Bank.
In the second subgroup:
[500 |100|200|300]
-
500 represents the start of the second amount range.
-
100 represents the bank fee for Same Bank and Same Branch.
-
200 represents the bank fee for Same Bank and Different Branch.
-
300 represents the bank for Different Bank.
After completing your CSV file, you can upload the file using the Import Assistant. If you're using a role with import CSV file permission, you can access the Import Assistant at Setup > Import/Export > Import Tasks > Import CSV Records.
To import Zengin Bank Fee Schedule with the Import Assistant:
-
On the Scan & Upload CSV File page, do the following:
-
In the Import Type field, select Custom Records.
-
In the Record Type field, select Zengin Bank Fee Schedule.
-
In the CSV Column Delimiter, select Comma.
-
Click the Browse to locate and select your CSV file.
-
-
On the Import Options page, do the following:
-
Select the Data Handling option: Add, Update, or Add or Update.
-
Expand Advanced Options to display additional settings.
-
In the Custom Form field, select Custom Bank Fee Schedule Form.
-
-
On the Field Mapping page, fields mapped from your CSV file to NetSuite fields are automatically displayed in the center pane:

-
On the Save Mapping & Start Import page, in the Import Map Name, enter a name for the import map to save the settings.
-
Click Save & Run.